The Grow Awards 2026 🏆 


Likes
Comments
Share
@Auto_lover
Follow
She throwing tons of bud sites and still stretching alittle. Really starting to smell.👃 i’ve never had a plant start to stink this early
Day 38 another small defoi

Likes
Comments
Share
@braxat420
Follow
It's week four of flower, and my humidifier is busted. I can't afford to replace it right now so she's stressing. And by she I mean the two clones and then I popped the mom in the same pot due to space constraints. They seem to be doing well despite the dead of winter in Michigan humidity.

Processing
Likes
17
Share
@HVACBOY88
Follow
Update ending week 8 man she's looking so beautiful, we are in the home stretch, update on feed only twice last week, aslo trichomes are showing some cloudy and clear I think I'm going to start the big flush as I give her 2 more week untill harvest.

Likes
13
Share
@Kirsten
Follow
I have gone through the tent this week, and I have removed a lot of the lower branches on the plants, as they're not going to grow into big colas or anything.
So it's better not to waste the plant's energy, developing those to hopefully redirect it into the larger flowers.
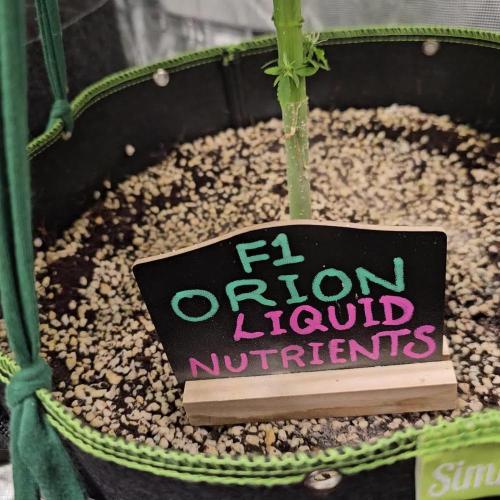
Orion F1 Liquid Nutrients.
The plant is developing the buds. Now, it has stopped growing vertically.
This plant is 1 week behind the other plant in the experiment due to some nutrient issues.
So it's not quite as far as long as the other one. However, it is not going to be as big a plant.
The buds are developing nicely, and even though we might get a lot less, it will be nonetheless good, Bud.
Hoping for some big colas, that would be really nice! 😅
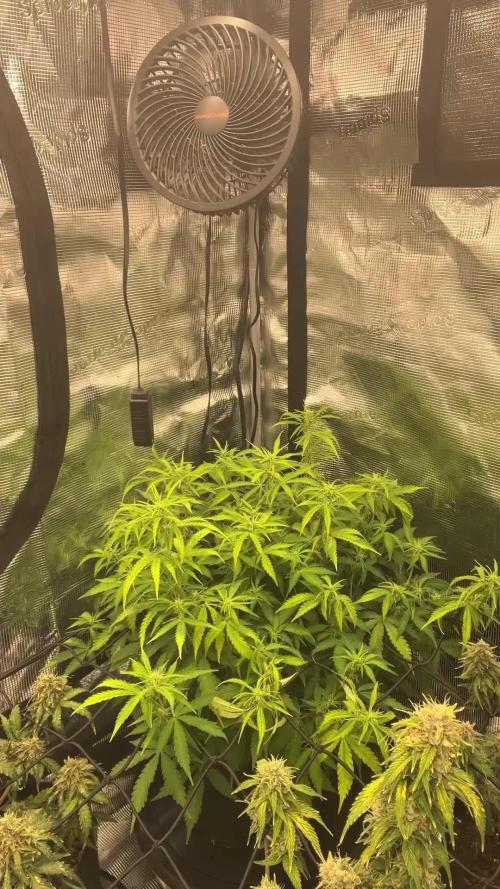
The plant is really developing the flowers while they look really dense, and like they will be some very top shelf buds!
The buds are beginning to stack on weight now, and hopefully, we'll just see the colas become larger and larger as we go on from here!
I'm really impressed with the organic dry amendment plant, and the organic dry amendments are really working wonders, and that's been really eye-opening for me during this experiment!
I'm very pleased that Royal Queen Seeds were kind. Enough to allow me to try this experiment with some of the F1 hybrid strains.
It has been, and continues to be an extremely exciting experiment, and I am again learning more and more with each plant.
I cannot wait for harvest and to see what these buds look like after I've dried and trimmed them!
3.8.25:
I watered with 2ltrs of dechlorinated water PH'd to 6.2 with;
💜 1ml Trace
PH: 6.2
PPM: 371
I've just been keeping the medium, not bone dry, but there were some fungus gnats.
So I have let it dry out more than I usually would probably, because I wanted to sprinkle some Diatomaceous Earth on the soil, and it only works when it's dry.
4.8.25:
I watered with 3ltrs of dechlorinated water PH'd to 6.6 with;
💜 3ml Ecothrive Trace
💜 1.25 TSP Ecothrive Biosys
PH: 6.6
PPM: 385
I am going to top dress next week as I checked and it has been exactly a month since I last did one.
Thanks for checking in and hanging out 😁💚✌️🌱🤞🧡

Likes
20
Share
@Chuckwaggon420
Follow
Going nicely with this girl she is putting aome weight on at this point. It seems she has slowed on the tricome or desnt seem to be producing like it was. But compared to old pics i am wrong. She is lookong awesome its starting to really stink in here now.
She gets 3 l of food every 2 days and ph is at 5.6-5.7.
Buds are clearly swelling fat fat
All is good


Likes
2
Share
@Aleks555
Follow
The fourth week of growth has begun, and our FBA 2506 from 42Fast Buds is thriving. After the transplant into a 10-liter pot, the plant has adapted well and continues to develop strong and healthy. Despite being an autoflower, we're experimenting with a 12/12 light cycle, and so far, the results look promising.
The temperature remains stable, reaching up to 30°C during the day, with an average of 27°C–28°C. Humidity is maintained between 60% and 65%, providing optimal conditions for growth. The plant has grown noticeably, now standing between 20 and 25 cm, with well-developed foliage.
We've started applying low-stress training (LST) to shape its structure, encouraging better light penetration and maximizing potential yields. Additionally, we continue to feed our beauty with Xpert Nutrients, and the results are already visible—strong, vibrant growth and lush green leaves.
Everything is on track, and we’re excited to see how our experiment unfolds in the coming weeks!
Likes
2
Share
@Saintvicious
Follow
Not much to do with Autos. I take a handful of leaves everytime I'm in the tent. Veg thru 2-3 weeks of flower.
Likes
8
Share
@Bryankush
Follow
Il fumo è liscio e abbastanza dolce e fruttato con aromi che ricordano uno sherbet di arancia, anche piuttosto denso.

Likes
13
Share
@Robeeriegenetics
Follow
Dropped light hours down to 16 . Topped off nutrient solution with 5.0 ph evened out .removed none chosen phenos to be flowered in separate room no longer tracking those we will only follow the chosen mothers clones i cut clones today as well had the lady friend clean floor with bleach and dawn put clones in ez cloner 32 systems
Likes
22
Share
@Chumpkilla
Follow
9/1/23 - Day 80 - Things are going well, the buds are growing everyday still. A couple more weeks!
9/3/23 - Day 82 - I snuck in about 1 min before the lights turned on. I got some cool shots up above.
I also snuck in a cool photo from the base of the plant looking up.
9/5/23 - Day 84 - I took a few microscope shots of the THC. They are still very much see through so there is still a couple more weeks to go. I also got a mockup of the hanging system I will be using see pics above.
If you are looking for this experience, check out https://www.getleaf.co/

Likes
49
Share
@masterofsmeagol
Follow
6/1 I'm anxious to get my plants in their final homes. Another 90 degree day today and then it will be cooling off with some showers. I plan to take advantage and utilize that to make the transition. I have some small burns on a couple plants bit considering the weather we've had its nothing. Temperature swings 50 degrees. I hope these girls do OK outside. I was tired and stoned last night and I accidently topped a plant I had already FIMed. Oh well. Transplants soon. Supports screwed in after the heat. Plants have been handling this weather like a champ. Big thick healthy stalks.
UPDATE PUT THE PLANTS IN AROUND 730. Cutting down on light hours I'm poverty close to where we are. It was 95 today. Plants have suprisingly little burning. My fan was taken so they go without that tonight too. In the next few days it's going to cool down and that's when I'll transplant. Only thing left before transplant is sanitizing trellis and supports. Easy peezy. Especially if it's supposed to be in the 50s. And people dent climate change lol. I'm hoping that all this adversity makes my flower a higher quality. I'm glad to have the quantity to pick the best phenos for the BIG POTS. Im trying to stay excited but it's just so dumb hot. Oh well. If the plants can do it so can I. I'm planning to give them some kelp me kelp you next watering and may start some light organic nutes.
6/2 Phone doesn't like uploading my videos. Broke record high temp yesterday 95 and tomorrow we will break the record low 50. Plants withstood the heat well and are doing great. Transplant soon. They were a little light but I held off on the water. Plan on it tomorrow. May transplant tomorrow. I have several videos that haven't uploaded. I thought they did but I was wrong. Oh well.
UPDATE: Forgot to water. Some were light and others could've held off. Did the half a powerade bottle ahain. A litt ke less on the heavier ones. However I'm looking to transplant into final homes tonight and into this weekend. I sanitized a fifty and a forty so my bags and two pots are sanitized. Cage is sanitized and ready and pallets are sanktized and in place. The 40 and 60 fit PERFECT in the small space left from the pallets. Plus the plants always lean the opposite direction so things should go smooth. Only thingvleft is sanitizing stakes, bamboo, plastic garden stakes and all the other plastic training stuff. I'll just soak it while I transplant. Gotta mix the soil first too though.
UPDATE. Heat went higher than expected and hit 90. I figured I'd go back around three and screw in suppirt stakes and begin getting everything ready for transplant (i.e. supports, mix soil, sanitize trellis) before I transplanted tomorrow MORNING was what I had planned. Unfortunately we got a huge thunderstorm with a shot ton of rain and it's gonna continue throughout the night. I think this is God's way of telling me to take a break. I can get up early and get those support stakes screwed in. Then when I get back from the wife's doctor's I can do the transplants. I'm trying to break the labor up into manageable chunks. Looking at my other diaries I can see that my plantscare fine in their three gallon homes. It'd a little disheartening seeing such big clones that I started so much earlier on the other diaries. However I always was fighting SOMETHING (usually more than one thing) and last year was a shit show. At least this year I stay away from anyone else's cannabis any clones and I'm extremely cautious. I've seen my cousin out perform me multiple times with healthy plants like this I'm excited to see how it goes. I really needed the break anyway but tomorrow morning the stakes will be in. Hopefully they'll be outside.
6/3 Broke the record for low days after breaking record for highs. I saw it 94 yesterday and the day before. On the way to my grow at 6am it was 44 degrees and it's not warming up much. Fifties at best. Rainy. I left the door closed. The big door on the otherside got opened as the other end of the garage neededcto he used. If the rain let's up I'm going to set up the grade stakes so I can transplant in the morning and throughout the day. I think I'm going to light dep a couple of them and leave them in the 3's. We'll see.
UPDATE: At 12:30 the temp today was 44. Yesterday it was 94. I can't believe this. Plants are doing great though and are in the garage under lights for the day. The BIG door was open part of the day. Didn't take any pictures (or even enter the grow area) as I sanitized the last 40 gallon pot and a bunch of grade stakes. I drilled the grade stakes to the pallets in the front. The first row is done. Just need to sanitize the plastic trellis itself and finish attaching the other grade stakes. I don't need the fill trellis up by transplant. I just need the bags to not knock over and have SOME support. I'll be back over there either to tonight to put more supports in or tomorrow when I actually plan to start transplanting. I'm getting excited. After dealing witb the stiff that I sanitized I didn't dare go fuck with my plants so I looked through the window. I'll finish sanitizing the net tomorrow. These plants look great. I'm wondering if doing the two diagonal I poles with zipties actually works. It would save me some kone for sure. I'll definitely update in the morning.
6/4 It's warmed up to a balmy 44 degrees. My plantsxare in the garage still. Weather sucks this whole week but after this heavy rain it should be perfect weather to transplant these girls. A little to chilly but it will warm up and I need to get this shit done. I'm trying to do to much at once. I need to just out dirt in bags and get them outside. I'm glad I waited until after this craziness. Breaking temp records for high one day then breaking it for low the next can't be good for the plants. I'll update what gets done today. I may mix soil or I might wait until tomorrow. It will let up some then. Plants still look fabulous 👌
6/5 50 degrees still raining like hell. Rain until Friday. Plants are inside under the onecworking light. Lots of indirect light through the massive windows though. I'm planning on mixing soil today and tomorrow and getting bags and pots half filled. Just trying to break the labor up into manageable pieces. It's probably a good thing I didn't put them in their huge containers before all this rain.
UPDATE: MIXED SOIL 1/3 of each (FOX FARM OCEAN FOREST, HAPPY FROG, AND ROOTS ORGANIC 707). I prepared I believe 11 containers for transplant. I need to sanitize two more containers and I'm good. I got a lot done. Might go back over. Set up extra cams too. I'm excited. Talked to my commercial buddy amd he motivated me. No reason my plants can't handle this shit. I've just had massive personal shit going on. Friday is the next GOOD day but these girls might go out earlier. I'm checking the forecast. I'll sanitize the other containers in the morning and fill them.
6/5 Today is usually my watering day but shit still seems heavy so I'm going to hold off. Despite that i need to transplant. I think they're wet enough. I could do it today. Plants are looking good and weather takes a better turn Friday. It's not raining hard though. It's just sprinkle right now. I may transplant some today depending on how things go. I'll keep the diary updated.
UPDATE: I went back over with the intent to just mix soil and let it acclimate. I decided to try to transplant one. I grabbed a 10th planet and started to go. I had done a bunch of manual labor already so i wasn't thinking. Of course the fucker was dry and didn't wanna come out ofcthe pot and the root ball pretty much decintigrated in my hand so I'm not sure how that will go. Tried again with the Blueberry Cheese Cake. I thought the roots just might not have been rootbound abdcthat could've been the case. After having another rough transplant I recognized I was tired, all the hard stuff is done and it's gonna keep raining until Friday. I wanted to transplant three and put them outside but with the wind and rain and the difficult transplant I let them sit under the light in the garage in indirect light. I had the doors open for a while. Should be open now but i don't want to have to go back over and shut it. Plus I'm not to keen on getting water on my light. Let's hope for a better day tomorrow. This was the only thing I had going good. Phrple punches are still behind. I've decided I'm oing to light dep ttwo of the plants in the 3 gallon pots. The two shittiest or smallest plants (probably purple punch will be light deped.
WENT BACK OVER AT FIVE AND IT APPEARS EVERYTHING IS ALRIGHT. WILL HAVE CHECK IN MORNING. Vid won't upload. Tried multiple times. I'll try again tomm.
6/6 Waiting for a doctor's appointment when I should be transplanting buy whatever. Everything is looking really good. Despite me disint9grating the rootball in my hands the two transplants look great! When I get back I'm planning to get some more work done. It's still lightly raining off and on but the door is up. I'm lettingvthe soil mix acclimate a little bit too. Hard labor is mostly done. Now the intricate part. Wish me luck. Not sure if it will be today bit I'm hoping.
WENT BACK OVER CAUSE IT WASNT RAINING BUT AS SOON AS I WAS CLOSE IT STARTED POURING SO THE PLANTS ARE UNDER THE ONE WORKING 150HPS AND THE AMBIENT LIGHTING FROM THE WINDOWS. TOMORROW IS TRANSPLANT DAY. I WONT HAVE A VEHICKE SO IT WILL BE TRICKY BUT IM GONNA MAKE IT HAPPEN. Opened doors at 530. Video still didn't upload
6/7 Still raining. It's off and on and a nice rain though. It's 53 degrees at noon. I transplanted two 10th planet's into 20 gallon pots. I transplanted these two a little differently. I put the bags in there final spot I side my cage andctransplanted in the misting rain. The first one came out and seemed to be heavier on the bottom and broke off. I tend to "throw" them in the hole before they collapse. With my anxiety I suck at transplanting. Plus these plants haven't filled the 3 gallon pots with roots yet but i want hem in their final homes and its time to go outside. I transplanted the other two plants indoors and let them have days in the garage with the door open and the light on then protection from the elements at night. I've been doing this for awhile. They would all be outside if the weather wasn't so shitty. This rain is supposed to stop. I'm curious as to what will be the fate of the two plantsci transplanted and left outside. I'm praying and hoping for the best. I also put my back tarp up so I have a wind break between rhe buildings. I stopped working because I didn't want to fuck anything up. Anxiety disorders suck. TOOK A BUNCH OF VIDS BUT THEY WONT UPLOAD. GOES FROM 9% TO 65% BUT ALWA7S TURNS RED "FILE FAILED TO LOAD". I'LL KEEP THE DIARY UPDATED. ESPECIALLY IF I GO BACK OVER. WAS ABLE TO LOAD A COUPLE VIDEOS. I GUESS ITS NOT AS BAD AS I THOUGHT. AT LEAST I HOPE. WENT BACK OVER AT 3 AND CHECKED THINGS OUT. THE TWO REXENT TRANSPLANTS I LEFT OUTSIDE SEEMED TO BE IMPROVING. DESPITE THE FACT I DUMPED A SHIT TON OF SOIL ALL OVER ONE OF THEM. IT SNAPPED A LITTLE BRANCH CLOSEST TO THE SURFACE. ITS STUFF I'LL REMOVE ANYWAY BUT STILL. IM REALLY CROSSING MY FINGWRS AND PRAYING THESE GIROS WILL MAKE IT. With everything i have going on tjis is my respite.IM GOING TO TRY TO SEE WHAT I CAN ACCOmplish TOMORROW. SOME OF THE PURPLE PUNCHES ARENT READY FOR TRANSPLANTING THOUGH. I ALSO ADDED TEO TARPS TO THE CAGECTO COVER THE WIND TOWER BETWEEN THE TWO BUILDINGS. THIS IS GOING TO BE A GOOD YEAR! Shut the door at seven. For some reason the two 10th planet's I transplanted (that fell all over the plant and I thought mightve broke it) look awesome lol. Despite the ridiculous pouring rain. It's going to let up soon and we are do fir some good weather. I'm trying to get everything (that isn't getting light depoed) into the cage. Four transplanted. Ten (I mean 8 more) to go.


Likes
1
Share
@HuskyHouse
Follow
Massive growth this last weekend! WOW!!! Letting her rest this week from defoliation, she is thick!
Likes
21
Share
@Staffedition
Follow
Всем привет друзья!
Решил попробывать фотопереодный, поднять от Барни и не только, смотри профиль.
Это будет мой первый опыт с фотопереодными растенями.
#Smail_Seeds
Likes
20
Share
@Steno
Follow
Amnesia Haze #1: harvested, 90 gr. fresh (nana) (the image with the weigth is coming with the rest of the harvest)
Smoothie #1 / #2: flushing, 1 week left
Amnesia Haze #2: still giving nutrients, 2/3 weeks left
Likes
223
Share
@GERGrowDesigns
Follow
Welcome to week 8 or Flower week 3
The Strains from Sweet Seeds doing Amazing !
4 x gorilla Girl f1
6 x tropicana Poison F1
-Gorilla Tent 4x8 Shorty
-2x 600 watt lights
-20 Liter pots with Narcos Organic Mix
-Narcos organic Nutriets With every water for the Plants
- 2-3 Liter every 1-2 day Each plant
- 28 day temperature
- 55 % Humidity
The plants Stretching a lot . The tropicana more then the gorillas .
Every Plant looks Healthy and im doing a bigger defoliation the next days for Each plant .
Tempartures are betwenn 27-30 and the Humidity about 50-63%
Keep up Growing everyone !
Likes
14
Share
@MillennialHippie
Follow
I’m about to lose it. Big progress both from the broken stem and the plant as a whole. I think though the accident was very stressful and it turn it into a hermie. Once the lovely community makes sure I got a hermie I will cut the balls off(no cap).
Day 36, one day after the hermie incident.I cut the sacs of and keeping a really close eye on it.Like checking every hour on different lighting again and again. Main cola looks like neither full bounced back, nor losing the battle from the harm I did to her in the middle of the fifth week,the tape is still on. I'm anxious if I face a light stress till the full recovery of the stem. I can't LST thats for sure and I have an HPS lamp.
I'm aware that my yields will not be the same as the true potencial of the strain but I'm sure the taste and high will be diffrent for me due to the work I'm putting in and the "stress" I'm going through.
Day 37: No sight of sacs. Looks thirsty every day and sometimes I water twice.The soil is dry one the first cm.
Likes
5
Share
@prebiancagrower
Follow
Hellooo friends!
Is the first time I am growing this way, so is the first time I am seeing a big plant hahahaa.
Just one word, AMAZING!
Lets get the maximum of this Plant!!!!
Thanks to everyone.
Love you all!
Likes
17
Share
@OrganicBuds030
Follow
So langsam fangen beide Phenos an zu riechen. Pheno#1, die etwas größere Pflanze mit kleineren Buds, riecht leicht nach dem typischen Runtz Geruch und etwas doller als Pheno#2 mit sehr großen Buds. Beide Pflanzen sind schon gut frosty.

Processing
Likes
9
Share
@howrad
Follow
Cutdown GDP this week. 5gl bucket yielded 2.25 dry ounces. 3gl bucket yielded 3 dry ounces.

