


Likes
Comments
Share


@TerpTurtle
Follow
Planning on the harvest!
Trichomes Mostly milky seeing a little amber maybe around 5%
Pictures taken with iPhone SE.. looking into some new cameras like the Nikon COOLPIX p1000 or Sony A6700


Likes
3
Share
@lolasher
Follow
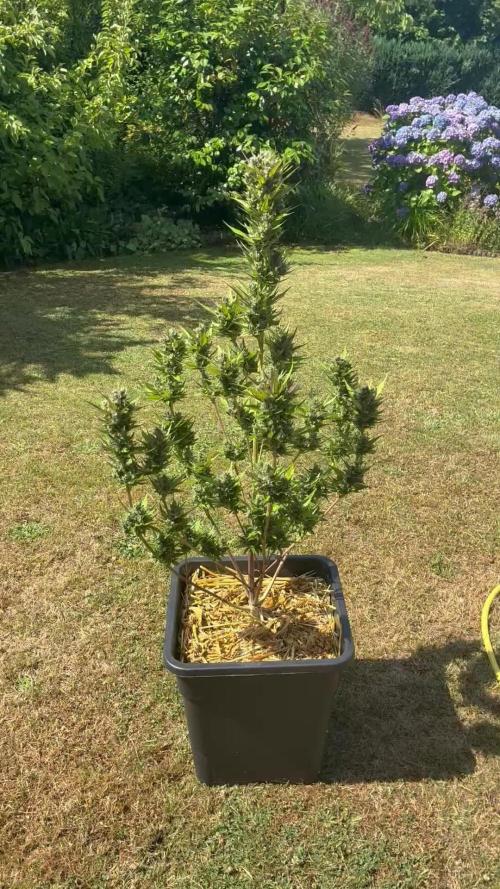
Am Anfang der 13. Woche wurde geerntet.
Kein Schimmel, keine Insektenplage. Ein Grow wie aus dem Bilderbuch. Props an Fastbuds, toller Strain!
Ebenfalls der erste Grow mit Living Soil. Absolute Empfehlung.Für alle die es interessiert:
Pro 10l Erde:
Lightmix oder alte Erde 10l
Urgesteinsmehl 50g
Mycorrhyza Granulat 200g
Kokoserde 1,5l
Hühnermistpellets 150g
Bims 0,5l
Wurmhumus 0,5l
Dolomitkalk 20g
Zusätzlich kamen in 40l rund 10 Kompostwürmer, die den Boden schön locker halten und massiv - bei all meinen Pflanzengrows - zu gutem Wachstum beitragen und diese gefühlt deutlich resistenter machen - vorsicht: Bro-Science!
Diese füttert man mit Komposttee, Stroh als Mulch und allen Blättern, die ihr der Pflanze entnehmt - kleingeschnitten. Füttert ihr die nicht, nagen die an den Wurzeln. Aber keine Angst - Stroh allein reicht im Regelfall. Die Pflanze bekam über den kompletten Grow zwei Komposttees aus Wurmhumus, das wars.
Wie man sieht, fühlen sich die Tiere pudelwohl - die Honigmelone steht bereits im selben Topf - mal gucken, wie die das findet.
Die Buds sind wie zu erwarten fluffig und etwas foxtailig. Das lässt sich im Gewächshaus bei dauerhaft irre heißen Temperaturen nicht vermeiden. Die Innenbuds sind trotzdem schön fest.
Bin wirklich zufrieden- kam ordentlich was bei rum. Hängen jetzt bei 18 Grad im Keller im Netz.
Und habe ich schon gesagt, dass die KEINERLEI !!! Schimmel hatte? Im Norden Deutschlands? Und das das keine Noternte war, sondern eine fertige Auto?
Ich freue mich schon aufs nächste Jahr… vielleicht ne Apple Strudel von Fastbuds? (Falls ihr das liest: meldet euch 🤙😉😂) Ne, Spaß beiseite. Wirklich toller Strain!
Stay tuned für weitere Fotos der fertigen Buds :-)

Likes
5
Share


@MrGoonai
Follow
02/24/25 - Short Facts:
- Plant is looking horrible, quite many leaves have necrosis -- had to cut many off
- VPD increased to 1.2, but I can only get it up to 1.1
---------------------------------------------------------------------------------
So, what is there to say? I haven't had as much time lately, so I haven’t been keeping a close eye on the plants in general—especially on the 1:Walt. But a few weeks ago, I noticed that something was wrong and concluded that it had to be a sulfur deficiency.
So I bought Epsom salt, which contains both sulfur and a lot of magnesium. And here was my first mistake: I misdiagnosed the deficiency. My next mistake was using way too much Epsom salt—far more than I should have. That was a big mistake, which only made things worse. This is how the plant started to look like, but unfortunately, I caught it too late—like I said, I was quite busy.
It was so obvious that something was going wrong. The leaves at the top of the plant looked worse and worse by the day.
So I did some research and came to the following conclusions:
- I misdiagnosed the problem. It was never a sulfur deficiency but actually a manganese deficiency. The small spots all over the leaves later became necrotic, eventually killing some of them.
- By adding too much Epsom salt, I disrupted the balance between calcium and magnesium. This inhibited calcium uptake, leading to the symptoms of a calcium deficiency as well.
I bought some "micronutrients" that do contain manganese and I watered it in and also sprayed the foliage.
Right now, the plant looks so bad that I don’t know if she’ll be able to finish flowering or if I’ll have to do an emergency harvest.
The next big problem is that I won’t be here for about ten days, starting on Wednesday next week. So yeah... not good.

Likes
3
Share

@Lifesgarden420
Follow
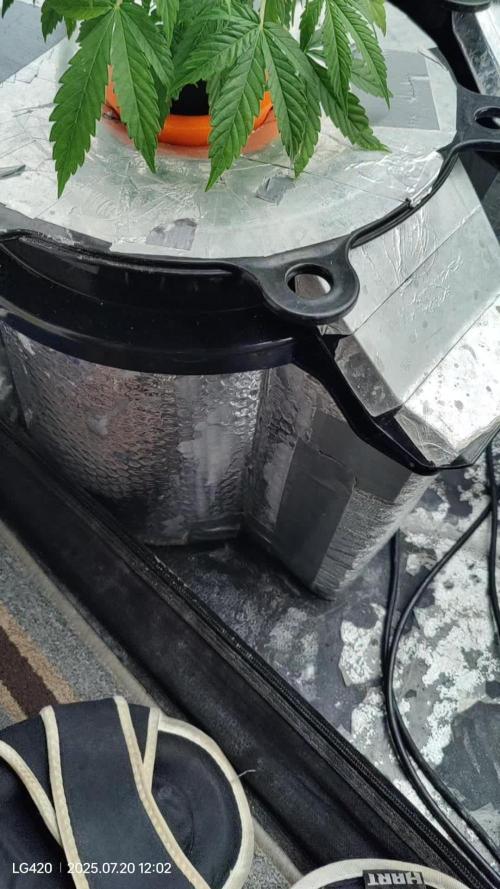
Another week of bed and these ladies are looking healthy with a strong odor

Likes
33
Share


@Roberts
Follow
Cali crasher is doing great under the Hortibloom Solux 350. She is starting to bulk. She has a nice resin layer going and good aroma starting to develop. Nothing else to report at the moment. Thank you Hortibloom. and Doctor's Choice. 🤜🏻🤛🏻🌱🌱🌱
Thank you grow diaries community for the 👇likes👇, follows, comments, and subscriptions on my YouTube channel👇. ❄️🌱🍻
Happy Growing 🌱🌱🌱
https://youtube.com/channel/UCAhN7yRzWLpcaRHhMIQ7X4g

Likes
15
Share


@Kitties_and_Colas
Follow
Not a massive harvest by any stretch but the bud I sampled so far was outstanding... I'm glad we grabbed many clones of this strain... Happy growing everyone :)

Likes
3
Share


@Kinglui77
Follow
Because of the extrem Defolitation/Schwazzing, which was more or less necessary regarding Humidtiy levels of of over 95% around evening night and morning. Even though I also did it for trying out how the Plants react. They mainly stopped growing Bud for 3-4 Days and the leaves of the Bud Sides got a bit Bigger. Also I had problems with NutBurn and Heat Burn, Nutburn because of my not constantly watered Pots which, I guess, ended up beeing a really salty and nutrient soaked(from the soil) substrate because they are reused Filters for Water out of clay. As well in midday it gets really hot and we are more than 3500ft over the sea level.
And why I grow in Clay Filters ? Just to try, in my opinion already not recommendable even though it keeps the Soil a bit cooler..
Likes
216
Share


@CRiSPrGrow
Follow
Well this was quite an experience, from the nice box the dutch passions come in to the germination , vigours sprouts came about, and took well to transplant. Potted each of these into their own soil and peat mix, layered seven of each i think with perlite. they got CELLMAX soil, best soil I've ever used for sure, it's horticultural soil so it's been steamed meaning no pollutants and no pests. The room itself this time i had reworked a bit, still loads of bends on the tubes though, but had a proper intake this time with a fine mesh filter so nothing got into the room. Had the pots elevated only by the time flower came around same for the CO2 so I only had a few good weeks with it. Didn't kill the plants though, so I'll review using it in my Six shooter diary, check it out . Anyway these plants veged out , and in the first weeks had the light too high for how strong/weak it was (it's crazy how close you need to have it actually!) and the little seedlings stretched some, so I LST'ed all of them. They all took to LST really well actually. The biotabs plant was the first one to sort of musle through her bindings, and i ended up feeling sorry for it and removing them thinking the bend was mostly done anyway. It didn't help that this was a corner plant and I just didnt really have access to it as nicely as the others. Anyway the LST wasnt done though and the plant fully redressed showing only a little bend towards its base at harvest time. The Mr. B's showed the best results on LST. It got bent 90° then grew out but managed to stick it's main cola out just in time i guess, so it had several mains maybe 3 maybe 4 and several side shoots. The Vertafort one took to LST the worst of the three (through no fault on vertafort's nutrient's part!) It basically got bent 90° but got held down too much by the bindings , and being a corner plant simply it got less light the whole grow, being overtaken by the other plants in the tent. Through veg though these grew to nice busheles, each in their own style, pushing out fat indica leaves , mostly being kept at appropriate VPDs. Note that the temps i've recorded are for maximum temperatures hey ! Anyway it I ended up with an uneven canopy by the start of flower stretch due to the different LST styles and the different growth rates, the vertafort one being basically stunted. During flower stretch these stretch ! lol doubled in size at a steady rate I can tell because the biotabs one was basically no longer LST'ed right? Anyway way blueberry styles not so much auto gsc styles that much I can tell you. The longer side colas a great too, they're much longer than the GSC's side colas and they have two or more flower nodes more each. By week 4 of flower the Mr. B's started to look pro, with a nice canopy and several distinguishable mains sticking out from the bush. The vertafort one was a corner plant so I just paid less attention to it - too bad for me ! Anyway the flowers themselves started to emerge with a calyx to larf ratio of 1:0 for the biotabs ones, and I started getting stoked. I could already tell from the squeeze that these would be nice and dense nuggy nug nugs just like I like them. The Mr.B's one was different though, the flowers grew all up and down the colas like they were all filled up. The sugar leafs themselves were like non-existant on Mr.B's but long and thin on the Mr.B's. Then the stacking began, last quite a while to finish up and rippen, i'd say from week 8 through 13. The trichomes reached out, filled up some, curled, in and were full white. I noticed some amber trichomes and it was time for the chop !
Throughout the grow I tried something new. From joining GD on my first grow I got loads of goodies from @Mrs_Larimar with the Mr.B's nutrients - thank you so much ! - and the biotabs contest , plus the Vertafort that came with seeds from the folks at Zambeza, Zamnesia, and RQS , all of these were dry nutrients, and I got those micro nutrients from my friends too. Great experience using dry nutrients, much more affordable on the whole, easier to measure too. That didnt stop me from messing up a few measures though ! So For most of the grow I planned to add my own micro. I had four micro powders made. One green one for early veg with all the "rare metals" in it at 2% , a bio cal mag, white powder for veg and early flower and a cal mag and mag sulfur I meant to use during flower. So I ended up giving a quarted dose of the organic cal mag most of the time then in flower still had them on a quarter dose of cal mag sulfur before i realised and switched up too late. My whole micro line up i think would cost 10 dollars retain and I had plenty of it left over i think it should last like 4 grows. Not that I'll use it again unless i can get a steady supply - a the travails of the underground micro nutrient market. Worked great though, pH neutral, i used it as spray too, next time I'll mix in humic acid directly in the same feed, because why not and because I would have massively helped. Sometimes in flower i used only calmagsulfur and maybe I didnt mix it in very well but i would dump everything on anyway , a couple time I would check after water and the clumps had formed like 3 inch crystal formations on the top of my soil... Anyone ever seen that before? maybe it's a good sign idk, i usually tried plain water to dissolve them asap. The biotabs worked great on the Colorado cookies though, that much I can say, no excesses of any sort detected, leaves weren't too dark green at all. Mr.B's turned out a BEAST , but that could be from the LST aswell... the vertafort one ended up being a very healthy plant that never lacked anything either. Around halfway through flower I started traing the colas upwards where they were drooping on the biotabs plants and the Mr.b's plant, glad i did because i think plants like to make colas going straight up right? Chopped these at the top of week 14 which is 95 days from the moment i dunked them into the water kept a calendar which I'll show you. Hung to dry for 10 days, then jarred with the 62% boveda, burped
inspected daily for a week, then weekly for two weeks. I weighted what I kept lol , no small buds this time, finally my grower dream realized ! So happy i got two (maybe three phenos) because I loved the flowers on the biotabs but I also loved the yielding of the LST'ed pheno. Plenty of wasted cola space though if I'm honest, should have defoliated more, maybe done that just at the edge of veg or something, maybe next time I'll try to flux like @silky_smooth so I can keep them in veg longer and make me a couple beasts.
Had to travel to for two halfway through, so what I did was to put perlite in the trays, get the pots off their grills and onto the perlite then i bottom fed plain water, the idea being that the perlite would keep the water from evaporating from the trays too quickly, just as i was loading up the trays , the nex day I saw three thrips but they were flying all wierd and all strange so i thought maybe the airflow was f-ing them up ... and i had to leave anyway. Got back and the pots were bone dry but the plants hadn't died, and the temps were way up. I think the remaining perlite absorbs heat... Anyway started top feeding them again but by this time they were showing signs of stress especially the biotabs one, the mr.b's kinda recovered, and the vertafort was healthy enough it just looked like a bit of magnesium issue. May this could be a good technique for other folks to try. Like i said the perlite might absorb heat, so remove it when you dont need it anymore (i had issues with heat).
Over all these gens are yielders, had some of my best work in here, and some less good work. I like having been able to use the GD platform as a companion app, was great fun really. it's great to be able to put all your pictures up and see them side by side, i tried to keep it organised so you and I can see some interesting things like the "three stages of LST" and other interesting nuggets of info. Speaking of nuggets I'll try to get some more and some better pics of the nugs in. Hope you'll visit this again 🚀
EDIT: made some bubble hash for the first time, grower's priviledge ! only used the stems stalks and leafs for it, and it came out really delicious, smells like perfume, burns like incense and tastes like vanila and spices/hash lol basically used some bubble bags , rand the water through once, got negligeable 120s 75s and 45s but got some 25 quite a lot. ran it again, same results with just about the same amout of 25s, i thought i could go a third one, but got negligeable everything lol. Two passes for whatever that is in bubble hash lol, it's still got to dry for another week - bubble hash is kinda of the grower's priviledge, definitely recommend doing it ! 🚀

Likes
29
Share


@Flower420
Follow
Lowered the PPMs to 420 😎
Only added base nutrients.
Her buds are still creating lots of resin and are getting thicker. Ripening nice with an elegant aroma of sweet citrus.
I can’t wait to try her out soon!
Next week will be her flush week, then time to harvest! I had to use zip ties on some of the bud sites due to how heavy they are. Next grow- definitely Doing LST right and different hydro set up. DWC is a great learning curve for hydroponics, but what a pain in the tush every week for feeding.
Bottom line- I’m loving what I’m learning and I’m having fun doing it! 💜

Processing
Likes
4
Share


Likes
42
Share


@Master_weeda
Follow
Jour47 arrosage avec de l'eau ph6.3 à laquelle j'ajoute 1ml par litre d'eau de topmax biobizz


Likes
8
Share


@Herbman420
Follow
Hello everybody and welcome to my grow diaries. this week went really well I noticed with these new genetics that there are a lot hungry .so I started to feed them for their second feed 400 parts per million they seem to have reacted very well. I'm going to feed them every three days but today I will feed them 400 parts per million as well just to make sure that they're okay and they have adjusted well .I don't want to push them. Have learned from that . As I say things are going very well .I appreciate you looking at my diary there will be an update every week and you always have to keep in mind that is 420 somewhere 🌱👍
Likes
127
Share


@PapaNugs
Follow
Overall great product. Easy growing. Good looking. Smells great. Nothing but the best from Humboldt!

Likes
26
Share


@Buddyman75
Follow
Filled in nicely after all cropping was done.Mostly the bottom and midsection show great development. I've had them on a 16 hr schedule for a few weeks I think I'll flip the lights to 13/11 tonight. Trying something different in lowering the daylight time gradually to a final end of flowering light/dark of 10/14.

Likes
16
Share


@danwho
Follow
2-24, Day 59 harvest
Plants were all cut down together. Hung to allow tent conversion to drying setup and reloaded into the tent. Some nicer images were taken with the R100 cannon camera, and also a mix of images from my iPhone and my buddy's Note7. Current drying environment: 62F, 62% humidity.
2-26, Day 2 drying
The tent is very stable around 60% humidity and 60F. I have the tent set up for negative pressure to pull a slight vacuum, ensuring the air will turnover inside the tent, with one oscillating fan helping to distribute the humidifier mist. I have an external air purifier running with active carbon filters to manage the smell.
Likes
3
Share


@iorabiadopo
Follow
Seems like last week of nutes and then directly into flushing. The buds are getting fat and trichs are starting to turn milky (like 5%)
On 12/05 starting to see a lot of trichs turning milky, can't still see amber, but a good portion of them are still transparent
Likes
4
Share


@musashi_miyamoto
Follow
Used RootMax mycorrhizae- bacillus + glomus: good root growth
Top dressed with compost

Likes
10
Share


