
Likes
Comments
Share


@ButterfliesLittleFarm
Follow
Hello Diary,
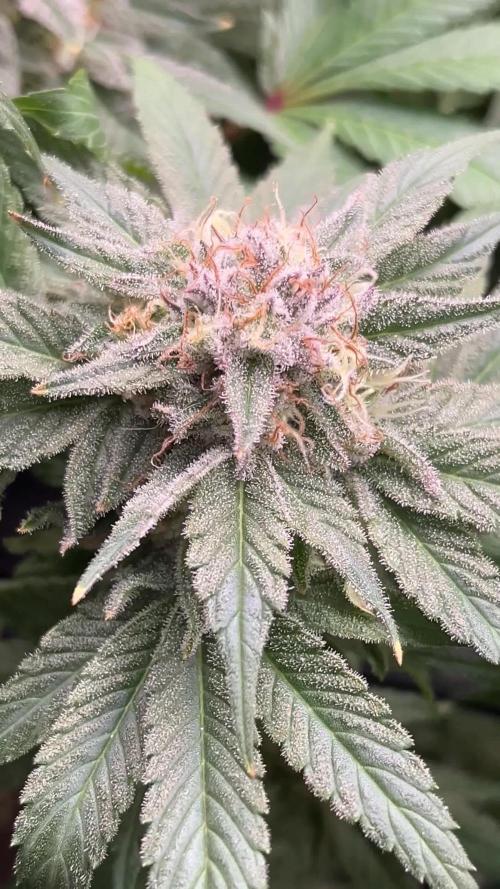
Cherry Pie has finished its last week, I harvested it two days after taking the photo.
73 days since I put the seeds in the ground.
65 days since the start of the vegetation.
Really very fast.
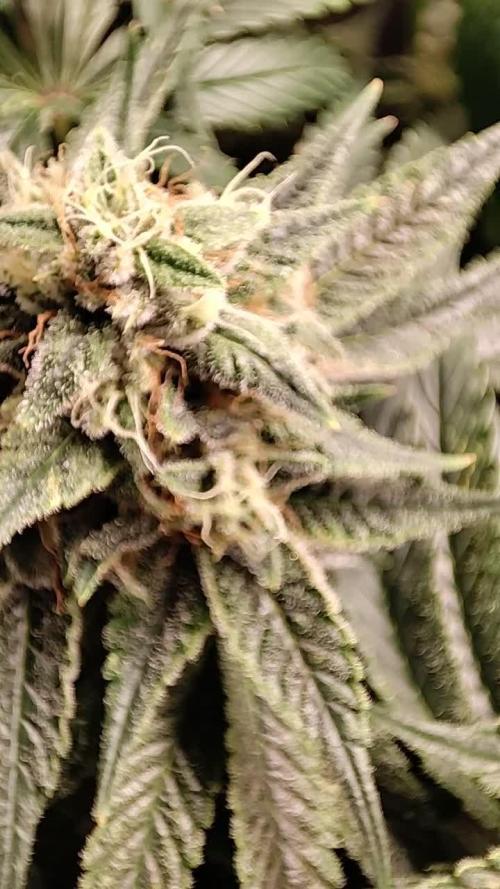
But the result is impressive as you can see in the photos.
The flowers are large and dense, the branches bend slightly under their weight.
The main cola is especially large and full of large flowers covered in trichomes.
The flowers are very hard to the touch and sticky under the fingers, especially the flowers on the main cola.
The leaves have started to turn autumn yellow which is also an indicator of its maturity.
The smell is very intense at this stage, the whole room smells like plants when I open the grow box.
Watering was standard, every three days.
This week I stopped adding nutrients, I just lowered the p.H. to 6.0 and water the plants with clean water.
After taking the photos, I left it in the grow box for two more days to drink all the water from the soil to make it easier to dry.
Before cutting, I removed all the leaves from the plant to also make drying faster and have less work to trim the dried flowers.
After cutting, I left it upside down in the grow box to dry.
Now all that remains is to see how much it has really rewarded me. See you when that happens.
Here's what the last week looked like.
19/09/2024 - Day 57.
Watering.
I prepared 9 liters of water, lowered the pH to 6.0 and used that amount to water all three plants on the farm.
22/09/2024 - Day 60.
Watering.
I repeated the same procedure as three days earlier.
24/09/2024 - Day 62.
I watered them all with 1.5 liters of water each plant so that they were fresh for the photo shoot.
25/09/2024 - Day 63.
End of the last, 9th week since Cherry Pie began its journey. Photo shoot.
27/09/2024 - Day 65.
Cherry Pie has been harvested.
That's almost all from me for this diary, there is still the final report that follows after drying and testing. Thank you all once again for your support and comments.

Likes
1
Share


@nowayReggie
Follow
Happy this grow cycle is over.
I will give more attention and focus next time I work with these
Likes
7
Share


@RizlaZA
Follow
Incredible strain this, grew hassle free from the start. Keep her healthy and give her what she needs and it will produce some dense, trich covered goodness.
The smoke is Incredible but has a massive kick so be warned. Estimate these girls will be 25%
THC.
Likes
13
Share

@ButterfliesLittleFarm
Follow
Hello Diary,
The first week of flowering on my little farm is over.
As you can see in the photos, the plants look beautiful. All three F1 strains are developing nicely, but the Titan F1 somehow dominates.
In terms of height, it is in the first place, the leaves are a beautiful dark green color and the flowers that have just started to form seem the most concrete of all three plants.
His shape is also almost perfect, at least if you ask me. I have always been a fan of natural plant growth regardless of yield.
Since there are a lot of leaves, every week I remove a couple of extra leaves, mostly in the lower part of the plant.
Watering is a little more frequent, this week I added bio flowering booster with one watering.
I don't always add supplements when watering, about once a week.
The temperature at the Farm has risen slightly, around 28 degrees, which corresponds to the conditions outside, while the humidity is around 50%.
Here is a quick overview of the past week.
23/05/2023 - Day 24.
Watering. I prepared 8 liters of water, lowered the pH. to 6.0 and added the first two components of the bio flowering booster. I watered all three plants on the farm with that amount.
27/05/2023 - Day 28.
Watering and photography. This time I watered with clean water, I just lowered the pH. he 6.0.
Titan F1 - 48 cm
That's all for now, see you soon. And thank you all for your support.
Processing
Likes
15
Share


@greenflipcali89
Follow
Finished week 2 of flower. I have been inspecting every single leaf for PM and have found a few spots, but quickly spot treated with solution. I have learned that PM is a SYSTEMIC disease and the spots on leaves are a symptom of an already infected plant. So the best thing I can do is keep the symptoms in check by spot spraying and its working! Only a few burned leaves as a result, but nothing like my first grow where it was widespread!
Defoliated to thin out a bit and allow for better airflow. Light LST to a few of the taller stems to maintain an even canopy. Overall, I am happy with the way my 2nd indoor grow is progressing.


Likes
8
Share


@TOTEM
Follow
This is a very interesting week!
After mainlining, I transplanted the lady into a 3L AirPot, adding 3 spoons of Mykos by Xtreme Gardening, 45g of BioMagno Algae and 5g of BioMagno Neem Flour. I uploaded a time-lapse video that shows the process.
Then I fed her with the nutes you see above this comment, in 1L of water (actually, 750ml would be better).
I hope you liked this week content!
Day 28 (May 7, 2019): 0.5L of tap water with Activator @ 0.5ml/L and Rizostimo @ 1ml/L.
Likes
4
Share

@Jardin33ro
Follow
Semana de engorde total, la planta con el overdrive ya se ve renovada, llena de pistilos nuevos. Mucha resina y mucho olor, se siente como un caramelo de anana 🍍 Vamos de a poco bajando la ec y el ph mantenemos en 6,4 para que coma y terminar en un 6.3 con 1.4-1.6 de ec estaria ideal

Likes
6
Share


@NO_DRAMA
Follow
Let the new week begin 💪
We transfer plant in to the big pot and make toping 💪👍
I hope plant had minimum stress 😬

Likes
21
Share


@Wrongholn519
Follow
It's been another easy week in the Fastbuds tent. I've spent most my energy preparing my outdoor grow space for a wild summer. At this point, there's not much I can do except water and watch my plants grow. I've added videos of other plants in relations to the mimosa cake just for visual aid. I also added a photo of my cheese auto.. it's still drying!
With the Mimosa cake auto I've been taking fan leaves off slowly for weeks now. This is a very busy plant. She is also going to run later than I expected. She's on day 76 and I suspect 95 to 100 days to finish time. I'll have to keel feeding her bloom nutes for the next few weeks; her 3 gallon bucket ran out of nutrients already.
Feeding schedule: water, feed, water, feed
Step 1- I'll take an aeration stone and use it to remove the chlorine residual in the water... this only takes 8 - 12 hours depending on water temperature. (I'm a water treatment process operator, I have checked several times in the past with my own Cl2 meters).
Step 2 - add Calmag
Step 3- add bloom nutes
Final step - pH the water accordingly (very important that this is final step)
A TDS residual of 500 ppm equals roughly 1 E.C. (I just double it)

Likes
6
Share


@Lazarus42069
Follow
Fed her a little bit of 550ppm so that the medium stays moist until I come back.
Fans on low so that the humidity actually stays. Post coming back i watered before lights out . Seem to be getting a little nutrient burn. Need to make the feed one by one and not for all plants at once

Processing
Likes
11
Share


@Newbie5648
Follow
Last week of flower. Flushing plants this week with 150 to 200ml water ph 7.0 to 8.0each day
Day 76 plants are pretty much ready for harvest. Buds have fattened up a abit.
Day 77. Alot more orange hairs. Buds fattening up still by a little. Plenty of milky trichomes. Harder to spot orange trichomes but can see them.
Likes
25
Share


@Sators
Follow
Keep watering with same nutrients mix, because I had add before to soil some extra worm castings, palm tree ash, bat guano and egg shells.
Day 24. keep doing all the same feeding with 2.5L nutrients mix.
Likes
34
Share


@MadeInGermany
Follow
Info:
Unfortunately, I had to find out that my account is used for fake pages in social media.
I am only active here on growdiaries.
I am not on facebook instagram twitter etc All accounts except this one are fake.
Have fun with the update.
Hey everyone 😃.
Every day is a joy when I take the lid down and see how the lady comes to life 😊.
She is developing great :-)
It only had to be poured once with 300 ml because it is under the hood with a very high humidity :-).
The hood was sprayed every day.
I think I'll start training this week :-).
Otherwise, as always, the humidifier was refilled and the entire tent was cleaned.
I wish you a lot of fun with the update :-).
Stay healthy 🙏🏻 and let it grow 👍.
You can buy this Strain at :
https://www.exoticseed.eu/
Type:
Quick Sherbet
☝️🏼
Genetics:
75% Indica / 25% Sativa
Sunset Sherbet X Black Lemon
👍
Vega lamp:
2 x Todogrow Led
Quantum Board 100 W
💡
Bloom Lamp :
2 x Todogrow Led
Cxb 3590 COB 3500 K 205W
💡💡☝️🏼
Soil :
Canna Coco Professional +
☝️🏼
Fertilizer:
Green House Powder Feeding
☝️🏼🌱
Water:
Osmosis water mixed with normal water (24 hours stale that the chlorine evaporates) to 0.2 EC. Add Cal / Mag to 0.4 Ec Ph with Organic Ph - to 5.5 - 5.8 .

Likes
24
Share


@Finniegrow
Follow
NOTES:
This week I'm starting to flush with only water and Final Solution -nutrient, so emptying the tanks and refilling them as doing so. I'll try to keep the pH at around 5,8-6,2. Overall everything looks pretty good and I can't wait to harvest. 🙏
Day99 (23.1.)
Took some pics and videos for the diary with my shitty camera.
Day100 (24.1.)
Emptying and refilling all nutrient tanks with fresh solution as mentioned above.
Day101 (25.1.)
Increased the dark-/night-time by 30min so now the lights are 11,5h On / 12,5 Off.
Day102 (26.1.)
Day103 (27.1.)
Reducing 30min of light again so now my timer is set to 11h On / 13h Off. I also moved the lights a bit higher for the rest of the grow, about 10-15cm higher than before.
Day104 (28.1.)
Day105 (29.1.)

Likes
27
Share


@Lordshiva83
Follow
Olá companheiros de cultivo! Esta semana parece que as plantas estão a desenvolver muito bem, estavam sob 20 horas de luz, reduzi horário para 18/6, e adicionei na semana passada bactérias que se chamam bactohemp e deu um óptimo resultado na vegetação de todas as plantas principalmente a shiskaberry, fiz LST para obter mais produção e estão a crescer galhos por todo lado nunca tinha visto uma planta assim 💪💪💪 espero que tudo dê certo estava com medo de ser macho porque estão a crescer galhos e mais galhos 😅 mas já apareceu uma pré-flor, a runtz muffin tb fiz LST tb está muito bonita a desenvolver muito bem, a BlueBerry OG também está uma planta muito forte, vou esperar mais uma semana para ver o desenvolvimento.. para depois pôr estas meninas a florir, obrigado amigos 💪💪🌳🌱🍀✌️
Likes
15
Share


@Springbokke
Follow
Доброго времени
Сегодня 82 день жизни моей девочки. Она во всю цвете и сегодня ровна неделя с того дня как я начал считать цвет. Планирую еще 7-8 недель ее продержать, хотя по паспорту у нее всего 8 недель цвета. На 76 день жизни, я обрезал почти все слабые боковые стебли и все нижние листья. За неделю она заметно подросла. Азот я не стал еще убирать, думаю его высокое содержание продержать еще неделю, затем буду уменьшать его содержание в питательном растворе.
Внимательные люди заметили б однозначно весящую лампу, у меня все время вылетало с головы напить о ней))) Эта лампа UVB на 25вт, для рептилий. Много читал про ультрафиолет, единого мнения нет. Это мой второй опыт связанный с ней. Весной этого года я ее использовал с 4 недели цвета, режим работы 4 часа в сутки. Признаюсь я не понял разницу, то есть я не знаю прибавила ли она содержание ТГК в шишках или нет, но точно сказать могу вреда от нее не было. Следующий гров я ее уже не использовал, а в этот раз решил опять воспользоваться ею. На мой взгляд 25вт очень мало, при том что у моих основных ламп 600вт, в будущем думаю купить еще две на 25вт. Если у кого есть опыт с подобными лампамы, пишите, интересно узнать какого результата вы добились.
Полил ( 1212ppm )-3л Sensi Bloom Coco A - 4мл/л; Sensi Bloom Coco B - 4мл/л; Big Bud Coco - 2мл/л; Bud Candy - 2мл/л; Влажность 35% - 47%; температура 21c - 28c 1 - й день цвета, Полил ( 1123ppm )-3л Sensi Bloom Coco A - 4мл/л; Sensi Bloom Coco B - 4мл/л; General Hydroponics Kool Bloom -1мл/л; B-52 - 2мл/л Влажность 32% - 50%; температура 22c - 28c 2 - й день цвета, Полил ( 1081ppm )-3л Sensi Bloom Coco A - 4мл/л; Sensi Bloom Coco B - 4мл/л; Big Bud Coco - 2мл/л; Cal-mag Xtra - 0,5мл/л; Влажность 33% - 50%; температура 22c - 29c
3 - й день цвета, Полил ( 1173ppm )-3л Sensi Bloom Coco A - 4мл/л; Sensi Bloom Coco B - 4мл/л; General Hydroponics Kool Bloom -1мл/л; B-52 - 2мл/л Влажность 31% - 47%; температура 21c - 29c 4 - й день цвета, Полил ( 986ppm )-3л Sensi Bloom Coco A - 4мл/л; Sensi Bloom Coco B - 4мл/л; General Hydroponics Kool Bloom -1мл/л; Bud Candy - 2мл/л; Влажность 32% - 48%; температура 21c - 29c 5 - й день цвета, Полил ( 1121ppm )-3л Sensi Bloom Coco A - 4мл/л; Sensi Bloom Coco B - 4мл/л; General Hydroponics Kool Bloom -1мл/л; Nirvana - 2мл/л; Влажность 30% - 48%; температура 21c - 28c 6 - й день цвета, Полил 3л Влажность 30% - 43%; температура 21c - 27c 7 - й день цвета,

Likes
34
Share


@PabloTheGrower
Follow
What's up growmies,
We reached the final stages...almost ready to cut. Its probably going to take an extra week compared to the Strawberry Cola. But the productions is maybe 30% more on this one. Veery long staked colas. Starting at the bottom of the plant all the way to the top. Sweet and fruity smells and drinking almost double the 💧 water compared to her neighbour.
One more week of nutes and then another week with plain water is what she'll have probably.
The root is a giant, white ball filling half the bucket space. I've used great white which from my experience is very very good. Doesn't perform miracles like Jesus though. The water temps in the reservoir needs to be in the correct range or else it almost always will develop phytium.
If you can't keep the water cool ( 17/21ºC) you're better off with a steril system using H2O2.
See you guys next week.
Good grows
Likes
162
Share


@Lukush
Follow
Finally week 4 Growmies 💪😎🌲🌲
She is beautifol and looking really healty🎉🌻
She is in hear new pot and i am shoure she is going to love it and love the new led Viparspectra 450🎉🎉🎉
Hope and shoure yall will enjoy
If you swing bi leave i like 👍
Still thanks for all the support, yall are beautifol ❤️❤️
Likes
33
Share


@SeshHouseCannabis
Follow
This week seem like the plant didn’t eat much of the fertilizer so we decided to push the Co2 up a bit, but its still drink crazy amount of water. Some of the plant were starting to smell and also getting a bit frosty. Hope that everything will be all good, have a good day to everyone who reading this Cheer!🔥🙏🏽🙏🏽🇹🇭👍🏻


Likes
15
Share

@Bncgrower
Follow
So far so good, this girl is developing really well. She's heading really well into the final weeks 💪✌️🌿
