
Likes
Comments
Share


@Oldwied
Follow
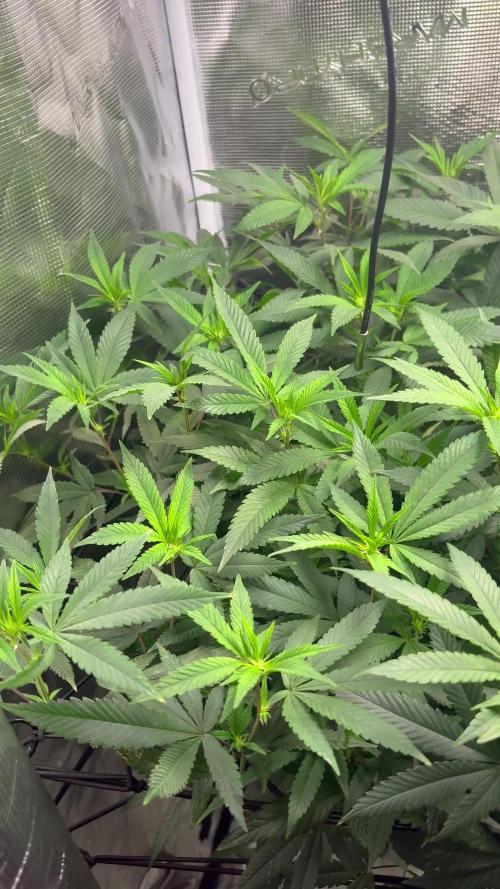
Day 10 of flower
The first flowers are growing.
Happiness grows very fast.
The living soil works great.
Big thanks to florganics!

Likes
4
Share


@20SYL
Follow
Semaine de croissance/ début de floraison pour deux des autofloraison. La troisième est toujours en retard mais elle à l'air en très bonne santé !
Ajout de bio bloom et top max en petite quantité (1ml/L).
Une d'entre elle montre des signes de sur arrosage ou/et d'excès d'azote. (?) Je vais laisser le substrat sécher et l'arroser sans bio grow ou à l'eau claire.

Likes
7
Share


@Cannabis_Sativa
Follow
Mid/late flowering buds are sticky and strong like rock but too baby

Likes
3
Share


@herbalistssword
Follow
First sign of mold formed. I cut the branch, remove moldy bit and drying it.
I needed to get her inside as soon as possible, so this made me harvest the Peach Puree CBD faster as she was using the lights, I brought the church in and put her next the peach for her final night, you can see her in the 3rd picture. I needed to do some super cropping to get a more even canopy so that the light gets as many buds as possible. Was still not happy with how the lower branches are getting barely any lights so I did some foliation and tied the lower branches so they are higher (you can see some side ways branches in the video, that is because I pulled them in).
Had to some reflective material lying around, so I wrapped that around her and she is looking very comfortable in her new home now.
I've put some hay which I had laying around on the soil with some leaves I cut to act as some mulch which could be why she is drinking very little water, haven't had to water her since I brought her in 3 days ago (mind you she was under a lot of rain before that).


Likes
22
Share


@UnorthadoxDude
Follow
Hey! Welcome to week four for Misty, a mystery auto from FastBuds.
I update daily so go check last week which is now complete. :)
Day 22: I have reconfigured the tent - see video for new config. Misty has more light now. Fertigated 2l.
Day 23: I have heavily pruned the companion plants and performed some LST and defoliation (where big fan leaves block nodes, or are in the way). Pretty radical looking changes, brutal perhaps. I did it to Nesia last week and she responded very well. So let's see how Misty handles it. I have been doing increasingly tough LST since Day 7 in preparation for this brutality so she should bounce back.
Day 24: See? :)
Day 25: Misty had breakdrought at 0900. Fertigated approx 4l.
Day 26: Trying to wait a week before further training.
Day 27: Did a little gentle LST and took off 2 leaves. Didn't manage to wait a week only 4 days.
Day 28: Fertigated 5l.
Likes
49
Share


@masterofsmeagol
Follow
MAY 17th I'll water the 10th planet again tomorrow. Things are going amazing! I topped one of the blueberry cheeses and fimmed another. I'm not seeing any stress. If they seem good I'll hst some of the others. This doing ONE thing at a time helps figure out problems. It's 75 right now but it was 39 this morning.
UPDATE: IT STARTED FUCKING SNOWING TODAY. Forecast looks good and others are putting plants out. I'll hold off. They'll go to the garage soon for hardening off. Looking at other diaries I had much bigger "clones" but they always come full of problems (see last year). These plants are the healthiest ivecever grown. I'd rather have a healthy plant half the size than a clone with a bunch of issues. Tomorrow I'm planning to wash my stakes and grow bags. I'll get the palletts in position and move my cage. I also am considering either putting a small pvc cover on my cage or finding a way to attack something to the trellis system for heavy rains. If anybody has ideas I'm all ears.
5/18 DIDN'T WATER TODAY. Soil was dry but the pots were heavy. I could feel some moisture through the drain holes. I think it would've been alright either way but I'm erring on the side of caution. I'll check again later in the day. I topped one and fimmed anotger of the blueberry cheese. The purple punch is quickly catching g up to her sisters. I HAD to add a small ring around one of the purple pounce plants as it was WAAAAY lighter than the others. It's possible it could've gotten less water than the others last time due to its positioning. I'm also considering adding silica next feeding. So much left to do before they go outside. Oh and it was fucking snowing here yesterday! May 17 and it was snowing middle of the day. Morning temp wad 31 this morning so I'm staying cautious and making sure I have all my ducks I'm a row before I go outside. I'm also weighing options to either add a pvc hoop on top of my cage or look into protecting plants individually come late fall with our horrible weather. I'm leaning towards the pvc top. I think that would greatly help things.
UPDATE: Went back over at four and everything's looked great. Leaves praying to the sun. Topsoil is dry as fuck but I can still feel a little bit of moisture through the drain holes plus they have a little heft left to them. I plan on watering tomorrow and see how that goes. I wanted to add silica but I'm afraid of changing to much or raising the ph of the soil.
5/19 Found out that my scale will actually weigh the three gallon pots! I don't have an empty one to fill with dry soil to compare though. WATERED everything today. Topsoil was totally dry. Some plants had some heft to them. However I last watered on the 15th so I decided to cut back on the amount of water and see how that goes. Instead of the full 28oz powerade bottle I gave them a little over half. I tried for approx 16fl Oz per plant. Everything is looking great. Other than the little runt. I don't know whatcthecdeal is with that one bit it may get given away or culled. I also FIMed a purple punch.
UPDATE: Went back over around 11 and boy weren't the plants looking good. I'm moving my cage and sanitizing my pallets tomorrow. I sanitized my grow bags. I vleaned them with the baking soda and water and a scrub brush but since I had that problem with fusarium last year I then soaked them in a h2o2 solution for 20 mins before rinsing them off and letting them dry. I am so stoked for this season. Wondering about the pvc top and whether it's necessary 🤔. I have TONS of heavy equipment (well dad does) but the smallest thing we have is a backhoe and a bulldozer neither which I'm to inclined to use to move big plants. I thought that since the door to that garage is large enough to drive a front end loader in than if I could find a way to make my pallets mobile I could bring them in if storms are coming. I worry to much. I also got rid of anything that could gave spires on it. Ilk need to wash my plastic trellis netting and the bamboo as well but better safe than sorry.
5/20 Plants are still growing like weeds and are the ones I HST are recovering nicely. Soon they'll go out to the garage and spend their days outside in the sunshine and their nights inside the garage while I harden them off. Having trouble uploading stuff right now.
5/21 Topped two blueberry cheese and one purple punch. Plants are still doing great. We are getting close to go8ng outside in tye forever homes in smart pots ranging from 10gal to 50 gals. I still need to sanitize the pallets but this week I plan on hardening these girls off fully.
5/22 I weighed a couple of the plants and they were different. I think I got a couple 7lbs one that was 6 something and a heavier one that was 8. Looks like I've found the right amount. I plan to water tomorrow. They'll be moved in the next couple days to the garage and I'll let them fill the 3's before they go in their final homes. Plants are recovering from HST great. Still getting cold nights here. Honestly if I didn't have a major life event happen they'd be outside hardening off now
5/23 Watered everything with approximately 18oz of water. I am either going to move plants outside today to indirect sun (even though they've handled full sunlight from an open window) in the garage and keep the light going for a little longer. They need to fill their pots before they go in their forever homes. I've got some work to do but it will pay off.
EDIT: Cage has been moved to its new home. A huge pallet takes up most of it but I have littler ones that will fit in. I just haven't had a chance to disinfect these. I'm probably going overboard but I'm not fucking around with that fusarium or other any pathogens this year. I'm going to use the systemic organocide once I go outside. It's going to rain tomorrow amd might be cold but I still move the plants to the garage in the morning.


Likes
41
Share


@KAPT_SAVE_Da_HOE
Follow
Forbidden Runtz is being harvested to make room for another strain. Sour Stomper has one more week then making room for another strain. I didn't supply the enough nutrients and became evident the last few weeks. I made many mistakes that I hope to dial in next run. The whole experience for a first time indoor autoflower was fun and low maintenance. I look forward to the dry product and will update as soon as is happens.


Likes
9
Share


@NanoLeaf
Follow
End of Week 8 (First week of flower)
Increased the CO2 to 1200ppm and the ladies love it, already started stretching within the first 3 days of flower which shows that CO2 definitely boosts the grow cycle of cannabis.
The main top-sites are popping up everywhere and everything looks evenly spread out. I defoliated again because the fan leaves are growing so fast and blocking bud sites. I also did one last lower canopy maintenance and removed small and stalky bud sites and stems below the trellis net to make sure I get maximum energy distribution to the main colas.
I also added some GHF BioEnhancer to make sure the soil-microbes are happy and that the plants reach their maximum potential.
Pest Report: EXTERMINATED!
Thrips VS Ladybugs VS Neem Oil...
I decided to fight fire with fire - I purchased Swirski-Mites from Koppert (They are beneficial insects that feed on the eggs and larvae of thrips and other unwanted pests). As for the adult thrips - I got very lucky and found about 10 Ladybugs in my garden and decided to introduce them into my grow room as they will feed on adult thrips and any other unwanted pests.
Then to be extra sure I know that neem oil hinders the life cycle of pests like thrips causing them to stop colonising in my grow room. So I sprayed the ladies every day during the dark period to make sure there are no pests that I or the Ladybugs have missed.
Mission accomplished. No more wilting and definitely no more thrips.

Likes
10
Share


@HideAndFly420
Follow
Day 34 this lady is running, I can see flowers getting bigger every day, smell started really really soon this time so I already had to add the Carbon Filter.
I’d like to close the cycle in less then 80 days. It would be great
First flowering fertilisation
Ph 6.2
Ppm 631
Day 37 - 9 of flower 🌸
Started blooming fertilisation, I’m keep Giving all-in one from aptus, i think I lm substitute with super pk and I stop all in one.
Ph 6.2
Ppm 731
As I’m growing an solito in a 9.2 lt pots with all mix nutrients I’m slowing down with all in one and just giving base feedings, I ll decide later if I should give super-pk for the next weeks
Day 40, tomorrow will be feeding days. Sge’s going really well, resin is already showing up on flowers that are several as and colorfull, smell is already there 🤤
Tomorrow update with feedings parameters.
Day 41 feeding day
Aptus regulator 0,15ml/1 lt
Aptus all in one 1,25ml/1lt
Aptus Topbooster 0,3 ml
Aptus enzym + 0,5 ml
Calmag 0,3 ml /L
Ph 6,18
Ppm 756
Let’s see


Likes
5
Share

@ProfessorWeed
Follow
Der Steckling aus dem Garten Eden hat in der ersten Blüte Woche ein Wachstumsschub von fast 30 cm hingelegt.
Ich habe einen Blüte Dünger auf in Salz Form benutzt. Ich hoffe ich habe mir meine Boden nicht kaputt gemacht.
Durch den Einsatz von Klimaanlage und Entfeuchter hab ich sehr stabile Werte die sich konstant halten.
Ich möchte mich in diesem Durchgang auf maximale Hartz Produktion und Erhalt fokussieren.
Welche Tipps habt ihr für mich die ihr schon getestet habt?
Likes
65
Share


@Nebula420
Follow
I really love grow Blue Gelato 41.It’s a very tasty and strong.Suitable for gourmets.
Blue Gelato so delicious that I want to eat it all the time.
Thanks to everyone who follow my grow report, love u all, Peace!😘
Likes
18
Share


@Ageddd
Follow
She is starting to getting fat, at the begginning of this week, it was raining, but in the middle of the week, sunny days are appearing, and she is loving it, drastically increased eating levels, in 1-2 days, lower leaves started to yellow, but i noticed soon and gave a good dose with 4ml/l Top BLoom + some carbohydrates, Top Candy 2ml/l, and now she is lovin it.
That purple colours appearing...no words... Simply a blessing, even more beautiful :D
Last videos are about what i think are Chemtrails, like ie said before, the week started with rainy days, but when the sun came, this kind of biodegradable material appeared again like it is usual, it could be identified as spiderwebs if you dont look closer, but when you touch it is like soap and disappears... Guys and Ladies, let me know what you think if you want to stick a comment :)
Take Care GD !!!

Likes
51
Share


@Organic_LarF
Follow
Week 6,
2 weeks outside, first week was a blast, fantastic wheater good night temps.
Second week was much colder. Daytime temps just tipping 20 degrees celcius in the sun. Nighttime was between 6 and 7 degrees.
Pictures are plant 1 in the shed with transparent roof. Not a real serre, its more just a roof and some protection against most of the elements of nature.
Video is plant 2, she's hardening because of the harsh nights. She didnt grow as much as plant 1, but looks healthy, goal number 1 at this moment. Better times are coming so all will settle.
🍀🍀🍀
Likes
3
Share


@mquintero7
Follow
This could be last week before harvest. She looks beautiful, very big buds with great shape and smell. No disease or pest present. She didn't turn purple, still, she grew very well and produces a very interesting yield.

Likes
8
Share


@Ninjabuds
Follow
Runtz from Zamnesia has been a strong grower along the way. When it was in veg it started with a little slow growth but this plant has a lot of euro genetics in it and it seems it would have loved higher light intensity durring veg so it would have stacked better. The buds are an interesting structure that’s why I think the plant was meant to be stacked the nugs army nice round balls there weird shaped like they were meant to be closer together to make long colas. There is potential with this plant just would need some more grows to dial it in to be grown at its pote
Likes
6
Share


@emeraldlabs
Follow
Nothing to report.
All same strain but damn is the girl on the left different; taking her sweet time making fat buds.
Photos/video taken 92 days after breaking soil (48F).

Likes
11
Share


@DimJesus
Follow
Saludos 🙌 tercera semana completa, aumentando la dosis de los fertilizantes.
Quité los primeros pares de hojas para darle paso a las ramificaciones que se puedes ver en las fotos, está brotando el quinto nudo pero me parece que aún está un poco pequeña para la LST y corte apical, que piensan?
Donde vivo hay muchas variaciones de temperatura pero generalmente el grow se mantiene entre 23° y 29°, la humedad también varía bastante pero no baja de 50% ni sube de 78%.
Ansioso para la floración 🙏 having a lot of fun 💪

Likes
6
Share


@agustinnnv
Follow
Una planta criada en excelente condiciones desde el comienzo hasta el final de su ciclo. Nunca demostró carencias ni excesos y tuvo un buen armazón para el momento de empezar a cogollar. Aún así, no salió mucha cantidad pero no tengo ningún tipo de queja respecto a la calidad. Cogollos bañados en tricomas y con un pegue increíble. Excelente genética.


