
Likes
Comments
Share


@CannaBossBizz
Follow
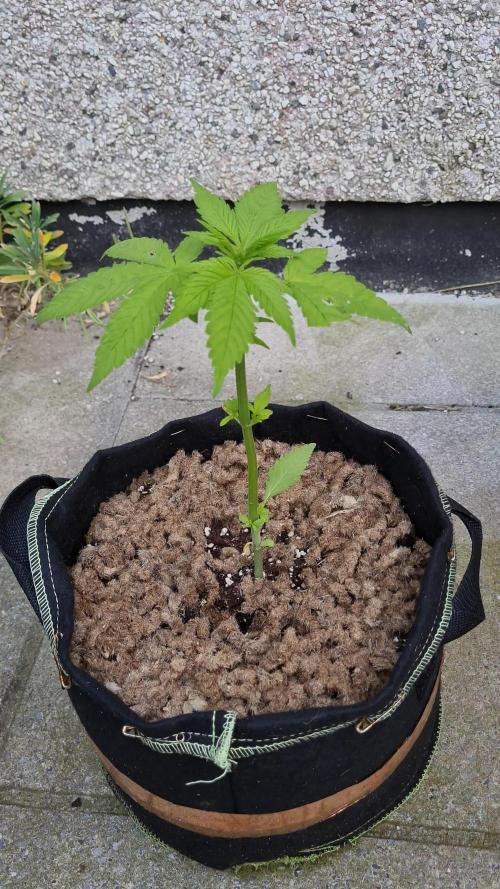
The Moby Dick ist doing great. Getting bigger every day! I Hope she'll Go on Like that! Maybe one more nod and i'll top her maybe Not. Gonna think about it. Stay tuned! 🤙🏽


Likes
55
Share


@nonick123
Follow
Día 64 (17/03) Riego con 500 ml H2O EC 0,45
Estamos en el día 36 de floración y empieza a mostrar una senescencia preciosa 😍💥
Día 65 (18/03) Riego con 500 ml H2O EC 0,45
Día 66 (19/03) Dia 39 de floración y la senescencia empieza a avanzar en algunas hojas. Unos colores preciosos!
Riego con 150 ml H2O EC 0,45
Día 67 (20/03) Riego con 500 ml H2O EC 0,45
Día 68 (21/03) Riego con 500 ml H2O EC 0,45
Día 69 (22/03) No riego (vacaciones)
Día 70 (23/03) No riego (vacaciones)
🚀 Khalifa Genetics - https://khalifagenetics.com/product/lemon-blanco-v3/ @khalifa.genetics
💦 BioTabs 15% DISCOUNT code "GDBT420" biotabs.nl/en/shop/ @biotabs_official
🌱Substrate PRO-MIX HP BACILLUS + MYCORRHIZAE @promixmitch @promixgrowers_unfiltered
💡2 x Mars Hydro FC1500 EVO Led Grow Light (2024 NEW FC 1500-EVO Samsung LM301H 150W LED) - https://marshydro.eu/products/fc1500-evo-led-grow-lights/ - https://www.amazon.de/dp/B0CSSGN5D8?ref=myi_title_dp

Processing
Likes
7
Share


@Weedganja420
Follow
Pues sigue expulsando resina esta preciosa cepa! Ha bajado bastante la temperatura en esta ultima semana y he tenido que estar poniendole un calentador algunas horas para controlar la temperatura, de todas formas lleva muy buen ritmo!

Processing
Likes
9
Share


@High_Grade_Dadli
Follow
Growth stun abit in #1 due to snap in the stem but still manage to grow half inch. n push new growth........#2 main growth stun but directed to lower branches n still grow about 2 inch......#3 double it growth with 4.5 inch. didn't need lst was showing good growth in lower branches from early
Likes
20
Share


@Stickybudz420
Follow
Just hoping she fattens up with a bit more frost, overall I’m happy with how she’s growing! 😄🤞🌲

Likes
45
Share


@chapadux420r
Follow
Wassuuuup my dudes
21 days into flowering and the results from the lst and defoliation are showing up. Multiple healthy tops and even the small nodes under the canopy are growing bigger, if all goes well I won’t have many popcorn nugs but I’ll have just big buds (let’s hope)
I guess this also means they won’t stretch much more but I think some more height would be good for yield, anyway, can’t complain for the 1st grow and this is a process, there are no perfect grows!
This week was also a week to add some more nutrients (the plagron) and it’s working very well for now!
Let’s wait for the next few weeks, can’t wait to see the fatty buds 😂
Tell me what you think!


Likes
6
Share


@LoganatorDude
Follow
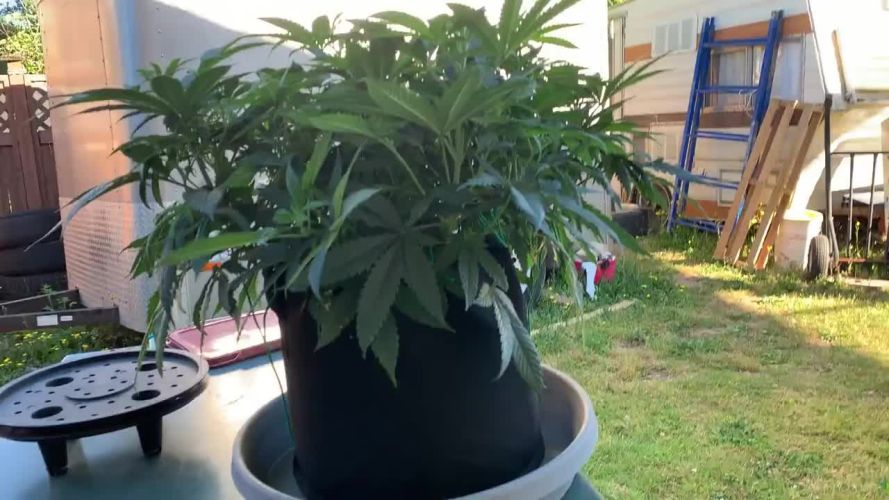
Even though it says 80 Gallon pot, it’s really 400, it just glitches out when I enter 400 and converts to say only 80.
I know she looks bad! I know.
She has only been managing a nutrient lockout with horribly low pH for far too long! The Hydrated Lime has indeed fixed the pH! Resulting in my next inbound set of problems. The original soil from the second 2.3L pot she was in was too strong! She needs to get her roots out into the larger pot, but that only gives her so much more space. Plus in that larger black plastic pot, the hot dry sun at 7,000 ft in elevation, really heats up those pots! When it’s 98F later, that sounds like torture! Maybe it was enough to balance out the more concentrated stuff towards the inside of the root mass. But I don’t want her roots to stop there! The time is now for her to go into the 400!!!
The soil is 6.5 pH through and through. The peas are about to bloom! She has just avoided lockout and is picking up momentum! The 400 gives her a huge diameter for her roots! Something I sincerely hope her genetics will take advantage of. The soil is rich and alive! The temps in 400 will be so much better!
Now I must prepare for my Arch Nemesis!
The Butterfly!!!!!!
Lol
But seriously. They find my plants attractive, and decide to serve my plants as food for their offspring!!!! Not okay! Last year their success rate on my plants was a fat 0!! But they did some serious damage! I am prepared this year!! I will watch with vigilance for any butterflies around my plants specifically. I will spray my plants down regularly with diatomaceous earth! Not too much obviously! I know less is more when spraying that stuff! No mother wants to give her children food with razor blades in it!
And as always there is always next year! I can’t let a phase of mice and men get the better of me. However!!… that’s what I said LAST YEAR!!!! Lol. This year IS next year!
Anyways she looks rough right now on Day 58 but I tell yah what, she has very recently made a dramatic turnaround for the better!!
…I hope!
Happy Growing!
StrongTrees💪🌳

Likes
2
Share


@Farmeryo901
Follow
Experiencing what seems to be my first nutrient lock out. Bought a soil ph tester from homdepo its reading 7.0 so that what bring me to that conclusion on top of the slower growing and the slight yellowing around the leaves. I was being cheap and using the liquid ph tester that comes with the ph up and down and im regretting now seeing my plants in not the best condition. Im ordering a better ph pen today i used the vivosun one the i currently have got the water to 5.8 checked the run off and its at 6.2 hopefully that helps. Saturday im going to top dress and water at 5.8 aging and im thinking that should put me back on track
Any advice i could definitely use some tips and pointers or advice
Likes
11
Share


@Mo_Powers
Follow
the weather in germany is still totally changeable. temperatures from 10 degrees at night to 30 degrees during the day. and lots of rain. but it is growing incredibly well for the conditions.
Likes
13
Share


@Leanback
Follow
Day 21 of flowering did defoil the lady’s. No hermaphrodite showing up. Did a compost tea today. Corn is sprouting for tea. Did covercrop to get some fresh greens for the hcompost after the run.
The buds are stick as fuck. Looking forward for the next and last defoil in week 5.

Likes
30
Share

@KnightRider
Follow
Hey Peeps,
So its been quite a bad week for my girl.
Its rained every day apart from today and shes been lollipoped not by me. The damage that you can see actually occured over one night, in a word carnage 😔
Ive taken her out of her hidey hole about mid week as one more attack like this and shed be dead, just gonna have to risk her out in the open and hope that the neighbours dont notice if she recovers.
Thats all from me this week, thanks for stopping by ✌️
Likes
11
Share


@CanabisLoverHobbyGrower
Follow
Well I've done a final tie down going to give them 5 days to a week and then flip them into flower, they react to training so well and are so flexible, think these are going to be one of the best looking ones the training on the bigger plant looks ace, roll on next week, flower time

Likes
41
Share


@TheBulldozerSicily
Follow
Sabato 6 luglio Aggiungo 50 lt acqua per livello basso
Venerdì 20 luglio Aggiungo 50 lt acqua e il doppio dei nutrienti, vediamo che succede. Ho dato anche una bella defogliazione e pulizia rami inferiori
Martedì 23 luglio
Inizio controllo ec 3999 ph7
Cambio soluzione parto da 75 lt acqua osmosi inversa + 5lt acqua rubinetto ottenendo ec 473 ph 8.4
Aggiungo tutti I nutrienti ottenendo ec 1489 ph 6.5

Likes
15
Share


@IsseyBukkake
Follow
Week 2 has gone just as well as I'd like it too!
I had an accident during the week where I had dropped a sticky bug trap on one of my girls, this led to me accidentally ripping off a fan leaf and a half, but she seems to have come out of it just fine! (Thankfully).
I have been feeding 1/3 strength nutes the past few feeds, stepping it up from 1/4.
I will be watering until I see runoff from now on to prevent nutrients from building up in the coco.
Update(day 15, 4/12/20)
Today I purchased a new oscillating fan, co2 bags and a new hygrometer that hooks up to my phone and shows me stats.
The girls have been putting in a lot of work over the past 24 hours.
I also had a Purple Punch photo seed sprout today which I may be turning into a mother plant. I will be starting a diary for this girl too.
Update (Day 16 5/12/20)
Second purple punch photo popped today, going to keep 1 inside and give the other to my mom to take care of.
The girls got their first 1/4 dose of calmag today fed at 6ph due to all the nutrients settling there.( I do have ph +/- but I'm going to try run this whole grow at 5.8-6.2.
Update (Day 17 6/12/20)
Plants seem happy today.
Fan leaves producing a the pre-existing nodes are starting to shoot out quite rapidly.
Unfortunately, my streets power went out today for ~90 minutes, I opened the tent, windows and doors to get any light in I could, thankfully the power came back on shortly after.
I fed the girls today with very little run-off(I'm trying to perfect the amount of water they need).
Update (Day 18 7/12/20)
The girls have jumped up over night!
I wont be feeding today as I'd like the coco to dry out quite a bit more.
Update (Day 19 8/12/20
Gave the girls a small feed today with very little run-off
Everything seems to be going well so far, I'm very thankful!
Update (day 20 9/12/20)
Everything is going pretty well today.
I will not be feeding as the increased humidity has kept the coco more moist than usual.
Will be feeding full strength nutes tomorrow!
Thanks for stopping by, HMU with any questions or tips you have.

Likes
18
Share

@VI_Cannabis
Follow
June 21st - they are doing great with the newa ac unit. temps are saying around 25-26. They are just growing away. I decided this week I would swap there nutrients for transition to flower. I watered them today with the first mix of the recommended transition to flower.
June 22nd - Still growing away, they seem to be picking up growth quite a bit now!
June 23rd - Starting to explode with growth! Everything looks healthy. I have turned the lights up to about 85% now. Gave them a feeding today, again with the transition to flower recommendation.
June 24th - Still growing like crazy. They are on a 12/12 schedule and it looks like they're on there way to flower!
Junes 25th - Lots of growth in the last 5 days. They have perked up a ton, grown a ton of fan leafs and its almost time to do some more lst or defoliation. Gave them another feeding today. I have decided to just feed with every watering as it is the manufactures recommendation.
June 26th - Took the girls out and did some LST on them again as they were starting to become pretty uneven. Unfortunately I only took pictures/videos of the one plant. You can definitely see the growth since the start of this week. They seem to be getting pretty dry by the morning so I have been feeding roughly every 24-36 hours making sure not to overwater.
June 27th -They popped back up overnight and are just growing away. Another watering today. Roughly 3L per plant. Again making sure not to overwater.
Likes
8
Share


@GuniGugu
Follow
- BioBizz Light Mix soil
- BioBizz Nutrients used according to their schedule
- stopped LST

Likes
48
Share


@AsNoriu
Follow
Day 117. Trim jail and heavy upload session for 24 hours at least. Don't like to keep photos, so ill upload each plant separately and will delete them. Phone camera is still cracked and off-focus, but they are all nice !
Day 121. Made even bubble hash, if Runtz was white and brownish when dried, Kalini Asias bubble went a bit redish/pinkish/brown after drying, you can easy see difference in colour between Kalini and Blue Dream in photo.
Kalini + Blue Dream ended up in 14 g of bubble. Runtz made about 5, smoked it too quick to weight even ;) nice buzz and taste !
Day 128. #3 85, #2 87, #3 68. Buds are nice and closer to dense side, but again result was far from my expectations. This strain is really good, have just find the way to make her bulk, better lolitoping maybe ? .... Lost, but this strain is really really nice by taste and how she grew.
Happy Growing !!!
Likes
13
Share


@Sublyme_ness
Follow
Stocky plant, thick stem.
Mutations continue. Some looks like tobacco mosaic but I doubt it.
Thrips seem to avoid this plant comparative to my others at present.

Likes
2
Share


@kanabise
Follow
De jolie couleur violette et la tête devienne très grosse mais pas beaucoup dense

