
Likes
Comments
Share


@undermink
Follow
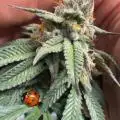
Her buds are growing and growing.. There are still about 4 weeks until harvest but her buds look awsome just now : I hope I can wait until she's finished, hehe
She's looking beautiful at the end of week 9.


Likes
12
Share


@Pedro_88
Follow
Estoy muy satisfecho con el crecimiento de mi chemical bride, ayer hubo un fuerte viento y tumbo a mí watermelon skittlez no la pude encontrar, pero ya tenemos otra en proceso que verán en estos días

Likes
11
Share


@electabruce420
Follow
F1 youngest of them all, will try to just leave it be without lst or topping or anything... Maybe.

Likes
17
Share


@Sativa_Juice_Grows
Follow
Nov/21
She grew like crazy.
Big green fan leaves coming in.
Branches are growing strong.
Smell is starting to get intoxicating.
i finally got over my habit of nervous watering
and am feeding the girls way less and they're happy.
Cant wait to flip this girl to flower.
No problems this week at all.
11/29
Shes growing ok. Green and healthy branches and leaves.
She growing more like a sativa, sativa hybrid
tall and branchy, manageable fan leaves
but because of that she started to get some light burn.
Dont have my tent yet so i cant adjust my light any higher so i tried
to lower the plant down a little
So hoping she can do without super direct light for another day or so.
Other than that shes looking healthy.
(some of this is the same as White Widow diary)
11/30
It wouldn't let me do veg and flower in the same week
on the diary so i just split it up in here.
Two busy days.
Tent came i!! which im super excited about
because now i flip the girls to flower.
It wouldnt let me do veg and flower in the same week
on the diary so i just split it up in here.
I spent tuesday putting the tent together
and dropped a video of the new setup because
im REALLY excited about.
got the ladies nice and cozy. Started them on 12/12.
Its my first time on an indoor grow so i hope it works out well
Shes super healthy. Super green leaves are big
stems are thick
everything is a lovely dark green
i can smell it more because theyre tented now.
but it looks great.
12/1
topped dressed with some happy frog soil
I couldnt add the castings amount in the thing above
So ill say i mixed about a quarter of the amount of soil
into about 1 to 2 gallons of top soil
i had some down to earth
dry amendments i mixed in with that soil as well.
i couldnt tell how much soil exactly.
I only put in 5 tsp of great white instead of the recommended 7
because i switched the bloom nutes and i didnt wanna over do it
i couldnt tell how much soil exactly.
Fed them some flowering nutes, but cut back
on the amount of nutes by a lot.
Decided im going to just follow what biobizz instructions
say from now on so apparently less is better.
started the bloom and the top max kept everything else the same
and cut out the fish mix for flower, added great white at the end.
Defoliated the bottom few branches and cleaned any growth at wasnt going to produce.
Nothing to major.
12/2
Temp of tent is steady at 70, 71 degrees.
thats a little bit lower than id like but ill
figure out something in the next few days.
Took the bottom branches and leaves the night before and
Wanted to give it a night of rest before i defoliated the big leaves.
Took most of them off but left the few at the top of the plant.
Looking extremely green. Hoping i get to see some pistils soon.

Likes
7
Share


@MicroHidroGrow
Follow
Día 15. Las plantas ya alcanzaron un altura muy buena. Ya empiezan a aparecer los primeros pelos blancos. Por el momento me ha sorprendido la reacción de las plantas al bud blood. Si puedo voy a comprar bud candy para ayudar un poco a la mezcla. Por el momento decidí mantener el bud blood a media dosis durante una semana más con el big bud. Veremos que tal resulta.
Día 17. El estirón siguió y las plantas alcanzaron 51 cm. Las pequeñas directamente quedaron tapadas. En este experimento se puede ver la diferencia entre tierra e hidroponia. La verdad que estoy sorprendido. Creo que los productos usados son los que han marcado la diferencia. Las plantas quintuplicaron la altura total que tenían al momento de pasarlas a floración. Y sospecho que van a seguir estirándose una semana más. Espero no tener problemas de altura porque no lo planeaba. Creo que voy a cortar algunas ramas bajas más, dado que se están generando muchas sombras nuevas. Seguiré actualizando.
Día 19. El estiramiento continua, pero levemente. Ya alcanzaron 55cm. Estuve cortando algunas ramas y hasta supongo que podría cortar más. Pero a esta altura ya todo lo que hay recibe buena luz. La diferencia entre la madre que está en tierra y los esquejes en hidroponia, es cada vez más notoria. Si bien ya la he visto, tener una planta al lado de la otra bajo la misma luz, hace la parte alevosa de todo esto.
De todos modos, he comprobado que el sabor obtenido en tierra, es más fiel al de la hidroponia. En hidroponia en principio, las plantas son mas fuertes en todo, pero el sabor de alguna forma, es demasiado afectado por los nutrientes. Incluso habiendo lavado dos o tres semanas, la planta sostiene un sabor constante en todas las variedades, que parece estar atado a la nutrición. Siendo que en tierra, cada variedad tiene su sabor distintivo, siendo una distinta de otra.
La próxima actualización será en la nueva semana, ya que al quedar poca solución, la voy a cambiar antes y voy a poner 12 litros en lugar de los 10 que vengo usando. Las plantas vienen comiendo mucho.

Likes
12
Share


Likes
6
Share

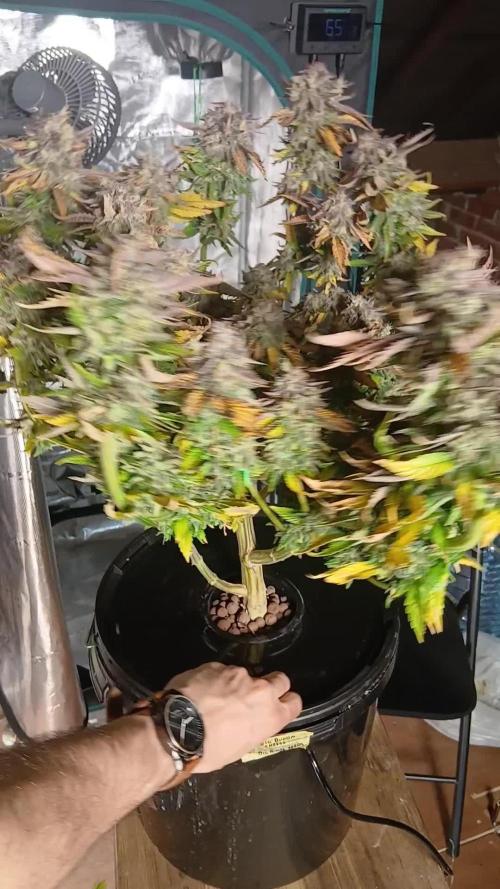
@Chrisandweed
Follow
Bueno, ayer hice el ultimo riego, mas cantidad de lo habitual, y ya cuando seque, se corta, supongo que actualizaré fotos, conforme avance la semana, del corte y posterior proceso ya que dado que hubo araña y ciertos problemas, voy a hacer el budwashing que habitualmente hago.
En el video se ve algún cogollo con telaraña de araña roja, de ahí el budwashing. Dentro de lo malo, no son todos los cocos los que la tienen pero bueno, un buen lavado no jode nada.
Likes
1
Share


Processing
Likes
41
Share


@Wicked_Stix
Follow
Day 35 and she is a beauty. She has a nice color and I love her structure. I am going to call it flower this week since she is well into preflower. The system is running great. Haven't had any roots try to grow into the pipe yet. Going to start them on a little maxibloom soon.

Likes
15
Share

@deFharo
Follow
Bienvenidos cultivadores de marihuana! 🖐️ 👨🌾
Desde el centro de la carpa de cultivo, elevada en un pedestal, porque es la planta más bajita del jardín, este cruce se reivindica poderoso y seguro.
Las ramas compiten entre si, las hojas captan luz y la convierten en energía, la fotosíntesis se encarga de todo.
No hay carencias, no hay excesos, solo paz y vida en esta transición a floración, hace 5 días cambié el horario a 12/12... nada puede fallar!
😁 HASTA LA PRÓXIMA. SALUD Y SALUDOS PARA TODOS!
=============================
- Esta semilla me la regaló mi compadre canadiense: https://growdiaries.com/grower/1right_angle
- Se trata de una semilla feminizada proveniente de cruce casero entre Northern Lights (100% índica) x Thai (100% Sativa), un espécimen original con el que espero disfrutar mucho durante el cultivo.
=============================
Likes
4
Share


@KannaGrowing
Follow
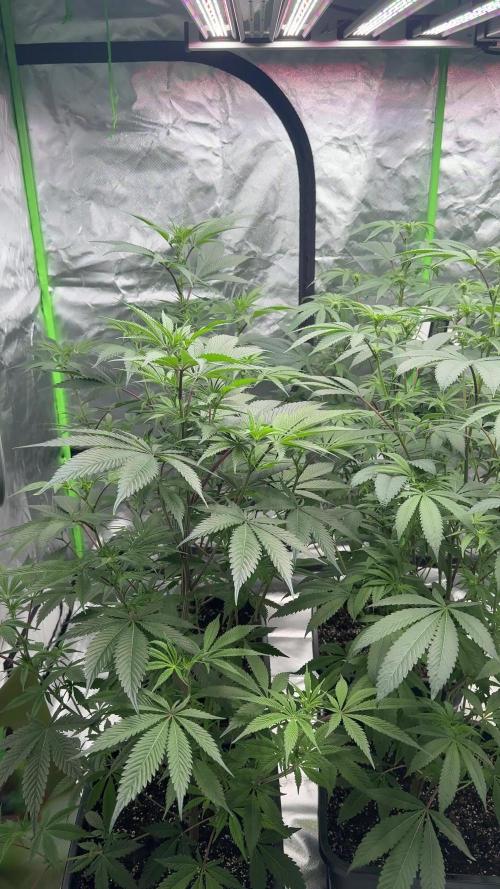
Esta semana seleccionamos las plantas más adelantadas de nuestro cultivo, para colocarlas bajo la nueva luminaria Led LazerLite Pro 720 de The Pure Factory, con la potencia ajustada al 50%.
Miramos de que las cuatro variedades estén representadas bajo el led y bajo las lamparas HID, de esta forma podremos ver las diferencias entre los dos sistemas.
Seguimos con nuestra rutina de fertilización para la fase vegetativa Grow Soldier + Green Mystic by JUJU Royal y CALMAG de BioBizz.
Al final de la semana, cambiamos el ciclo lumínico para pasar a 12/12 Floración.

Likes
17
Share


@VegHead_Lou
Follow
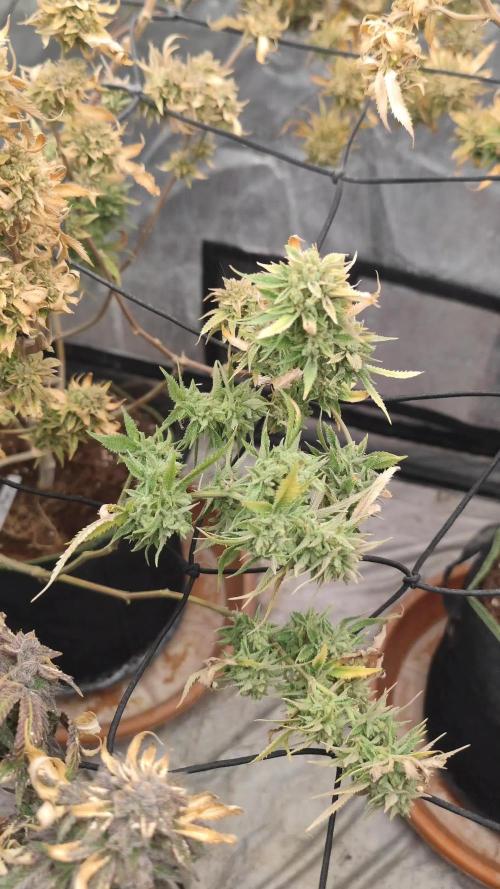
Most definitely a great strain to have in your garden if you want some color. Yield isn’t much but the flowers make up for that. I wish this strain had some more funk to it. My last Devil Cream lady smells straight like citrus. Stay tuned for its harvest. Thank you all for following my first grow dairy. Make sure you follow my future grows and follow me on Instagram.

Likes
22
Share


@BB_UK
Follow
So in this diary it has become a comparison! I am feeding 3 organic and 3 synthetic to see how or if the results vary! I decided to top the younger ones earlier as they had fast pace growth and they are just showing vigor! I have such thick leaves too and stems so expecting an amazing turn around when I do the second topping! These are all mysteries! Some seeds sent to me are the organic and others I found in a harvest so will be interesting indeed.... Happy growing buddies ✌️💚 and they all have such vigor in growth because of the dynomyco 😜 very useful! I used it on transfers! So not sure of the amount as I sprinkled it in the potting hole
Likes
5
Share


@Terpio1500
Follow
This plant is getting really big it looks lovely through out about to start feeding a little lighter do when the buds come in the smell is beautiful it’s smells gassy & stinky.
Week 5 check out my other grows (Jungle Verde, The New)
& follow my IG @therealterpio
Likes
25
Share


@XperencdGmanXG
Follow
Well these girls sure have grown since my last update. They are coming along nicely I will have to LST them hard or put them outside, This strain is a monster!.


