


Likes
10
Share

@420DeepGrow
Follow
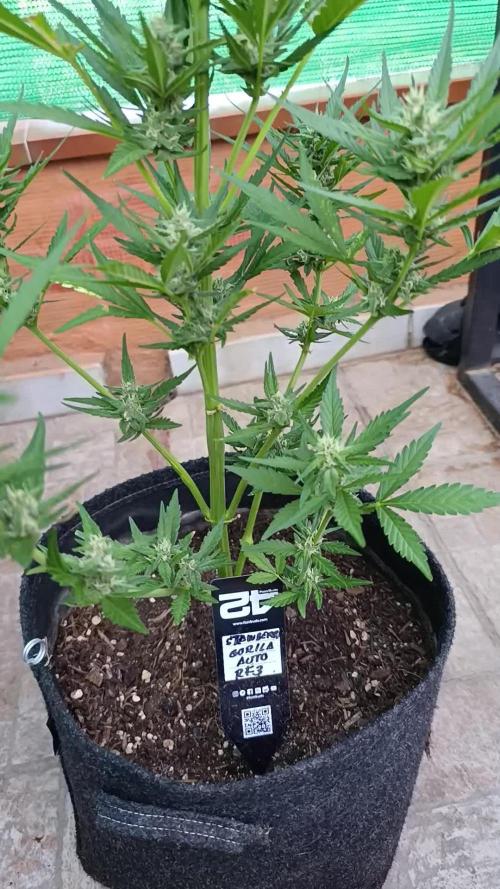
📆 Semana 4
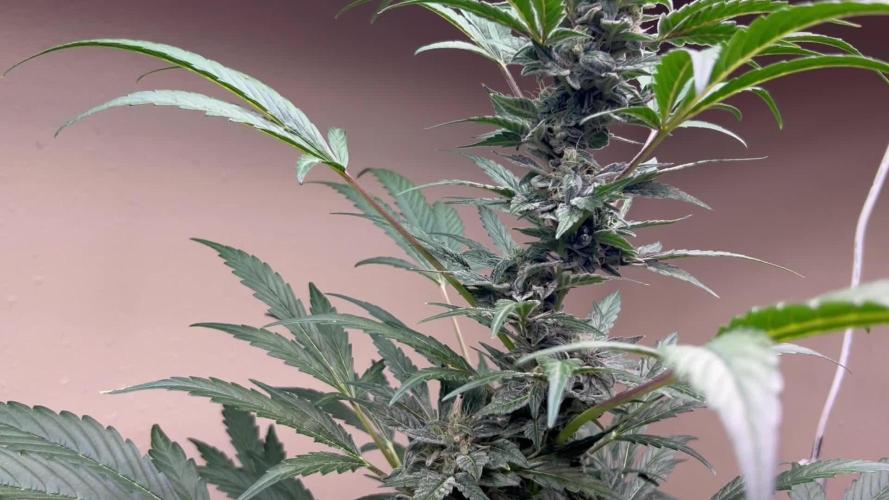
La planta comienza a dejar atrás el stretch y centra cada vez más su energía en el desarrollo de las flores. Alcanza aproximadamente los 100 cm de altura y los cogollos empiezan a ganar volumen en todas las puntas, mientras la estructura queda prácticamente definida.
Los pistilos siguen apareciendo en abundancia y la producción de tricomas aumenta de forma visible, acompañada de los primeros aromas intensos. El consumo de agua y nutrientes se mantiene elevado, reflejando el gran ritmo de desarrollo.
⚡ EC: 1.4 – 1.5
💧 pH: 6.3
🌡️ Agua: 18–22°C
🌫️ Humedad: 45–55%
☀️ Luz: Sol directo de junio
🌡️ Temp. ambiente: 24–32°C
📏 Altura: 100 cm
🔥 Nota: El estiramiento llega a su fin y comienza la verdadera fase de formación de cogollos. Mantener un riego constante y una buena nutrición permitirá aprovechar al máximo el potencial de floración.
Seguimos creciendo fuerte 💪!

Likes
17
Share

@StonedSteve
Follow
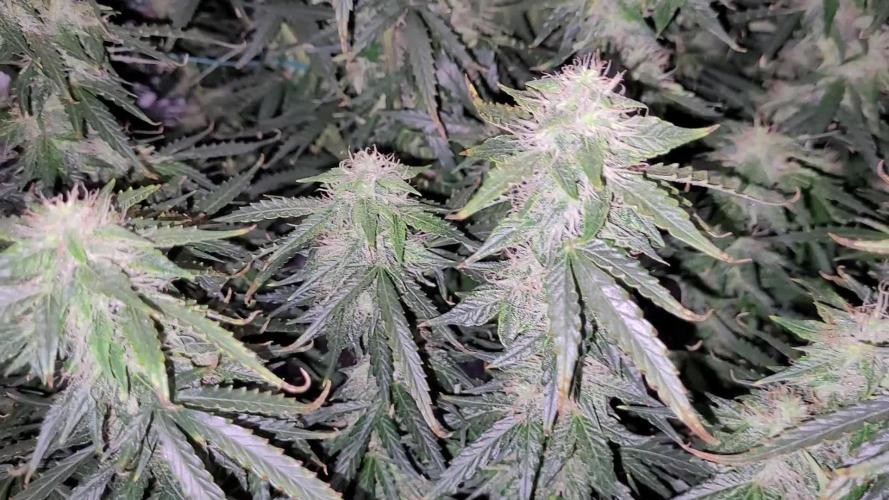
Today I am closing 6th week of blooming and starting 7th week
Day 83
I'm watering with 5 liters and I removed Bud Factor X and added Overdrive👌
Following HombreCZ advice, I reduced all nutrients for 50% except Vitamax. Děkuju😇

Likes
3
Share


@cmstacker01
Follow
aprox 4 weeks to go before chopping time
Going good,buds fattening up and all healthy


Processing
Likes
1
Share


@Teddy01500
Follow
Bonjour à tous, ces derniers jours ce sont bien passé pour mes petit bébés elles grandissent doucement mais sûrement.C’est la première fois que je travail avec cette gamme de produits (je vous est mis des photos des produits 😉) pour l’instant j’en suis satisfait après, il faut voir le résultat final ce qui est moins facile 😂. Mes petit bébés commence leurs 5ème semaine (je me suis trompé d’une semaine 😕 désolé 😉) trop pressé!!! 😂 de mettre de nouvelles photos 😜. Je vous dis à là semaine prochaine vivement 😉 bonne journée à tous. Je vous remercie 😉.


Likes
31
Share


@XperencdGmanXG
Follow
Nice little stretch, did a bit of a defloiation to help with airflow and light penetration but I like to leave as many leaves on the plant as possible because the plant will use those leaves as batteries when it comes to mid to late flower. And its all about the microbes! Just been giving microbe bombs every week, once a week.

Likes
24
Share


@Grnhead
Follow
At about mid-week the canopy was becoming very full so I defoliated to let light hit all of the bud sites. I found an article that mentioned "Schwazzing" and it seems close to how the approach this grow has gone. They got heavy defoliation just before flower and then also a few weeks in.
The broken stem has healed dramatically even though I didn't reconnect it but let it stay split. I put rooting gel in the wound and then duck taped it. Now it looks like its going to seal itself back up within a few more weeks.
The light is intense, 70-75K LUX on the top of the canopy. I have a little room left to raise the top light before I have to start dimming it. Hopefully I can manage to keep them at max 75K LUX without dimming, or may try supercropping depending on how the stretching goes. This week all the side lights are on along with the main light. They all seem to be loving the light and the heat has been manageable.
They are drinking about a half gallon of water a day and TDS started at 1100 and ended at 800 by the end of the week.
* Pineapple Express 1 is the furthest along and I can already tell the smell is going to be amazing, very fruity.
* Pineapple Express 2 is very lush but flowering a notch slower.
* Pineapple Skunk has a concentrated number of buds sites compared to the others, I'm very excited for this one.
Day Temp: 75 degrees F
Night Temp: 65 degrees F


Likes
19
Share


@RFarm21
Follow
Ola growmies!
Comecei o flush dia 17 janeiro, irei rega-la mais uma vez ate à colheita!
Likes
15
Share


@Waveform
Follow
Day 33: What an amazing height and bud gain in just 3 days! Lady #1 is 67 cm tall now, her sister a tad smaller. Both still have a great color, and I dared to cur away just the lowest branches and leaves that do not look like they could gain height in time. Really enjoying this strain so far!
At the end of their day, they are a bit dropping leaves, so clearly no hunger for more light. The impressive growth speed continued on their buds: Tallest lady at 70 cm now.
Their next morning shows growth is still at an impressive 5 cm/day as lady #1 with her leaves erected again stretches now 72, the maximum of my previous growth. Pulled the lights as close as possible to the ceiling and hope they won’t make it much more than 1 m. I activated the Sansi 30 W folded wings LED to give them somewhat of a morning and evening light and to add some more light to their overlapping center branches in the middle of "their" day. Sadly that’s causing some interference to the timelapse videos, but I can’t say they’re perfect if it wouldn’t.
Watching the timelapse video of day 34, I have the feeling the additional light rather irritates them. Maybe the interference is not only visible for electronic eyes. I’ll keep it off next day for comparisons.
Day 35 shows stretch speed has reduced indeed and they seem to be concentrating on leaf and bud growth instead. 75 cm, so we are currently at "only" 3 cm/day. Watered them with a HPE/Bud growth mix again last night, about 1 l each.
Well, forget my words about reduced growth. After they recovered during the night, we are at 77 cm for lady #1.
Which measured at 78 with hanging leaves in their day’s evening. I must have missed a day number – day 36 concludes their 5th week. I gave them another 2 l of fertilised water each and will lave them for the weekend again.
Video shows that growth concentrates now more on leaf and bud development than on gaining height. So I guess my 160 cm tent will be sufficient. For a moment I was worried, but it looks like stretch is over. Anyway, time to rearrange the camera next week. Leaves are running out of focus.

Likes
4
Share


Processing
Likes
6
Share


@ladyjane
Follow
7/18 - Transplanted all three ladies into 3 gallon pots. As I did I sprinkled Oregonism XL (mycorrhizae) to the root ball to assist the roots in adhering happily to the soil. Then I watered with RO water and CalMag.
7/20 - Fed with liquid nutrients
7/22 - Started the brew on Terp Tea Grow. Gave all a light water and a foliar spray of Extreme Serene.
7/24 - Top dressed with Elemental (calcium supplement) and watered with the Terp Tea Grow. Both ladies are looking healthy and strong. They are full and vibrant. Will be flipping to flower at the end of next week!
7/25 - Check out Struggling Jack! She is the biggest one of all three! You would never guess she ever struggled. It's my opinion that the struggle actually made her stronger. Go Jack!


Likes
152
Share


@BioBuds
Follow
How is it growing, my fun(k) loving friends?
***INFO*** For more on my setup, why it was monster cropped, and how I made the canopy, see Germination page and subsequent weeks.
They had 48 hrs of darkness, and the time has come to say goodbye to my friends.
I thanked them again, spend some time with them, and under the sound of Amazonian shaman's harvest and healing songs (will post link), asked for their gifts, and apologized for taking their lives.
I do this while in contact with the plants, touching, smelling them, observing every detail, no thoughts, just in the present moment.
I feel emotional as I do this and remember how they were a companion, a source of distraction in a time of worry, sadness, and loss.
How they already comforted me and kept me company in a time of painful insights about honesty, commitment, and staying true to myself.
I thank them again for their wisdom and gifts, viva Santa Maria, viva Planta Maestra, may the mother of all beings give us healing and protection.
And I proceed with the harvest as I visualize my intentions with every cut.
Branch by bud laden branch is tenderly untangled from the scrog net, taken with a clean-cut and immediately hung upside down in the grow tent, which will now double as a curing and drying room.
A couple more weeks and we will have the final cured and dried weight.
More photos and movies will follow, this is where we are so far!!
Thank you for checking in on our journey, all the love, support, and compliments were a true motivation, a very needed distraction, and guidance for me and for Sunshine.
Big hug, lots of love and take care!
***UPDATE***
The final weigh-in is ready. I hadn't seen them in a week, because of my vacation. The humidifier I set up, had failed. So the grow had dried in 7 days, what I wanted to be 14 at least. Thankfully, its Sativa ancestry shines through, the smoke isn't harsh, the buds a sticky and smelly, no hay smell at all.
We ended up at 246 grams, excluding a shitload of larf and popcorn bud, totaling at 310 grams all in, a first at a gram per watt for me, but for the Zambeza seed competition, I stated we would only weigh the quality bud. Overall I'm very happy!!
Guessed weights in the competition:
- @hashy : 0 grams
- @MrHyde : 198 grams
- @JamMAKEcan : 224 grams
- @TrickOrTrip : 260 grams
- @Greeneysgrow: 312.5 grams
- @Ohey_fu_kyu: 350 grams
- @Puffs4Pipes: 385 grams
- @Hempkid : 605 grams
- @DoDrugs420 : 621 grams
TrickorTrip was closest!! Congratulations!!! I will be contacting you to get the seeds with you!! Thanks for playing to all the others and better luck next time, I will give away some seeds again!!
Summary:
Cost of setup: 850 euro
Cost of nutrients and soil: 125 euro
Cost of seeds: None they were cloned
Cost of power: 150 euros in the power bill
Total cost: 1125,-- for setup and this run.
I smoke for medical reasons and it's used for ritual and healing purposes, never to be sold, as it loses its magical properties.
Should I have to buy Gelato of this quality at the dispensary that I frequent, it would cost me at least € 15,-- per gram.
246 x 15 = 3690 euros. also, 49 car rides of 25 miles there and back, 250 euros in gas saved.
Overall conclusion:
I think we can call this a succes. Made back my investment, my cost per grow and we saved the environment.
Thanks for all the love, tips and support! Couldnt have done this on my first indoor LED grow, without you!!
Wish you were here to smoke a fat one, some good conversation about our hobby and now... I'm hungry.... See you on the next one!! Hugs Bud!!!
PS. Should you be interested in Shamanism or Teacherplants by anything I mentioned. Pls watch the following documentaries or read these books:
- The Last Shaman on Netflix
- Fantastic Funghi on Netflix
- Food of the Gods, by Terrence McKenna
- The Herbal Jedi / Yarrow Willard on Youtube
- The Tao of Physics
- DMT: The Spirit Molecule on Youtube
- The Doors of Perception by Aldous Huxley
- Plants of the Gods by Richard Evans Schultes and Albert Hoffman
- What the bleep do we know - Down the rabbithole (although vague and some theories mentioned here, could not be replicated, like the water by Emoto)
- The Secret on Netflix- if you like enlightenment in bitesize, tellsell format
The link to Santo Daime hinarios for the Santa Maria cura, healing ceremony: https://www.youtube.com/watch?v=kSjNgg_-iD0&t=333s
If you want to learn more about permaculture / homesteading, see the following links:
- Pete Kanaris, Green Dreams TV, visits many permaculture farms in tropical area's, he is great!! https://www.youtube.com/user/GreenDreamsFL
- Supersoil recipe by Learn Organic gardening, take your ADD meds first, dont watch if prone to epilepsy... they like to talk... https://www.youtube.com/watch?v=z9_5iIqpTVA&t=1216s
- Mr Canuck, indoor organic cannabis growing master on Youtube: https://www.youtube.com/channel/UCtU2-cpxx18iQ4BvracrxDQ
- People creating food forests all over the world: https://www.youtube.com/user/happenfilms
Happy travels and enjoy!
Final update: Very happy to announce that this dairy had won the sixth place best diary of August 2021. My prize came in yesterday and I'm very happy!! Thank you Growdiaries!! Thank you Fastbuds!!! Thank you all my grow buddies here for the love and support!!
Hope to see you all, maybe at a future Growdiaries Meet and Greet? Wouldn't that be a lovely idea, per country and a yearly one on a different continent every year? The Growdiaries Conference. Would be a great Hemp growers fair... I'll keep dreaming and light another one... Big hug BioBuds

Processing
Likes
7
Share


@Kushizlez
Follow
Day 42-49
(Day 42) Just watered today but couldn’t go until runoff because I didn’t have enough RO. I forgot to add the probiotic too. Nonetheless, everything is starting to recover from those weird deficiencies and is looking super healthy. Plants are really bushing out now too. I had to top the zkittlez and BBB#3 again as they are just getting too big. Nothing is definitively showing sex yet but I’m seeing clues. Shouldn’t be long now. If I get 4 females or less I will use 10gal pots, 5-7 fem 5gal pots and 8-12 3gal pots.
I need to stop overwatering. Even though it doesn’t look too overwatered, it is much better to water a little bit each day at lights on. This will help keep the humidity down as well as deliver optimal oxygen to the roots speeding up plant growth considerably.
(Day 45) Gave an EM1 spray down today. The beneficial bacteria is said to overpopulate surfaces so powdery mildew and septoria can’t form. Something seems to be really working as I haven’t seen any yet.
(Day 47) I sealed up the tent and am running both dehumidifiers and it’s keeping the RH around a safe 70% night and day which is right on track with VPD. Plants are all looking super healthy. Deficiencies have pretty much all cleared up. Cold nights I’m running 600w and warmer nights I’ll run 400w.
I was asking around Instagram about white ash/good burn and a few different people assured me it has to do with mineral content of the soil. I was told the three best products for clean ash is glacial rock dust/basalt, oyster shell flour and langbeinite. I already have langbeinite so I’ll grab the other amendments today and top dress.
I grabbed the amendments and also got some Destiny Organics dark matter super soil, coco and some beneficial nematodes. Top dressed each amendment except langbeinite and mulched in some coco coir.
(Day 48) My shelf came in today and I think it may be to big for the 4x4 tent. Each square is 12”, not the 11.8” advertised. I could wipe down my flower room and set it up in there which would give my plants a good adjustment to the new lights before I flip. Or I could set it up in the veg tent but that seems like a huge hassle as the need to be moved and flipped soon anyway. I wish they would show sex already so I can toss out the plants I’m not keeping.
For flower I am considering starting over fresh with the new Destiny soil and coco mixed with some amendments. I’m concerned that my current mix might be too hot. I could also dilute it with the Destiny/coco mix. Those little bulb mites that came in with the worm castings are a little concerning as well. Some say they are just beneficial composters aka “worm bin mites” and others are telling me they’re predatory bulb mites which destroy crops like garlic. I’m leaning towards beneficial composters but in another grow I watched them devour a seedling before it sprouted. Gotta check the current roots but the plants aren’t quite ready to be transplanted.
(Day 49) Got everything in the flower tent wiped down and sprayed with alcohol then EM1 few hours later. Got the shelf set up and got all my temp controls set up and running. I put the controllers outside the tent this time and will patch any light leaks. Gave a lite compost tea at 830ppm and a velokelp foliar spray at 6ml/L. This will be the last veg feeding before I transplant into their final containers on the 31st.
BCTG#2 is a confirmed male and I pulled him. No one else is showing definitively. Roots looked super healthy with very few mites but I’m not 100% convinced they’re all clean. I saw a few mites on leaves today too.
Saw a bit of droop after the move but they all look happy just a few hours later.
Took a few clones from some sucker branches on a few of the blackberries.
Likes
26
Share


@KingSalomonsWeed
Follow
Notfallprotokolle treten in Kraft.
Grund?
Gelato 41fast
UNKONTROLLIERTE GEWALT.
Obwohl ich sie einige male sehr zärtlich dazu überredet habe (ok, es knackte einige male) in andere wuchs richtung zu wachsen, nimmt sie ¾ des grow room an platz ein. Und, das ist keine Beschwerde. Sieht von oben fast aus wie ein sea of green (zufall).
Und überall, diese watte Bällchen.
Ich bin entzückt!
Update. Es wird wasser mit Wasser gegossen, welches ich aus einiger Entfernung per Hand aus einem wasserlauf hole.. 😛
Die Phylaxien der Gelato 41 fast sind anders.
Heftig. Sind superdick lang und schnell wieder braun.
Bud Körper bilden sich und sind hart.
Und das überall. Ok tiefer gleich kleiner.
Am 001.009.021 wird sie 71 tage alt.
35 in Blüte.
And, what the phylaxien!
I mean they re unnormal.
Never seen phylaxien growing so massive (i mean pls look at one phylaxie., i think theyre big,) and then as FAST they go brown.
Boah difficult to explain.
I checked the soil. Wet enough.
Looking my Gelato 41 FAST. She is everywhere healthy.
I read this is a monster genetic
But to see, how it grows!
This strain is (so far) different from all the others i made with before.
First its a photo. (accidently because I'm a idiot)
Than 2 weeks untrained growing.
Than not vey lovefull i showed her her new grow direction.
And the smell. Of Gelato 41 fast is..
The smell of Gelato, 41 fast.
Heavy smell on your fingers from everywhere. Steam, sheet,,, buds are becoming sticky.
I mean i smell vanilla schololade.
My Next noise means she smells like an gelateria.
And YES! SHE IS! FAST!
GREAT! WORK(till now).👍🏻 👊
I tried to make some defoliation... You wont see on the photos. Just 3 leaves and 8 little buds somewhere i found.
O8. Oo9. I cut off 2 side branches.
I knewed it before that they will take only energy from the GELATO 41 FAST.
But holy mother earth, she got enough of this.POWER!
And its me a little ankward, because im the only one till now, who got an growdiary of this FABULOS HEAVY SWEET SMELLING STRAIN!
And., the BREEDER SEEDSTOCKER, himself is watching this GROWDIARIE!!!
And holy mother earth... Im so a noob.
First I thought it was business, advertising.
The contact, i mean.
Than, after i joined the original website of SEEDSTOCKERS, and i read what i really bought!
THE PENNY FALLS..
Its the FLAGSHIP.! (
.
So im the advertising?
Oh je oh je. I do my best, but remember, please,
(and because of some little mistakes i did)
.
.
.
OK OK ok ok, big mistakes!
It is not the yield another grower can go for it, what i expect i will harvest.
But HiGHEST Quality!
This is what i expect.
And dont get me wrong,
I build an joint of some fast dried micro buds.
Brought to a friend.
After the third time Jonny goes out(because after one or two breathes he forgotten jolly Rogers). He Realized it. "Hey i hold the joint now all the time (15 min). Why don't you say a word?"
"I knewed it. But i just smiled. Looking about how long it takes till you notice it!"
He thought a few seconds "Longer"…
Both began to laugh.
So the quality i try will be heaven!
DID YOU REMEMBER THE SEED
WHEN I FELL IN LOVE?
SMARAGDGREEN.
10.09
Everday you can see the buds go with more flesh.
And sticky as nothing i had before.
Smelly? Yes. It is!
It seems that i had an Sativa dominant phenotype
Like the leaves form. (and from some fresh harvested i smoked, with 75 % milky trychomes, and the rest clear... 😛 Heavy uplifting, motivated you start to do something! As you start to moving you discover that you re really stoned).
And my 0.36 m² tent is from the GELATO 41 FASTer as i never seen any Cannabis so quick blooming, sticky everywhere.
ABNORMAL! in a great way.
And i think, soo small arent they. Or?

Likes
98
Share


@Natrona
Follow
Sour Jealousy Auto FastBuds 2025 Outside Grow
Week 12 June 15-21 FLOWER 6
Well, it was another rainy week. The Almanac pics show that our month to date rainfall is 3.11 inches and 2/3 of it was in the last week. The expected weather is supposed to be sunny next week. The anticipated sunny days are a mixed blessing. The temperatures for the next 10 days will exceed 90f and with this heat the humidity often exceeds 70-80%. This means the” feels like” temperatures exceed 100F, Checking Sour Jealousy today, I saw some bud rot, I treated her with Arbor fungicide to stop the spread. Fast Buds says 60 days of flower. She went into flower May 18 so it has only been a month and needs an additional 30 days or so. Fingers crossed she can withstand any more fungus spread. I would really hate to lose another plant.
I pulled off 2 caterpillars from her top and side buds. One leaf at the top looks like it was eaten.
Sour Jealousy Auto is a bright sativa dominant powerhouse, packing 29% THC and reaching heights up to 63 inches (150cm). I only grew one seed and it may be an outlier, but my Sour Jealousy is only 24 inches. Based on her short stature, she will not yield anything close to what FastBuds indicated as exceptionally high yields (up to 600g/m2 indoors and more outdoors depending on pot size. She is in a 5 gallon Air pot which is sufficient for autoflowers. They also indicated that odor is strong and herbs like mint, basil, marigold etc will help mask the scent. So far mine has minimal odor. Based on these differences observed so far, I wonder if this seed was correctly labeled? I’m genuinely looking of the effects this strain provides with 29% THC- a creative and uplifting high with energetic and euphoric effects. Despite its Indica-driven genetics the accompanying physical relaxation induces some hunger and sleepiness, but not much sedation. Medical patients hail Sour Jealousy Auto for treating chronic stress, depression, and ADHD.
As aways, thank you all for stopping by, for the likes and most of al growers’ love and support.
Stay green, growers love 💚🌿
💫Natrona💫
Likes
7
Share


@inversi0n
Follow
Hello, readers!
I'm trying to stretch her more. But I noticed at the beginning of the week, that now, she's not that flexible that she was before. It means, preflower begins.
By the end of the week, some stigmas starter to appear. I think, by the next week it will be fully on pre flower or may be starting to real flower.
And i expect her to stretch vertically as well.
Here I have some root photos, they definitely has a lot of room to grow.
I have removed some big fan leaves, but not much. But mostly i was trying to shift them a bit, so the tips of the branches would get more light
Light on 60%
Likes
5
Share
@Timmay_Grows
Follow
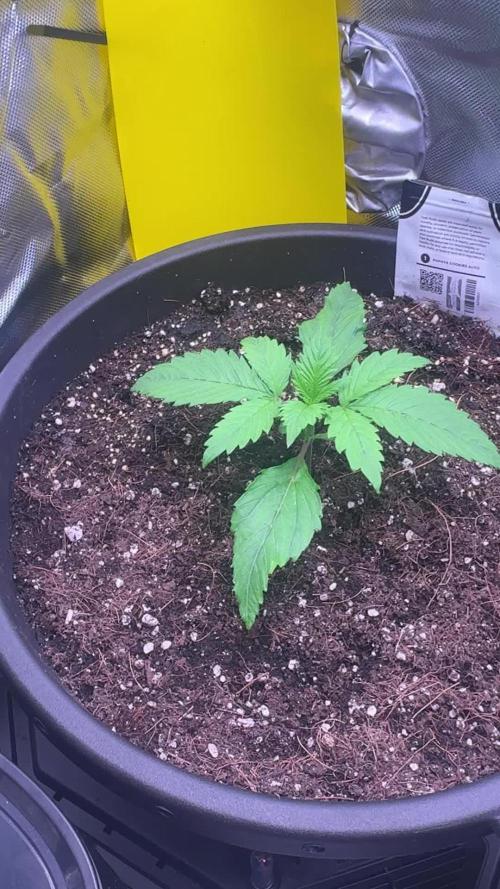
🌱 MASTER GROW CARD
Autoflower Comparative Grow Log
📅 Grow Identification
Field Value
Grow Start 2/23/2026 (Day 0 – seed)
Current Log Entry 3/8/2026
Plant Age Day 14
Plants Papaya Cookies Auto / Forbidden Runtz Auto
Seed Type Feminized Autoflower
Breeder Fast Buds
Genetics Reference (Breeder Data)
Papaya Cookies Auto
Trait Data
Dominance ~60% Sativa
Lifecycle ~8–9 weeks from seed
Height potential 70–120 cm
Indoor yield 450–550 g/m²
THC potential up to ~29%
Forbidden Runtz Auto
Trait Data
Dominance ~65% Indica
Lifecycle ~9 weeks from seed
Height potential 90–130 cm
Indoor yield 450–550 g/m²
THC potential up to ~26%
💡 Lighting System
Parameter Value
Fixture MIGRO 150 Array
Schedule 24/0
Output level 50%
Distance from canopy (not yet recorded)
Likes
6
Share


@Fleetwood
Follow
Wondering how much longer PK1 has before harvest. 80% of her pistils have turned amber.
Exploring mid week shows me I have at least another week...maybe 2


Likes
16
Share

@sanibelisl
Follow
Well it been a week since the move indoors and she is just getting accustomed to the new surroundings. Things took a couple days pause and had no growth for the first few days but she seems to have finally started to fatten up her flowers again. She is drinking about a third less water than before but maybe that will pick up some more as well since her flowers are getting bigger. She is pretty sparse in terms of vegetation so will only remove leaves on a must need basis only. Watered her this morning and she received a low dose of calmag and bloom nutrients ( King Kola) by Emerald Harvest so should see an increase in flower size shortly. Have been increasing the duration of light each night and am currently at 18/6 have been toying with the idea of going to 20/4 and beyond to get the DLI up into flowering requirements. We are stuck at 450 PPFD so I don’t think I can her too many hours of light per day. I will be watering the other two girls later today with a update for them also.
Harvey Wallbanger. Miss Harvey is recovering well. Every day is better than yesterday and the past forty eight hours have been very good with her flowers starting to grow again. Trichomes and terpines have started to show up and she is going to be very sticky and have a pleasant sweet aroma. There are already fan leaves covered in trichomes and we have only just begun the process of flowering. She lost so much during the assault. She was going to be truly special. Maybe she will still be special we will see.
Vanilla Fizz. Ms. Fizz, alive and well. Had us scared for a while as she was slow to respond for a couple of days, no growth after her assault and subsequent relocation took its toll on her but happy to see things have turned around for her and now even doing better than expected. Prayers help. Flowers are growing and she has a certain perkiness to her that is inspiring after all that she’s been through. She is a bushy girl and removed a fair amount of foliage and will need to do some more later on some here some there. Trichomes and terpines arrive and are in abundance for both. Everything is covered in trichomes even fan leaves and smells like my Uncle John’s vanilla French toast and my Aunt Shelly’s Guava jelly, amazing!
*Update Day 68* 91 Grapes
She is doing well, blooming! Her flowers have decided to start growing and swelling in good ole Chem91 fashion, kind of just stacking up upon the flower below, and dense! Orange pistils have arrived and she is going to be pretty showing off an array of colors soon enough. With her being in flower mode and needing some extra energy decided to up the lights to 50 power despite my concerns for that being too high of power. We will see. I can always turn them back down if I see a problem. I hope to see a significant increase in flowering soon!
Vanilla Fizz. Ms. Fizz , we’re going to start calling her Ms. Fuzzy, she is so covered in trichomes! Bushy my goodness I have never had a plant with so much vegetation. I have seriously removed over a hundred leaves already and there will be more many more. But she is amazing in terms of smell, if you have ever smelled distant scent of a guava tree you would have an idea. Throw in just a little skunk and you nail it. She is going to be a sticky bitch to trim when the time comes.
Harvey Wallbanger. Miss Harvey, has the assault behind her now and the continuing rehab has proven to be beneficial. She had such perfect form and even after all the injuries she still shows off her balance. I picture her in a massive hotel lobby in a tropical destination in a corner where the elevators are. She was so perfect. Pinkish orange hairs now accompany her beauty as she displays the deepest of green fan leaves. Trichomes encapsulate the entire flower and she has a very floral scent. She seems to be the furthest along at the time. But we will see.
