
Likes
Comments
Share


@BlaBlaGrower
Follow
Es gab Probleme mit der Osmoseanlage. Ich musste die Lösung mit Wasser aus der Stadtleitung verdünnen, was sich negativ auf die Pflanzen auswirkte. Heute ist alles repariert und ich spüle es mit klarem Wasser ab.

Likes
127
Share


@DutchFarmer
Follow
1 week done!
Really impressed with how strong she is!
Let’s gooo we will keep on pushing forward
Time to start the plagron sauce


Likes
46
Share


@DogDoctorOfficial
Follow
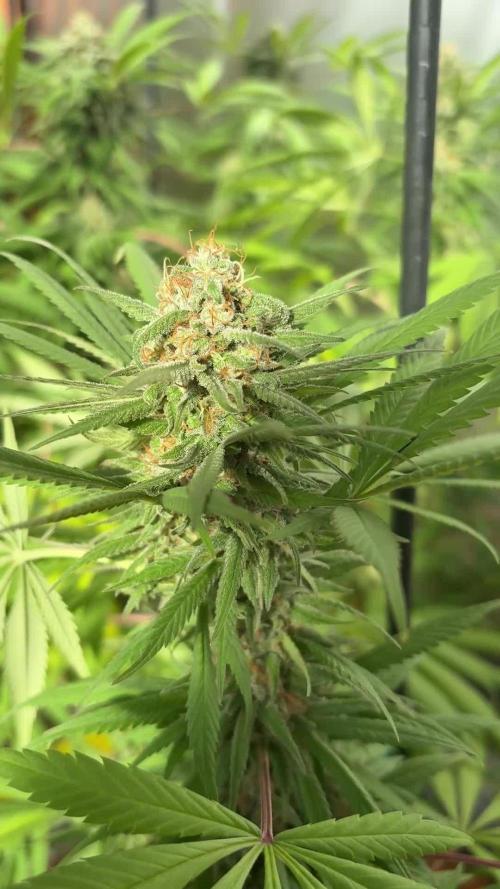
Hello again, green warriors and cannabis aficionados! 🌱✨ We’ve now reached week 5 of flowering in our Runtz Battle, and the excitement is at an all-time high! The plants are deep into their flowering phase, and the results are beginning to show in the form of thick, resin-coated buds. Let’s dive into this week’s progress and explore what’s been happening.
Week 5 Flowering Progress 🌿🌟
The Runtz strains continue to impress as they head into the final stretch of flowering. Here’s what’s been happening:
• Bud Development 🌸:
• The buds have significantly bulked up this week, with trichome production reaching new heights. The plants are covered in a frosty layer of resin, indicating that we’re on track for a potent and flavorful harvest. The F1 strain remains a standout with its compact and dense bud structure, showing off some serious bag appeal already.
• Terpene Profile 🌿✨:
• The aroma in the grow room is intensifying, with the distinct sweet, fruity, and slightly earthy notes of the Runtz strains becoming more pronounced. This rich terpene profile is a hallmark of the Runtz genetics, and it’s a good sign that the final product will be bursting with flavor.
• Environmental Consistency 🌡️:
• We’re keeping the environment steady with a room temperature of 30.3°C, water temperature at 18°C, and humidity at 51%. These conditions are perfect for continuing the flowering process and ensuring the buds develop fully and healthily.
Defoliation Impact 🌿✂️
Last week’s deep defoliation continues to pay off:
• Light Penetration and Bud Growth 🌞🌸:
• The defoliation has allowed more light to reach the lower bud sites, and the impact is clear. These buds are now catching up in size and density, ensuring an even distribution of growth across the entire plant. The plants are responding beautifully, with all buds swelling and maturing at a consistent rate.
• Air Circulation and Health 🌬️:
• The increased airflow has kept the plants healthy, preventing any issues with mold or mildew as the buds become denser. This is crucial in the later stages of flowering when moisture can become a concern.
Nutrient and Care Strategy 🌱💧
Our nutrient and care routine continues to support the plants as they push toward full maturity:
• Watering and Nutrients 💧:
• The Autopots are still providing consistent hydration, and we’re maintaining the Regulator and CaMg Boost in the reservoir. The soil, enriched with organic inputs, is doing an excellent job of supplying all the necessary nutrients. The plants are showing no signs of deficiencies, and their vibrant green color is a testament to their health.
• Lighting and Environmental Control 🌡️:
• The Lumatek Zeus 465 Compact Pro is continuing to deliver powerful, full-spectrum light, which is crucial at this stage for maximizing bud development and resin production.
• The TrolMaster Hydro-X controller is keeping the environment perfectly balanced, ensuring that the plants are stress-free and focused on producing the best buds possible.
The Road Ahead 🌟🌿
As we move into the final weeks of flowering, the anticipation is building. The Runtz strains are looking and smelling incredible, with dense buds covered in sparkling trichomes. The next few weeks will be crucial as the plants finish maturing, and we start preparing for the harvest.
Stay tuned for more updates as we approach the finish line. The end is in sight, and we’re almost ready to reap the rewards of this epic Runtz Battle! 🌟💚
#RuntzBattle #Week5Flower #CannabisCommunity #BudDevelopment #TrichomesOnFleek #GreenMagic #LumatekZeus #TrolMasterHydroX #GrowStrong #StayPositive
Germination method 🌱 @thecannakan
Genetics Runtz F1 @zam.nesia Runtz auto @kannabiaglobal
Nutrition
@aptusholland 🌿
@aptus_world 🌎
@aptus_es 🌍
@aptusbrasil 🌱
@aptus_thailand 🌿
@aptus_portugal 🌳
@aptususa_official 🍀
@aptusplanttechnz 🌺
@aptusplanttechaus 🍃
Ambient controls🎮
@trolmaster.eu @trolmaster.eu.support @trolmaster.support @trolmaster.agro
Soil @promix_growers_eur @promix_cannabis
LED - @lumatekeu
Watering- @autopot_usa @autopot_global
Love and attention- @dogdoctorofficial
#aptus #aptusplanttech #aptusgang #aptusfamily #aptustrueplantscience #inbalancewithnature #trolmaster #trolmastereurope #trolmastersecrets #Autopots #RuntzBattle #KannabiaVsZamnesia #GreenJoy
As always thank you all for stopping by, for the love and for it all , this journey of mine wold just not be the same without you guys, the love and support is very much appreciated and i fell honored and so joyful with you all in my life 🙏
With true love comes happiness 💚🙏 Always believe in your self and always do things expecting nothing and with an open heart , be a giver and the universe will give back to you in ways you could not even imagine so 💚
More info and complete updates from all my adventures can be found ⬆️ link in the profile description ⬆️
Friendly reminder all you see here is pure research and for educational purposes only
💚Growers Love To you All 💚

Processing
Likes
19
Share


@Mission420
Follow
This week things seem to be progressing normally. Although not knowing what to expect, I can't say for sure, but no mishaps so far. I think they have stopped stretching, and are starting to get bigger buds, but that may be wishful thinking.
Watching the time lapse I am noticing that during certain parts of the day, the leaves are drooping still. At first I manually turned on the pump for their nutrients when I saw the leaves starting to sag, which was generally when I got up in the morning, but then watching the video, I decided to start doing it earlier. After watching last weeks video, I decided to set the pump to go on even earlier, and now I think I might do earlier still, or even perhaps set it to run twice a day. Time will tell... literally.. 😃
As you can see, I dropped the amount of Medi One this week, and upped the Bloom formulation with no big change in the results that I can see, but they do look healthy with green leaves and no unusual tips.

Likes
14
Share


@ApothecAries
Follow
I used half the recommended dose of Indo products for each plant through this grow. The monkey juice is half recommended making it every week rather than full dose every two. The sticky bandit was fed with it every week at half dose till later on.
Likes
74
Share


@KrautFabrik
Follow
Day16: nutrients like plan
Day 18: i added 2 secret jardin tled 42w bloom
---------------------------------------------
She seems to stuck because of the heavy deflotation last week, but ok lesson learned 🤷♂️
Maybe someone have some experience with secret jardin tled can can tell me how far i should place them? 😅
Merry Xmas everyone 🎄🍧
Likes
14
Share

@cultivars
Follow
OCTOBER 18th to OCTOBER 24TH
Sunrise: 08:31 | Sunset: 18:50 | Total Daylight: 10:19
Weather over the past week saw several consecutive days of full cloud cover and rainy periods. Greenhouse has held temperatures during the day, and only dropped below 10C once (Day 168). Good periods of sun on Day 167 and 168, with the forecast looking sunny for the next few days. I suspect that will help along the ripening process as the plants process nutrients from the fan leaves during the fade. There hasn't really been any issues with humidity levels, as it has hovered in and around 40% to 45% RH
Purple Romulan isn't as near to ripe as I'd like, with many trichome heads still clear, with only a few cloudy. Not a lot of time left as it is getting quite cold outdoors, and honestly there isn't a lot of sunlight now that we are down to 10 hours.
DAY 162
2L of plain rainwater (cold) applied to each specimen.
DAY 163
n/a
DAY 164
15C in greenhouse in the morning; Cloudy and cool day overall, but greenhouse holding temperatures above 19C and plants are clearly going through senescence.
DAY 165
Steady rain overnight, with armer temperatures; Greenhouse held overnight at 17.5C and 50% RH. Cool, cloudy and rainy day (high of 9C, 97% RH, but greenhouse and the associated equipment performing as designed and holding temperatures at 19.5C with humidity ranging from 40% to 45%.
DAY 166
Cool and rainy overnight (6C intermittent light rain). Greenhouse held to 16.5C and 41% RH. Noticed some droop so provided 1L of plain rainwater (cold) via drip in the afternoon to each specimen and everyone perked up thereafter. Temperatures reached 19C for much of the day, with 43% humidity. Temperatures outdoors were a high of 7C, with 80% humidity (or more) during the day. Remained overcast for much of the day, but there was a couple of periods of increased brightness. Plants are doing well, all fading;
Purple Romulan's long and abundant pistils have only began to wilt to a bright orange colour wholeheartedly over the last 7 days. Flowers are of decent size, have a typical hybrid shape with trichome production that looks to be average. Smells of pine but has a sweetness as an undertone. Trichome heads on calyxes remain mostly clear. When rubbing fingers over sugar leaves, this plant is notably greasy in comparison to any other specimens in the garden.
DAY 167
Overnight low of 2C, greenhouse held at 12.5C and 41% RH. After a cloudy cool morning, the sun broke through and warmed up the greenhouse shortly after the noon hour. Exhaust fan even came on intermittently to reduce temps below 24C. Humidity was ideal all day, in and around 40%.
After noting some droop, applied 1L of plain rainwater (cold) via drip. This may be the last watering of the season. I think it will be possible to decommission the irrigation system for the winter over the coming weekend. I can pull 20L of water for use either for this crop and/or the mother tent.
DAY 168
Greenhouse 9.5C (-2C outside) in the morning with 40% RH. Sunny morning, with greenhouse warming to over 10C by 9:30AM; Exhaust fan kicked in to hold temperatures at 24C just before the noon hour.
Likes
87
Share


@Wicked_Stix
Follow
I did her first water change on day 10 upped the nutrient dose and increased the reservior to 12 gallons. Gave her the first dose of armor si and humic acid. I topped her on day 12 to start 4 main branches. Will most likely top again and start training in about a week depending on how she wants to grow. She is the slowest growing plant so far but I have high hopes for her. The goal is a maximum of 5 weeks veg if they cooperate. They are under 240w qb and a galaxyhydro pulling about 140w for now. Will be adding more qb when I spread the buckets out.

Processing
Likes
2
Share


@Jelemond
Follow
Hello names John this is my first grow.I’m not using any bottled nutes for this grow. Instead using nature’s living auto flower concentrate.

Likes
6
Share


@IQuSX
Follow
Formula 1 Royal Queen presents:
[Medusa];
Orion;
Epsilon;
Titan;
&
One sssecret seed…
Watch them, topman, and see the revolution.
Here goes!
Likes
18
Share


@TheGreenLeopard
Follow
Starting to take shape and smell😂 was able to take a fastbuds down this week to help the ramp into harvest. 😂😂 gréât strains - spring is here - on Twitter now @greenleopard420 - all good. Variation if feeding in the tent. Those little fleas still there , nematodes didn’t work so disappointed there.


Likes
88
Share


@Lady_NugWitch
Follow
Getting ready to chop her down!!!! Yay! No issues other than she would not stop growing!! Lol 😂


Likes
10
Share


@NOLOGIK
Follow
21/4
beautiful indeed, much more! smell good hard buds and full of glue, I was hoping for a more red color !, but that's fine anyway! I think 2 weeks to the maximum then I cut everything!
Processing
Likes
13
Share


@Silverback_Guerilla
Follow
I'm wanting to replace all my miscellaneous lights with another quantum bar rig before my Fall grow this year.
Anybody want to buy some gently used lighting gear this summer???😁😎
👉 2 x 100w Cree CXB3590 (3500k) with pin heatsinks - 3 grows usage
👉 1 x 100w Citizen Clu048 COB (3500k) with pin heatsink - 3 grows usage
👉 1 x 120w DIY quantum board (3000k) 256 x LM301b's - no heatsink - used for 2 grows
👉 1 x 60w Bridgelux COB (3500k) - Par38 style - used for 1 day (a back-up bulb)
👉 1 x Morsen 2000w (367w actual) blurple with a bank of 1/6 of the 200 LEDs not working - used 3 grows
👉 1 x Morsen 2000w (367w actual) blurple with only my current grow in use (the replacement)
👉 1 x HeroLight 1500w (285w actual) 5 x COB full spectrum (pinkish-white) - 2 veg stage uses
👉 4 x 36w Par38 type deep red (660nm) bulbs - 3 grows usage
👉 2 x 25w 225 LED panels (660nm) - 3 grows usage
👉 2 x 25w 225 LED panels (440nm) 4 veg stage uses
👉 2 x 25w 225 LED panels (440nm)
👉 1 x 50w 225 LED panel (6500k+440nm)
👉 1 x 20w Par38 style Cree COB (3000k) - (more like a 40w) - used for a week
👉 1 x 15w Sansi blurple Par38 type bulb - used 1 day only
👉 1 x 40w Sansi 4000k daylight Par38 type bulb - used during germination only
👉 4 x 12w MiracleLED red spectrum (4000k daylight + 700nm red) regular light bulb - used during flowering in 2 grows
Just hit me up in chat if you are interested in anything-
============================================
SUNDAY 3/31:
I did a little more tweaking on the timers and ventilation. I foliar fed her a few times and rotated her.
MONDAY 4/1:
I foliar fed her a few times and spun her around, then tweaked the timers a bit more...fingers crossed..
TUESDAY 4/2:
I fed her about 1/2 gallon of all the good stuff, and started her on Open Sesame and Tiger Bloom. Increased Terpinator, Bud Candy, and Calimagic, and decreased Grow Big. She's got at least 10 good bud sites and I never even FIM'd her.👍
MONDAY:
I spun her around and foliar fed her a few times
TUESDAY:
I fed her about 3/4 gallon and started her on Open Sesame and Tiger Bloom. Foliar fed a few times and tweaked the timers again..
WEDNESDAY:
I foliar fed a few times and rotated her, then took some photos. She's starting to stretch now.👍
THURSDAY:
I foliar fed her a few times and rotated her.
FRIDAY:
I watered her with about a half-gallon including boomerang, bud candy, terpinator, kelp me kelp you, calimagic, and armor si.
I foliar fed her several times and rotated her 180 degrees.


Likes
53
Share


@xbrico
Follow
D64/FD36 - Not much to really talk about this week. Things still ticking along. Cookies are baking nicely! 😋 SCP in the same tent on the other hand, bit of a slow goer!!! Defs going forward, only 1 strain per res and I think "Cookies" based breeds will be it for me as they're so easy worked with.
RAM Oscillating Fans...again, barely 10 days running and it has died!!! WTF! Hydro place will be willing to change again but its a joke, the batch is useless!!! Not the Hydro Shops fault though! They're bending over backwards as I do a good bit of business with them! :)
Apart from that, dropped my EC by 0.2 this week (Pulled back on the base and bloom by 10-15%) just because they're drinking but not taking on food at any big rate - rather not poison the roots with a rising EC when they have a wee swallie to themselves!!! Changed the CalMag to Biobizz calmag as no nitrogen in it (it is a lot dirtier in a tank though which is the down side!!!). Apart from that, no real big changes.
Happy Growing all!!! 💪
Likes
77
Share


@Ukfarmer420
Follow
Light = bloomplus bp2500 250watt actuall draw.
Exhaust is a ac infinity 6inch with digital controller
Inkbird humidity controller with a ram 5l humidifier. Veg only!
Soil= biobizz light mix
Nutes= biobizz using the 10 week schedule at half dose this run.
Heaven =2ml avti vera=2ml
Topmax =1ml bloom = 1 calmag=2ml
Grow=1ml
All nutes mixed to 1l of water
Ph= 6.4
Room humidity is 60%
Day Temp is 25°c
So entering week 3 and the girls are growing fast, gelatocake are putting out pistils to show there sex.
The sherbert mimosa are still growing strong and I will bend them and tie them down today.
Happy growing guys 👌💪💚

Likes
4
Share


@Andres
Follow
I don't know what happened to her ... it's my first time growing up like this. We will see what happens in the future.