
Likes
Comments
Share


@Natrona
Follow
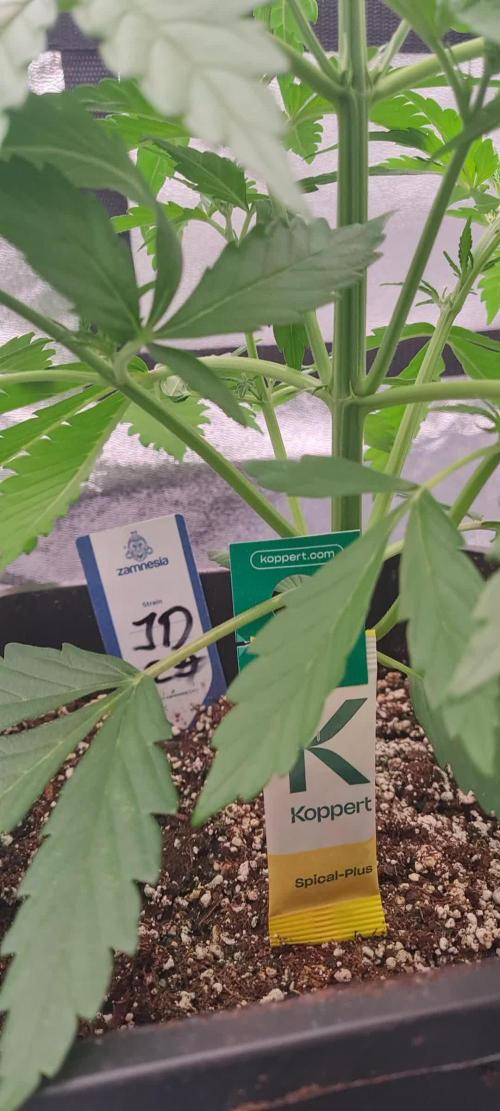
SUNSET SHERBET
Sponsored by **Zamnesia **
11/24-30 week 12
Welcome to week 12 of my Sunset Sherbet journey sponsored by Zamnesia. This is the last look for Sunset Sherbet before chop. We are experiencing a very cold snap with nights in the 20f-30f and days only in the 40f. I decided to take advantage of the cold and move her from the tent and put her in the garage in hopes of bringing out some colors. I’m only giving water phd’ to 6.6. Water temp is in the low 50s, light is filtered thru the window. All her trichomes look milky so next weekend she will be chopped.
Your likes and comments are appreciated. Thanks for stopping by.
Growers love 💚🌿
💫Natrona💫


Likes
20
Share


@MrPott
Follow
Switched to 18 hours light schedule now and she seems to be loving it so far. The lemon balms are keeping the soil nice and moist.

Likes
13
Share


@HIAZ_urbanbudfarmer
Follow
Time for flower. Cleaned my flowering tent & equipment & transferred the girls from veg tent.
Developed really nice structure on these plants.
Use the promo code GROWEED for a 15% discount on any Fast Buds purchase!


Likes
6
Share


Processing
Likes
27
Share


@MissFlowerPower420
Follow
Added some more bio bizz soil n mixed in a bit worm humus, she's happily plodding bless her.
Nice colour green ,
Lil tear on leaf not sure what caused it but it's not affected her .
Happy growing n peace to all you fine herbalists 🕊️🕊️🕊️


Likes
22
Share


@PhotonMan
Follow
04/02 500ml of water each pot, PH 5.82, nutrients as described into schedule
04/03 --
04/04 --
04/05 --
04/06 500ml of water, PH 5.92, nutrients as described into schedule
04/07 --
04/08 250ml of pure water each pot, PH 5.8. I've also defoliated #3 and removed dead leaves from #1 and #2
Likes
120
Share


@DogDoctorOfficial
Follow
It's time for an exciting update on my incredible Lego Ninja Tropical Tangie Run. We've embarked on week one of the veg stage, and let me tell you, this little beauty is growing at a pace that would make any ninja proud!
Picture this: a cute, green sprout emerging from the soil, guarded by not one, but two fierce Lego ninjas. These miniature guardians watch over her with unwavering devotion, ensuring she grows strong and mighty.
Now, let's talk about the secret behind her vigor: the magical touch of Aptus Holland nutrients. I'm giving her the VIP treatment with a combination of Regulator, All-in-One Liquid, Camg, and Start Booster. These nutrients provide the perfect balance of nourishment, empowering my Tropical Tangie to reach her full potential. She's like a superhero in training, fueled by the nutrient arsenal of the gardening gods.
But let's not forget about the dance of light that illuminates her journey. Currently rocking a PPFD of 350 (photosynthetic photon flux density), she's bathing in just the right amount of light energy. This ensures her leaves soak up every photon with delight, powering her growth and vitality. It's like a ninja training camp for photosynthesis, with each photon whispering, 'Bring it on, we're here to help you thrive!'
As for the environment, the temperature stands at a cozy 27 degrees Celsius, creating a nurturing atmosphere for our tropical superstar. And with a relative humidity of 60%, she's surrounded by the perfect balance of moisture and freshness. It's like a tropical vacation for her, where she can stretch her limbs and enjoy the ideal climate.
Now, my fellow gardening enthusiasts, let's take a moment to appreciate the sheer joy of this situation. Imagine a Lego Ninja Tropical Tangie Run, growing happily with Aptus nutrients, basking in the perfect PPFD, and thriving in a cozy environment. It's a true celebration of the wonders of cannabis cultivation.
Before we wrap up, let's give a shoutout to the master breeders at Dutch Passion for bestowing upon us the tropical delight that is the Tangie strain. Their expertise and dedication have blessed us with a plant that embodies the spirit of adventure and flavor.
In conclusion, my friends, this Lego Ninja Tropical Tangie Run is off to an incredible start. With each passing day, she grows stronger, guided by her ninja guardians and fueled by the power of Aptus nutrients. Let's embrace the journey, nurture our plants with love, and remember the joy that comes from cultivating life.
Wishing you all happy gardening, ninja-style! And a special shoutout @DutchPassion_Official for their amazing contributions to the cannabis world, for providing us with amazing seeds , for the amazing genetics and for it all, much respect <3 <3 <3
Oh i will try my best to do at least a couple photos a day during the all grow that and i will also try and do a complete time lapse from day one to harvest, lets see how this Lego Ninja Tropical Tangie goes hehe , fingers crossed, i have faith she will not disappoint us <3 <3 <3
As always thank you all for stopping by, for the love and for it all , this journey of mine wold just not be the same without you guys, the love and support is very much appreciated and i fell honored and blessed with you all in my life<3 <3 <3
#aptus #aptusplanttech #aptusgang #aptusfamily #aptustrueplantscience #inbalancewithnature #trueplantscience #dutchpassion #dogdoctorofficial #legoninjago #growerslove
With true love comes happiness <3 <3 <3 Always believe in your self and always do things expecting nothing and with an open heart , be a giver and the universe will give back to you in ways you could not even imagine so <3 <3 <3
Friendly reminder all you see here is pure research and for educational purposes only
<3 <3 <3 Growers Love To you All <3 <3 <3

Likes
80
Share


@Hawkbo
Follow
Video was taken 2 days ago right before a feed, today they are all praying to the lights and look good.

Processing
Likes
1
Share


@Lifted
Follow
Week 8 ,not much has changed..Trying to get more height still and haven't used any nutrients. Would raising my light give my plant more height?


Likes
9
Share
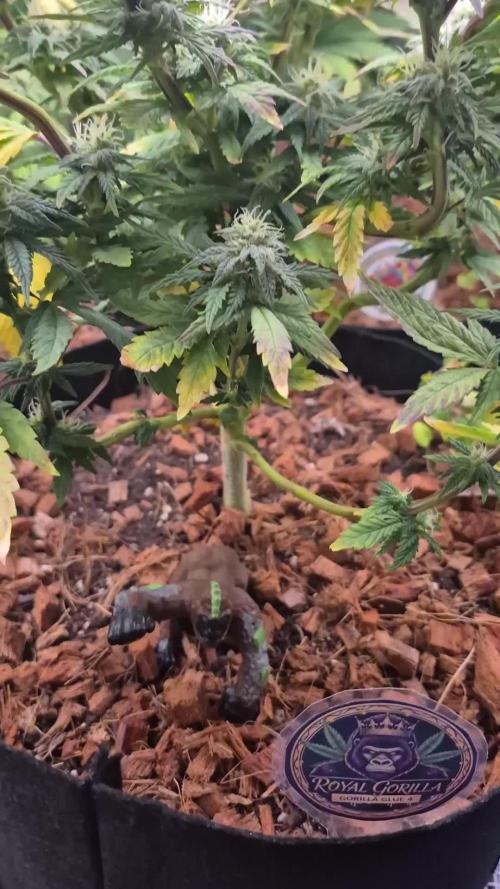

@3rnest
Follow
Die Pflanzen kommen jetzt in die 5. Blütenwoche.
Der Gorilla wird schon schön Harzig und ich bekomme schon Appetit auf die bevorstehenden Ernte 🤤
Auch der Duft im Zelt ist stärker geworden und die Filter haben gut was zu tun.


Likes
8
Share


@TechDCo
Follow
04/03/2026
Switched to flower week 10 of vegetation!
Now we're off to the races! Finally!
....
05/03/2026
Supercropped some colas and tuck some under the net!
Table-Top Canopy!
....
06/03/2026
Added 5L of Sensi Bloom 4ml/L + 20ml of Hydrosol liquid Feed! Suppercropped another 2 colas.
08/03/2026
#Back to The Future - DC Seeds: is already showing signs of pre-flowers it's only been 4 days since the switch over.
I defolled a little and tucked the colas under 5h3 netting as she stretches.
Bubblegum Femaleseeds
No sign of flowering yet and to be honest she ain't ready!
08/03/2026
Midday - Secondary Scrog Net Added!
Removed training wires.
09/03/2026
Defolled and tucked!
10/03/2026
Big defoll
11/03/2026
Likes
6
Share

@Hidden
Follow
During the tenth and final week of the flowering stage, the plants exhibited excellent development in both overall size and bud density. Although a reddish pigmentation was initially expected, the calyxes developed dark, almost black tones, resulting in a visually striking appearance. The RHC#1 phenotype displayed a greener foliage, with leaves beginning to show subtle reddish hues at the tips, providing an appealing contrast.
The dominant aroma profile combines strong cheese-like notes with sweet, fruity undertones, which are expected to intensify during the curing process. Irrigation was carried out only during the first three days of the week, using water adjusted to a pH of 6.3. The plants were then kept in darkness for the final two days to promote the final maturation of the trichomes.
At present, the flowers are undergoing a controlled drying phase, with stable humidity and temperature parameters. The cultivation process was completed without any significant issues, and the overall results are highly satisfactory, reflecting a successful execution of the growth cycle.

Likes
1
Share


@Dabking
Follow
My favorite strain I've grown from Divine Seeds thus far.
I chopped the plant on day 97 from seed .
She produced 67 grams (2.39 ounces) of very dense nugs.
The smell is incredibly pungent. She is SUPER sticky.
Currently in grove bags curing. I'll update on the terps and such once I do a smoke report in a few weeks.

Likes
30
Share


@Cremo
Follow
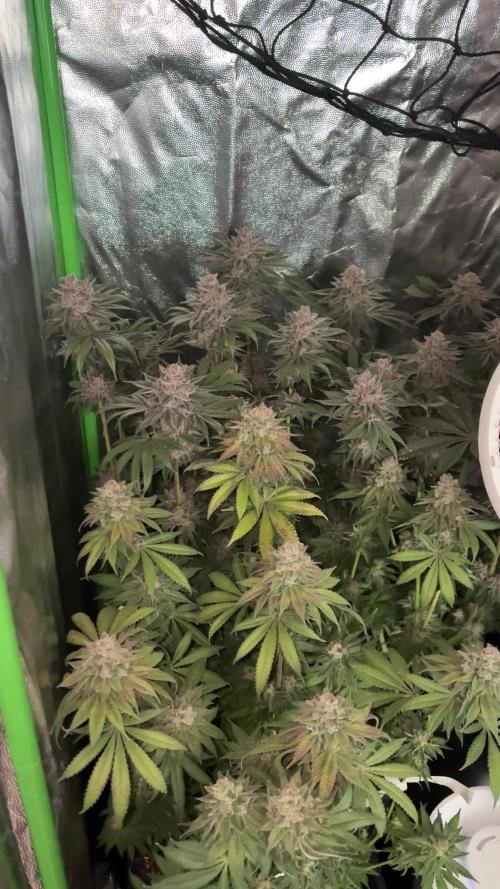
Sweet mother of god! What a beautiful plant!
Now I finally know what it means to grow US genetics. Sherbinskis in collab with Sensi Seeds has made some uniquely beautiful plant. She's dark, almost black, she's extremely good looking, and frankly I didn't expect the plant to look as good as the advertisement photographs but here she is! As beautiful as it can get! I've pushed my photography skills again and god damn, it was worth it. I don't know if any other plant has been this photogenic!
The yield is great, as expected from a extra longer veg period. The smell is off the hooks!
Please, have a closer look at all the photographs, there are soooooo many gems that should be able to win dozens of contest IN MY OPINION XD
PS: Hopefully I'll grab your attention with these bomb ass macro shots!!!!! I love me some great Trichome worlds, and this is a special one!
Cheers
XOXO
Cremo
Likes
13
Share


@Farmerskr
Follow
Así terminaron la cuarta semana! 🙏
Estas 🦍🍌 quieren la flora pero ya!
Se ven maravillosas, hambrientas a mas no poder… Se van a flora con 30 días!
Gorilla Banana - BSF Seeds
Saludos 🖤🙏💚


