The Grow Awards 2026 🏆 


Likes
Comments
Share
@Zuppler
Follow
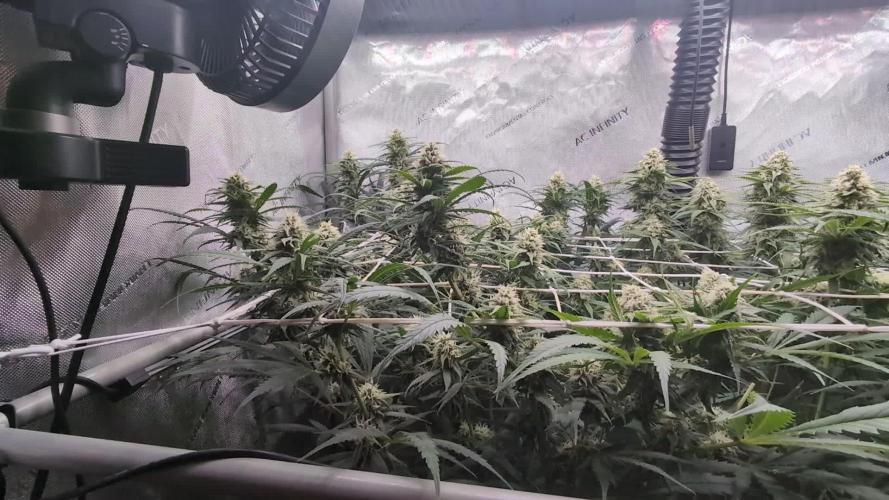
Vegetation Phase - Week 4
The Donutz ladies are cruising through Week 4 in style, with no major changes to their routine. Simplicity is the key: just consistent care, reverse osmosis water, and keeping the vibes steady in the tent. Growth is strong and steady, with no signs of stress or issues.
Updates & Maintenance:
Watering: Still exclusively using RO water. No overwatering, just light and consistent hydration as needed.
Lollipopping: The plants got a little cleanup this week. Lower growth was trimmed back again, keeping the stems neat and focusing energy on the upper canopy. This helps maintain that signature Sea of Green look and primes the plants for fat main colas later.
Observations:
The plants are uniform, healthy, and stacking nicely. Each one is starting to show its individual character, but they’re all working toward that tight SOG canopy.
Marienkäfer buddy is still around, keeping the ecosystem in balance. No pest issues, no drama.
Next Steps:
It’s all about staying steady and letting the Donutz do their thing. The lollipopping ensures the plants are focused on upward growth, and the stable environment in the tent is creating the perfect conditions for success. Week 5 is around the corner, and everything’s looking set for these plants to keep stacking up!

Likes
3
Share
@carlitoshaze44
Follow
Día 6 de diciembre ,tenemos una amanecida de gran niebla que se mantuvo en la mañana con ello una alta temperatura en la noche del cultivo amaneciendo este a 90% de humedad
Después del encendido de la luminaria y colocar dos pequeños humificadores de usar y tirar..en dos horas ,la humedad se mantiene bien.
55%
En el día de antes de ayer se le aplicó un buen riego.
Día 7
Humedad en el cultivo de un 60%
Hoy le e metido otro riego con todos sus nutrientes de vegetación y metiéndole un poco de floración
La EC 1100
El ph 6
Un ventilador dejó de ser oscilante para quedarse fijo.. hahaha meteré otro en unos días más grande y oscilante .

Likes
170
Share
@nonick123
Follow
Día 54 (10/03) Riego 1,25 Litro H20 + Wholly Base 2,5 ml/l + Solid Green 2 ml/l + Early Flower 1,25 ml/l de Gen1:11
TDS 1033 PPMs - pH 6,51
Día 55 (11/03) Defoliation time!
Con la increíble ayuda de @miyaguiokpolilla, @dogdoctorofficial y @growwithflow420 hice la defoliación recomendada exactamente después de 21 días cambiada a 12/12
Consejos de defoliación
- Elimine menos del 20% de las hojas de abanico y solo las hojas de abanico
- Retirar el tercio inferior de la planta, incluidas las ramitas.
- Retirar las hojas en forma de abanico dirigidas hacia el interior de la planta.
- Retire las hojas de abanico que dan sombra a los futuros cogollos.
Día 56 (12/03) Esperando algo de estrés tras la defoliación... Han crecido 2 centímetros en 24 horas 😍🚀
Día 57 (13/03) Riego 1,25 Litro H20 + Wholly Base 2,5 ml/l + Solid Green 2 ml/l + Early Flower 1,25 ml/l de Gen1:11
TDS 1043 PPMs - pH 7,0
Las plantas muestras una ligera deficiencia de CalMag. Voy a subir el pH a 7.0 en este riego para mejorar la biodisponibilidad
Día 58 (14/03) Siguen con su crecimientos, los cogollos formándose y las hojas de azúcar empezando a llenarse de resina
Parece que la corrección de la deficiencia de CalMag ha sido muy efectiva! No hay más manchas y las plantas no paran!
Día 59 (15/03) Como mañana me voy a Spannabis 😍 voy a adelantar 1 día el riego reduciéndolo a 1 litro
Riego 1 Litro H20 + Wholly Base 2,5 ml/l + Solid Green 2 ml/l + Early Flower 1,25 ml/l de Gen1:11
TDS 1080 PPMs - pH 6,57
Día 60 (16/03) Spannabis time! 🚀
Día 61 (17/03) Spannabis time! 🚀
💦Nutrients by Gen1:11 - www.genoneeleven.com
🌱Substrate PRO-MIX HP BACILLUS + MYCORRHIZAE - www.pthorticulture.com/en/products/pro-mix-hp-biostimulant-plus-mycorrhizae

Likes
59
Share
@TheCannaProphet
Follow
~ AirCube Active Oxygen Ebb/Flow System sponsored by GrowAce, featuring Tropicana Cookies by FastBuds ~
Well guy's and gal's here we go again on another exciting Autoflower run together! This time will be different as I will be doing a 'Hydroponic' run utilizing the AirCube Active Oxygen Ebb/Flow System by GrowAce, who were kind enough to sponsor me for this run, so it should be interesting to see what results I get and have some fun along the way!
•Let me first tell you about this 6 Pot Ebb/Flow system from GrowAce:
"The AirCube system is the one and only Ebb & Flow grow system on the market that combines the benefits of air pruning with a fully automated Ebb+Flow system! With the AirCube's proprietary fabric pot in bucket design, this system is guaranteed to outgrow any other Ebb + Flow system on the market. The results speak for themselves- grow MASSIVE roots that result in MASSIVE fruits!
Air Pruning- Air Pruning only happens with fabric pots. As the roots reach the fabric walls of the pot, they penetrate and grow into the breathable fabric. Once penetrated, the roots are exposed to air, which causes the tips of the root to dehydrate and naturally prune themselves. This natural pruning process forces the roots to grow tons of lateral fibrous feeder roots. This results in a plant that utilizes the entire root zone and fills the entire pot with tons of roots. These fibrous feeder roots are incredibly effective in uptaking water and nutrients, resulting in a plant that grows healthier and more vigorously!
Oxygen Benefits- Without oxygen, nutrient absorption cannot occur. On a molecular level, oxygen is needed to transmit nutrients across the cell walls and into the roots of a plant. With the AirCube's proprietary bottom lifted draining design, the system actively draws all of the water out of the bucket pulls vital oxygen into the root zone.
Maximum Versatility with Any Grow Medium: The AirCube System is the only system on the market that allows you to use any growing medium you like. Use coco coir, soil, peat moss, perlite, vermiculite, hydroton, rockwool or any other medium you wish! This system is the most versatile Ebb and Flow bucket system in today's hydroponics industry.
Temperature Control- with the fabric pots constructed with highly porous polypropylene fabric, heat dissipates easily and effectively. Unlike standard plastic pots, heat isn't trapped in the root zone. Heat in standard plastic containers can reach temperatures of up to 125 degrees. When this type of heat is trapped and unable to escape, it can damage your plant's health and limit the potential of your harvest. Growing in the AirCube System, plant roots grow cooler, healthier, and more vigorous.
Largest Pots in its Class- this system features 5 Gallon grow buckets, the largest pot size of any other ebb and flow hydroponic system in the market.
Modular and Expandable- start with 6 grow buckets and expand up to 36 grow buckets with the optional 105 gallons PopTank reservoir!"
For my medium and nutrients I decided to also switch things up from my regular Organic runs, going with Plagron Nutrients and Root Royale 70/30 Coco/Perlite. When filling the fabric pots with medium, I first added just under a gallon of horticulture perlite from Nor-Cal as a base layer to ensure good drainage and then filled the remainder with the Root Royale.
•Now for the outstanding, award winning strain from my friends at FastBuds... Tropicana Cookies Auto:
I'll be running Tropicana Cookies Autoflower which is a 60/40 Indica/Sativa Hybrid. "Tropicana Cookies Auto is the perfect variety for growers of all levels, especially beginners as this strain performs very well outdoors and indoors, and can produce up to 500 gr/m2 in 56-63 days without needing extra maintenance. Reaching up to 110 cm, this strain grows fairly tall with medium-sized branching, showing its mixed heritage. Definitely the right choice for those with a high tolerance looking to get their hands on the strongest autoflowers out there. You can expect an extremely powerful and long-lasting high that’ll boost your mood and give you that extra push you need to start your days on the right foot. This variety offers the whole range of citrus and woody flavors with a strong candy-sweet background that will keep you coming back for more and more."*
*References: GrowAce.com, 2fast4buds.com
______________________________________________________________________________________________________________________________________________________________________________________________________________________________________________________________________________________________________________________________________
The Setup:
• AC Infinity 4x4 tent
•AC Infinity Cloudline T6 Exhaust Fan w/ Controller 67
•HLG 650R w/UVA Bar *** For some reason GD does NOT have a listing for the USA version of the 650R so I selected the closest match to it.
•AirCube Active Oxygen Ebb/Flow 6 pot System
•DL Wholesale Root Royale Coco Lite 70/30 coco/perlite
•TrolMaster Hydro-X Controller for light
•AutoPilot APC8200 co2 controller fed by a 50# tank
•16" Hurricane oscillating fan and 8" floor fan
•Tent cooling via filtered outside air delivered by AC Infinity Cloudline T6 fan
•BlueLab instruments: PH Pen and Truncheon Nutrient Meter
______________________________________________________________________________________________________________________________________________________________________________________________________________________________________________________________________________________________________________________________________
Weekly Updates:
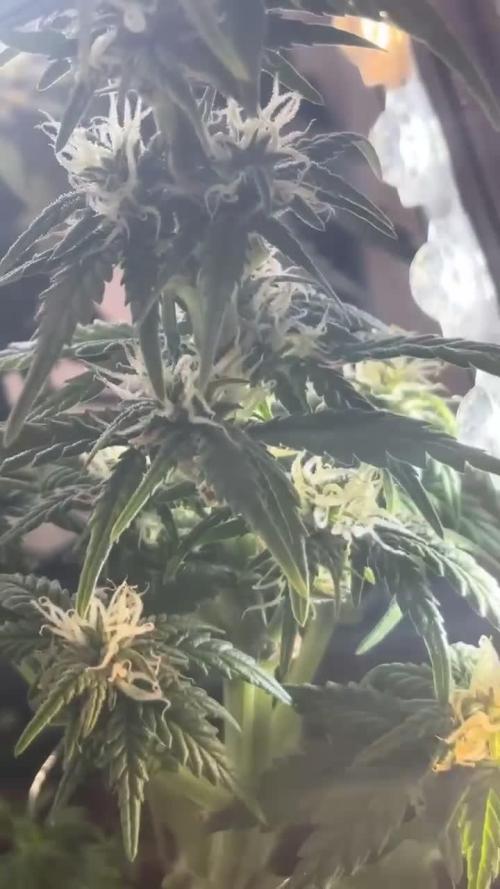
12/3- Well Fam, here we go into the 6th and final week of flower for these absolutely gorgeous Tropicana Cookies autoflowers from my friends at FastBuds and they are packed-n-stacked! I have been checking them every other day now and this is the week they'll be 'going dark' before I chop and hang them to dry.
12/5- I'm continuing to flush all three with 2g of straight well water with NPK Yucca Extract added, which I then ph to 6.5 @ 68℉, twice daily for a total of 4g each day. The two purple pheno's are just breathtaking in looks and their aroma's! The #2 plant is a beautiful cultivar as well, just not purple, with several huge cola's having formed due to her being topped!
12/7- Today at 'lights out' I placed all three Tropicana Cookies in the dark for 72hrs. I moved them to a dedicated room that is totally dark and which I can keep control of the temperature, humidity and air circulation (same room I use for drying). For the 72hr dark period I keep the temp's between 60-65℉ at a RH of 40-45% with decent air circulation.
12/11- Today, all three of the FastBuds Tropicana Cookies were released from 'Dark Jail'. I actually let them go an additional day, for a total of 96hrs in the dark, and from the looks of them it didn't hurt them one bit! All three look absolutely fantastic and the aroma coming off of them is just incredible! 🤪🔥
Every plant is heavily frosted up and all have tightly stacked, dense flowers.
After chopping, I'm going to hang each of them whole to try to extend their drying time as much as possible. My dedicated 'Drying Room' has no outside light and is maintained at 58-60℉ with a RH of 50-60%. I use a de-humidifier, humidifier and two fans in the room. One fan is for air circulation, the other brings in cold outside air and the humidifier/de-humidifier handle the RH. I'm shooting for a 10-12 day dry, but that can always change because we all know 'shit happens'! 😁
My next diary entry will be after these fine ladies are done drying, get trimmed up, weighed and jarred. I hope to see you at the Harvest Report... this should be a goodie!😎🙏💚
💚 Thank you for checking out my passion in life! Please visit as often as you wish and I hope you enjoy this journey as much as I know I will! Grow what you love, Love what you grow!💚


Processing
Likes
9
Share
@russrahl
Follow
Placed seeds in water for the night and the started sprouting in the glass before morning, very strong seeds! Put them directly in rock wool cubes in RDWC buckets and the we’re up and out the next day. Got the 1000w MH HID turned down to 600w and moving on a light rail about 2ft above seedlings.


Likes
6
Share
@yggy-420
Follow
Only water filled up again. 💦
Due to the rather humid living soul substrates, a few fungus gnats

Likes
13
Share
@Happydays58
Follow
05/31 -Day 64
~650 PAR across the canopy. A & B continuing to stack.
C & D’s pistols are starting to change colors along with some swelling.
06/03 - DAY 67
(C) top nugs are feeling tight and hard. Still assuming another 2 weeks till chop.
(D) Foxtails coming out everywhere but not too extreme. Possibly another 2 weeks.
(A) & (B) slowly progressing still.

Likes
15
Share
@blazin_skywalker
Follow
I guess I can't put it off any longer.... This plant officially needs some yoyos. She can no longer hold herself up, and I have too many colas leaning against the wall.
These buds are exquisite! The contrast of the trichomes against the purple bud is stunning! I want to make it my mission to grow all the purple FastBuds strains! They're just breathtaking!
The smell in this tent is phenomenal. If only I could upload the smell! 🍇🍇🍇
Likes
24
Share
@GrowGuy97
Follow
I am honestly blown away with how amazing all 3 plants done! I didn’t really have any deficiencies or issues with any of them the entire grow & it really shows in the quality & weight these ladies put off! Bud smells almost like licorice & has a very sweet taste when smoking! If you havnt already make sure to go check out New420Guyseeds, he has extremely fast shipping, great prices and quality genetics! Thanks for following & happy growing friends!🙏🏼✌️🏼🌱

Likes
63
Share
@MrHightimes
Follow
The beast plant is yellowing a bit. i think its either because it got to big or its getting heat stress. a little curious, but nothing to do but truck on and see how things go. all the other plants seem to be very happy and doing things the Mephisto way! Will update as week continues!
☺️☺️☺️Don't judge my video to much. its hard to make these things!☺️☺️☺️
>>>>>https://viparspectra.eu/discount/MrHighitmes<<<<<

Likes
9
Share
@Northern_Ent
Follow
June 28: Sunday Punch EV continues to impress with its rapid growth. I love the late veg stage where plants grow more than an inch per day.
June 30: two inches in two days.
July 2: hot today at about 33C.

Likes
70
Share
@Insaniac_0
Follow
All feeds with nutes use either a whole ratio or combination of "Veg Mix" and "Bloom Mix"concentrates DILUTED in water until a total ppm of add in is reached using a (Total Dissolved Solids)TDS Meter measured in PPM (parts per million). The "Veg Mix" concentrate will eventually be added in smaller ratios and "Bloom Mix" concentrate what will eventually replace the "Veg Mix" concentrate entirely with the ppm and ratios listed when I feed. Veg mix recipe is on week 3. Bloom Mix recipe is on week 5.
Day 28
Just a quick update for this morning since I had to move the ties a little. LST, I now have them above the 3rd node branches. Stats are normal and the growth tips are turning upward now.
Stats 73F/ 63% RH /IL Vent at 33% - Lights also same as before 345ppfd highest, 330 center, and 315 at lowest. No need for adjustment.
She seems to be taking the training well.
Day 29
Water day - checked last night and decided it was time again - Water by weight again so no runoff to measure at about 4 cups. (4 days since last feed by weight)
13lbs even par is 15lbs 4oz so I prepared 2lbs 4oz of water.
Tested my meter and discovered it needed calibration (the temp is off and cant be calibrated - so I used a trusty meat thermometer.
started with 4ppm and added 300ppm of epsom and vegmix ph balanced to 6.34 at 69.8F - then splashed with H2O2. Poured around roots and splashed the stem base - sprayed some on the leaves and use the whole amount.
Had to adjust lights now to be brighter so I brought them down to 18.5" and ppfd is now 375highest 360 center and 345 at lowest.
VPD is normal at 1.0 with 73F /63% RH /33% IL Vent - fans are pointed to directly now as the leaves are starting to get rough feeling - so I moved them a bit to blow less directly
Training is doing good nice upward turn on the training (making small LST movements with the ties other than than... just letting it make new branches.
Day 30
Checked PH and got 5.0 on my meter(+1.25 tested differential = 6.25) Stats normal too - 73F /64% RH /33% IL Vent - Lights at 385highest 370 center and 355 at lowest
Removed cross ties since they are no longer needed to hold the fan leaves- training still looking nice as the new nodes are formed with 2nd node leaves growing already.
Day 31
Identified an issue this morning - went back through my pictures, identified the start, looked at the day before, and noted my changes that I took notes on at that time. Went to google to diagnose a few possible hypothesis and am now testing with a treatment. (suggestions from more experienced growers welcome)
This morning the issue was brown spots on the older fan leaves. Mostly just the left fan leaf. Seems to have started 2 days ago (day 29) when I changed the lights and fed her. When I fed her, I left water droplets on the leaves instead of drying them off after a short time (I had been drying them with a tissue after a wet pic. The fans were also adjusted after the lights were dropped closer as well.
Hypothesis:
I think the water was magnifying the light and caused light stress at the those spots. I dont think the wind of the fan had much to do with it other than they helped dry the leaves faster as noted by the water being completely gone by the time I took pictures later that night for measurements.
Test: Raised my lights to a max of 350ppfd (from 385 highest reading this morning) Had to adjust fans again since they rest on my lights.
Will observe looking for improvement over the next few days.
... another possibility was given to me by Guru @Roberts (thank you) as it possibly being a ph issue locking out calcium. So I thought I might test ph and then try diluted cal/mag in a spray if my soil is too low (also looked at pics and seen VERY close similarities in my pics and those)
and so on that advice, I tested/calibrated my soil meter (it FINALLY calibrated for me!)I found my soil was avg of 3 readings at 5.153 (5.08,5.09,and 5.29) NOT GOOD - potentially locking out most all nutes.
I weighed out about 2 cups of purified water with and added about half ml of CalMag, ph balanced the water to 6.5 at 69.7F (my research shows Calcium lockout starting at 6.3 or lower) and splashed with H2O2 - I poured most around the base and sprayed the leaves too. I made sure to use the whole solution by pouring the last of the solution in the spray bottle over the stem and stem base.
EOD follow-up
Found a possible calcium blockade in my ph and on my leaves (of which are now starting to curl so I placed my fans on oscillate to ensure they aren't doing more damage) --- fully documented now.
otherwise measurements are now documented too. -- second node is starting to pull away from the last top so I will be looking to top again (3rd of possibly 4 total) and then HST and bind in a new spot
Day 32
Doing a morning and evening check her now while I see this issue resolved.
So far no sign of improvement since last night - might have gotten worse in comparison (will check pics side by side today) but I think because it's a immobile micronutrient so it should take time to stop then reverse.
So in the mean time I am doing a slurry test as a 2nd test for my soil before I treat it. I took soil from 3 different spots and made sure I got some from about 4 inches deep in each spot
(ensured calibrations were still good with buffer tests) 1st test is a PH meter tested directly in the soil. After using the 2 cups of 6.3 yesterday I got 3 readings today = 5.47, 5.32, and 5.5 to avg 5.43 - (yesterday's readings prior to treatment were 5.08, 5.09, and 5.29 to avg 5.153) - still far below the normal 6 to 7 for soil and the requirement of 6.3 and above for calcium to enter roots. suggesting again lockout.
So while I am checking the plant conditions I also looked at the new nodes - 2nd node is starting to pull away from the first, but not quite enough to top yet - thinking I will be able to top tomorrow evening - should be able to correct the ph tonight, so I can see if there's results in that by then as well.
I also set the fans to oscillate last night, so here's a video for that now.
Measurements, ppfd, and vpd will be in tonight's check-up
Day 32
So I started this evening by testing the run off with 2 meters, 5.7 and 5.67 - prepared 1 gallon of 7.5 ph water and splashed with H2O2 (checked with both meters)
Before flushing, I documented the leaves again - still curled and look very dry but they still have some flexibility with them - they dont seem to getting any worse so the spray may have gotten enough to the leaves most affected. The new nodes and growth tips seem to be okay but not growing as fast as they were. That would still mean that the soil needs treatment before the roots begin to die off and I end up with stunted growth overall.
SO I flushed the whole gallon and noted the runoff from the sides and bottom. I then tested the soil directly with 3 readings 5.95, 5.8, and 5.73 for avg 5.826 and tested the runoff water with 2 separate meters for 5.91 and 5.85
Not sure if I should feed dunk in 7.5 still or just use that number on the next feed in like 3 or 4 days. will discuss
Other than that ppfd highest is 360, 350 at center, and 330 at lowest.
VPD was 1.0 with temp at 74F /63% RH /33% IL Vent
Growth tips could be ready to top again tomorrow night, but I would like the get the ph taken care of first.
Day 33
Started the day by noticing the lower branches seem to stop turning and the next level branches seemed to have finally turned but nearly as fast as the first. (Noticed them having a start yesterday) Newer branches dont have any signs of issues.
So the plan today is to make Bloom Juice for later. Feed Dunk with 100% Veg Juice at a ph of 7.3 test runoff and ppm. Top the 4 nodes and remove the lower leaves. Calcium issue or not, that was always the plan with main-linning the plant. However, because of the health issues, I dont think I am going to go past these 8 colas - rather instead I will simply stop here and do some HST to set them how I want them to grow and let her recover and finish her veg for about two or three weeks.
Dunk had 300ppm of Epsom, Veg juice, in a little over 3 gallons of purified water. I had 7.4 ph and splashed with h2o2.
I pushed the entire plant into the water and soaked for a few seconds. Drained by hanging the pot up for about 10 minutes and the stream started dripping instead.
Checked the runoff with 2 meters 6.01 and 5.93 with 2580ppm.
Then I topped all four nodes and removed the fan leaves from under my mainline. I used LST to finger press the new branches apart into the direction I plan to move them to get the nodes powering up.
Next I will wait for a day to do HST on those new branches. Tonight I will simply let her rest.
VPD still at 1.0 - 73F /63% RH /33% IL Vent -
Lights are at 365 highest, 355 center, and 335 lowest.
No need to measure for growth now as I dont plan to top anymore
Day 34
Early entry to day for HST the morning after topping.
So I started off the morning checking stats and health. PH levels are still low. 3 soil meter tests 5.41, 5.41, and 5.44 for an avg of 5.42 - kinda at a loss here but can only monitor now.
VPD and lights are mostly the same - 74F /63% RH / 33% IL Vent - VPD not relevant today as the settings are the same and I am using HST to change the plant position.
leaves are noted for future reference - all four lower fan leaves have signs of calcium deficiency but not progressing nearly as fast as the first two did, so I think my attempts via higher ph water and feed may have helped. (I know the microbes in the soil are supposed to help get past ph issues , but mine seem to not be heathy)
HST
used a cuticle rod from my wife's nail case and a paint stick to press the rod against the branches and smash the inside of the elbows I want to bend.
LST
I then cut 4 strips of garden wire at the same length, hooked the ends like candy canes and aligned them about 1/2 inch above the new node and into the soil. From the side they look level but have the leaves now facing sideways. They will turn in a day or two.
Likes
27
Share
@Dunk_Junk
Follow
I note this strain is super frosty!!!!!!!!!!!!!!!!!!
Still weeks to go!
Likes
8
Share
@NOLOGIK
Follow
21/4
excellent cbd plant, the proportion between thc and cbd is perfect, a plant with the classic tree shape, I had small problems on the claw leaves !, then all solved, but in my opinion it made a little less on the final buds!

Likes
1
Share
@psychonaut420
Follow
The autoflowers development is coming along well first 2 in the video are lemon cherry cookies auto and last one is frozen face auto the Lemmon cherry cookies have a purple streaks but the first more purple than the second and frozen face auto is bulking up slowly but surely

Likes
8
Share
@Cannabot
Follow
week 3 flowering,kept the feeding the same.colas are definitely starting to bulk up nicely.The colors are amazing,the smell is exactly as described papaya mixed with nuts.tbh this plants smell reminds me of a desert like a cheesecake.

Likes
20
Share
@Boomdrawfyah
Follow
Dia 134 y semana 6 de floración,ultimo dia de vida de las plantas.
Este año ha sido un poco raro las plantas han crecido como monstruos tuvieron un crecimiento espectacular un tallo muy grande y junto con sus ramas flexibles y muy resistentes. Pero al llegar el engorde de floración no se porque les falto el empujon final para hinchar el cogollo, tiene muy buena pinta , mucha resina y muy fuerte buen olor pero me esperaba mas en la fase final. Cortamos ya que tambien habian orugas y no terminaba de eliminarlas por completo, la semana que viene era entera de lluvias así que decidi cortar un poco mas temprano para poder prevenir cualquier mal mayor, hay mucha gente que le gusta cortar antes de tiempo ya que el efecto es muy diferente, este año probaremos que tal.

Likes
34
Share
@modmyplants
Follow
Here I shortly document the making of Cannabis-infused-butter for what ever you want to cook with it.
1. Decarboxylate your weed: Grind the amount you want to use (pref 8-15 grams) spread it on a bakingsheet and bake it at 110 degrees for 40 minutes.
2. Infuse it into butter: Use 250grams butter+ 200ml water and heat it up to 70-90degrees (preferably keep it at 80degrees) add the weed and let it "simmer" for 3-4hours. Stir every 5-20minutes and keep the temperatue inbetween 70-90degrees or you destroy THC.
3. Seperate the weed from the butter: Use a kitchentowel or teafilter to seperate the butter. After let it cool down in a fridge.
4. Enjoy the cooking/baking. Use it inbetween 5days or freeze it.
Enjoy the high! its banging👌
Bubblehash-Process coming soon!