Likes
Comments
Share


@Budz_Bunny
Follow
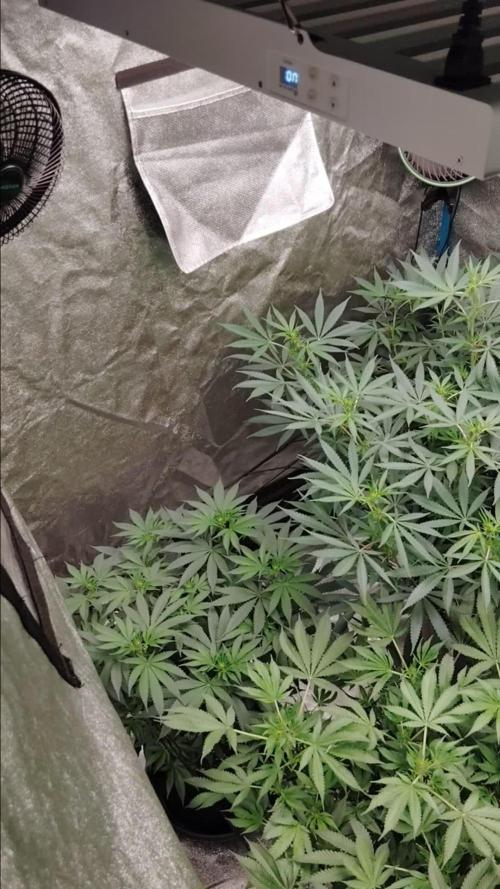
Grow Journal Week 3: Bloom Phase Progress 🌼
Hello dear growers and growerettes,
I’m thrilled to share the third week of the bloom phase in our grow journal! Here are all the details for Week 3:
Weekly Progress
We are at the end of Bloom Week 3, and the plants are thriving! Even our previously problematic plant has made a full recovery. My favorite plant, the one on the left, has claimed an entire half of the tent for itself. The stretch phase has now concluded, and I am very pleased with the results.
Watering and Control Systems
The watering system is operating smoothly, even with the increased water consumption of the ladies. The Blumat and TrolMaster systems are working without any issues.
Challenges
In Week 2, I performed a heavy defoliation since I had some time that day. Although it was a bit early, the ladies have recovered well. Due to limited time over the past two weeks, and this likely continuing until the end of December, I've been doing my best to keep the journal as current as possible.
Goals and Expectations
In the next two weeks, I expect my buds to start swelling, and I am very excited about this development.
Thank you for following along, and stay tuned for more updates! 🌿✨


Likes
87
Share


@beenSlayin
Follow
What I thought to be a cal deficiency at first glance appears to be rust fungus or leaf septoria, but nothing rubs off of the spots, which confuses me. I freaked out and tore the hell out of the plant my buddy left on my doorstep, stripped all the freakin spotted leaves. I'm hesitant to toss it, dont know why, I did notice spots on 2 other plants, barely, bastard being one of them. Ill be keeping a great hawk eye on them, ready to pluck anything I notice with a rust spot or toss that one plant out of there if I see too much appear. I need to grab some neem oil as well. Maybe I shouldn't run the tent sealed anymore, as I think it could be a big reason for the fungus. I never let humidity get over 60 and I had pretty decent air movement, but they are squeezed in there. I'm freaking scared.
Nothing rubs off these spots. My run off PH has been low which makes me think calcium still. Guess I'll do some big-time flushing.
Flushed all with 6.8 water until run off reached 6.5, roughly 10-12 gallons each. I'll l feed them tomorrow. Usually, I flush around day 45. I was trying to see if i could get away without doing so, with that scrog n all.
Whew, I was trippin out there there, after reading n shit I got thinking the worst, should've stuck with my original diagnosis. I'm sure they'll be ok.👍
Zipper broke off the tent the other night, so it's now "sealed" with a red blanket🤣
Likes
19
Share


@Paultemp
Follow
Hi all! 👊😊
Another week started ohh yeaahhh
I do foliar 3 times this week and i see pistil white change in orange
Smell very good pine and citrus :)


Likes
44
Share


@rudiak
Follow
The growth on the girls continues to stagger me! We have had a less drastic week this week then last everything gone smoothly!
Took the LST off on day 16 to allow the girls to continue growing upwards, already bushy enough and only so much space in my tent, but as you can see from the vid the stems and canopy looking great! So many potential bud sites! Been doing lots of leaf tucking, fortunatly nodes nice and close together so it makes my life simple can optimise the light penetration very easily!
The feed has been increased to 1.5ml/l of vega and 0.9ml/l of calmag, doing feed feed water. Girls drinking alot now and giving each around 1.5-2L per sitting every couple of days!
Stem diameter just below first node - 16mm
Getting around 1.5-2 inch of growth a day currently.
The girl that had the transplant is loving life and really filled out her pot showing little signs of being stunted, few slightly crinkly leaves but at the time it was like -3 outside and wasn't ideal situation to be doing transplant in, but no obvious signs of being stunted!
The first signs of flowering on day 21 but its very early should be more obvious tomorrow! The good times are about to begin :)
These girls are so big now its kind of lucky we broke one and dropped to 4 plants not sure there is room for a 5th in there!
Let me know what you think of the progress and drop your estimated yields below see who gets the closest as we go through the grow!
Don't forget to follow me on insta guys if you want daily updates! @rudigrows
Likes
2
Share


@Earthsower
Follow
The white is not doing too well but she’s holding up to the environment she has not stretched much but showing signs of bloom with little white hairs she stands at about 33cm

Likes
31
Share


@MrJones
Follow
MrJones VIPARSPECTRA XS1000 LED
📜 SUMMARY - I have been given the opportunity to run the next generation of LED lights by VIPERSPECTAR, the XS1000! I set up a Stealth Cabnient and moved 3 Cream Manderain Auto XL.s under these lights, the cabinet set up is automated with WIFI light controllers, and INKBIRD Temperature and Humidity Controllers, I am very excited about this opportunity!
Specs and Discount Codes Listed Below.
🔹🔹🔹🔹🔹🔹WEEKLY GOALS 🔹🔹🔹🔹🔹🔹
🌞Environment - 80F and 55%Humidity - using Humidfyer as needed.
💧 Feeding - Feeding with FOOP Canna Organic Nutrient Line
🍃Training / Super Cropped - and put 2 plants into a training hoop.
🕷️ IPM - Will be using Green Cleaner" 1 OZ per Gallon, and CannControl from Mammoth alternating between product each month for Integrated Pest Management.
💡 Vegetation & Flower (new) Viparspectra XS-1000 Release on March 15th.
🔹🔹🔹🔹🔹🔹🔹🔹🔹🔹🔹🔹🔹🔹🔹
📜 Week 8 and the buds are starting to get larger, thining I may have to clean up a few more fan leaves. great combination of Lights, Nutrients, Environment, and Strain.
🔹🔹🔹🔹🔹🔹🔹🔹🔹🔹🔹🔹🔹🔹🔹
▶️Monday 04.12.21 / Fed about 30 ounces today - looking great!
▶️Tuesday 04.13.21 / Fed about 30 ounces today - looking great!
▶️Wednesday 04.14.21/ laying off the feeding tonight, had to readjust one of the plants this afternoon, added some support to it.
▶️Thursday 04.15.21 / These ladies are doing well, the height is right up to the lights, but still looking pretty good. Drop the feed down to 20 ounces per day.
▶️Friday 04.16.21 / Fed about 20 ounces today - looking great!
▶️Saturday 04.17.21 / Fed about 20 ounces today - looking great!
▶️Sunday 04.18.21 / Fed about 20 ounces today - looking great!
🔹🔹🔹🔹🔹🔹🔹🔹🔹🔹🔹🔹🔹🔹🔹
VIPARSPECTRA XS1000 LED
🔹🔹🔹🔹🔹🔹🔹🔹🔹🔹🔹🔹🔹🔹🔹
Amazon US:
XS1000 10% off: in10MrJones http://yx-8.cn/0y-6
XS1500 5% off: in15MrJones http://yx-8.cn/0yA
XS2000 5% off: in20MrJones http://yx-8.cn/0y2Y
XS4000 5% off: in40MrJones http://yx-8.cn/0y5k
Amazon Canada
XS1000 10% off it10MrJones https://amzn.to/38udUVe
XS1500 5% off: it15MrJones https://amzn.to/3esVUyr
XS2000 5% off: it20MrJones https://amzn.to/3l5zAfg
XS4000 5% off: it40MrJones https://amzn.to/3l7k5Uj
Likes
59
Share


@Schneidersitz
Follow
Wir befinden uns am Ende der Bw5. Laut Fastbuds braucht dieser Strain 7 Wochen. Die ersten Pistillen färben sich braun. Die Kelche werden bald anschwellen. Der Duft nimmt weiter zu. Sehr schöne Pflanze bisher.


Likes
7
Share


@darb35
Follow
This will be a bit of a challenge, one of the LCC is 45cm while the others are 25cm.
I gave them little ramps to keep canopy even and all 3 are still looking healthy.
Likes
2
Share


@Ninjabuds
Follow
My Grand Tourismo plant has really dark-colored leaves and is growing really well. It's still small, but it's growing really dense and short. I think it's going to be really stacked and compact!
Okay, This past week has been absolutely fantastic! The weather has been incredible, and I've been able to keep the windows open almost the entire time. My plants are thriving in the humidity, and the VPD has been perfect. Everything just feels so balanced and in check.


Likes
20
Share


@420DeepGrow
Follow
Gracias al equipo de MSNL y XpertNutrients sin ellos esto no sería posible.
💐🍁 Forbidden Fruit Auto:
Forbidden Fruit Autoflower, llamada así por sus deliciosos sabores, es un cruce entre Cherry Pie, Tangie y Siberian Ruderalis. Esta variedad ofrece efectos estimulantes y relajantes con un sabor afrutado, cítrico y a pino. Ideal para quienes buscan un dulce escape.
🚀🌻 Consigue aqui tus semillas:
💡TS-3000 + TS-1000: se usaran dos de las lámparas de la serie TS de Marshydro, para cubrir todas las necesidades de las plantas durante el ciclo de cultivo, uso las dos lámparas en floracion para llegar a toda la carpa de 1.50 x 1.50 x 1.80.
https://marshydro.eu/products/mars-hydro-ts-3000-led-grow-light/
🏠 : Marshydro 1.50 x 1.50 x 1.80, carpa 100% estanca con ventanas laterales para llegar a todos los lugares durante el grow
https://marshydro.eu/products/diy-150x150x200cm-grow-tent-kit
🌬️💨 Marshydro 6inch + filtro carbon para evitar olores indeseables.
https://marshydro.eu/products/ifresh-smart-6inch-filter-kits/
💻 Trolmaster Tent-X TCS-1 como controlador de luz, optimiza tu cultivo con la última tecnología del mercado, desde donde puedes controlar todos los parametros.
https://www.trolmaster.com/Products/Details/TCS-1
📆 Semana 2:
Fantástica semana, estan creciendo de una forma espectacular gracias a la ayuda de @marshydro, @xpertnutrients y @trolmaster.
Se puede apreciar un tercer nudo aunque la aplicación de cola de caballo y el estar en una maceta pequeña ha influido en el tamaño de ella, se recupera muy rápido 😁.
Esta semana se ha puesto en la maceta definitiva y se traslada a su lugar definitivo 😎
Potencia de la lámpara: 50%


Likes
15
Share


@PiusWaxis
Follow
Here we are at the end of my plant's wonderful eleventh week of flowering, another week full of exciting developments and new discoveries.
The constant and unstoppable growth of the plant has come to an end, showing a beauty and vitality that are a true spectacle for the eyes. 😎
The abundant layer of resin that has formed is a clear sign of the health and well-being of the plant, once again confirming the benefits of the premium nutrients used throughout the entire growth cycle.
TrollMaster's "TENT-X" environmental control system continues to prove its worth, precisely maintaining optimal temperature and humidity levels to promote vigorous plant growth.
The combination of advanced and precision technologies ensures that plants can thrive in a controlled and conducive environment😎
I am thrilled to share with you the latest video showing the temperature, humidity and VPD trends of this last week of flowering, providing further demonstration of the extraordinary performance of the TrollMaster control system and its synergy with the other elements of the grow room.With each week that passes, the anticipation for the new discoveries and challenges that await us continues to grow.
With the constant support of Plagron nutrients, trust in the TrollMaster control system and the excellence of MEDIC GROW LED lighting, I am sure that I am always ready to face any challenge!
Thank you again for being by my side in this extraordinary adventure, dedicated to exploring the wonders of plant cultivation. Together we continue to look to the future with confidence and enthusiastically anticipate the successes that each new week holds for us. 💪👽🌱✨
REVIEW TENT-X:
I was pleasantly surprised by the effectiveness and functionality of the TROL MASTER!
This device is simply amazing, as it has allowed me to monitor the environments I use it in accurately and efficiently.
One of the most impressive features of this device is its ability to operate LED lights easily and intuitively. Thanks to its user-friendly interface, I could easily customize the lighting of my rooms according to my tastes and different situations. I particularly appreciated the possibility of programming the sunrise/sunset simulation, thus creating a more natural situation.But that's not all: the device goes further and manages to keep me constantly informed about the humidity and temperature of the surrounding environment. This feature has proven to be very useful, especially in times when I am not present.
I was able to set humidity limits, so that the device would immediately alert me if the levels exceeded the desired threshold. This allowed me to intervene promptly and avoid excessive oscillations.
The accuracy of the temperature measurements was another welcome surprise. The device is equipped with a high precision sensor that allows me to constantly monitor the temperature of the rooms. Here too I was able to set temperature limits, allowing me to be notified immediately if they were exceeded.
Overall, I was really satisfied.
The TENT-X exceeded all my expectations. Its ease of use, precision of measurements and possibility of customization make it an indispensable tool for those seeking to monitor and optimize environmental conditions.

Likes
51
Share


@Hempface86
Follow
WEEDSEEDSEXPRESS has awesome genetics... This girl is taking a beating and she's handling it well.. hope everyone is doing well and happy growing ✌️