The Grow Awards 2026 🏆 


Likes
Comments
Share
@TerpTurtle
Follow
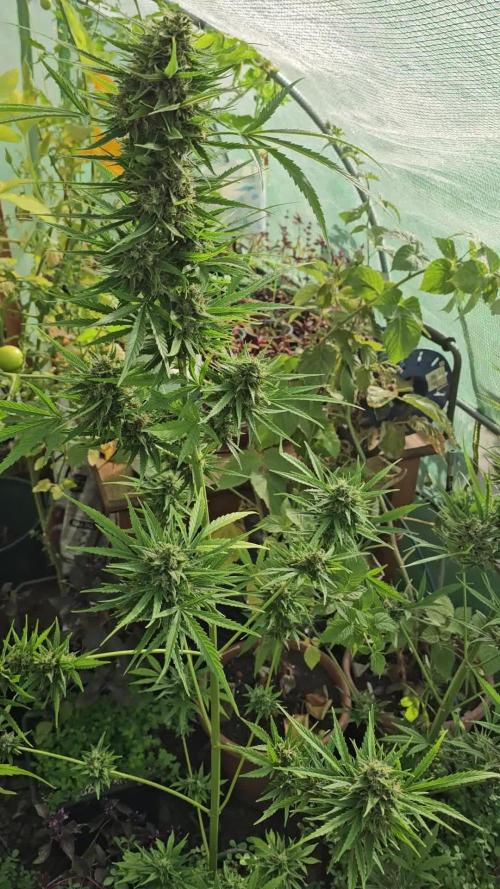
White Truffle x Red Pop by Detroit Seed Co
BuildASoil 3.0 LOYAL TO THE SOIL
Strawberry truffle | Vivosun 2x4 | Mars hydro sp3000 | 7 gallon pot
Chem 91 x Red pop | AC infinity 2x3 | AC Infinity Iongrid 24 | 5 gallon pot

Likes
3
Share
@theicyeffect
Follow
Always cool to see what old school strains are all about. If there’s something experience has taught me is that classics are classics for a reason, and that’s the theme of this cycle.
The germination was exceptionally fast, followed by the development of a thick stalk and huge broad leafs, this Gorilla surely started strong.
Humidity and temperature kept fairly high throughout the week (70%/ 24°C), with regular misting, which they love!
So far so good, feels like a happy and healthy seedling. Let’s see what she’s got 💪🌱

Likes
39
Share
@Sammy23
Follow
Bonne semaine dans l'ensemble, les 2 plus grandes plantes qui avaient des tuteurs mesurent maintenant 30 cm, je vais passer en floraison. J'ai trouvé le moyen de baisser la température en ouvrant la porte de la box... C' est pas très discret. J'ai baissé un peu le chauffage aussi. Je n'ai pas arrosé beaucoup mais les plantes ne semblent pas souffrir, tous les trois jours à peu près. Les noeuds sont éloignés les uns des autres, ont voit clairement l'influence sativa, à part peut être sur un ou deux phénotypes...

Likes
40
Share
@MrJones
Follow
47th Parallel Crowly's Comet
🔹⊱╮🔹╰⊰🔹 GROW Started 03.10.24 INFORMATION 🔹╰⊰´🔹⊱╮🔹
🌞Environment - Maintaining 80F and 65%Humidity
🌾Training - Nothing this week, just letting the seedlings veg out.
⚱️3-Gallon 📊6.2 PH
💧 Feeding - Using Horti Grow 8-11-21, Bloom 5-15-26, Late Bloom 0-24-26, Cal 12-0-0
🌞Medic Grow Smart 8 760 Watts
🕷️ IPM - CannControl from Mammoth and Mosquito Bits as needed
🔹⊱╮🔹╰⊰🔹 PLANT UPDATES 🔹╰⊰´🔹⊱╮🔹
📝 Notes - These ladies are just going nuts; they are stretching aggressively, and the vertical growth is outstanding. I want to defoliate these plants, but I need to be cautious and not stunt the stretch.
📝Fertigation injects fertilizers into an irrigation system to supply dissolved nutrients to crops.
🗓️04.27.24 Just feeding daily, sometimes twice; today, fed with Hort-Bloom @ 2.7 GRMS Per Gal and Horti-Cal @ 2.5 GRMS Per Gal.
🗓️04.28.24 Just feeding daily, sometimes twice; today, fed with Hort-Bloom @ 2.7 GRMS Per Gal and Horti-Cal @ 2.5 GRMS Per Gal.
🗓️04.29.24 Just feeding daily, sometimes twice; today, fed with Hort-Bloom @ 2.7 GRMS Per Gal and Horti-Cal @ 2.5 GRMS Per Gal.
🗓️04.30.24 Just feeding daily, sometimes twice; today, fed with Hort-Bloom @ 2.7 GRMS Per Gal and Horti-Cal @ 2.5 GRMS Per Gal.
🗓️05.01.24 Just feeding daily, sometimes twice; today, fed with Hort-Bloom @ 2.7 GRMS Per Gal and Horti-Cal @ 2.5 GRMS Per Gal.
🗓️05.02.24 Just feeding daily, sometimes twice; today, fed with Hort-Bloom @ 2.7 GRMS Per Gal and Horti-Cal @ 2.5 GRMS Per Gal.
🗓️05.03.24 Just feeding daily, sometimes twice; today, fed with Hort-Bloom @ 2.7 GRMS Per Gal and Horti-Cal @ 2.5 GRMS Per Gal.
╰⊰🔹╰⊰´🔹⊱╮🔹╰⊰🔹╰⊰🔹STRAIN INFORMATION🔹⊱╮🔹╰⊰🔹╰⊰🔹╰⊰🔹⊱╮
Crowley's Comet / https://www.47thgenetics.com/product-page/crowley-s-comet-10-fem-birdseeds
It's everyone's favorite piece of space rock, Crowley's Comet! The culmination of reversing our Matterhorn cut off Mr. Crowley to Intergalactic Runtz, and the results were out of this world (I had to do it). These ladies were slow to start, but once they hit their stride, they put any worries we had to rest. Compact, short-framed, and robust. They pack beautifully boulder-like flowers that reek of garlic and sickly sweet cotton candy. Dark green to a mosaic of purples, yellows, and silvers. Frost production is off the charts, the internode spacing is tight, and they certainly will impress in their last few weeks of flower. This is one of our favorite crosses in the new fem lineup. If you're looking for your hype fix, here you go.
Yield: Heavy to XL
Flower Time: 63 days
Feeding Schedule: Heavy
Likes
7
Share
@Ieiogrow94
Follow
Eccoci di nuovo qui!!!
Super eccitato per questa nuova collab con Anesia Seeds, team davvero al top, che mi ha dato l’opportunità di testare questa nuova genetica e di condividere i progressi con tutti voi!!!
Come sempre partiamo nei bicchieri per poi travasare.. Questa volta verrà svolto tutto sotto la Lumatek Zeus 465 ProC, mi aspetto molto da questo ciclo!!
Purtroppo ho perso i file delle scorse settimane e dovrò reiniziare il report da ora scusate per il disagio
Grazie a tutti per il supporto ❤️🍀🔥

Likes
5
Share
@UnorthadoxDude
Follow
Welcome to week eleven for Fraya, an Auto Fractal by Divine Seeds.
Day 71 - photographed
Day 74 - photographed
Day 76 - photographed
Thanks to Shogun for providing the nutrition for this grow, and to Divine Seeds for providing the seeds.
If you are not already a part of the cannabis community on X (formerly Twitter), I recommend joining! I have the same username over there.

Likes
46
Share
@Capo420
Follow
This strain was a breeze to grow. The purple phenotype is hands down some of the best herb I have ever tried. Will definitely recommend to anyone looking to grow a highly resilient, highly potent strain. Thank you to all those on this platform.
Grow diaries really made it easy to have my first grow be a success! Until next time Growmies 🤙😎🤙

Processing
Likes
4
Share

Likes
54
Share
@TechDCo
Follow
Date: 07/04/2024
Illumination Activated!
Anticipating your contemplative response 🤔, it is evident that a larger vessel is imperative for her growth trajectory, considering her current confines within a 19L container. The imminent requirement calls for a spacious 60L receptacle, especially for accommodating the root expansion of this 100% sativa cultivar, akin to cultivating three distinct plants. Rest assured, I am diligently addressing this necessity.
My cognitive acuity now far surpasses any previous state, a veritable testament to heightened clarity and focus. Maybe more common sense than my pervious brain dulled 😑
Mid-day: The Train of Disframe
I am perplexed by the presumptions some individuals harbor about their own identities, a realm from which I am keen to distance myself.
I exemplify the valor to be met with disdain.
I abstain from soliciting your allegiance or appreciation towards my creations. Subsequent to the fruition of these cultivation endeavors, their merit shall resonate independently. Should you be inclined to express admiration and allegiance, it brings me joy; conversely, indifference does not perturb me. My aspiration transcends superficial accolades; I envision forthcoming cultivators beholding my endeavors with awe akin to stargazing.
"I have the courage to be disliked I'm beyond it"
- End of Story
08/04/2024
I find myself amidst the transition to the flowering phase of cultivation, a process I previously jestingly referenced. In humbled reflection, I seek divine forgiveness for my momentary lapse in candor.
In pursuing optimal nourishment for my botanical charge, I have meticulously curated a regimen involving the gradual escalation of Sensi Bloom feed to a maximum dosage of 4ml per liter, attuned to the specific needs of the plant. Embracing the role of a discerning steward, akin to a 'Plant Whisperer,' I am dedicated to orchestrating a harmonious symphony of growth and vitality within this verdant realm.
4inch Extractor Fan installed.
"The Recurrence Vid"
In the compelling narrative title, the strain Forgotten Haze Cakes, classified as a pure Sativa, luxuriates in ample space for vertical expansion during the inaugural fortnight of transitioning phases, courtesy of the employed cultivation methodology.
By delicately leaving the initial set of lower big fan leaves, it'll anticipate discourage within the plant from branching and proliferation.
In the vibrant realm of my sativa tent, where the verdant sentinels of growth flourish under the radiant canopy of light, a unique challenge presents itself – the absence of a means to monitor humidity levels. Despite this limitation, my steadfast dedication to the well-being of my botanical charges remains unwavering. As the sativa strains bask in the nurturing embrace of their environment, enveloped in a tapestry of vibrant hues and resplendent foliage, I adapt my stewardship with a blend of intuition and experience.
//////////////////////////////////////////////////////////////////////////////////// ⏸️
▶️
"HUMIDITY" + "HUMILITY" = MILITARY!
- This saga; can NOT , continue in the Military realm of Sativa"
In the captivating narrative of cultivation, where the seeds of growth are sown with care and nourished with intention, a poignant reflection emerges – the distinction between "humidity" and "humility" reverberates with profound resonance. Within the intricate tapestry of botanical stewardship, the ethos of humility stands as a guiding principle, shaping the ethos of caretaking and nurturing. However, as the whimsical wordplay unfolds, the realm of the military - a stark and regimented domain - starkly contrasts with the delicate intricacies of the sativa realm.
The sativa tent, with its vibrant tapestry of growth and vitality, thrives in a sanctuary where the essence of humility permeates the air, fostering a symbiotic relationship between caretaker and plant. Yet, the rigid confines of the military realm, with its structured hierarchy and discipline, stand in stark juxtaposition to the organic fluidity of the sativa's journey towards botanical magnificence.
In this divergence of paths, the saga grapples with a fundamental incongruity, a dissonance that renders the blending of military precision with the ethereal essence of sativa cultivation an untenable pursuit. As such, the narrative must veer away from the militaristic paradigm, embracing instead a narrative that celebrates the organic harmony and symbiosis that defines the cultivation journey within the sativa realm.
With reverence for the intrinsic beauty of growth and a deep-seated appreciation for the interconnectedness of all living beings, the saga pivots towards a narrative that honors the essence of humility, nurturing, and respect that underpin the art of cultivation. Through this recalibration of focus, the sativa tent emerges as a sanctuary of growth and renewal, where the ethos of humility reigns supreme, guiding the journey towards botanical excellence with grace and wisdom.
In this realm where empirical data gives way to intuitive guidance, I rely on a finely tuned sensibility cultivated through years of tending to these green companions. Attuned to the subtle cues and nuances of their growth patterns, I navigate this uncharted territory with a blend of caution and ingenuity. While the absence of direct humidity readings may pose a challenge, my keen observation and intimate connection with the plants allow me to discern their needs with a heightened sense of awareness.
As the delicate ballet of growth unfolds within the confines of the sativa tent, I embrace this unique opportunity to deepen my symbiotic relationship with Forgotten Haze Cakes.
I will adapt my Military training skills with attentive care and a deep-seated understanding of their botanical language, I strive to create an environment that nurtures their flourishing without the aid of conventional metrics. This journey of cultivation, guided by intuition and nurtured by experience, embodies a union of art and science that transcends the boundaries of empirical data, fostering a connection that transcends the limitations of instrumentation.
Feed Schedule ATM: 3.5.5ml/L = 66.6
Currently drinking 6L/24hrs
09/04/2024
Effective immediately; all photos taken during the flowering stage must only feature the plant with the lights on. Exceptions may be made in the case of serious incidents or issues that require documentation with the lights off or during mid-day. This protocol aims to ensure consistent monitoring and assessment of the plants' growth and health during this crucial stage. Thank you for your cooperation and adherence to this new guideline.
/////////////////////////////////////////////////////////////
- "The Singularity Expansion" -
The Singularity Expansion in the realm of my botanical cultivation practices embodies a concept of unification and harmonization. Through meticulous research and thoughtful contemplation, I have elucidated a methodology that leverages singularity as a guiding principle. At the outset, the elements of my grow technique may appear disparate and disconnected, akin to a fragmented mosaic. However, as the cultivation journey unfolds, each component seamlessly converges towards a singular, coherent endpoint, transcending the initial chaos to manifest a harmonious and bountiful fruition. Singularity serves as the transformative force that orchestrates the convergence of diverse elements within my cultivation process, culminating in a cohesive and synchronized outcome that epitomizes unity and balance.
10/04/2024
...... as the lights illuminated the verdant expanse of my botanical domain, I meticulously undertook the task of adjusting the colas. Engaged in a strategic battle of balance and precision, I ensured that the lush growth on both the left and right sides of the scrog remained impeccably level......currently still in PROGRESS of this battle!
- "In navigating the realm of visual representation within my botanical narrative, a distinct dichotomy emerges between the untreated authenticity of unedited photographs, characterized by a vibrant green hue and crisp clarity, and the studio-enhanced counterparts which exhibit a washed-out white palette. Delving deeper into this juxtaposition, I find myself strategically oscillating between these two visual paradigms, recognizing the nuanced interplay between natural realism and heightened studio effects on my S23 Ultra device" -
https://youtube.com/shorts/RngRlQwy4Hk
WATCH OUT the Kangaroos About!
Never mind that Double-O,7, I'm Double-7,0. 707.
Amidst the luminous glow, as I embarked on another day of nurturing my botanical companions, a significant milestone unfolded within the realm of my cultivation journey. The arrival of pre-flowers signaled a crucial juncture, prompting a pre-warning to elevate the nutrient feed to meet the escalating demands of this transformative phase. With precision and care, I made meticulous adjustments to the scrog, ensuring the optimal positioning for these burgeoning blooms. The act of "fluffing her" symbolized a tender gesture of support, further enhancing the growth trajectory of my botanical charges.
"The Recurrence Vid 2 -Pre Flowers"
Upon a recent realization, it has come to light that she does not solely possess the traits of a 100% sativa strain. In a moment of introspection, the humorous realization surfaced that this misconception had taken root in my mind. Nonetheless, she retains her endearing moniker as "Forgotten Haze Cakes," a creation by the revered breeders TerpyZ X Kalyseeds. Acknowledging my humanity, I accept the occasional errors in judgment that may arise, understanding that such missteps are a common thread woven into the fabric of human experience, even among the most seasoned individuals. These moments of revelation serve as poignant reminders of our inherent fallibility, etching themselves into our memories as enduring lessons in growth and refinement.
Additionally, it has been unveiled that "Forgotten Haze Cakes" is, in fact, a hybrid of Amnesia Haze "Hy-pro cut" and Vanilla White. This may explain a little depth to the botanical identity of this intriguing lanky plant, enriching the narrative of her genetic lineage. Anticipation brews within me as I eagerly await the unfolding of her growth journey, with fingers crossed in hope of witnessing her blossom into her full potential. Here is a sneak peek photo of her, a visual encapsulation of the promise and potential that lies ahead.
The flowering stage presents a plethora of nuances and intricacies to marvel at and contemplate.
12/04/2024
Lights On: Budsites
Adjusted Scrog slightly.
Pre-Flowers
On 13/04/2024, a gentle defoliation was carried out to clear away leaves that were obscuring younger bud sites. Additionally, the nutrient regimen was adjusted to incorporate Sensi Bloom at a concentration of 3.6.6 ml/l, with planned incremental adjustments up to 4ml/l as the flowers begin their enchanting journey towards full bloom.
1 hour after the lights were turned on, it was noted that the extractor fan may have been inadvertently disturbed during the defoliation process. This is evident from the slight drooping of the , likely influenced by both temperature fluctuations and the defoliation itself. Remember to always double-check the outlets after each session to ensure smooth operations.
Few hours later....
Cropmaster installed/extra 4inch extractor fan attached!
14/04/2024
Undertook defoliation procedures and implemented certain modifications.
In the previous evening, Cropmaster experienced LED malfunctions. Consequently, I have resorted to utilizing the Budmasters God 9 once again God.4
Mid-day: installed 60watt side light!

Likes
3
Share
@BLAZED
Follow
Week 11 (26-8 to 1-9)
26-8
Temps: 20.5 to 26.1 degrees
Humidity: 50% to 56%
27-8
Temps: 20.7 to 27.3 degrees
Humidity: 50% to 56%
Watering: Both 1500 ml. (Only Calcium) EC: 0.4 PH: 5.6
Dry Weight: Both 2.7 kg.
28-8
Temps: 21.5 to 28 degrees
Humidity: 51% to 56%
29-8
Temps: 23.3 to 27.4 degrees
Humidity: 55% to 62%
30-8
Temps: 19.9 to 27.7 degrees
Humidity: 50% to 60%
31-8
Temps: 20.2 to 26.6 degrees
Humidity: 50% to 55%
1-9
Temps: 21.1 to 29.1 degrees
Humidity: 49% to 55%
Watering: Both 1000 ml. EC: 1.4 PH: 5.6
Dry Weight: Both 2.4 kg.
Recalibrated my PH pen and it was only 0.1 off, so i dont think the leaf problems are PH related.
Likes
79
Share
@DudeGrowsWeed
Follow
This is your Captain speaking, Mexican Airlines flight 420 is making its final decent for landing. Please place your seat backs and tray tables in their upright and locked position. 😀
She's in full flush mode now, and will be harvested this weekend. The smell is overwhelming and lovely, a very fruity aroma. Can't wait to smoke this one!👍


Likes
4
Share
@Grownewgenetics
Follow
Was a real experience to grow the Darkdevilauto, with these Strain we could see a lot of what a ganja plant can resist, the two ladys are amazing but the vipaspectra has a bigger, strong and clear smelling, the second Lady look also greatly under the Mars hydro pannels but in thc production we see a gigantic difference.
Thanks again to sweetseeds for send us these strain.
Always with TnB naturals co2enhancer and ph up and down , thanks to all the feeding to biobizz and Greenleaf nutrients

Likes
17
Share


Likes
Comments
Share
@baphomet_botanica
Follow
Welcome to the garden.
We are three weeks deep into the vegetative stage, and the ritual is officially underway. I prefer running from seed there is something alchemical about watching them crack open and rise from the soil and these girls have taken to their new reality with aggressive vigor.
The lineup for this run is a study in contrasts:
- NineWeeksHarvest - GrapePak: She’s already showing a structure that promises density. Expecting sweet, heavy resin production here.
- Solfire Gardens - Barf Breath: The name says it all. I’m hunting for that loud, offensive funk that Solfire is known for. She’s stretching out a bit more than the Grape, demanding her space early.
Current Status: Things are dialed in. The stems are thickening up, and fan leaves are praying to the light. No deficiencies, no stress. Just pure, unadulterated growth. I’ll be looking to start some light training soon to break their apical dominance and spread this canopy out before we flip.
Stay tuned as we push these genetics to their breaking point.
PS: I don't know which Plant is which. We'll find out during flower :)


Likes
10
Share
@Froggman
Follow
Thickening up nicely! Got some nutrient issues on the LSD, but not nearly as bad a previous grows.
Likes
2
Share
@Delta9tetrahidro
Follow
En esta etapa no agregue ningún nutriente a la solución para evitar que la planta tenga gusto al nutriente, así dicen los expertos que queman esta hierba. Yo lo hago solo por deporte, no porque lo fume. mantuve el ph en condiciones estables a como dictan los científicos en este rubro. la próxima😁 semana corto las plantas y las pongo a secar.
Likes
66
Share
@Hashy
Follow
Light settings
12/12 on at 9.00am off 9.00pm
Light power= 62% 150w
Radiator settings
LIghts on
Turn on if temp drops below 23.5c
Turn off if temp goes above 23.5c
Lights off
Turn on if temp drops below 19c
Turn off if temp goes above 19c
Dehumidifier settings
LIghts on
Turn off if humidity drops below 60%
Turn on if humidity goes above 60%
LIghts off
Turn off if humidity drops below 62%
Turn on if humidity goes above 62%
Extractor settings
temperature 24c with 1c steps
Humidity 58% with 2% steps
Max speed 8
Min speed 3
VPD aim 0.7-1.1
Wednesday 22/2/23 Day 29
7.30pm
#1 Dli=20.8
Thursday 23/2/23 Day 30
10.00am
Feed for 3hrs
5L used.
1.6L each
Need to try a different pump.
Friday 24/2/23 Day 31
8.00pm
Everything looks fine.
10.00pm
Extractor settings
temperature 24c with 1c steps
Humidity 55% with 2% steps
Max speed 9
Min speed 3
Saturday 25/2/23 Day 32
7.00pm
#1 Height= 22CM Dist= 46CM DLI= 22
Sunday 26/2/23 Day 33
1.15am
Feed for 1hrs different pump.
Different pump is better.
10L Ec=1.59 Ph=6.3/6.3
2L left
2.6L each roughly.
#1 no run off
4.00pm
Radiator settings
LIghts on
Turn on if temp drops below 23.0c
Turn off if temp goes above 23.0c
Lights off
Turn on if temp drops below 19c
Turn off if temp goes above 19c
Monday 27/2/23 Day 34
7.30pm
#1 defoliate some lower stuff.
Tuesday 28/2/23 Day 35
#1 Height= 25CM Dist= 43CM DLI= 22.5
The 1st week of flower has flown by. I'm quite happy with how things have gone with the grow so far. The environmental system seems to be keeping conditions a lot closer then I could manage using guess work and timers, probably the best investment I have made for growing.
#1 Wedding cheesecake FF hasn't started stretching yet and has turned into a proper bush, I have had to remove a load of leaves throughout the week, a few every couple of days and then I removed a load of the lower nodes that aren't going to make it past the screen. She hasn't started showing pistils yet.
Power used for week
Light
(1.85+1.79+1.79+1.78+1.75+1.75+1.75)=12.46Kw
Extractor
(0.16+0.12+0.14+0.15+0.14+0.17+0.18)=1.06Kw
Fans
(0.39+0.39+0.41+0.4+0.39+0.39+0.40)=2.77Kw
Dehumidifier
(1.26+0.62+0.73+0.04+0.11+0.55+1.61)=4.92Kw
Radiator
(1.59+2.70+2.28+3.6+2.86+3.15+3.23)=19.41Kw
Water pump.
(0.0+0.01+0.0+0.0+0.01+0.0+0.0)=0.02Kw
Total for the week=40.64Kw
Back in a week.
Thanks for stopping by.
Likes
4
Share
@WeedDoctorSam
Follow
Well, boys and girls and those who don't differentiate, it's Weed Doctor Sam here and I'm about to fail gloriously or succeed by the skin of my teeth.
This being my first grow -- of any kind, let alone a hydroponic grow involving (potentially) advanced training techniques -- I fully expect things to go wrong. And, well, golly... wouldn't it just be fun to watch?
Tune in week to week to see what goes wrong, what goes right, and what goes just luckily enough not to fuck up the whole grow.
Update to this week coming at the end of Week 1. Until then, may the rain fall soft on your fields.
Likes
49
Share
@masterofsmeagol
Follow
7/25 Did two videos this morning. One where I was only going to water the 3 gallons I had mixed up but it's going to be very hot this week. Didn't want to make the same mistake as last time so I watered everything AT LEAST A GALLON. I need to bump up the volume during these really hot, humid days abd it doesn't get worse then this. Things are getting dusty. Found an inch worm and some minor pest damage. Once it cools down ill spray something. Also noticing small nitrogen deficiency that takes a leaf and moves up the plant a little bit. I'm going to need to start nutes this week. I'll keep this updated. Went back over around one and everything was looking fantastic! Took a few pictures and defoliated a few leaves.
UPDATE: I GOT A MESSAGE FROM DAD SAYING MY PLANTS LOOKED DROOPY. I HADNT MADE IT OVER FOR MY NIGHTLY INSPECTION BUT HAVING WATERED YESTERDAY I WAS THINKIBG OF SKIPPING IT. GOT THERE AND SAW THE FIRST 10TH PLANET DROOPY. ALL THE TENTH PLANETS LOOK RELATIVELY THE SAME BUT ONE OF THEM IS MY "CANARY IM A COAL MINE" AS IT DROOPS WAY BEFORE THE OTHERS. THE TWO BLUE CHEESES IN 20S THAT DRY OUT FASTER GOT TWO GALLONS AS DID MY 10TH PLANET CANARY AND MY BIG BLUE IN THE 50. ITS BEEN 90S AND SUNSHINE AND ITS ONLY GOING TO GET HOTTER. I HAVE THINGS GOING ON IN THE MORNING SO I WONT HE ABLE TO WATER. I NOTICED MORE NITROGEN DEFICIENCY RISING IN THE BLUECHEESE THAT DRINKS ALL THE WATER. OBVIOUSLY ILL NEED TO ADD NUTES SOONER THAB LATER CONSIDERING IM IN FLOWER BUT THE PLANTS ARE STILL A NICE GREEN AMD ONLY LOSING VERY FEW LEAVES. I ACTUALLY SAW A COUPKE BURNT LEAF TIPS ON A COUPKE PLANTS AFTER I WATERED WITH THE KELP ME/YOU. THIS SOIL IS AWESOME. WHAT IS THIS? WEEK 16 AND STILL GOING STRONG. WHEN I DO DECIDE TO START NUTES ILL TEST IT ON THAT BLUE CHEESE THATS FURTHER IN SENESCENCE. I TOOK A QUICK VIDEO ILL UPLOAD TOMORROW.
7/26 Had a bear come around my cage and getting into out bird feeders. Bent the iron shelerds hook all the way to the ground! Getting AMMONIA now to try and keep him away. Bags were heavy this morning but it's going to be really hot again. It'll be on the 90s the next few days so I need to be very careful. After we get through this I'll do an app of BT. Garden looks fantastic!
UPDATE: ANOTHER SCORCHER OF A DAY WENT BACK TO THE GARDEN. NOTHING WAS DROOPING SAVE FOR MY CANARY. THAT AND ANOTHER WERE BONE DRY. THE TWO PLANTS IN THE MIDDLE OF THE CAGE ARE SURROUNDED ON ALL SIDES SO I ASSUME THATS WHY THEY DONT SRY OUT AS QUICK. I GAVE EVERYTHING IN THE GARDEN ONE GALLON EXCEPT THE 10 GALLON PURPLE PUNCH, AND THE TWO IN THE MIDDLE. ONE TENTH PLANET ONE BLUEBERRY CHEESE. I ONLY GAVE THOSE 1/2 TO 3/4 GALLON. THE TWNTH PLANET IN THE MIDDLE IN THE THIRTY LOOKED HAPPY AND WAS STILL HEAVY TOO. I GAVE THAT A HEARTY HALF GALLON AND I WOULDNT EVEN HAVE DONE THAT IF TOMORROW AND FRIDAY WERENT GOING TO BE THE HOTTEST DAYS OF THE WEEK. I DEFOLIATED SOME. I NEED TO DO MORE BUT I HAD TO BEAR PROOF. I SOAKED THE BOTTOM BOARDS OF THE CAGE IN BLEECH. VERY CAREFUL NOT TO GET ANY ON THE PALLETS OR GROW BAGS OR ANYWHERE IT COULD GET TO PLANTS. I TACKED DRIER SHEETS TO THE CAGE. I CUT A COUPLE PILL CASES IN HALF AND SOAKED THEM IN BLEECH AND DROVE THEM IN BY THE WOODS WHERE HE WNTERED AND BY THE FEEDERS HE EMPTIED. PUT UP ANOTHER CAMERA FACING THE OPPOSITE DRECTION SO I CAN SEE HIM NO MATTER WHAT. I WOULD STAY AWAY MR. BEAR.
7/27 Plants are looking FANTASTIC this morning. Soil is still damp this morning and bags are heavy as hell. They look super happy. Obviously my watering situation depends on the weather. Today and tomorrow are supposed to be the hottest days so I wanted to make sure the plants had sufficient water before this. I'll let them dry out totally before watering again. There's another four lined plant big somewhere that sat there and destroyed another leaf. I'm AT LEAST spraying with BT after this heat wave. Supposed to rain a little today with thunderstorms. I haven't got my supports up yet but if i need to I coukd throw my tarps up real quick. Don't think I'll need to though. These are some tough freaking plants and I am super proud of how they've turned out thus far.
UPDATE: WENT BACK OVER AND RE APPLIED BLEECH TO THE RAGS AND ON THE PERIMETER OF MY CAGE. I TACKED A FEW MORE DRYER SHEETS UP. REASON I DID THIS WAS BECAUSE WEVE BEEN GETTING HORRIBLE THUNDER STORMS WITH TORRENTIAL RAIN. THE WEATHER MAN HAD BEEN WRONG SEVERAL TIMES WARNING OF THUNDER STORMS AND WE WOULDNT GET SHIT. THIS TIME IT WAS PRETTY BAD. TOOK A SHORT VIDEO. IT WAS SUPPOSED TO BE THE HOTTEST DAYS TODAY AND TOMORROW. I DIDNT NOTICE ANY BREAKAGE AND I DONT SEE ANY ON MY CAMS. IM SURE ITS NOT THAT MUCH RAIN AND THOSE NAHS WILL DRY OUT SOON. I NEED TO GET MORE PH DOWN AND DECIDE WHAT IT IS IM GOING TO DO FOR NUTES IN FLOWER AND MAKE UP MY MIND.
7/28 Huge thunderstorms all day yesterday and through the night with high wonds. Plants made it through unscathed despite the lack of a trellis. Today is supposed to be the hottest of these days. I think the hear wave ends today. I really need to get my supports up. I'm super lucky to not have had any breaks during the storm. I have a couple of videos I did but I didn't upload them earlier and now that I'm back in the woods I doubt they'll upload now. I'll give it a shot. If not I'll put them up tomorrow. OH! I found that four lined plant bug that had been fucking up my leaves and squished him. Well I hope it was him. If not I killed a sibling at least.
UPDATE: JUST WOW. This morning all drooped over from the storm went over at 4 and its still 90 and they seem to have grown sic inches and jumped forward WAY more into flower. I am amazed. I'll upload a photo or two but I took a video I'll put up tomorrow. Super stoked. Oh and you can give me a red smile face for not using nutes every week @growdiaries but you point out the deficiency then I'll fix it.
7/29 Plants looking fantastic this morning.
UPDATE: PLANNED ON NOT GOING TO THECGROW TOMOGHT SEEING THAT IT HAD RAINED SO HARD AMD THAT WE ARE SUPPOSED TO GET RAIN TONIGHT. I GET THERE AT ABOUT FIVE AND MY CANARY AND A FEWCOTHERS WERE DROOPING! IT WAS IN THE 80S ALL DAY. I GAVE EACH PLANT A GALLON OF WATER. THE GROW BAGS ON THE TEO WORST PLANTS WERE SUBSTANTIALLY LIGHTER THAN THE REST. I HOPE IM NOT OVERWATERING. THE PLANTS SEEMED TO PICK BACK UP AFTER WATERING BUT ILL HAVE TO WAIT UNTIL TOMORROW TO UPLOAD MY PICTURES AND VIDEOS. I NEEDED TO ADD TEMPORARY SUPPORTS TO A COUPLE DIFFERENT PLANTS. IM CERTAINLY GLAD I GOT THE URGE TO GO OVER. WHAT A CHANGE IN A FEW HOURS
7/30 Plants are really growing fast and transitioning quick to flower. We got almost no rain so I'm glad I watered like I was supposed to even though the bags had some heft to them. I'm noticing more pest damage. I'm thinking a bt spray tonight might be beneficial. I'll look through what I've got on hand. I may just give them an application of spinosid but we'll see. I still need to move things and put my supports up. Medical problems have slowed me down.
UPDATE: Went to check the plants around 3 and they looked great. Bags were still heavy and a little bit moist. I think with the added rain some of the plants may have been overwatered. I should have only watered tue bags that felt light. There is only one plant now that looks a little overwatered and even that is looking good. I found some more minor pest damage. Winds were fairly high. I wondered about my trellis netting but it hadn't been sanitized and my plants are very healthy so I decided to wait. I watched them dance like willows in the wind. I know it won't be like that with big ol colas on them but for right now it's working out just fine. Goal for next week is to move the front row back and move things around to better utilize space, possibly spray for pest and add supports for final flowering after I get the plants situated how I want them. If I do it right I may be able to lst some. Also took a 2 minute video but I cant upload until tomorrow.
7/31 I'm wondering about my watering habits. This morning I watered a couple blue cheese and purple punch plants with just a half gallon as they were light and looked drooping. I'm wonderingvif I'm overwatering. Some plants still seem heavy while others are light? I think the plants may have been overwatered due to the torrential rain and my taking less time hand watering. Hopefully I won't come home from this doctors appointment to wilted plants but I really doubt it. 10th planet requires far less water than the two other strains. Even specific phenos require more water and its difficult with the different size containers but im working with what ive got. I need more ph down and I've gotta get these plants supported. These are some massive plants. Store was closed. Dispensary was opened. Showed my buddy the video then it started raining. By the time I got there the plants looked horrible. Everything was droopy but a couple were really bad. A few weren't bad at all. Actually the one in the ten needed it. I think I just need to give more water at a time and document how I water each plant individually. I also need to take into consideration the weather. Hard to do when it's so unpredictable. I'll wait for them to dry out and then I plan to start low doses of big bloom and grow big but I need to wait for them to dry out first. Then next watering they'll get some nutes. It's sunny now so I may go check my plants. I may also put a fan out for a while on the bags. That might help them out.


