The Grow Awards 2026 🏆
Likes
Comments
Share
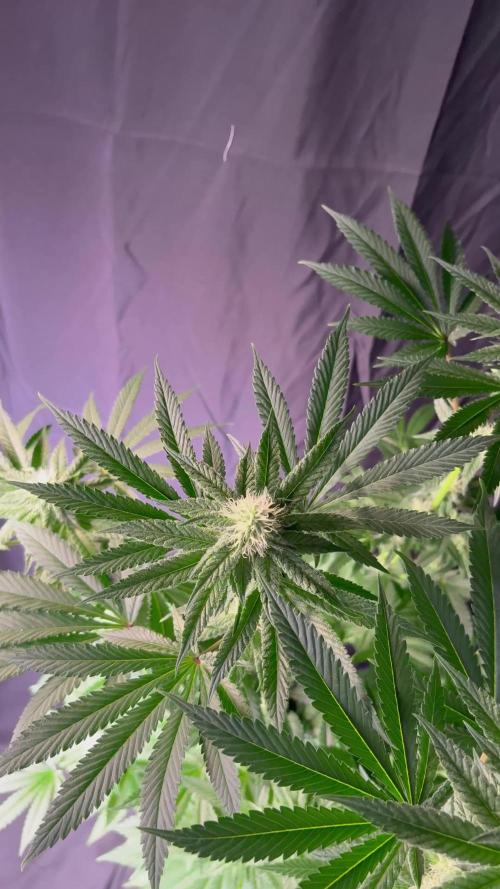
Venga familia que ya viene la cosecha de esta Panty Punch de Seedstockers, que ganas que tenia ya de darles machetazo. No veas que pinta que tienen estas plantas. Las flores aparte se ven bien resinosas, y son bien prietas, aparte son súper aromáticas huelen mucho. (COLOQUEN UN BUEN FILTRO PARA EL OLOR). a sido una genética con la que disfruté mucho cultivarla, la genética es perfecta para SOG y es bien vigorosa, es muy fácil cultivarla y muy resistente merece la pena si eres cultivador principiante. Hasta aquí es todo, espero que lo disfrutéis, buenos humos 💨💨.
Likes
22
Share
Seeding March 16 Germination 21-25 march 🇱🇺🌱🤩 Day 56 from seeding, flower in full progress Grow method 12/12 from seed- Sea of green here I'am again, yesterdy morning my ladies had their last schwazzing that means day 20-21 in flower, all in all everything looks very good, from yesterda on my CO² system is also in operation, tomorrow my ladies only have a bit of ph reg. water from me and giving them some time to revover from the defoliation stress before i start with nutes again.... and now I leave them alone until further notice.... Cheerio & Tataaa🤜🤛👊🏻🇱🇺🌱 ⚠️ Short info about my Humidity: as you can see my humidity sensor from my CT grow system that I have is around 80% RH, but that is not right, my humidity  is around 49-52% my sensor gets 24 hours  fully blown by my humidifier  onto the sensor no matter where I hang it because my ventilation is all around and is blown from top to bottom and a box fan lets everything circulate through the growroom so my old hygrometer is hanging in there againe and everything is fine Amnesia by & for @Superstrains Official Runtz by & for @Zamnesia Webshop came in 1 week later Sour Diesel by & for @Inseedious NL Cobalt Haze by @Sensi Seeds  & Arjans Strawberry Haze by @Greenhouse Seeds  for @Amsterdam Seed Center Under & for @Mars Hydro Factory Nutes by & for @Hy-Pro Fertilizers Soil: Atami light mix & 5mm broken puffed clay & 16mm puffed clay on the bottem of my 5.5L. pots Temp: 24,56 °C temp outside 15°C Lights: 12/12 Humidity: 49-52 % Vpd kpa: 1.3-1.4 Roots 17.50°C Ph : 5.90 Tds/ec 1.5 Water: 0.8L. p.plant  23°C CO²: No Mercy Tabs & boost bucket Nutes by Hy-Pro Fertilizers HyPro : Spraymix 0ml by 1L. HyPro : Terra vegi & bloom 4.5ml by 1L. HyPro : Rootstimulator 5ml by 1L. HyPro : Generator 0.16ml by 1L. HyPro : Epic Bloom 00ml by 1L. HyPro : Cal-Mag  0.5 ml by 1L. Light distance: =55cm to plant = 30cm to CTgrow sensor dimmer on 80% = 980umol/m²PPDF +-10 Vpd/kpa  - 1.350 -1.400 Gear all controlled by @ctgrow 1x MarsHydro TSW3000 1x MarsHydro TSL 2000 Air Van: 900m³ Prima Klima on 30% Filter: Prima Klima 660m³ for seed& veg stage & 660m3 CanLite for bloom stage 3 l water cooling airco Diamant... 3.3l humidifier 1.8l dehumidifier My grow room is variable in size 120cmx120cm² Custom Grow space for sog 150cmx150cm for scrog   Big THANKS to my lovely sponsors : Super Strains,  HyPro Fertilizers, Amsterdam Seed Center, Zamnesia, Inseedious, BTB Grow Supplies, Mars Hydro & CT Grow Systems
Likes
22
Share
@Fatnastyz
Follow
Day 44 10-8 Tea and slight defol. Shes got a tall branch! Look at it go! 😱😁🤘 10-9 Water, leaf removal. 10-11 Water yucca cal/mag. Tea soon. 10-12 Day 48 Well her head was way above the rest, so she got bent down. Personalsmokes talked me into. He said, go for it! So I did! 😂 Hopefully i didn't F her up. No clue how she got away from me, but this is something new for me. 😁🤘 Light is amazing on everything now! .
Likes
16
Share
@Dunk_Junk
Follow
Only 1cm vertical growth this week, but she's been pushing out some leaves! She seems happy so far.
Likes
28
Share
Day 36 - It's week 5 already! The canopy is really gaining height day by day. Tied some more side branches down and adjusted the tie down on the main branch. Day 37 - Trying to figure out the correct watering amount. 1.5L was too much today will lower tomorrow to 1.2L. Day 38 - Plant is looking good today. Adjusted the tie downs on some branches. Watered with 1.3L and run off was still around 350ml so lowering tomorrow to 1.2L. Day 39 - Watering with 1.2L today. There was still no run off, I'm putting this down to the increased fan speeds, longer open tent periods and the plant growing more vegetation. My 2L watering can should arrive today, so I will be able to mix nutrients in one reservoir and water more accurately. Removed 3 of the bottom most fan leaves which had a branch large enough to support itself. Day 40 - Watered with 1.5L today. Removed 1 fan leaf and tied down a side branch. Run off was around 100ml. I also set the fan speed back to 1, as I think 2 was too strong for the plant and dehydration levels of the soil. Day 41 - Watered with 1.6L today. Run off of 400ml (25%). Getting pretty bushy now almost stretching to all sides of the tent. Day 42 - Watered with 1.4L today. Run off was 150ml (10%). She's now 32cm tall with the light hanging 36cm above the highest tips. That brings us to the end of Week 6. It looks like we are a day or two away from starting to flower properly. Bring on Week 7!
Likes
24
Share
so were almost at harvest, have begun flushing this last week and hopefully will be chopping beginning of next week, then the cure... CAN NOT WAIT TO BUST UP SOME OF THESE NUGS AND PACK THEM IN THE BON 😆
Likes
17
Share
Great lemon strain. Grew and smoke it before, very nice smell and dence buds, weight update soon. Ok can't be happier 🤩🌴 total weight from 3 trees are 316 gr of rock solid top quality bud. Didn't weight all the bottom trim but that's another 70gr on top of that at least. So almost 400gr 🤩😶‍🌫️ Seedsman genetics rocks hard💚🔥 Total harvest weight of 54 trees is 5kg, of solid quality buds, around 2kg of small bottom buds
Likes
45
Share
Info: Unfortunately, I had to find out that my account is used for fake pages in social media. I am only active here on growdiaries. I am not on facebook instagram twitter etc All accounts except this one are fake. Have fun with the update. Hi everyone :-) . It develops beautifully :-). This week I will start training. I will top them very often this time. Everything was cleaned and checked. Have fun . Stay healthy 🙏🏻 You can buy this Strain and Nutrients at : https://greenhouseseeds.nl/ ☝️🏼☝️🏼☝️🏼☝️🏼☝️🏼☝️🏼☝️🏼☝️🏼☝️🏼☝️🏼☝️🏼☝️🏼 Green House Seeds Company Cup Clone 🏆 Type: Wonder Pie ☝️🏼 Genetics: Wedding Cake x OG Kush 👍😍 Vega lamp: 2 x Todogrow Led Quantum Board 100 W 💡 Flower Lamp : 2 x Todogrow Led Cxb 3590 COB 3500 K 205 W 💡💡☝️🏼 Earth: Canna Coco ☝️🏼 Fertilizer: Bio Grow Feeding ( GHSC ) , Enhancer ( GHSC ) , Bio Bloom ( GHSC) ☝️🏼🌱 Water: Osmosis water mixed with normal water (24 hours stale that the chlorine evaporates) to 0.2 EC. Add Cal / Mag to 0.4 Ec Ph with Organic Ph - to 5.8
Processing
Likes
8
Share
Have been using half strength this far and switching to full strength for nutes & continuing to use tap water.
Likes
35
Share
Bonjour à tous les padawans et les maîtres jedis Pour cette semaine je prévoit de pratiquer comme technique spéciale le LST et juste un arrosage. Pour cela comme à mon habitude j'attend le cinquième noeud ou que je juge la plante robuste. Je profite que cette semaine qui va être relativement calme pour faire un LST appliqué et vous faire un rappel de ce qui est pour moi la meilleure technique pour arroser une autofloraison et la façon dont je pratique le LST. En suivant ces quelques simples conseils vous obtiendrez un résultat optimal tout au long de votre culture : Le cannabis est une plante qui n’aime pas recevoir un léger arrosage en continu. Il est impératif de l’arroser en grosse quantité, puis d’attendre que la terre soit bien sèche avant d’arroser à nouveau! Pour calculer la quantité d’eau nécessaire à chaque plante, suivez cette règle : Le volume d’eau à donner lors de chaque arrosage doit représenter au moins environ un quart du volume du pot !! Exemples : pour un pot d’1L, donnez 0,25L d’eau à chaque arrosage pour un pot de 4L, donnez 1L d’eau à chaque arrosage pour un pot de 12L, donnez 3L d’eau à chaque arrosage pour un pot de 30L, donnez 7,5L d’eau à chaque arrosage !etc… Pour donner un tel volume d’eau, il est souvent nécessaire d’arroser en deux (voir trois) fois, lentement et uniformément sur toute la surface. Disposez de bonnes coupelles sous les pots, celles ci se rempliront d’eau qui remontera dans le pot par capillarité en moins d’une journée. Il est également très important d’utiliser un bon terreau de qualité, avec une bonne capacité de rétention d’eau mais qui assure également un bon drainage (celui ci doit contenir de la perlite, et/ou de la coco, etc..) Il vous faut alors maintenant attendre quelques jours en sous-pesant régulièrement les pot avec vos bras. Quand ils seront redevenus très légers, vous pourrez arroser à nouveau !! En effet, comme l’eau pèse beaucoup plus lourd que la terre, un pot gorgé d’eau pèse plusieurs fois le poids d’un pot d’une plante prête à être arrosée. Avec un peu d’entraînement, vous apprendrez donc très rapidement à sous-peser vos pots pour savoir quand une plante a soif. C’est une technique à la fois très facile et très efficace, et qui peut être appliquée à toutes les plantes en pots ! En arrosant de cette façon, en général vous devrez arroser vos plantes tous les 3 à 6 jours. Pour cette semaine 3 au jour 17 ma plante fais 12 centimètres et son cinquième noeud apparaît je décide donc de pratiquer un LST sur ma plante. Pour ce j'utilise du fil de fer galvanisé que je plante directement dans le substrat en faisant attention de ne pas endommagé les racines car n'oublions pas que ce qui pousse dessus pousse aussi dessous. Jour 17 je pulvérise du une solution composé d'une cuillère à café de savon noir mou dilué dans un litre d'eau en prévention d'éventuels nuisibles. Je corrige mon LST suivant la pousse de ma plante ... Pour ma par c'est la manière dont je procède. Comme promis petit rapel de: Quand commencer à appliquer la technique LST De nombreux cultivateurs commencent la manipulation dés que les plantes possèdent entre 3 et 6 nœuds ou une paire de feuilles. Durant cette première étape de la croissance, le tronc encore flexible est pliable sans risque qu’il ne se casse, même si au fur et à mesure du développement de la plante il sera de plus en plus difficile de le plier. Nous pouvons continuer à guider la croissance des branches durant toute la culture, même durant la floraison, ce qui pour cette étape représente un grand avantage face à la taille, qui n’est pas du tout recommandé une fois que la formation des têtes commence, cela stressera en effet la plante, ce qui aura pour effet de retarder la récolte. Comment appliquer la technique de guidage LST Si nous sommes prudents, la flexibilité naturelle des fibres du cannabis permet de plier leur tronc et branches avec une relative facilitée, même durant la floraison des plantes. En utilisant une corde fine, nous pouvons accrocher la pointe de la plante à la base du pot par exemple ou à un tuteur que nous aurons planté dans le substrat. Nous plierons le tronc avec précaution et nous le fixerons avec la corde, à partir de là, nous pouvons augmenter progressivement la tension de la corde, chaque jour un peu plus, jusqu’à obtenir la position souhaitée. Soyez attentif à la réaction de la plante, essayez de ne pas appliquer trop de pression sur la corde et rappelez-vous que la flexibilité des branches peut varier d’une plante à l’autre. Pour obtenir de meilleurs résultats, il suffit de suivre quelques règles simples. Pour commencer, nous devons choisir une corde fine mais pas trop pour ne pas blesser les troncs au fur et à mesure qu’ils grandissent et qu’ils deviennent plus gros. Nous pouvons utiliser des crochets en plastique souple ou de n’importe quelle autre matière flexible pour éviter d’endommager les plantes. Spécialement en intérieur, utiliser des cordons en plastique de couleur (voir les diaries de @Silky) est très pratique pour voir facilement les accroches et faciliter le travail au milieu du réseau formés par les cordes, les tuteurs, les mailles ou les supports que nous aurons dans la culture. Bien entendu, en culture extérieure et surtout en guerilla nous ferons juste le contraire et nous utiliserons des matériaux de couleur qui n’attirent pas l’attention pour que notre jardin reste discret. Pour stresser les plantes au minimum, la mieux est de réaliser ces manipulations le soir ou juste après que les lampes en intérieur s’éteignent, ce qui leur permettra de se remettre durant la nuit. Normalement, le jour suivant nous pourrons observer comme les pointes des branches que nous avons pliées se dressent de nouveau vers le haut à la recherche d’une source de lumière. Que la force soit avec vous
Likes
5
Share
Very few white pistols left. I have started checking tricomes now for peak harvest time (hopefully) lol. 11/9/22 Added tricome pics and video to this week. Starting to turn milky, which is what I want, so I'll be keeping an eye on her.
Likes
42
Share
@JeyJo
Follow
Diese Woche war Wetter Technisch wieder tiptop. #3 wurde entlaubt von unten kleine Triebe entfernt, oben wird sie die Tage auch noch etwas freigeschnitten. Die Blüten entwickeln sich sehr gut. Anfang Blütewoche 3 gab es dan 25g Phosphor pro Pflanze. In der laufenden Woche wird #1 und #2 entlaubt und freigeschnittem
Likes
5
Share
La pandemia kush es la más avanzada y se le empezará a regar solo con agua al igual q la Trimosa x mimosa_1 La Trimosa x mimosa tiene un problema con absorción de agua, pero ya está siendo solucionado
Likes
79
Share
Greetings, fellow cultivators and green thumbs! Today, I'm thrilled to share the exciting journey of germinating the Epsilon F1 from the generous folks at Royal Queen Seeds. Buckle up, my friends, because we're diving deep into the art and science of bringing this beauty to life. Step one, the initiation ceremony: I submerged our precious seed in a water bath for a luxurious 24-hour spa session. Why, you ask? Well, it's all about hydration, my friends. This ritual kickstarts the awakening process, encouraging the seed to absorb moisture and activate those dormant life forces within. Now, onto the VIP treatment — the Soil Plug sponge. Picture this: a cozy, nutrient-rich haven where our Epsilon F1 can stretch its roots and prepare for its grand entrance. I carefully placed the seed into the sponge, and lo and behold, within a mere 24 hours, a tiny tail emerged. It's like witnessing nature's own magic show, right in my grow space! And then, the big reveal! Our little Epsilon F1 burst forth, ready to conquer the world. It's like welcoming a new member to the family, complete with cheers and applause. But wait, there's more! I've chosen to dance with Aptus Holland nutrients, my trusted sponsor and the organic mineral line that has never let me down. Because, you see, a plant's gotta eat, and I'm only serving the best. Now, let's take a moment for the traditional shout-outs. Big love to @James and Royal Queen Seeds for the Epsilon F1 hookup; this journey wouldn't be possible without you. Cheers to Grow Diaries for being the virtual garden where we share our victories and lessons. And of course, mad love to all my followers — your support is the wind beneath my plant's leaves. So there you have it, folks. The Epsilon F1 is awake, the nutrients are ready, and the adventure has just begun. Stay tuned for more updates, as we watch this green marvel blossom into something truly spectacular. Happy growing, and may your harvests be bountiful! As always thank you all for stopping by and for supporting me on this journey, i am super passion about growing and fell blessed to have you all with me on this new journey <3 <3 <3 Genetics - RQS EPSILON F1 Ligth - LUMATEK ZEUS 465 COMPACT PRO 
Food - APTUS HOLLAND 
 
All info and full product details can be find in can find @ https://www.royalqueenseeds.com 

https://aptus-holland.com/
 
https://autopot.co.uk/ 

https://lumatek-lighting.com/ With true love comes happiness <3<3<3 Always believe in your self and always do things expecting nothing and with an open heart , be a giver and the universe will give back to you in ways you could not even imagine so <3<3<3 <3 <3 <3 Growers love to you all <3 <3 <3
Likes
11
Share
Really happy with this harvest She grows very well using topping, LST and defoliation I fed them with half of the recommended dose for a photoperiodic all the growth
Likes
5
Share
Flowering day 34 since time change to 12/12 h. Hey guys :-) The buds have developed incredibly nicely this week. The smell is getting more and more extreme :-) . The growth has slowly stopped as the full energy goes into the production of the buds. Watering was done twice this week, each time with 1.2 l (nutrients see table above) They were individually inspected and checked for their health. Osmosis water for the coming week was refilled in a 100 l tank 👍. Have fun reading the diary and stay healthy 💚🙏🏻 👇🏼👇🏼👇🏼👇🏼👇🏼👇🏼👇🏼👇🏼👇🏼👇🏼👇🏼👇🏼 You can buy this Nutrients at : https://greenbuzzliquids.com/en/shop/ With the discount code: Made_in_Germany you get a discount of 15% on all products from an order value of 100 euros. 👇🏼👇🏼👇🏼👇🏼👇🏼👇🏼👇🏼👇🏼👇🏼👇🏼👇🏼👇🏼 You can buy this strain at : https://gardenofgreenseedbank.com/candyland/ Water 💧 💧💧 Osmosis water mixed with normal water (24 hours stale that the chlorine evaporates) to 0.2 EC. Add Cal / Mag to 0.4 Ec Ph with Organic Ph - to 5.8 - 6.5 MadeInGermany
Likes
6
Share
Likes
12
Share
Space is limited and I'm struggling with the time to keep up with these plants since things are back to normal on my parts of town. Just gonna keep about eye on em at keep defoliating