
Likes
Comments
Share


@Kirsten
Follow
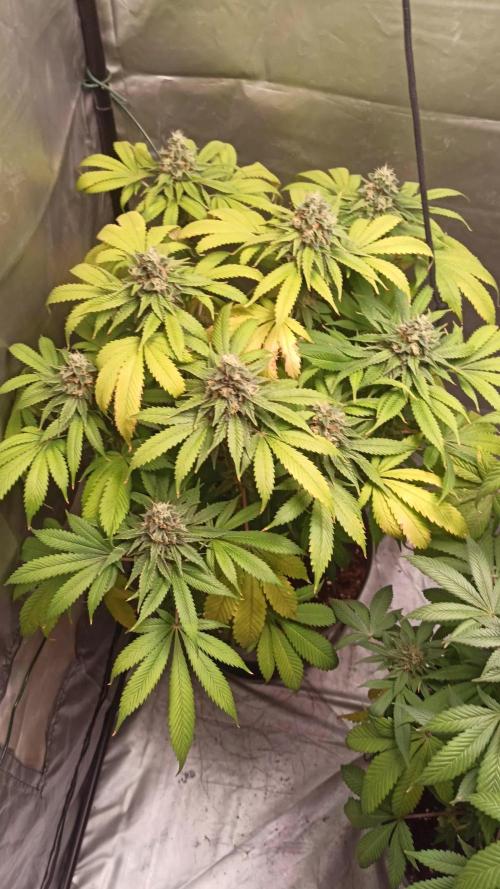
26.12.24:
I have noticed light stress on my plants. I had moved the lights further away and increased the light intensity to 70%. Unfortunately that created some issues. Namely severe palour of the leaves.
To try and rectify the situation, I've dimmed the lights to about 30%, staying at the same distance, about 30 inches away. I measured the par levels, after I did this. They should a reading of anywhere between 40 and 150, at the canopy of the plants. They are all different sizes. This seems to have improved the colouring on all plants.
After this evenings watering, I will monitor recovery and increase lighting intensity again slowly. I am also using the light cycle of 21/3, so the plants have many hours more light to absorb, than for example 12/12 or 18/6.
I am pleased with the progress, considering all of my mistakes!
29.12.24:
So I finally gave LST a shot, it's probably a bit too late, however I really want to get the most of the triploid pheno, and I went a little crazy and LST'd all plants except 2, as they're too small.
I did that late last night, this afternoon I was amazed to see the plants turn their leaves back to the light source. I'm glad I overcame my fear of trying it. I'm very excited to see them adapt and progress! 😁 there are videos above with before and after of my LST process.
Thanks for checking out my diary 🍃 ✌️


Likes
8
Share


@TakinTopsDaiily
Follow
So this week I did a few upgrades in my garage. First off, I insulated the garage itself to minimize wasting energy keeping my garage warm. Secondly I put a little space heater to help keep my temps more consistent, especially when my lights go out for 8 hours it tends to drop into the mid 50’s, which personally is too low for veg for me anyway. My babies are starting to do some growing now, and with this weeks little bump up in nutrients, I think they will begin to take off. I went up with the calmag as I’m using 100% coco coir as my medium, and it really does eat up a lot of Calmag. I think my babies will get nice and green and have a nice life in my updated garage. Lemme know what y’all think, I’m happy to share and document not only successful grows, but failures also with everyone. We need to humble ourselves and learn to be better from one another everyday. Stay blessed everyone, HAPPY GROWING!
Processing
Likes
45
Share


@Kelseyheart
Follow
Hiii guys!! Everything's going!
Flowering .. bud sights getting bigger. Plant stopped growing more leaves .. isn't getting any taller. BDM 1 has more bud sights but they are smaller and BDM 2 has bitter bud sights but there are less. So you guys can see a comparison between the all natural and the stress training . Let's see if BDM 1 catches up! Stay tuned fam!

Likes
26
Share


@Highgrade_Harvests
Follow
Thank you everyone for following this grow. Thanks again to Seedsman for allowing me to be a part of the #Seedsman420GrowOff! Always amazing genetics and their customer service is top notch! If you want to grow some killer weed, hit seedsman up! Follow my channel for my highgrade Harvests! @

Likes
7
Share


@Stickygreens420
Follow
1/8/2023: chop day for the Newberry! Like the other plants, I will be drying the whole plant, along with the Orange Bubblegum in a 2x2 AC Infinity tent, with the temp and humidity as close as I can get to 60° F
and 60% humidity. The portable AC unit and humidifier do a good job keeping me in range. This was very easy plant to grow. Other than a few nanners the last week in flow, I had no problems with her. Smells amazing and looks amazing too. Can't wait to try growing this one again.

Likes
37
Share


@BB_UK
Follow
Purple urkle is a beast! She’s producing trichromes all over shining for the world to see! Got sweet and deep gassy aromas coming off her too. like a candy shop already! A few weeks to go and we’re done! Stay tuned! It’s always exciting from here!
Likes
Comments
Share


@GrassWhisper
Follow
Second week, little to tell, the girls are big and looking to root, I have passed them to pots of 3 liters, at the moment only water and Rhizotonic to stimulate, and are already under the 600wLED

Likes
10
Share


@StickyFingah420
Follow
Día 81 y no puedo estar más ansioso porque ya ha llegado el tan anhelado día de la cosecha 🤩, esta hermosa planta excelente un aroma dulce, cremoso y un poco ácido como frutillas.
Luego de la sesión de fotos se cortará por ramas y será colgada en la tienda de cultivo con ambiente controlado.
Volveré en unos días luego del secado para dar una reseña sobre el sabor y aroma de esta belleza.
Como siempre agradecer a FastBuds por tan buenas semillas.
BUENOS HUMOS 👽


Likes
26
Share


@DisTentAint4Campin
Follow
Growing great in week 8 day 2 bloom fed her the last time going to do winter frost and straight water out the gate I started supplementing phosphorus and it fatned them buds up some these girls are heavy eaters

Likes
10
Share


@Bread_n_Buds
Follow
Here we are at the halfway point, after the first month our photoperiodic plants are multiplying their florets and then going into flowering.
Slurricane is a lady with low internodal distance. This characteristic greatly influences the application of growing techniques. In this case it is a plant that responds to topping a little slower than the others and it is best to wait for the branches to grow to avoid damaging the little ones. However, we are at 4 florets and between tomorrow and the day after tomorrow we will cut 8. My plan for photoperiodic plants is to get to 16, wait a few days and go into flowering. 16 florets as I see it is the perfect size for the 11 liter pot.
Topping is an extremely delicate moment as regards cutting the tops to split them, we always pay attention not to damage the new growing branches.
Topping is also a delicate moment as regards fertilization because the plant slows down and absolutely does not need all that nitrogen that it would normally need and that the producers recommend in their sheets. So you should arrive with the plant green and perfectly in shape at this moment and dose the fertilizer very well for growth.
Mine came from a slightly deficient veg because I kept it low fearing this over effect during the topping that I know well and now I am a bit over. Nothing to worry about, of course, but if you do repeated topping, my advice is to use preferred soil or prepare the soil with Monster Bud Mix by Zamnesia or Plagron Super Mix, in short, enrich the soil at the start and only add nitrogen if necessary, especially during repeated topping.
In any case, everything is under control and I will demonstrate it to you during the flowering phase. Wait for the Uncle BreadandBuds and see what it does to you.
Remember that cold temperatures make the girls absorb food much more slowly than in summer, so be careful to give the right amount and let the plant dry in maximum 2 days or you risk imbalances.
We are always using soil, feeding and all the recommended additives from Plagron 100& organic, we have only lowered the amount of grow in this topping phase for the reasons mentioned above.
---- Decide on the right soil and calculate your fertilizer sheet based on the soil on the official website.
-- www.plagron.com
Try a seed of this strain that drives us crazy...It's a super News!
---- https://www.zamnesia.io/it/11177-zamnesia-seeds-slurricane.html
Zamnesia Description // Do you want to add a prestigious genetics to your grow room? Slurricane is a premium US strain created by In House Genetics and now available to growers thanks to the breeding processes implemented by Zamnesia. Born from the fusion of Purple Punch and Do-Si-Dos, Slurricane is 60% indica and incredibly vigorous. Whether grown indoors, outdoors or in a greenhouse, this strain can produce large quantities of dense and aromatic buds. Add Slurricane to your assortment and enjoy growing one of the most beloved hybrids in the United States.
All the best that mother nature can offer is on ---- www.zamnesia.com
Likes
18
Share


@North420Wolf
Follow
The small pineapple and the zkittles are in the 2nd week of flowering the other 2 on 1st also I have one random auto I don't know the breeder
Likes
9
Share


@Siriuz
Follow
Alright guys so last time we went from 1400 to 900 ppm only adding plain water
She is doing great, developing more new buds and fattening those small pop con buds you get below where lights wont get thru with that much intensity....
Smells wicked good and should taste awesome once its dried and cured
Im still going to week some more weeks
I dont know if is the region but my plants over here since is always spring and SuMMer they tend to produce and last longer i just noticed because even tho we at week 15 they still growing new buds which is kind of amazing
I still got one gorilla girl xl
This one is going to grow using only
LST / HST and defoliation at the latest
Otherwise it will slow down production
Learned the hard way with this strain
My first one died the second one got eaten by a worm go figure and this third seed made it so far and when she was flowering I accidentally main line her, good thing duct tape was near me so I could help her heal and with so much caring she was finally up again and did not lose any buds but that took too much energy while pre flowering did not create many spots but good dense fat buds full of crystal and at least you get to see those impressive colors
Thanks for giving me support
Likes and comments are always welcome
You can also suggest me things as well
I am all ears brothers happy growing
Follow me for more at the Instagram
@cannagrowersiriuz
Have fun
P. S.
ADDING MORE CONTENT AS IT GOES!
Enjoy the videos and my thoughts about
Gorilla Girl XL from sweet seeds
At week 15 from seed
Schedule 18/6

Likes
6
Share


@mikheil007
Follow
An amazing strain is Vanilla latte: it shows 25%THC and 4%CBD !!! STONY!!! Perfect taste, smell and effect.


Processing
Likes
20
Share


@Cinderman
Follow
Same nutes, I'm keeding usually but 1/3 than usage even less.. sweet smell start raising stronger.


Likes
1
Share


@RussianGrower
Follow
10 weeks. 70 days. Auto AK 47. Soon I will make updates at harvest and create a new diary of guerrilla outdoor.

Processing
Likes
20
Share


@Mr_nugs_lover_David
Follow
This lady has ended up with a very big size, she's such a nice bush full of sweet stinky colas, tje nuggets are very hard and the resin production is top, very terpy, the aroma is starting to become more and more like cherry 🍒 but with some floral notes. Definitely would love to run her again for sure! 🔝 Very stable strain. All of my 5 black cherry punch have the exact same aroma. 💎💯 She's in a super living soil full of beneficial bacteria and 100% organic nutrients. I'm using Silicium flash by biotabs which contains a lot of beneficial fungus and bug shit. And FLO which is the super food full of aminoacids, a lot of diferent strains of endomycorryzhae and mycorrizae. It's like 100% natural steroids for organic plants, the aroma are so pure and clean. GUYS TRY TO ALWAYS GO THE ORGANIC WAY! YOU'LL NOTICE THE DIFFERENCE 💚🤞💎🌱 pd she's algo got kalong powder and seaweed powder by guanokalong.

Processing
Likes
61
Share


@Dunk_Junk
Follow
She's over doubled her height this week!!!!!!!!!!
Looks like she's going great!
An educated guess says she is just about to enter flowering in the coming week.
Likes
7
Share


@Greenislandfr
Follow
Je suis vraiment surpris 😲 le tronc a souffert c'est la 2e fois qu'il se fend en 2 cette fois c'est le chat qui a voulu sauter dedans je comprend pas trop il a du kiffer la plante et s'faire un kiff mais bon j'ai des gros dégâts a cause de lui j'ai réparer comme j'ai pu avec de laloe vera en gel pour cicatriser et du propolix (cire d'abeille) pour prevenir d'un état fongique. Dailleur le propolix sa a l'air de marcher je traite par arrosage quand je voit qu'il va pleuvoir +2jour a raison d'1.5ml par litre (entre 69 et 99% d'humidité en général ce mois d'août).
Les têtes sont collante et grossise a fond grâce au bactobloom utilisé avant le propolix bien sur et du Green sensation de plagron. J'ai réadapter l'engrais de floraison j'ai changer pour alga bloom. La plante a eu une mini carence car le top bloom de top crop il est vraiment puissant 😂
L'odeur est légère mais pas oppressante c'est une odeur de Zkittlez/Gorilla glue donc En note de tete le sucre typé 🍬 avec des note de pin/gaz avec un soupçon de café. J'ai aussi installer un filet scrog qui ressemble à rien mais qui est efficace pour le vent et bien aéré les têtes car elle vont être dense et lourde je vais devoir surveiller les attaque fongiques de très près. Pour les nuisibles type thrips j'ai jamais eu une seule piqûre sur la gorilla Zkittlez
