The Grow Awards 2026 🏆
Likes
Comments
Share
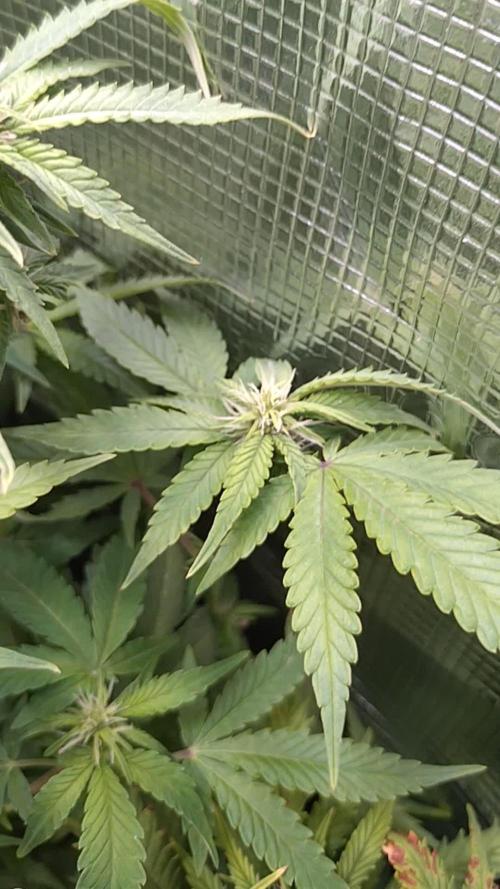
Defoliated the inner leaves and noticed her stretch was inevitable. This could be her last week in veg mode as her stretch is extreme and I would like to avoid breaking when shows up the buds.
Likes
12
Share
The Cookie Girls are doing great 😊 Overall, I’m very pleased with the results so far. At day 8 I stopped tucking the branches and allowed them to grow up. In hindsight, I probably should have kept going for another couple of days. They continued to stretch rapidly all the way up to date 12 or so. At day 10 I cleaned up some of the small bud sites and leaves that were below the 1st trellis. These sites do not get enough light to make anything good, and take away energy from the main tops as they grow and compete. At day 12 I decided to add a second trellis net to provide support to the tops that came up so fast. They seem to have stopped their main stretch faze, and are looking happy and healthy now. I’ve continued my water, water, feed schedule and have not seen any cause for concern. The girls are taking a little over a gallon of water every 72 hours at this point. Humidity is being controlled automatically with my in-line fan and humidifier. RH is set to 57% and temps hover between 77-80 degrees with lights on, and about 70-72 with light off thanks to my furnace being back on for the cooler temps. The 2x4 5 gallon girl is doing great as well. 😊During the stretch, while I tucked, I snapped more than a couple of tops off, but the plant continues to thrive. She is going to have some great bud, the branch structure is nicely developed with tight node spacing. I’ve been plucking off all the lower growth, and tucking leaves as they block bud sites. Will be doing a defoliation next week. Happy Gardening 🇨🇦👊❤️
Likes
36
Share
Info: Unfortunately, I had to find out that my account is used for fake pages in social media. I am only active here on growdiaries. I am not on facebook instagram twitter etc All accounts except this one are fake. Have fun with the update. Flowering day 1 since the time change to 12/12 h. Hi everyone . Yesterday it was placed in the flower tent. Next week the lowest shoots are removed so that you can put your energy upwards. In addition, she will get 2 g GHSC Bio Bloom per L coco next week. Otherwise, as always, everything was cleaned and inspected. I wish you a lot of fun. Stay healthy 🙏🏻 You can buy this Strain at https://www.barneysfarm.com/blue-cheese-34 Type: Blue Cheese ☝️🏼 Genetics: Blueberry X Original Cheese 👍 Vega lamp: 2 x Todogrow Led Quantum Board 100 W 💡 Bloom Lamp : 2 x Todogrow Led Cxb 3590 COB 3500 K 205W 💡💡☝️🏼 Soil : Bio Bizz Coco ☝️🏼 Fertilizer: Green House Powder Feeding ☝️🏼🌱 Water: Osmosis water mixed with normal water (24 hours stale that the chlorine evaporates) to 0.2 EC. Add Cal / Mag to 0.4 Ec Ph with Organic Ph - to 5.5 - 5.8
Likes
52
Share
@Salokin
Follow
The High intensity was to strong (clearly my fault) in the beginning which stunted her overall stretch, she however still delivered super dense, terpene and trichome loaded buds.
Likes
23
Share
Exciting week the plants are all out of germination and into their veg growth stage. This means we get to begin the exciting work of building our soil. When the plants veg growth reaches the tips of the pots, this indicates the roots also have and your plant is then ready for more room. We have a fantastic grow shop in town that is great about soil classes and teaching you some great essentials. We plan on utilizing this resource and will keep you updated with the progress of the soil build. Stay tuned for compost tea as well ;) Stopped by the grow shop to get the run down on the soil build. Because building your own soil creates hot soil, it needs to sit for 6-8 weeks. This obviously won't work for our purposes on this grow. After some deliberation we decided to go with a pre built soil that has already sat and composted. We are going to go with Build A Soil because they have done tons of research into their super soils. We want to do a super soil so that we don't have to top dress or add in any nutrients, we want the grow to be as natural as possible. After looking at Build A Soil's options we are leaning toward the L.O.S. OLY Recipe. This recipe uses 33% OLY Mountain fish compost. We want each plant to be able to finish out in the pots that we switch them into from their nursery pots. I recently found a new grow bag that we are going to try out for this next grow. It is a bag so it has a much larger circumference than the grow pots. It also has a lining on the sides of the grow bag so that it doesn't dry out from the sides like normal grow bags. This is our ideal growing situation because we are trying to simulate earth. When a plant is in the ground in the earth it doesn't dry out from the sides, we don't want our plants to either. The bags are very large (15 gal) but we don't want to fill to the top, in case we need to top dress more soil in the future. We use one cubic foot bag of soil per plant per container. This change will happen tomorrow at the turn of the week. Starting week two of Veg growth we will be in the containers that we finish in. This means minimal transplant stress and much less room for human error effecting my medicine.
Likes
56
Share
@Prilyfe13
Follow
February 23, 2024 Day 8 Both babies got 250 ml top water today. I'll check on them in a couple hours and see how they are. Other than that. Nothing else to do. I did want to mention how very similar these two are. I think they're the same phenome. Although, it may be a bit early to really tell. That would be cool though. Beautiful green color and perfect little stalk. The true fan leaves are starting to show themselves now, so I can officially move them into the Veg Stage. So for this week, the focus will be watering and ensuring the light intensity is at the right level. I'll probably wait another few days before I think about introducing some nutrients. I'd like to start when the true fan leaves are fully showing. As I've said before, the soil is used, so I think a bit of recharge and Advanced Nutrients 3 Part Base solution would be a good idea. At a minimum of course. I'm counting more on the recharge to really kickstart the soil back to life. I'm definitely going to need to do a full watering when the first node starts and with the nutrient solution. However, I feel like I may need to do that sooner rather than later. Based on my last grow, the biggest plant had the most water in the second week of growth. I even thought I overwatered, but nope. So I'm going to try to replicate that. Especially because this is a super fast strain. They'll need all the water they can get. I'll start that on my next watering. I'll bump it up to 500 ml and focus mainly on the outer rim to help the rest of the soil get to the right moisture level without disturbing the environment they already have at the base. The light is still the same distance from the plants with the same PPFD. I'll start to focus more on DLI in the coming days as they grow. I have my light schedule for the week and plan to stick to it, letting the intensity slowly increase for the start of the next week and so on. I was considering increasing the power to 40% when I need to increase the intensity, but I have so much distance to play with, I might as well keep it at the same level until I get some nodes going. By flower, I'm hoping to have a perfect DLI of 45 by flowering. And hoping to be able to bring the light up to 100% for super deep penetration by then. I'd also like to get the light down to 24" for the veg stage. It seems to be the sweet spot for the coverage footprint. Also, I think I got the Tent Environment down for once. The night temp drops to around 68° while the day temp, although slow to climb, stays around 77°. I'm hoping that doesn't cause a stunting issue with the temp swing at such a young age. I think it will be fine. We shall see. The average temp is a bit low though. I may increase the night temp to 72°. That should put the average over 75°. The RH is pretty steady across the board around 72% with it dropping a little bit to 68% and up a bit higher at night to 74%. The VPD is also spot on averaging around 0.82 kPa. During the day it climbs up to 1.03 and at night drops down to 0.77 kPa. It's a bit low for my taste, but with the increased temp, I should see a nice round 0.83 kPa at night. Someday I'll get an automatic humidifier. Anyway, I know it was a lot, but it's a new week. See you tomorrow: Grow System Environment: Temp: 74.6° RH: 71.8% VPD: 0.82 kPa February 24, 2024 Kind of a big deal today for both ladies. So I in have a pair of Tropicana Cookies sharing the tent with these plants. The TC is showing signs of deficiencies. So to combat that, I added a 1/4 tsp of Recharge to a gallon of water. As I'm growing both strains as similarly as possible, I fed 250 ml to all 4 plants. Hopefully the packaging is correct and it won't burn these little babies. They are definitely hitting Veg already. But to be on the safe side, I covered them with a Starbucks cup and then watered them. It kept the soil from getting saturated at the base and will also help promote outward growth. As for watering itself, I feel like I should be watering more to prep the soil for when the veg stage really hits and the roots start to search more. I'd like to get to the point of runoff by the end of the week. Maybe I'll add another 250 ml with the cup in place again tomorrow. I will also need to water at the base in the next day or so. They are both growing the exact same still. I know it's only been a day, but a lot can change in that time, so nothing yet. Plus, what else am I supposed to document? Stems are strong. Leaves are a beautiful green color and the true leaves are starting to spread more. Lookin good. I'd also like to mention that it is 16° outside today, so even with the heat cranked, it's not really doing much. So low temps for a bit today. Around 70° much too low, but not much I can do until the heat catches up. Grow System Environment: Temp: 73.4° RH: 67.6% VPD: 0.90 kPa February 25, 2024 Not much to do today. I'll either water 250ml today or 500 ml tomorrow. Either way, it's time to start wetting the whole container. I'm starting to think I should have done this the day before planting them. Oh well, I'll try that next time. For now, I'll stick with the gradual watering. It'll be increased again next week if needed. These babies look great. The leaves are getting longer and seem to be a medium width. Much like a true hybrid. So far at least. It's still pretty early to tell. We shall see. The light intensity is pretty good as well. No changes needed at the moment. However, I have a feeling I'll be dropping it an inch or two in a couple of days to match the schedule. I don't think I need to increase the power yet. I'll start increasing the power when I start training. It makes sense. I'll be pulling the tops down, so the DLI will be off a bit. But instead of dropping the light, increase the intensity so it can penetrate the new canopy right away. And if I can hover between 22" and 24" light distance, it should be perfect. I feel like that has the best footprint for this setup. Interesting Theory: Mostly for My Records: I may be slow on the info, but I think I figured out how brightness and distance make a difference in PAR and Brightness as well as footprint. The light distance defines the footprint. And the light power defines the brightness. Combining the two makes for a PAR reading. However I feel that the higher the brightness, the deeper the canopy penetration. Distance doesn't really change the brightness. It does change the PAR, but we can fix that with Distance. As long as we match the PAR reading to the proper level, there's no difference, correct? Maybe not. A less bright light even super close to a canopy would not be strong enough to penetrate the canopy because the power isn't strong enough. Even at the same PAR reading, it still wouldn't be powerful enough to penetrate. On the other hand a brighter light with the same PAR reading would work differently. Same PAR reading at a higher distance. But the power would also be higher. I feel that the light will penetrate deeper as long as the PAR remains the same. An example is a too large plant for the setup. Light distance was under 9" and power was down to 30% the PAR reading was much too high even with such low power. The light however couldn't penetrate below the first set of leaves and buds very well. But, in a smaller tent with a 100 watt light, I grew a wonderful plant where the light penetrated the canopy deeper because it was brighter and the distance was deeper. The plant wasn't nearly as big as it was in a 2x2 tent and 1 gallon container compared to the 3x3 tent and a 5 gallon container. But it had dense buds almost all three way down to the base. The larger plant had bud as far down as I allowed, as it mostly came out as popcorn, loose buds and some larf. This all brings me to believe that light power directly affects the canopy penetration and not necessarily distance. Distance plays a role with footprint and brightness, but not power. I also believe light heat makes a difference as well. A brighter light is warmer and plants like to be warm. So they will stretch to the warmth of the light as well. Less power means a cooler light and a less happy plant. My opinion of course. As I'm keeping this for my records, if anyone has any extra info, or correcting facts, please let me know. I'd rather have a theory be corrected or supported so I have the correct information. Doesn't matter how old this Diary is as I check all comments. Thanks in advance! Update: I decided to water in 250 ml of Recharge without the domes. I'll do another 250 ml tomorrow with the domes on and so forth until they get too big to fit under the dome. Then it will be normal watering. Grow System Environment: Temp: 76.1° RH: 74.4% VPD: 0.57 kPa (a bit low, but I'm measuring 2 different probes) February 26, 2024 Mid-week update: Both ladies are looking great! Still wonderful green and growing nice and steady. They are about 6 cm tall or 2 3/4". DLI: 18.1 mol/m²/d PAR: 280 ppfd. I also watered in another 250 ml with the domes on today. I'll run the 250 ml daily until week 3 and then I'll change it up to 500 ml every other day for that week. After that, everything should be good to go for the flowering stage. I'll also install the basins after week 3. It should be excellent timing. They are 1 gallon basins. So refilling should be every other day or so. The goal with this run is to not have to top water at all. The basins should work perfectly as long as I set them up properly. Grow System Environment: Temp: 75.8° RH: 70% VPD: 0.83 kPa February 27, 2024 So major problem in my opinion. My humidifier is blanketing the whole tent with the white powder they give off. I wasn't running my exhaust fan as I didn't need it at all. So I turned it on as low as possible and started one of my circular fans. Hopefully that solves the problem. I had to carefully wipe it off of Banana PP B. However, regardless of the powder, these two are growing quite nicely. Maybe a little slower than I was hoping, but still nice steady growth. They both got a little misting today as well as will be getting the 250 ml watering after the water comes up to room temp. This watering will be PHed to 6.0 and will be dome free. There was still about 400 ml of Recharge left, so I let it stay and just won't add more til next week when I start the base nutrients. I'll also be adding Cal/Mag. Other than that, they are still super green and super healthy. Hopefully they take off when the base nutrients kick in as well as the container soil being properly moistened. Grow System Environment: Temp: 74.7° RH: 60.6% VPD: 1.16 kPa February 28, 2024 Not much going on today. They both got their daily 250 ml watering PHed at 5.95. I didn't go near the base though. So it's kinda like having the dome, but not as precise. They are slightly reaching and the first set of true leaves are finally starting to pop out. The node is also growing at what seems to be a wonderful pace. Still a beautiful green and the stalk is nice and strong. Very straight as well. They do have a bit of a lettuce structure on the single fan leaves. It'll be fine. The true leaves look spectacular. Lighting is still pretty spot on. 2 more days and I'll be either lowering the light or increasing the intensity. At this stage I don't think I need to increase the power. The light distance is pretty far away. That gives me a good 6 inches of wiggle room. I'll increase the intensity when they start to grow a second node. On the other hand, I could keep the light where it's at for now and let the plants grow into it. Then I can increase the intensity when they get to that point. Week 3 from seed starts in 2 days. Which should be the true first week of Veg. I'll evaluate on what to do tomorrow. I'm pretty sure I need a DLI of 20 mol/m²/d starting next week. So I'll run the light at 350 ppfd or DLI of 22.7 mol/m²/d. Just above. It seems to be the perfect spot for these ladies. I'd also like to add that I've had zero issues with the 250 ml per day. It keeps the soil moisture just around 50%. Not sure if that means I'm not getting any deeper, but that's why I'll be starting 500 ml every other day next week. I feel that adding the extra 250 will help penetrate the soil better and a bit faster. Especially because those roots are going to start stretching past the dome width. And it's time for the roots to start growing down. Grow System Environment: Temp: 75.4° RH: 62.9% VPD: 1.09 kPa February 29, 2024 Today is the last day of the first week of plant life. Week 2 from seed. Both plants got the 250 ml top water without dome. Lighting looks great. Although, I noticed that a couple hours before lights out, they were both standing straight up like there was no light, but they still had a good 3 hours left. Strange or good? Either way, it'll be adjusted tomorrow to a DLI of 22.7 mol/m²/d. PAR will be 350 ppfd. I'm also going to try and lower the light a smidge. Maybe down to 26". We shall see what works best. Both plants are super healthy and right on track. Maybe a little slower than I'd hoped, but still steady growing. I feel like this will be a 4 week veg time. Greens are beautiful and she looks very strong. Leaves are growing nicely and I can only imagine they will take off when I start the Advanced Nutrients regimen tomorrow. At least I hope they take off. They should though. Tomorrow is around the time when they really start taking root. That in turn speeds up growth so I think I'm right on point here. I'm also going to be posting a video every week. Once the 2 start to show their differences and greater size, then they will each get a video every week. Update: I realized my plants were reaching a bit too much and leaning in toward the light. That being said, they definitely need more light, so I lowered it until I hit a DLI of 19.8 mol/m²/d. That way when I bring it up to 22.7 mol/m²/d it won't be hit so hard immediately. I should have dropped the light down a day or two ago, but oh well. It will be on point for the rest of the grow. Grow System Environment: Temp: 73.0° RH: 62.3% VPD: 1.03 kPa The temp slammed down over 50° last night and I'm having a bit of trouble combating it. It'll definitely take a decent amount of the day to re-acclimate. However, it should be fine. I have the temp in my room set to 80° so that should combat the sudden cold.
Likes
45
Share
@AsNoriu
Follow
Day 80 since seed touched soil. Lovely strain, grew nice for 0 care she got. Had bad summer, no sun, just rain, so developed slowly and small, would perform way better - no doubts !!! Happy Growing !!!
Likes
5
Share
overall Garden is looking great didn't look that great after Hurricane Florence's aftermath on the northern states
Likes
79
Share
Started the Mexican Airlines seed directly in soil on Tuesday and she broke ground today (Saturday). I've been reading a lot of good things about this strain and am looking forward to watching her grow. Setup: 24x48x72 grow tent 1 Viparspectra V300 300w LED fixture 1 Viparspectra R300 300w LED fixture 1 CFL 100w (26w actual) 4” exhaust fan w/carbon filter 190cfm 6” clip on fan Electric oil filled radiator behind air intake
Likes
126
Share
Guten Tag zusammen, Wir sind in Woche 4 der Blütephase angekommen. Bisher läuft es ganz gut. Die Blütenbildung ist voll im gange und so sollte es auch sein, denn nach dem Entlauben letzter Woche galt ihre ganze Konzentration nämlich darauf. Makro und Mikronährstoffe sind sehr gefragt. Wir versuchen einmal am Tag, ca.1 Liter Nährstofflösung in den Topf zu geben. Aber es gibt auch Tage bzw. eher Wochenenden, wo sie mal etwas auf Diät sind da wir nicht Vorort sind xD Bisher haben wir dort aber trotz allem, zusammen eine super gute Chemie entwickelt. Ansonsten zur re vege, die obigen Blätter sind schon dreiblattfinger. Jüngere Blätter beginnen sich zu Rollen was ein gutes Zeichen ist. Farblich gesehen und gesundheitlich passt es bei ihr aber auch. Dennoch haben wir den Haupttrieb getoppt, da es zu viel Masse für das kleine 60x 60x 120 cm Zelt gab. Somit auch nochmal ein wenig Schimmel gefahr vermieden. Ja ansonsten wünschen wir allen Growmies eine mega und erfolgreiche Woche! Genießt das des letztigen warmen Wetters und vielen Dank fürs vorbeischauen! VG 😎✌️
Likes
4
Share
@lotero
Follow
Las amnesia están malitas. Ns exactamente por qué es. El único fallo que creo haber cometido ha sido regar de más, supurando por abajo un par de veces. He regado cada 4-5 días (muy poco) así q ns si el sustrato está muy compacto y por eso no traga ni como airearlo
Likes
9
Share
Here we are day 48 for our Pineapple Express F1 Hybrid. We remind our friends, enemies, supporters, girlfriends, haters and company that she was born a little after the others, a week to be precise and if you notice that she is a little behind the other Zamnesia F1 Hybrids it is only for this reason. For the rest we proceed at an exhilarating pace, the plant has put in a lot of hemp, it has begun to swell the flowers well and is also resinating. To tell the truth, you can also see the first red hairs which for me is usually a sign to start the flush but be careful. These plants swell quickly and quickly and even a little amazingly. It is natural that while they swell at this crazy speed there is a need for fertilizer for flowering, you have to follow the tables very well and give something more if you see deficiencies. I kept her nice and full, a hair over because I noticed this characteristic of rapid swelling and it needs fertilizers accordingly. The plant is tall, promises to be productive and very very pretty. It is very suitable for photos, only the white background is not in a more advanced stage of maturation than the others and does not do it full justice. Let's wait until next week to see some drool-worthy stuff. Strong, fast, stable as promised by Zammi. https://www.zamnesia.io/it/10681-zamnesia-seeds-pineapple-express-f1-automatic.html Feeding is by Plagron with the Power Buds - Sugar Royal - Green Sensation + Alga Bloom combo that drives me crazy https://plagron.com The lights are from Viparspectra p2000 and provide super light www.viparspectra.com/ Tent & Air www.secretjardin.com Music of the week www.radionula.com +++ 432 hz frequencies to keep in line my Girls to Gaia. Site Description ZAMNESIA SEEDS - PINEAPPLE EXPRESS F1 HYBRID AUTOMATIC: FRUITY FLAVORS AND ENERGETIC EFFECTS Combining Trainwreck with Hawaiian, Pineapple Express F1 Hybrid Automatic brings a beloved strain to new heights. This autoflowering F1 hybrid cultivar ensures exceptional uniformity, reliability, and stability, making it well-suited to growers of all experience levels. If you've not checked out Pineapple Express F1 hybrid Automatic for yourself just yet, now is the time. GROWING PINEAPPLE EXPRESS F1 HYBRID AUTOMATIC All it takes is 8–9 weeks from germination before Pineapple Express F1 hybrid Automatic is ready to harvest. Thankfully, very little effort is required throughout the growing process, aside from a bit of maintenance, to ensure ample, high-quality harvests. Thanks to its F1 genetics, Pineapple Express F1 Automatic offers superb resilience and uniformity, meaning all plants will have a similar height and appearance, and will churn out comparably large yields. Reaching heights of 50–70cm, Pineapple Express F1 Automatic is not an overbearing plant and can effortlessly slot into any setup. Once ready to yield, growers can see a return in the region of 400–550g/m² indoors and up to 200g/plant outdoors. AROMAS, FLAVORS, AND EFFECTS OF PINEAPPLE EXPRESS F1 HYBRID AUTOMATIC Just one hit of Pineapple Express F1 hybrid Automatic treats users to a rich assortment of flavors and aromas. This strain offers strong pineapple notes alongside moments of citrus, spice, and pine, making for a mouth-watering blend that's extremely moreish. Bolstered by 21% THC and an array of cannabinoids, Pineapple Express F1 Automatic showcases an energetic and uplifting high that will have you feeling chatty in no time. So if you've been looking for a strain to enjoy with friends, Pineapple Express F1 Automatic could be just the thing. All F1 Hybrids and more and more and more on www.zamnesia.io
Likes
102
Share
D28 - The first day in the fourth week of veg. She is now 18 cm tall, and I'll start doing some low-stress training this week. I trimmed the cover crop today as it was a bit all over the place. I gave her around 1.2-liters of the compost tea I started brewing yesterday, and for once, I remembered to check the pH and adjust it to 6.5. Yay, progress! D31 - Today, I finally got around to doing some low-stress training. I should have done it ages ago, and I don't even have a good reason for not having done it, but hey, better late than never. Right? D32 - She is bouncing back nicely from the training yesterday. Starting to smell a bit so I got the active carbon filter installed. D34 - The last day in the fourth week of veg and the final day as she is in flower now. I did some more LST, as well as defoliation and cover crop trim to increase airflow.
Likes
149
Share
Hi all the happy people here in GrowDiaries. This is my second cultivation ever and it will be fun to try a bigger space than my closet grow. First, I'm just going to say I'm done with the construction of my new growroom. I put some pictures on the construction here in week one. The room is 2.14 meters by 1.7 meters and has a ceiling height of 2 meters. It provides a floor area of ​​3.6 square meters. I use a 54 Watt Lightwawe T5 for germination and 2 Pcs 400 Watt HPS lamps. I have a channel fan that replaces the room air about 40 times an hour to get a comfortable theme in the room, the air enters a fresh air intake from the outside. The air is purified through a carbon filter to then leave the room to the rest of the basement. Then I use that heat to heat the rest of the basement. I will use 8 pcs 15 liter Autopots to grow with and a 100 liter water tank that supplies the pots of water and nutrition. I will grow completely organically in soil and will watercure my buds to get the best possible medicine for me. But there are no cultivation rooms to be displayed here, so I continue with what is most important. Today I have put my seeds in my moisture dome and hope the seeds have germinated within a few days. I am very excited to see how the new growroom will work and how this Blue cheese Auto from Royal queen seeds will turn out. Blue Cheese automatic cannabis seeds are a cross of Blueberry Automatic and Cheese Automatic that has been perfected over five years of breeding and careful selection. The result is a feminized, autoflowering strain with superior yield, flavor, and effects to either of its distinguished parent strains. THC: 16% CBD: Low Yield Indoor : 325 - 375 gr/m2 Yield Outdoor: 60 - 110 gr/plant Height Indoor: 40 - 70 cm Height Outdoor: 60 - 110 cm Flowering: 7 - 8 weeks Harvest month: 9-10 weeks after planting Genetic Background: Blueberry x Cheese x Ruderalis Type: Sa 35% In 40% Ru 25% Effect: Cerebral and uplifting Climate: Mild .............................................................................................................................................................................................................................................................................................................................................. Update 2017-08-15. All 4 seeds have germinated and planted in small pots inside the humidity dome. I'm so glad it worked so well and now it's just hoping they'll start growing and become 4 big healthy girls :) ............................................................................................................................................................................................................................................................................................................................................... Update 2017-08-16. I have mixed my own soil today. Its 40% sieved peat harrow H2-H4 0-30 mm, 45% sieved peat harrow H4-H6 0-30 mm. 5% sand and 10% of compost soil. And i use 15% of perilite and mix it all together. ................................................................................................................................................................................................................................................................................................................................................ Update 2017-08.20. Nr1 and 2 grow and thrive. Number 3 just got rid of the seedpod and is folding out the sheets. Number 4 is a bit shy and can only be seen if you look carefully into the soil. ......................................................................................................................................................................................................................................................................................................................................... Update 2017-08-21. Nr 1 and 2 is doing well. Nr3 is trying to catch up and Nr4 is still shy. -------------------------------------------------------------------------------------------------------------------------------------------------------------------------------------------------------- 2017-08-23. Transplanted 2 girls from humidity dome and the small germinating pots to 15 liter autopots. The other 2 girls have to wait a little more before transplant to the autopots. ................................................................................................................................................................................................................................................................................................................................................................................ 2017-08-27. The girls have settled in to there new home of the 15 liters autopot after a little transplant chock. Now the real week 1 starts for me and the girls. -------------------------------------------------------------------------------------------------------------------------------------------------------------------------------------------------------- 2017-08-28. New pic and movies. --------------------------------------------------------------------------------------------------------------------------------------------------------------------------------------- 2017-08-28. Nr3 is transplanted in 15 liter autopot. ------------------------------------------------------------------------------------------------------------------------------------------------------------------------------- 2017-08-29. New movie of the girls. Its no water for 3 days now for Nr1 and 2 so the roots develop more and match the plant above the soil. The temp controlled fan is awesome, its easy to set what temp you like to have in the room. Right now its 28 celcius. And humidity is 56%. ------------------------------------------------------------------------------------------------------------------------------------------------------------------------------------------ 2017-08-29. Hello to you who read my diary, I just want to say that I am pleased that you have chosen to check in with me and in my diary. I just want to say that I do this for myself and for a steady flow of my medicine. Everything you read and see in my diary is 100% honest and I will never distort or beautify anything here. I document my crops so that I can learn from my mistakes and also to look back at those different crops. I try to update with pictures every day and with text if something special has happened in the garden. This is my strainhunt for the best medicine and the beginning of my journey with cannabis and the cultivation of it. ----------------------------------------------------------------------------------------------------------------------------------------------------------------------- 2017-08-30. Cleaned the room this morning, just vacuuming and cleaning with chlorine solution. Im testing the fan to control temp and humidity, it works great. Added some pics with measurements and movie. Everything is looking great right now. --------------------------------------------------------------------------------------------------------------------------------------------------------------------------- 2017-08-31. New pics and videos. --------------------------------------------------------------------------------------------------------------------------------------------------------------------------------- 2017-09-01. New pics and videos. Gave each of the girls with 2 ml Alg-A-Mic, 4ml Bio-Grow, 4ml Bio-Heaven and 10 ml Formulex mixed in 2 liters of water. I hope they like it :) ------------------------------------------------------------------------------------------------------------------------------------------------------------------------------------------------------------------------------------------- 2017-09-02. New pics and the girls liked the water and nutrients yesterday. ------------------------------------------------------------------------------------------------------------- 2017-09-03. New videos of the girls this morning. Nr1 and 3 looks great and nr 2 is looking a little funny, maby a little stressed. Kl. 16.00. Did some defoliation on the girls. Added video. Kl.. 23.00. New videos, defoliation and leaftucking. -----------------------------------------------------------------------------------------------------------------
Likes
8
Share
Doing amazingly! Actually started flush literally today! So stay tuned to see how chunky these flowers are going to get! They smell delicious! Candy shop in my tent with all these flavours!
Likes
15
Share
@tokesly
Follow
This week the flowers really started to come out. Got some nice closeups on their formation. Video includes a quick rundown of the nutrient line and supplements. Apologies for the sideways viewing, going to straighten out all the videos soon.
Likes
24
Share
@nonick123
Follow
Día 37 (08/07) Ajustes de LST en todas las plantas! 🚀 Día 38 (09/07) Ajustes de LST en todas las plantas. Las ramas inferiores están creciendo como un cohete! 🚀😍 Riego con 250 ml H2O pH 6,5 Día 39 (10/07) Las plantas se muestran sedientas! Creo que el cepellón está lleno de raíces y piden el trasplante! El crecimiento no se ha visto afectado de momento Riego con 500 ml H20 pH 6,5 Día 40 (11/07) Paso a regar con 500 ml / día, ya que hace mucho calor (30 ºC) y efectivamente las plantas ya han copado la maceta de raíces OnionOG y KS1: Las ramas de nodo inferior se han quedado enanas tras el entrenamiento, de modo que las elimino y aplico canela en polvo en los cortes Riego con 500 ml H20 pH 6,5 Día 41 (12/07) Riego con 500 ml H20 pH 6,5 Clones! Mi experimento vuelve a demostrar que NO necesitas complejos productos de clonación ni sistemas para obtener clones! Hace 15 días puse 2 clones con el tallo sumergido en miel durante 5 minutos en una maceta de 400 ml con PRO-MIX HP BACILLUS + MYCORRHIZAE He mantenido la humedad alta con una cúpula de humedad casera hecha con una botella de agua PET de 5 litros cortada por la mitad y pulverizando a diario. Han estado los 15 días en mi terraza con luz indirecta, y temperaturas que rondan los 30 - 32ºC durante las horas centrales del día Hoy los he trasplantado a una maceta de 1 litro porque ya habían formado raíces y empezaban a formar nuevas hojas! 🐥🐥🚀🐥🐥 Día 42 (13/07) Riego con 500 ml H20 pH 6,5 Día 43 (14/07) Trasplante a maceta definitiva de 21 litros de ROOTPLUS Pot de GSKOREA GLOBAL! Estas macetas son una maravilla! Proceso de trasplante: Se prepara con 17,85 Litros (85%) de sustrato PRO-MIX HP BACILLUS+MYCORRHIZAE + 1,05 Litros de Humus de Lombriz (5%) + 2,01 Litros de Insect Frass (10%) + 210 gramos de Earth Vibes Super Soil (10 g/L substrato) Se llena la maceta de sustrato con las manos (limpias) y rompiendo los trozos más gruesos, para que el sustrato esté aireado y esponjoso, sin presionar Se coloca una maceta vacía de 6,5L para que quede la forma perfecta de la maceta donde están actualmente Se espolvorea la parte proporcional de la probeta de microorganismos sobre el agujero de trasplante Se saca la planta de su maceta actual (bonitas raíces 😍) y se coloca en la maceta final Se riega muy lentamente hasta percolación profunda con H2O EC 0,5 pH 6,5 Una vez asentada, complemento con un riego de 500 ml con 25 ml/L de Humus de Lombriz Liquido Se coloca mulch (acolchado) de paja para evitar traspiración excesiva y cuidar a los microorganismos del suelo A ver como reacciona al trasplante! Aplicación foliar Kelp hidrolizado de Lurpe Solutions a 0.25 ml/l Realizo ajustes de LST aprovechando el trasplante a la nueva maceta. De momento tienen una canopia muy bien formada! 💦Nutrients by Lurpe Solutions - www.lurpenaturalsolutions.com 🌱Substrate PRO-MIX HP BACILLUS + MYCORRHIZAE - www.pthorticulture.com/en/products/pro-mix-hp-biostimulant-plus-mycorrhizae
Likes
9
Share
Day 28: On day 21 until day 24 i switched the light schedule to 7-1 and i did not give them water at all. On day 24 i topped the soil with dr jimz organic nuts along with watering with dr jimz soup for the soil mix. i put a trellis net up however i have not actually used it yet. Also on day 24 i changed the lights back to a 6-2 schedule. I am letting them kind of do there own thing trying not to bother them much unless needed and I am however having problems with one of the plants a pic of it up top. It is growing however its just clawing the whole time and i dont know what to do or how to fix it so any advice would help because i really dont want to toss it. Thank you for checking my grow out and as always if you have any pointers or questions feel free to ask. Thanks again and happy growing. PS: I didnt take any photos for week one sorry in regards to that I was a bit nervous starting a grow diary and finally decided to do it end of week 2. Thank you for viewing and leave any tips or tricks if you see necessary. Thanks again and happy growing. 😀