The Grow Awards 2026 🏆 


Likes
Comments
Share
@michigrower
Follow
I'm very sorry. Everybody had a big move. This past couple weeks, everything settled in one of the plants did not make it unfortunately. This is the sour jealousy 2 weeks into flowering. Change the dose on the blue nutrient, up to fifteen milliliters per gallon, while dropping grow nutrients. Roots have more than filled the bucket and its space growing very well had a small p. H deficiency and stress from the move. Plant is recovering healthy.

Likes
1
Share
@bms1208
Follow
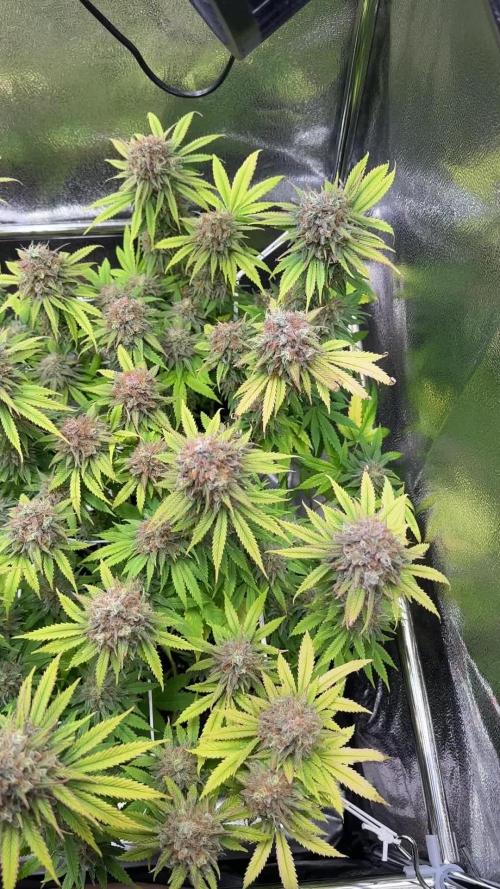
Buds poppin' off nicely. Rigged up some bamboo skewers to spread the canopy.
Scent's a wild mix - citrus vibes with that diesel kick. Like fuel-soaked shop rags, no joke.
Word is this strain ain't a monster yielder, but don't sleep on it. Sometimes the lowkey ones surprise you.
Can't wait to see how she turns out. Gonna be fire.

Likes
75
Share
@Pungolian
Follow
Well post tropical storm Ophilia report. Made it through with only minor damage. Thank goodness! I had to laeve town for a wedding in NC over the weekend and realized i might not be able to get back in time to protect the girls. They did ok. Drinking a lot less water now that it has cooled down. From 4 gals/ day back to 2 gal / day! Ill update with some better pics later, happy growing all!

Likes
22
Share
@OGgrows
Follow
the plant continues to stretch throughout this week. slight increase in flowering and growth feeds.some defoliation this week. good week everyone 🙏💚🌱


Likes
2
Share
@BigGGrows
Follow
This week has yielded positive results from the FIM And LST. I topped the internodal new branching that grew from the FIM job as well this week and the 2 extra tops are growing in response on each branching. She is now under a 4 bulb vivosun T5 6500K fixture and is responding very well to the light changes. Her stems are begging to give off terpines when rubbed. She smells of tart sweet lemons and diesel fuel haha. I am very happy about this grow and am expecting preflower to begin soon.

Likes
2
Share
@HighnerDank
Follow
She is expanding and drinking more and more water. The smell is getting stronger as well.
At the end of next week she gets a lollipopping which is good because I cant reach the soil anymore without making some leaves wet.

Likes
Comments
Share
@Dr_Zauberer
Follow
Day 97
Chop chop. Smells very fruity and lemony. Dont smell amnesia too much but the trichomes are 80/20 so we gucci :) i usually wait til all the pistiles are brown too cuz i think it looks better haha


Likes
4
Share
@Weediz
Follow
This is my side-grow. I do have 2 girls in flower, but I wanted to fill my room, and I started these as soon as I could. This is my first time (Well second, counting the flowering girls) growing in coco, and I still not all sure what I do, but I will try my best to do right, and learn from this. I am using RO water. The girls are on day 22, and everything seems to go good. I see they are dark green and are going to lay down on the nutrients on the next feed. The girls have been topped around day 12, and later done LST
Day 24: Decided to do some more LST on these girls. Girls are growing strong, and looks healthy, other than they are a little dark greenish
Day 26: The dark green leaves are getting worse. They are almost shining, and I'm sure I have a Nitrogen toxicity. I think I mad a bum-bum, giving my babies the nutrient water for my grown-ups 😱, so I have given them a good flush with ph 6.0~ RO water, and let them dry out, before giving them a light-mix, and hopefully this will do the trick as they are still growing strong 💪

Likes
98
Share
@OutForReal
Follow
SONG OF THE WEEK: Joyner Lucas - I'm not racist 👈 play it twice 🌟🌟🌟🌟🌟
-------
Day 72 - The ladies are packing nice nugs , the supercropped one is looking like she still wanna produce new flowers and new pistills 😁, the nugs are hard , really hard and smelling a sweet mango/exotic flavor but it's stealth as you have to be close to smell it. The "christmas three" one is more sensitive to high RH and a bit of mold were removed out of 3 spots so it's fair to say that she's not really strong in front of the others but the buds are hard rocks and smelling really good like mango & sweet all around the garden 😍. The last one got the nicest bud structure , likes tons of little calyxs stuck together but she's also the one with less smell.
------
Day 73 - 21.09 - 27 days left before the harvest so today will be their last feeding with Greenhouse Hybrids powder to have enough nutrients for the last days before tap water on day 76/77 then a full flush on day 80 until day 100. The Ec were 1.45 before my PK boost and 1.62 after with 6.4 PH for that last feeding 🌺🌹
------
Day 77 - Last day of the week , they start to yellowing a bit , the next flush will hopfully increase the yellowing process to get naturally rid of the chlorophyll. Pictures Next weeks 👉 23 days left before harvest 🙌


Likes
5
Share
@Saihtan
Follow
Plant is looking great so far just adjusted the light to It's full capacity. Day 23 first day of Diary.


Processing
Likes
21
Share
@LittleBigTrees
Follow
Plucked a few more leaves but other than that just feed them this week including bloom.
Also gave them some rice starch (from boiled rice water collection) on day 42 as a boost for the microbes 👍
Turned the IR off now and turned up to 34000lux
Likes
27
Share
@LSchnabel
Follow
Installed new Vipar LED light. Watered with pH 6.2 RO water with General Hydroponics Flora Grow, CalMagic and Great White. 1/2 cup. I have a fan blowing on the babies to strengthen up the stem.


Processing
Likes
14
Share
@Chowswooster
Follow
Sloooooow going. My temps are fine if not ideal, humidity is steadily above 40%. Yet these plants still look weeks behind.
If you are reading this and my parameters and see any glaring mistakes please feel free to drop a comment. I am definitely new to organic growing andI just don't know what to do.
I started PHing organically this week. I ordered a water conditioner from Microbe life. It's not here yet, but soon. And if my video uploaded you'll see a product from Microbe Lift that will hopefully kill any fungus gnat larvae in the soil. Beyond that adding Armor Si back into my nutrient schedule is the only other thing I can think to snap these plants out of their funk. Good luck everybody else!


Processing
Likes
24
Share
@DaddyPrime
Follow
8/9 shes flowering💚 pistils everywhere. Been feeding with open sesame from fox farms and everythings looking awesome. I am concerned about how lanky she is. Her node spacing is tight but shes long and the branches are already drooping from the weight from pistils and new leaves lol fml im gonna have to get stakes/supports soon
8/10 shes loving the weather or the nutes, shes praying so fucking hard its beautiful

Likes
17
Share
@Mr_nugs_lover_David
Follow
She's looking stunning, super healthy and big on her 3rd week, I'll be transplanting her in no time, and once Transplanted we'll start to see how I train my plants, thank you so much everyone! Let's see what awaits us with this beautiful pheno of ak420 by seedstockers! 🌱💎🔝
