
Likes
Comments
Share


@Yisusondahood
Follow
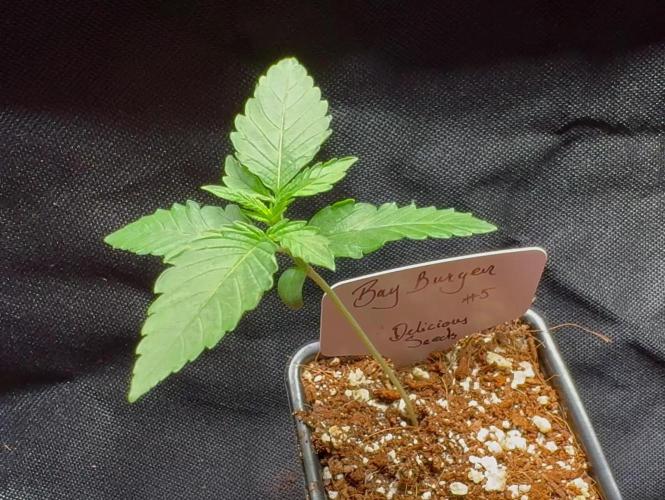
Cada tres/cuatro días empecé a regar con 500 ml de agua, el domingo va a ser el primer día de comida q le voy a dar ferti de crecimiento. Ya empezó a crecer para arriba y a ramificar bien.
Apliqué hasta ahora en cada riego micorrizas de Namasté


Likes
6
Share

@THcHunteR23
Follow
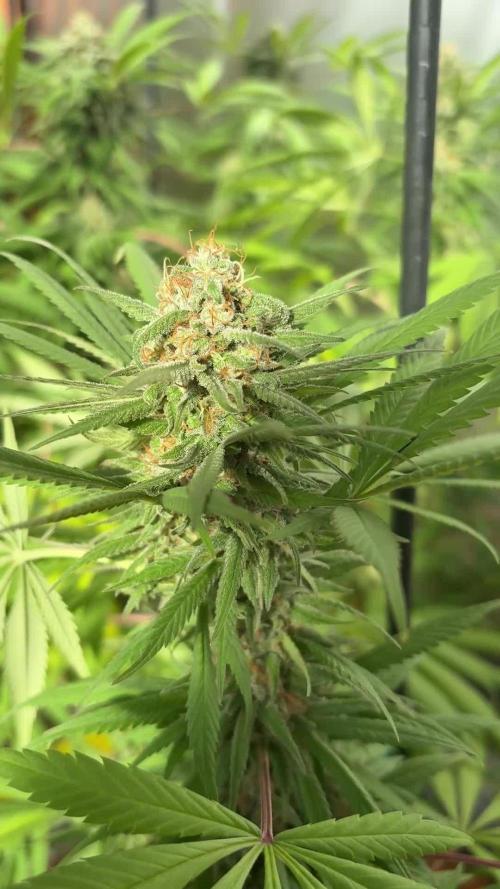
Je suis satisfait du départ il reste au maximum 5 semaines dans la tente en fleuraison et ensuite elle va fleurir

Likes
32
Share


@Arcadium
Follow
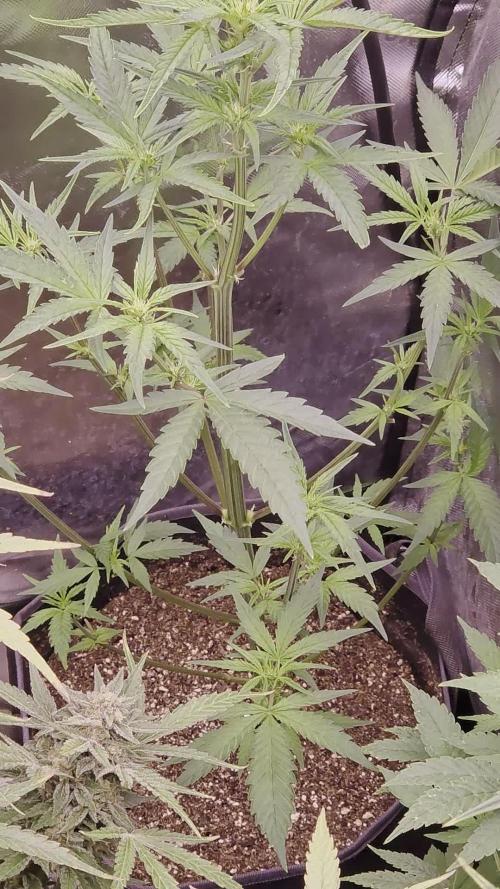
Hot and dry lately, she's getting big! Must of FIM'ed another 8 branches, topped the very top to try and keep the height under control!
She's already started showing preflowers which is crazy early to me?! So I'm using a 50:50 ratio of Gaia Green All Purpose to Power Bloom for transition every 3 weeks. Excited to see how much stretch I'll get into flower.
If she's starting flowering this early hopefully she'll be done by end of Sept!


Likes
14
Share

@cultivars
Follow
OCTOBER 18th to OCTOBER 24TH
Sunrise: 08:31 | Sunset: 18:50 | Total Daylight: 10:19
Weather over the past week saw several consecutive days of full cloud cover and rainy periods. Greenhouse has held temperatures during the day, and only dropped below 10C once (Day 168). Good periods of sun on Day 167 and 168, with the forecast looking sunny for the next few days. I suspect that will help along the ripening process as the plants process nutrients from the fan leaves during the fade. There hasn't really been any issues with humidity levels, as it has hovered in and around 40% to 45% RH
Purple Romulan isn't as near to ripe as I'd like, with many trichome heads still clear, with only a few cloudy. Not a lot of time left as it is getting quite cold outdoors, and honestly there isn't a lot of sunlight now that we are down to 10 hours.
DAY 162
2L of plain rainwater (cold) applied to each specimen.
DAY 163
n/a
DAY 164
15C in greenhouse in the morning; Cloudy and cool day overall, but greenhouse holding temperatures above 19C and plants are clearly going through senescence.
DAY 165
Steady rain overnight, with armer temperatures; Greenhouse held overnight at 17.5C and 50% RH. Cool, cloudy and rainy day (high of 9C, 97% RH, but greenhouse and the associated equipment performing as designed and holding temperatures at 19.5C with humidity ranging from 40% to 45%.
DAY 166
Cool and rainy overnight (6C intermittent light rain). Greenhouse held to 16.5C and 41% RH. Noticed some droop so provided 1L of plain rainwater (cold) via drip in the afternoon to each specimen and everyone perked up thereafter. Temperatures reached 19C for much of the day, with 43% humidity. Temperatures outdoors were a high of 7C, with 80% humidity (or more) during the day. Remained overcast for much of the day, but there was a couple of periods of increased brightness. Plants are doing well, all fading;
Purple Romulan's long and abundant pistils have only began to wilt to a bright orange colour wholeheartedly over the last 7 days. Flowers are of decent size, have a typical hybrid shape with trichome production that looks to be average. Smells of pine but has a sweetness as an undertone. Trichome heads on calyxes remain mostly clear. When rubbing fingers over sugar leaves, this plant is notably greasy in comparison to any other specimens in the garden.
DAY 167
Overnight low of 2C, greenhouse held at 12.5C and 41% RH. After a cloudy cool morning, the sun broke through and warmed up the greenhouse shortly after the noon hour. Exhaust fan even came on intermittently to reduce temps below 24C. Humidity was ideal all day, in and around 40%.
After noting some droop, applied 1L of plain rainwater (cold) via drip. This may be the last watering of the season. I think it will be possible to decommission the irrigation system for the winter over the coming weekend. I can pull 20L of water for use either for this crop and/or the mother tent.
DAY 168
Greenhouse 9.5C (-2C outside) in the morning with 40% RH. Sunny morning, with greenhouse warming to over 10C by 9:30AM; Exhaust fan kicked in to hold temperatures at 24C just before the noon hour.
Likes
59
Share


@Neo09
Follow
Hi buddies 😉🙌 ..at least im happy, that i have found my growmie! ..METROP works pretty well, plants movin just str8 ON, nice stretch. Tables done and next week we gonna work on support for plants.. bamboo and bandage..
Likes
6
Share


@MG2009
Follow
11/20/2020
An early harvest! Will update next week after dry is done
Currently wet weight is 110 grams.
(final weight) and smell report then cure and final report after curing. 4-5 weeks?
11/24/2020
2nd Day of drying she dropped to 60.9 grams, day 4 I de bud the stems and jar her up total weight dry (bud only) 21.6 grams, under taste I'm going by smelling will test a popcorn bud and update but not expecting much this early in dry/cure.
Ps.
I looked under my scope and still got about 20-30% clear trichomes. So not sure how strong she will be but smells really good!.
Three noses used for smells
Nose#1
Fruity candy
Nose#2
Sweet fruity mint
Nose#3
Candy catpiss old school.
12/18/2020
I am very pleased with the results she is sweet smooth slightly citrus and evergreen
No cough on this girl, high last a good..............................................
4 hours long, no extreme thirst or reddining of eyes overall quite happy with her and looking forward to hunt the rest of these seeds!
Taste, Smell, effect. Seeking a sweet vanilla cherry tastes in next run.
Likes
63
Share


@Ferenc
Follow
Day 80, 22nd of October 2020: 3rd week of flowering! Happiness she needs a lot of boost hard to keep up. She loves fertilization too much..... I mean before always craving for nitrogen now qould need more potassium and phosphorus hard to keep up. I also detect deficiency based on the leaves getting lighter and brown spots but I do feed her as much as I can really.
This week i have relised the first nice trichomes started "sitting" on the leaves as well and the pistils coming out nicely pre flowers forming. Let's go.

Likes
4
Share


@ThatsmyGrow
Follow
It's growing slowly but well. I removed the leaves at the top to allow better light penetration.
Likes
18
Share


@TheGreenLeopard
Follow
It’s a nice grow so far in terms of expectations reality on the seed breeders. Great stuff again. I had a real germination nightmare this time around though - lots of strains failing at seedling so the numbers and strains became more 😂. So the tents are mixed up again to auto on one side and photoperiod on the other. In this tent as well as Afghan and a red gorilla - there is sweet zensation , banana krumble and red hot cookies and a peyote skittlez. Water in using ro solely through the grow. There has been one issue. I tried a “pro” substrate from biocanna this time and I have those little fleas. Really annoying and my aphids are late so kind of annoying - takes the pleasure off a bit. Any good organic solutions let me know please on comments
Likes
21
Share


@FlavoursUk
Follow
Great grow from start to finish, very resilient plant and would of given her some more TLC if I was to grow her again.
Likes
35
Share


@Jacks_Pot
Follow
The 3th week of 12/12 is history and flowering has entered the grow room. 😋
I marked day 53 (day 17 of 12/12) as the first day of actual flowering.
Everyday I've checked if there were fungus gnats trapped on the yellow sticky traps and I've spotted a few. So not a total infestation.
I've also checked for signs of hermies and I haven't seen any.
I've had one a few years ago and it pretty much ruined the whole grow. Seeds everywhere. But that was another breeder and strain.
Under the screen I did some final pruning and above a minor defoilation.
The Runtz are stretching nicely and the screen is filled pretty much like I wanted it to.
Gonna leave them alone now, done with bending those shoots under the screen.
This weeks temperatures stayed between 20,6°C (69°F) and 24,2 °C (75,5°F) and humidity levels between 44 – 56 %
Light pressure was raised from 244 watt at 70cm (27 inch) to 260 watt at 63cm (25 inch).
Their diet consisted of ph adjusted tapwater (ph 6,38 – ec 0,49) most of the week.
They were barely fed for 1 day. Gonna keep it that way as long as I don't see any signals of shortages or surpluses.
Naturally, ec leves will rise next week but one day of feeding seems enough for now.
Smell is coming in slightly, but the CAN-lite carbon filter is doing it's job.
There's a 600m³ one hanging in the grow room connected to a 550m³ Airfan foam softbox that's dimmed at 40% since the start of this grow.
That was the most important info for this week. Up to next week's flowers!✋
Do you want to grow this strain?
👉 https://www.zamnesia.com/6000-zamnesia-seeds-runtz-feminized.html 👈


Likes
16
Share


@ChewiesGrow420
Follow
Today on day 17 from date of birth Iam preparing a worm casting tea. In a cheese cloth bag ,Made up of 2 cups of worm castings 2 tablespoons of unsulfured molasses,2 tablespoons of mineralized phosphate (bat shit) ,2 tablespoons of soluble seaweed extract . 2 tablespoons of alfalfa meal 2 tablespoons of all purpose 4-4-4 all Gia green products other than. I also sprinkled in some great white premium mycorrhizae inton2 gallons of water. Tea will brew for 24 hours before applying.

Processing
Likes
8
Share


@Buck5050
Follow
I added a humidifier this week to the tent to stabilize humidity.This addition is working great at the moment. The plants showed signs of decent growth in there new home early in the week so I decided to top them. After a couple of days from there topping they are starting to take off with growth.I hope I can cut some clones in a couple weeks and than we will head into flower.Growth is in full effect as you can see by the video. Lowering my PH to 5.5 seems to have quelled the cal-mag deficiency I had in the cups.The bounce back from transplant shock was great this week. I was able to top them on schedule and all are reacting well.
Likes
15
Share


@HighOhioAn
Follow
And that completes my grow for my FastBuds420 grow Truly was a fun and exhilarating experience learned a lot about each, and every strain would absolutely grow each and one of them again, but photos are in the future. Can’t wait to get my hands on a pack of those fast.buds Photo.
Likes
Comments
Share


@Mr_nugs_lover_David
Follow
She's looking absolutely gorgeoys very bushy with 12 main colas,wish I could have had more time to grow her in vegetative stage however she's eating very good,no problems at all,she went trough a bad week where she was lacking some nutrient I don't know why because she is in a living soil like her sisters and none of them had any issues however she's starting flower,actually she started force flowering with her sisters on August 3rd

Processing
Likes
15
Share


@CannabisAprendiz
Follow
Plantas de buenas estructuras y fácil de cultivar ,resistente a las plagas y estrés hídricos.
"WAKA" pasará a ser una de mis favoritas ,( guardaremos madres ) . una genéticas maravillosa muy resinosa de cogollos compactos .
Olores muy marcados a cítricos especialmente limón y otras más dulces esto también se refleja al momento de degustar las flores al fumar.
Seguiremos trabajando esta genéticas con las madres que seleccionamos de los fenotipos que más nos gustaron .
Corte : 08.12.2019 (secado)
Curado : 23.12.2019( puestos en frascos )
Likes
19
Share


@GoldenWeedGrower
Follow
Legend
Timestamp: 📅
Measures: 🛠️
Water: 🌊
Actions: 💼
Thoughts: 🧠
Events: 🚀
________________________________
📅 D22/V20 - 14/09/23
🛠️ EC 0.8, pH 5.8
🌊
💼
🧠 CO2 Dispenser is working good, it should deliver some CO2 trough the pipe
🚀
________________________________
📅 D23/V21 - 15/09/23
🛠️
🌊
💼 Added some workers to bend her down
🧠
🚀
________________________________
📅 D24/V22 - 16/09/23
🛠️ EC raised up to 1.2, pH trend is down
🌊
💼
🧠 I'm going to change the water in the next days
🚀
________________________________
📅 D25/V23 - 17/09/23
🛠️
🌊
💼 New workers at work to let her stay down and down 💼 💼 💼
🧠 Now Capitan America and his bike is bending the main bud and the CO2 is provided by NASA 😋
🚀
________________________________
📅 D26/V24 - 18/09/23
🛠️ EC is 0.9 and pH is 6
🌊
💼 Added LST with men at work and made some defolation
🧠
🚀
________________________________
📅 D27/V25 - 19/09/23
🛠️ EC 0.9 pH 6.2
🌊
💼 LST and new bending
🧠
🚀
________________________________
📅 D28/V26 - 20/09/23
🛠️
🌊 RES Changed 💦💦💦
💼 Added very little bit of silica powder to the water
🧠 I let the plant absorb it along the night and changed the water again in the morning. It's the first time I add a silica to my grows, waiting to see what is going to happen 😉
🚀

