


Likes
Comments
Share


@Wicked_Stix
Follow
The cherry bomb doing well. Gave her a flush and fresh nutrients. Been tying the branches down a little as they grow out and pulling a few leaves every couple days to keep them from blocking light. Will be switching them to flower next week.

Likes
Comments
Share

@Kardo
Follow
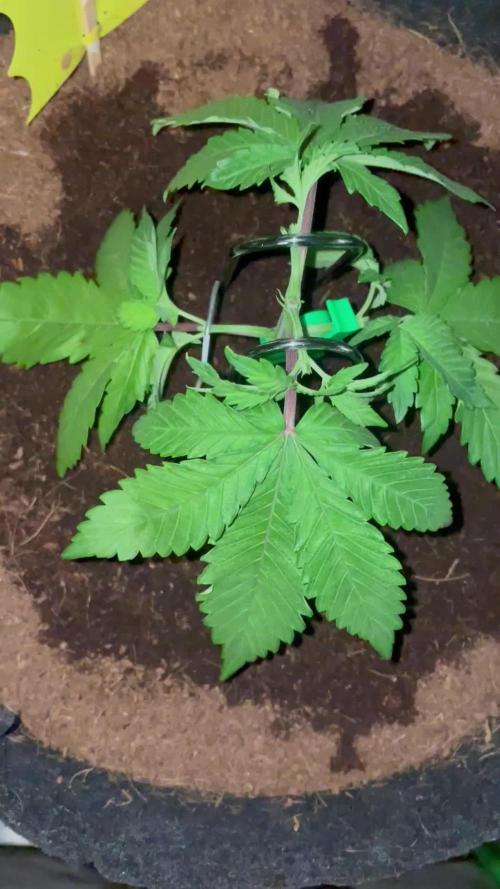
Die Purple Haze wächst sehr gut hat gesunde Triebe und die werden jetzt verdoppelt mal gucken wie sie es erträgt
Likes
9
Share


@TheGreenGroomer
Follow
🌿 Grow Update: Week 6 of Flower 🌸
Hey growers,
We're cruising through Week 6 of flowering, and I gotta say, things are looking solid in my grow setup. This being my first rodeo, I'm pretty stoked with how it's all turning out.
The plant's rocking a deep green, which could be a bit of nitrogen overload or just her natural vibe. Regardless, she's thriving, Ive been so stupid letting her get so big in a 5gallon i wouldn't be surprised if she is rootbound..
Got a bit of a snag with some lower bud sites getting overshadowed by the top canopy. Didn't want to push my luck with more defoliation i cant really at this point of flower, but hey, it's all a learning experience next round, I'll be more surgical.
Already thinking about the next grow — tossing in a couple of plants in 5-gallon pots, keeping veg short and sweet at 4-5 weeks. Gonna tighten up the training game for sure.
Despite the lower buds not getting as much love, the top ones are coming along nicely. She's a thirsty one, so I'm hitting her with 4 liters at lights on and another 2 liters a few hours before lights off to keep that coco from drying out.
Got about 3-4 more weeks to go, and I'm itching to see how it all pans out. Can't wait to see the final yield and taste the goods. Here's to a killer harvest ahead! 🌿💧✂️🌸 #GrowLife #Week6 #FirstTimer #HarvestCountdown

Likes
325
Share


@Metatronix
Follow
A BIG hallo to You all my familly and usual visitors. Thank you for stopping by and all the likes and comments....You rule!
I'm late with the update again because of the holidays and the Black Weekend shopping spree ;) So all the pictures were taken on November 25.
Everything runs smooth, The Blue Cheese is truly catching some blue colored buds and leaves....the leaves are also yellowing a lot right now, that you have to forgive me ;) But it's ok because this lady has one last week befor finish.
looking at the trichomes mostly they are cloudy with some amber and transparent both present, so i start flush any day now.
The bright Mars Hydro TS 1000 is kept at 33 cm from the top of my plants is is running on full power.
TS 1000 gives a full spectrum of light to the plants and you can see that... Mars Hydro did a very good job producing this lamp.
Thanks to Mars Hydro for supplying the necessary equipment for this grow.
That's it for this week folks, have a wonderful week.

Likes
17
Share


@Todzilla
Follow
2 Black Cherry Gelato - Clones from my clone guy
1000w LED, 4G Autopots,, coco/perlite 65/35, RO water, AC pro Controller and T8, 5x5 GG Tent with extension. Garage grow SoCal
Another hot week in the garage averaging high of 88°.
We just put in AC dehumidifier and we brought down the temp to 70 Degrees and 48% relative humidity with lights on for ripening. The girls are starting to finish the ripening stage and ready to cut the tops.
Smell is unbelievable sweet and dank.
As we’re at the final few days we’re running straight Jacks RO.
This weeks accomplishments:
AC for ripening
Eradicated the Spider mites by doing manual scouting and removal every day.
Long term issues
None. We’re just about done.
I hope you all are having as much fun as I am.
And thanks to my beautiful fiancée for her patience and scouting talents.
Check out my purple push pop grow and compare side by side- same clone batch. I also am doing an outdoor light deprivation run. This should be a great comparison of indoor versus outdoor grows on the same schedule, same nutes and same clone batch 👍
Best of luck gromies.
Likes
30
Share


@D33jW
Follow
FLOWEEK: 4
Light: 12/12
RH: max 65%
TEMP: 26C
PPFD: 750
Watering:
FLO21 -- Canna flores 4ml + Canna PK 0,7 ml + cannazym 2 ml (EC 1.4)
FLO23 -- Canna flores 1,5ml + Canna PK 1,5 ml + Canna Boost 1,5 + Cal Mg 0,5 (EC 1)
FLO25 -- Canna flores 6ml + Canna PK 1,5 ml + Canna Boost 1,5 + Cal Mg 0,5 +Cannazym 2ml (EC 1.75)


Likes
11
Share


@mike97
Follow
After 72h darkness time to cut this ladies. Smell is stronger that I imagine.
Now 7/10 days drying, aiming for a slow dry and then a proper cure.

Likes
4
Share


@Lazuli
Follow
It took its time to fmower but damn what a tree.. the big bud and overdrive really helped push the weight
Likes
31
Share


@AccidentalB
Follow
PAR PPFD 450
I hope my plants will fill out the 0,9 m2 grow tent in the last 2 weeks of veg. It would be so nice and make me so proud trying to achieve that in my first grow!!
I really think that good equipment (AC Infinity, Spider Farmer), good nutrients (Plagron) and lot's of watching on YouTube and reading in blogs will pay off at the end..
And of course the determination willing to do the very best I can, each day, for 4 months, will give me even more pleasure in my new hobby and hopefully more product at the finish line. 👊

Likes
41
Share


@Reyden
Follow
Devo dire che queste FF mi hanno sorpreso, la Purple Lemonade di Fast Buds si è rivelata un ottima genetica con una crescita rapida ed una resistenza allo stress elevata, il super soil di Dogma Organics mi ha veramente aiutato questa volta e sono stato ricambiato con dei boccioli dal profumo eccezionale e che cercherò di curare nel migliore dei modi!!! Penso che pianterò ancora molto presto queste Fast Flowering e preleverò qualche altro clone!!!


Likes
12
Share


@420DeepGrow
Follow
Gracias al equipo de Anesia Seeds, Marshydro y XpertNutrients skn ellos esto no seria posible.
💐🍁Sun of a Peach:
Adéntrate en un reino de serena creatividad y tranquilidad sin igual con Sun of a Peach, una excepcional variedad feminizada que personifica la sinergia perfecta entre relajación y estimulación imaginativa. Esta variedad única es la progenie de dos cepas excepcionalmente potentes y diversas, Gorilla Piss y Permanent Marker, tejiendo juntas un tapiz genético predominantemente Indica (70%) con un toque de Sativa (30%). Sun of a Peach es la encarnación de un retiro sereno y una musa creativa, diseñada para quienes buscan enriquecer sus experiencias sensoriales y elevar su estado mental.
Sun of a Peach hereda sus notables cualidades de dos cepas dinámicas. Permanent Marker, un híbrido con predominancia Indica, es una mezcla de Biscotti, Jealousy y Sherbet BX, que ofrece un perfecto refugio diurno. Gorilla Piss, la otra mitad de esta maravilla genética, es un híbrido equilibrado derivado de GG4 y Norcal Cat Piss. Con una proporción 50/50 sativa-indica y un contenido de THC del 37%, está diseñada para el consumidor experimentado.
Cultivar Sun of a Peach es una tarea gratificante, que ofrece abundantes cosechas tanto para cultivadores de interior como de exterior. Los cultivadores de interior pueden esperar cosechar entre 550 y 600 g/m², mientras que los entusiastas del exterior pueden cosechar unos impresionantes 800 - 1000 g por planta. Esta variedad se caracteriza por un rápido periodo de floración de sólo 7 - 8 semanas, lo que garantiza una cosecha puntual a finales de septiembre. Sun of a Peach presenta un patrón de crecimiento versátil, alcanzando alturas óptimas de 100-120 cm en interior y 160-200 cm en exterior, lo que la convierte en una elección ideal para diversas configuraciones de cultivo.
🚀🌻 Consigue aquí tus semillas:
https://anesiaseeds.com/es/product/sun-of-a-peach/
💡FC6500: Eficiencia líder en el mercado: la lámpara de cultivo LED FC-E6500, que ostenta un estatus líder en el mercado, es una solución rentable con un PPE de 2,8 µmol/J y un rendimiento máximo de 2,5 g/vatio. Ofrece un PPF alto de 2026 umol/S y es adecuada para una cobertura de vegetación de 1,50 m x 1,50 m y una cobertura de flores de 1,20 m x 1,20 m.
Iluminación versátil y uniforme.
https://marshydro.eu/products/mars-hydro-fc-e-6500-730w-commercial-led-grow-light/?gad_source=1&gclid=Cj0KCQjw1qO0BhDwARIsANfnkv9IIrYSbmJqz8PqpJOIyWwJfp5bc3SGJgUV68USLQ4tjmXDYwoBuAsaAue3EALw_wcB
🚥 MarsHydro ADLITE UV/IR/RED:
Para lograr un crecimiento óptimo de las plantas y maximizar los rendimientos es un arte simple que depende en gran medida de las condiciones ambientales adecuadas. Reconociendo las limitaciones de la iluminación natural y las soluciones de iluminación tradicionales para satisfacer estas necesidades únicas, lanzamos ADLITE. Estas luces especiales UV, IR y roja están diseñadas para llenar áreas del espectro, proporcionando las altas longitudes de onda que las plantas necesitan para un crecimiento y desarrollo óptimos.
Consigue aqui tu Adlite:
https://marshydro.eu/collections/adlite-supplemental-lights/
🏠 : Marshydro 1.50 x 1.50 x 1.80, carpa 100% estanca con ventanas laterales para llegar a todos los lugares durante el grow
https://marshydro.eu/products/diy-150x150x200cm-grow-tent-kit
🌬️💨 Marshydro 6inch + filtro carbon para evitar olores indeseables.
https://marshydro.eu/products/ifresh-smart-6inch-filter-kits/
🍣🍦🌴 Xpert Nutrients es una empresa especializada en la producción y comercialización de fertilizantes líquidos y tierras, que garantizan excelentes cosechas y un crecimiento activo para sus plantas durante todas las fases de cultivo.
Consigue aqui tus Nutrientes:
https://xpertnutrients.com/es/shop/
📆 Semana 5:
Una vez terminada la fase de estiramiento dedican todo su esfuerzo a crear nuevos pistilos y resina, es hora de engordar estos futuros cogollos.
La carpa esta totalmente cubierta gracias al FC-6500 y los Adlite de Marshydro, se nota la floración mas avanzada que otras veces y con una mayor densidad.
Continuo con las dosis de nutrientes recomendadas por XpertNutrients.

Likes
1
Share

@Smev1337
Follow
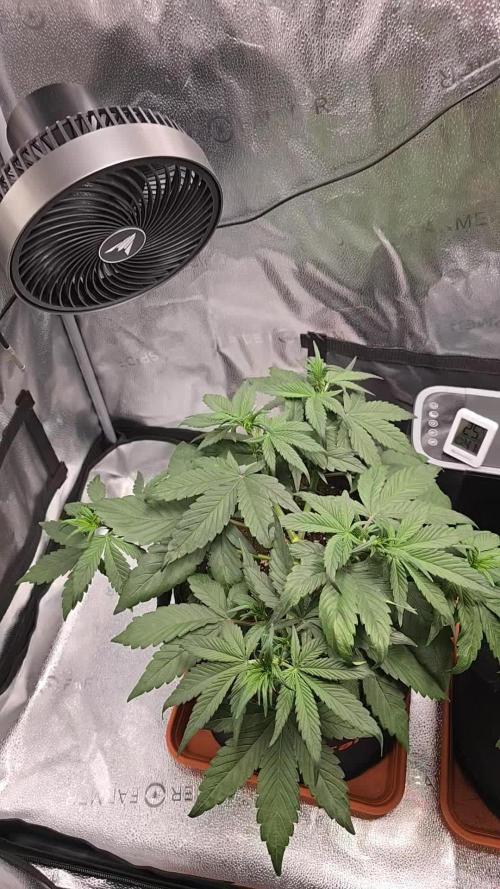
Hey all! i started doing the LST training a little bit to late but will still LST em and you have probably noticed that in the diary is only 2 plants and not 3 like on the pictures, that is because one did not really like the late LST haha so i cut her down and throw here away sadly but yea what else can ya do haha😅 happy growing all!😎✌️💚


Likes
62
Share


@Chucky324
Follow
Hello. This is the end of week 7 and the beginning of week 8 It's been a quite week.
There is a few more yellow leaves than I think there should be for the end of week 7 in flowering. It's been 25* c to 33* c day time temp in the greenhouse this week no wonder there is a few more yellow leaves. I start flush next week for 2 weeks. This strains description said 10 weeks to finish but I think some of these plants could be cut down soon. I don't mind overripe cannabis so I'll finish the 10 weeks for all the plants.
I made more Rick Simpson Oil this week. What a long process. It took most of the day. I got 140 g of oil from 1 lb. of cannabis. I tried to make a diary of it, but I know I could do better job. The camera I used ran out of juice and I grabbed another and forgot to turn on the sound. The wind got so strong at points it drowned out my voice. I'll put up what I made in a couple of weeks. after editing and subtitles : )
Till next week. Chuck.

Likes
18
Share


@Ananas_Comosus
Follow
Saturday, 05.03.2022
Girls graduation! Bwoy Shabba, world of girls, In container loads! (Shabba Ranks, 1991) I wish you could hear this song playing as you read this post to get the feeling I am feeling. Culled plant with strong male characteristics (#3). Left with 3 plants showing pistils, #s1, 4 and 5 😁. #2 was the largest and best looking of the plants but 'a soh it goh' 😉. All plants recovering well from recent phytotoxicity. Fed twice in past week with 12 ml/gallon CAB. Plants show no ill effects to Cytokin treatment and seem to like it. Have to move ties daily to accommodate growth. Signs of leafminers on a few leaves.
Sunday, 06.03.2022
A little rain fell Saturday afternoon but pots not overly moist. Fed with Recharge at 5 ml/gallon and remainder of Ph'd water. Ph measurement via Ph paper was still hot, 5.0~, so I repeated same method of adding 500 ml tap water to jug and topping up with acidified water, following the principle of adding acid to water and not vice versa 😉.
Likes
34
Share


@Bluntblazer66
Follow
Dec 8th
Put 3 seeds into distilled water PH = 6.0
Soaked seeds for 18 hrs
Dec 9th
Put seeds into RapidRooter plugs
Placed seeds into starter tray with cover and heat pad
Dec 13th
2 of 3 have popped up ⬆️ today
Dec 15th
Looks like all 3 have germinated
Started using fluorescent light pic above 18/6 schedule
Dec 19th
All three are up
Two have there first set of leaves
The third to sprout is just starting to make its first set of leaves
Three for three 100% germination
Dec 21st
Planted into 4” baskets filled with hydro clay pebbles
Dec 30th
Second set of leaves
Jan 3rd
Planted seedlings into a 30 l res

Likes
1
Share

@Northern_Ent
Follow
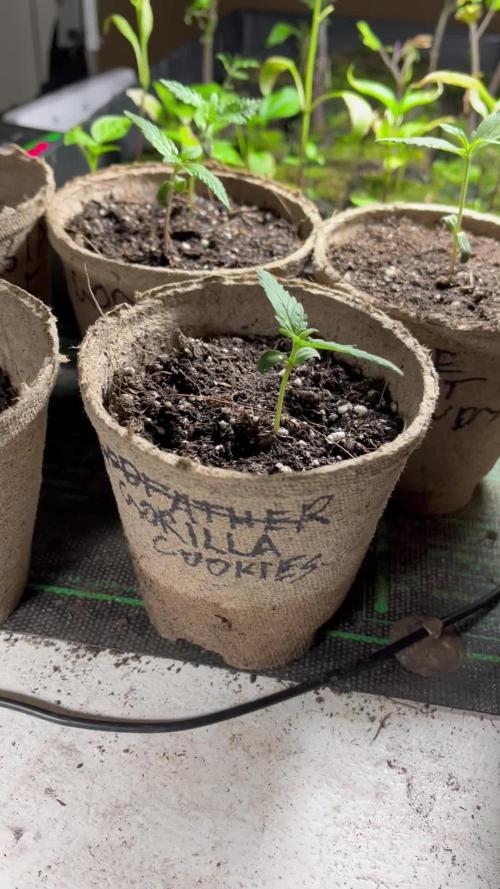
May 10 Day 9: Gorilla Cookies Fast is the most vigorous of the seedlings this year. Fast Buds consistently wins on strong germination at lowish temperatures.
Filled 7 gallon soil bags using a ‘ring’ or donut of spruce cones at bottom of the grow bag. Did a single wedge last year but roots obviously preferred the air exposure so doing the whole bottom edge this time.
Soil is mostly recycled from last year. Mixed in wheelbarrow with addition of peat and compost, some (5 tbps?) Azomite, 3 tbsp of Extreme Blend and 3 tbsp of about six year old Myco Grow (oh well, seems fine).
Likes
11
Share


@blasterw32
Follow
Hello gardeners!
I'm starting my third grow after two good attempts where I learned a lot. In my first trial I was able to pull 40 + 20 + 20 = 80 g under not optimal conditions (limited time mostly), and in my second I improved to roughly 40 + 40 + 60 = 140 g with one additional week in veg and an additional led panel during flower.
Now, my goal is to harvest 3 x 60 = 180 g with pretty much the same set up.
The differences from my previous grow will be:
1) 1 more week in veg (total 6 weeks): I felt that my girls were not mature enough when I flipped them to 12/12 in the last grows. I wanna see them stronger and more robust this time
2) Use a larger pot size during flower (5 gal): for the same reason as above, I want to give them the opportunity to be strong and robust plants
3) Reduced number of colas (16 per plant): last time I was a bit conservative doing lollipop and removing the little side branches, and ended up with ~23 colas/ plant, which did not allow proper spacing between colas. Although ventilation was never a problem, there was a lot of shade that could not be avoided.
4) Improved feeding regime: (see images) one of my goals with my growing is to establish a good feeding regime that works reasonably well for average strains with my growing medium (PRO MIX herbs and vegetables). Since the medium is a hybrid between soil and soiless, the plants don't need extra nuts in the first weeks, but as the plants grown, the organic compost present in the medium becomes not sufficient. My feeding strategy is basically the GH Flora Series - Drain to Waste chart with reduced amounts in the first 4 weeks and slightly less nitrogen during flowering.
5) Height Control: since the girls will have an extra week to grow, I'll need to be extra cautious and control their height from the very beginning. I'll be doing 1 top in the CBD and GG, and probably 2 on the Moby Dick. I also may try something similar to manifolding on the Moby Dick if she starts to grow really faster than the others. In addition, I'll be scroging everything as low as I can.
6) LED panel distance: last time plants finished flowering about 16 in away from the lamp. I feel that I can lower it to 13~14 without problems, so I'll try this too
SET UP --------------------------------------------------------------------------------------------------------------------------------------------------------------------------------------
Grow tent 2 x 3 x 6" hidden on a closet (0.54 sq meters)
Light: 2x LED Panel VIPARSPECTRA 450w (200w real)
Air filtration VivoSun 4" exhausting outside the closet
Air circulation: 2x 120mm 5v desk fan
Container: Red Solo cups / 1 GAL / 3 GAL / 5 GAL
Medium: 75% PRO MIX Herbs and Vegetables (sphagnum peat moss, Peat humus, compost, perlite, gypsum, limestone, organic fertilizer, Mycorrhizae - NPK: 0.30 - 0.05 - 0.10) + 25% Perlite
Nuts: GH Flora Series
Ph: 6.0

Likes
Comments
Share

