
Likes
Comments
Share


@Roberts
Follow
Deepforest auto has sprouted. She is getting acclimated. I am worried I made the solution too strong. I will find out when she finds it. She stretched a lot as I didn't remove her dome as soon as she broke ground. She should strengthen up in the next few day. Thank you Doctor's Choice, Athena, and Spider Farmer. 🤜🏻🤛🏻🌱🌱🌱
Thank you grow diaries community for the 👇likes👇, follows, comments, and subscriptions on my YouTube channel👇.
❄️🌱🍻 Happy Growing 🌱🌱🌱
https://youtube.com/channel/UCAhN7yRzWLpcaRHhMIQ7X4g.

Likes
10
Share


@DeepRootsGrowTrees
Follow
ROYAL QUEEN CBG AUTO
ROYAL QUEEN SEEDS
WEEK #11 Overall
WEEK #6 Flower
This lady made some big dense buds and just looks amazing as she's coming to the end of her grow cycle I've had no issues with this CBG plant easy to grow and a nice producer!!
Stay Growing!!!
Royal Queen Seeds
ROYAL QUEEEN CBG Auto

Likes
15
Share


@Weedman268
Follow
Week 11 of flower, 10% amber trichomes 90% milky, waiting a bit longer as I want a bit more amber.

Likes
15
Share


@UberSmokez
Follow
Plant is growing well. First 2 sets of leaves had deformities so had me worrying but another growmies from here told me totally normal for first set of leaves today I have started using biobizz bio grow feed following the feed chart of 2ml per litre of water the only thing
I am struggling is how much should I water my plant currently watering 100ml - 170ml. Per 5 days
But other than that she seems to be growing nice and healthy. And strong
I was advised to tilt my fan towards my plants a little to help with oxygen and to help stiffen stems ! So I have done that
I am wondering when I should start low stress her
And is she the right size for her age

Likes
31
Share


@Dunk_Junk
Follow
Nice growth this week. Making roots. Making leaves. She will shoot up in a couple of weeks.

Likes
13
Share


@balansa
Follow
Hello growers!!!
My ladys are near to harvest. I think in a week i will chop them as you see in microscope photos there are about:
70% milky trichoms
25% clear trichoms
5% amber trichoms
I will check again next week
So we have news for this week i added my favorit nutrition dry koolbloom
And next week i will use rippen aswell sooo......
I am excited :)

Likes
48
Share


@Igrowneil
Follow
Thanks to all the sponsors of this run
@Vipraspectra (LEDs) #xs4000 #p2000 #p2000 = 880watt full spectrum
@Zamnesia (seedbank )
@Emeraldtriangleseeds
@RoyalQueenSeeds
Hey growers @IGROWNEIL (now on Instagram)
this last week has seen amazing growth the plants have been super happy with the bigger feeds and the lighting moved to 18/6 saving on electricity is a must , 12£ gbp per day to 8£ gbp
, saving 4£ a day is about 300£ per run saved which will now pay for new pots and more nutrients from @terra_aquactia and mabey there light mix soil
The watered method of flood and allow to dry out works really good from seedling 🌱
Really happy with these results and really happy with my @viparspectraled lights #xs4000 and #p2000s also I'm using bio roots on this run which I do think is adding to the overall growth formation along with the lights themselves.
Plants appear to have alot thicker stems from very young , plants all seem vigorous in growth and appearance seem all quite healthy plants .
The new soil / coco @canna_terra professional plus is great stuff and also another factor I've changed to a lighter soil mix which is definitely helping out as it doesn't seem as compressed as the other soil without coco coir .
@Terra_aquatica nutes being used along with @vitalink dairys have ratios being used but @terra_aquatica bio roots is doing me well and my plants seem to love the bigger feeds
I will be moving over on my next run to @terra_aquatica nutrients line only I literally love the brand and how the owner relates to his own business and plant research 🙌
Extraction and intake @blackorchid @ramfilters
All 12 liter fabric pots (amazon basic) and Thhefabricpot companys
Soil - @canna_terra professional plus ➕
Had an amount of fungus knats that still presist having to make sure my soil is dry and ruffing up the top layer to stop any eggs being layed down the knats are a problem and this has put doubts in my usage of this soil again as I used about 240liters which is 5 bags at 18£ GBP each 90£ on soil to then cause me more money and additional problems in a big run isn't something I can let slide as this could seriously harm financially by reducing the amount at harvest.
Okay plants
@zamnesia
Gorilla glue
Doing amazing, thicker stems , bigger leaves , did notice some calmag or N defenices leaving me to increase calmag and nitrogen, but doing really well with the LST also and start to increase the size of the Bottom branches as we can create many tops instead of the one main on weeks 3 and 4 days 21 to 35 will see the main phase of stretching
Girl scout cookie's loving the growth and the girl with the leaves purple 💜 underneath are pretty cool 😎
Runtz 🚫 automatic
Study looking plant doing super under some LST hopfully see some more of the bottom branches catching upto the main colas before I hit them with netting
@royalqueenseedsrqs
#dosido
Expected more from these girls but there starting to come back a bit faster now hopefully this keeps up
@emeraldtriangleseeds
#lemonhazeauto
Doing well under LST being a sitiva I'm gonna watch closely for major sprouting.
#headlightskushauto
Doing well also under LST any defenices you see on plants will be me getting used to this new soil which I'm finding tempermental and a problem with knats
#blueberryauto
Coming back to life this little girl has surprisingly gained some traction keeping a close eye on her as I can't wait to finally try Blueberry weed , proper stuff 🙌
Thanks all for liking and commenting 🙂
Please follow me on Instagram @igrowneil

Likes
62
Share


@MeaCulpa
Follow
OK, it is bloomingtime.
Everything is fine.... I hope.... but it seems so.
Likes
2
Share

@fubar_1337
Follow
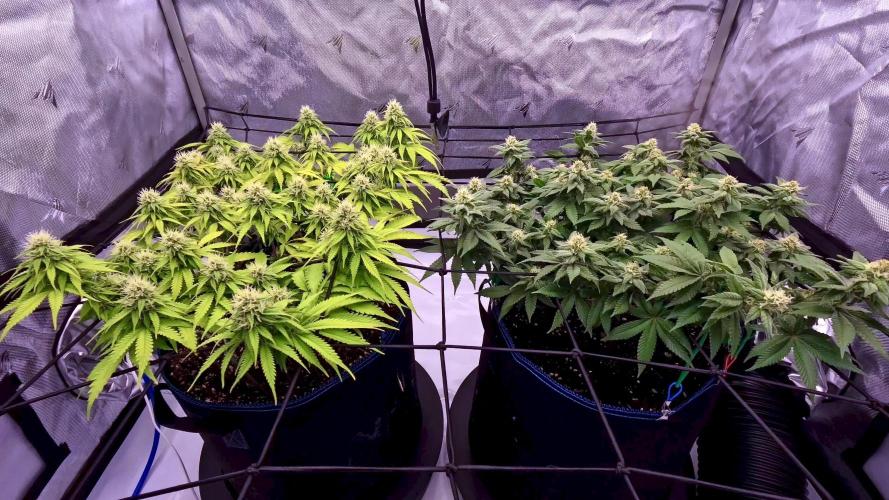
This week was mostly about maintenance, balancing the canopy, and keeping the rhythm steady. The lighter green pheno keeps drinking well and is building buds consistently. Growth in biomass seems to have slowed, which is fine — she’s clearly channeling her energy into flower production now. No new leaf mass, but steady bud development.
The darker green pheno, on the other hand, required real work this week. She had become very dense and bushy, so I carefully defoliated her, opening the canopy and removing shaded bud sites that would never reach proper light. I was mindful not to overdo it, giving her just enough space and air without stressing her further. The result is a much more open structure with better airflow and a cleaner look.
The PPFD increase to 1000–1050 µmol/m²/s from the week before shows no negative effects — both plants are handling the light intensity well. They’re responding steady and healthy, which gives me confidence to keep them at this level.
Overall, the tent is vibing steady right now. The darker pheno got a fresh haircut and is breathing again, while the lighter one keeps cruising, stacking buds even if she’s not pumping out more leaves. Light levels are up, the girls are chill, and I’m just letting the ride flow. It feels like the darker pheno might even catch up and outshine her bright sister.
For now, I’m keeping my hands off as much as possible, letting them finish strong so I can roll into the next project. 🚀


Likes
27
Share


@eldruida_lamota
Follow
Aquí están otra vez las do sweet dos por todo lo alto, las jodidas están increíbles, 10/10 y no veas que tufillo que empiezan a echar, y como no, de sweetseeds.
.
La humedad esta al 45% la temperatura está entre 21/24 grados , y como siempre el ph , ya que es de lo más importante,está en 5,8/6,0.
.
AgroBeta:
0,5 ml x L Flowering black line , vía radicular.
0,2 ml x L Beta shark, vía radicular.
0,3 ml x L Tucán , vía radicular.
0,8 ml x L Génesis, vía radicular.
0,1 ml x L Betazyme, vía radicular.
0,2 ml x L Flash Root , vía radicular.
0,05 ml x L Gold Joker, vía radicular.
0,2 ml x L Silver, vía radicular.
.
Hasta aquí todo gente, espero que os vaya molando , un saludo y buenos humos fumetillas💨💨💨.
Likes
8
Share


@R1pp3r
Follow
Tan solo esperando la flora ajajsjsjs no puedo estar más conforme con la estructura que alcanzó, sin duda hasta ahora es una de las mejores cepas que eh probado

Likes
12
Share


@Chuckwaggon420
Follow
These girls are still perfect. You want a picture perfect set of plants and it's these they are all damn identical i am still blown away by how close they are from growing from seed! The only real diffrnce is 1 has slightly wider smaller leafs so more leaned indica hybrid but all the spacing between the 4 are about the same.
They have been receiving about 500ml of food/ water about every 3 days with the ph at 5.6-5.7. Will top these girls soon to get a couple heads started just didn't want to end the symmetry. Still no smell or sign of preflower yet, with a stem rub they feel sticky to touch and only smell green so just tells me they healthy. Soon a smell will come along!
Peace be with you!
Likes
8
Share


@Franz1234567
Follow
increasing nutrient doses, monitoring EC and pH doesn't bear fruit, I think. Training also takes its toll and the girls flourish.
We will continue to feed and observe...
Second half of week brings quite intensive growth. Continue with LST, because need light penetration and some leaves out with same purpose.
What does next days bring? I am exciting...
Likes
3
Share


@High_Grade_Dadli
Follow
Girls are coming along well transplanted set 1&2... seem to be loving it....we getting there

Likes
16
Share


@BrainStorm22
Follow
6 Semana Floracion
Dejamos de utilizar monster bloom seguimos con los demás fertis de la línea con una Ec de 800 y Ph 6.7 se comienza a apreciar el desarrollo final de estas plantas✌️

Likes
5
Share


@Mackdad4000
Follow
Plant is really hungry,I thought she was finished but she just keeps going. I’m assuming my particular pheno is got to foxtail, buds are growing out the buds ! Wtf, she’s bigs asf her little sister is filling out
Likes
4
Share


@KirbyFarm
Follow
Now into flowering the girls are growing many white hairs and slowly chunking up. Some look urhter along than others into the actual forming oi buds. Looking good.
Likes
2
Share


@EtnoGrow
Follow
here we see how the girls are advancing, the buds are becoming clearer and clearer which makes us feel that it will be a decent harvest at least, we cross our fingers.
Likes
57
Share


@SmokieMcPot
Follow
2 girls 1 cup week 3!
Thanks for stopping by and checking out my experiment.
They're getting a little big to be taking individual overhead pics everyday now. They always both end up in the same shot no matter what. Will still update daily with pic. Got a new cam that can do timelapse. Almost sent it back until I said fuck it and tried TWO layers of sunglasses. Diff colors too. One more of a FLD filter color, one more of a UV filter color. Both are polarized as well. I'm sure the night vision footage will be trash with the IR behind the lenses, so the timelapse will have res checks/changes and night prob edited out. Stay tuned for that!
Going 1/2 strength GHE week 3 light feed and actually changed RES last night. Was looking at em and already noticed WG was drooping more than it should. Normal transportation and growth/energize cycles are expected, but was looking overwatered. GC if you look in vid "d14" in first and second set of fingers showing interveinal chlorosis. PH has been between 5.52 and 6.4 (lowest and highest), and averages a swing in a 12hr shift from 5.71'ish to 6.17'ish. Not uploading notes again like last week, but you'd get the idea if you saw them, I take notes lol. So PH wasn't an issue. They've been averaging a 7-15ppm drop in res per 12hr and has only been climbing again due to ph down additions. I should prob change RES mid week so it's not a high concentration of ph product. So they're DEF eating proper, have stable ph swings, optimal res Temps and dissolved oxygen is good. WG taking on more water to get the nutes, causing leaves to droop from excess water. GC moving nutes from old growth to the new growth. So they're hungry.
Ghe claims 62.5ppm nitrogen, 275-375ppm target per mixture below. Mixed and measured in between each addition to get my numbers.
-2gal Water/calmag/hydroguard 215ppm
-Micro 4.9mL - 170ppm
-Grow 4.6mL - 100ppm
-Bloom 3.4mL - 60ppm
Nute concentration - 330ppm (nailed it again GHE)
Water - 215ppm
Total - 545ppm
Ph'd to 5.6 final tds 563ppm
Mars Hydro TSW2000 on theeee way to finish these girls off right.. some of my worries are settled. For now...
*they just ate 32ppm since this mornings RES chk/adj... I was thinking I'd have to swap RES once mid week once they get older, but think they may benefit from it sooner than later. Tap roots popping out by the chute for the air line, the temp sensor, and the main stack.. going to have to pump the res out pretty soon to avoid root damage. Timelapse will turn out pretty sweet if I would quit bumping the damn camera, and stay TF outta there 🤣.
**these girls are starting to BLOW UP! Figured I'd bump their feed up a bit today because they told me to. Eating as much as they are as quick as they are I'm going to have to be on top of it or shit will go south quick.. so, for the record..
GHE wk 3 "light" feed 3/4 strength
Projected nitrogen - 93.75ppm
Projected TDS - 412.5-562.5ppm
2gal water/calmag/hydroguard 202ppm
Micro - 7.35mL 229ppm
Grow - 6.9mL 145ppm
Bloom - 5.1mL 97ppm
Nute total - 471ppm
RES total (after ph corrections) - 690ppm
May have to hit them harder if they keep eating like they are. Trying to borderline optimal without crisping their leaves. So I am watching the TDS to see how theyre eating. Aiming for 10-15ppm per 12hr. If they eat more, feed em more. Eat less, feed less. Seems to be working so far, just like last time. May up my calmag TDS of my spring water/tap mixture to 250ppm from the 80'ish it ends up being after mixed. I'm sure they want more calcium too. It can't hurt right??
Wedding Glue couldn't be happier with its bump up in nutrition... can't wait for this timelapse...
***realized I messed up settings on timelapse after the fact.. pissed I missed out on the footage from its night and day shift today. Uploaded footage from after RES change with more food for em to eat, sped WAY TF up cause I decided to grab a frame every 3sec vs 1min. Trying 2min this time and stop/save/start vid every 12hr. Fingers crossed it turns out. WG was happy ASF and let me know with a big ole wave. And some BIG growth over the time. Have tied em both down again to avoid topping, yet. . Looks like just wiping off the two leaves that got effected by my carelessness wasn't enough. Few drops of something got on GC in two spots shown in pics. Note taken, wash it off next time or just be more fucking careful.. got it. On a surprising note... RES level not only dropped 600mL, but also dropped from 690 to 645ppm (total tds). So they're eating MORE with the increased feed... doesn't suprise me much, but heard auto's don't like to be over 6-700?? Nute concentration @ 471 yesterday, and it's dropping FAST... will probably fatten up their plate on Sunday and go with a RES change, full strength week 3 GHE.
****tired of reading this shit yet?? Here we go with yet another RES change.. just bumped em up YESTERDAY! they're still showing signs of hunger, WG more than GC. Can't let these girls go hungry now can I? A couple bucks in nutes down the drain is better than letting em starve.. Plus they're more attractive when their leaves aren't full of water. So here goes... starting to smell in the tent..
GHE wk 3 light feed
Projected nitrogen - 125ppm
Projected ppm - 550-750ppm
2gal spring/tap, calmag, hydroguard - 248ppm
Micro - 9.8mL 362ppm
Grow - 9.2mL 189ppm
Bloom - 6.8mL 111ppm
Nute total = 662ppm
RES total (after ph correction) - 940ppm
Just realized if I delete timelapse from wyze app, it deletes from gallery too. Fuck, another good one... my bad. I think I got it now... side note, guess I have to count cotyledons as first node since these bitches wanna grow some arms from what mangled pieces are left next to em. Need to grab some 91% before I go cutting on these girls though, so they stay for now.
*****d19 mars tsw2000 showed up two days early! hung it during the "night". timelapse updated, day 18 and 19. lots of growth under the fans, and WG trying to push GC tf out of the cup lol. Training rods installed for the mains, and all the 3 fingers are plucked. Ended up plucking a 9 finger from WG and a 5 finger from GC to make way for the under growth. Feel like Bruce Almight parting a bowl of soup lol
******didn't want to post a pic of my girls in distress, but documenting everything else, so why tf not. swapped out the clear sight tube for a more UV friendly agro green. Marked the tube in the same spot as the clear, but it was almost a gallon more in reality at the same mark. I was drowning them with no air gap below the upper growing chamber. After measuring, it was submerged by about 5/8th inch. Sorted that out, and took almost all day for em to perk up. On top of that, the new light and adding another oscillator changed my environment. No more humidifier in the tent. Thought I lost both of them.. Soggy leaves, spotting, etc. Backed nutes back down to 3/4 strength wk 3 due to slight curling in new growth and one lighter tip on one new finger. Shortened the training rods tonight and started with some bondage. Prob the last time they'll get tied down before the net gets used (if needed) here in a week or so. Backed off to 16 DLI from 20 until they really perk up. End of week 3
Likes
7
Share


@Ereks007
Follow
It's been a smooth grow year ..I am only using flora nova ...and pro tekt. Silica ..water is from local tap ..filtered with rv filter. There is movement og ,fatso bx1 x wilson, sunset sherbert x Sunday driver x Natrual Born Killer strains ....thanks for viewing