The Grow Awards 2026 🏆 


Likes
Comments
Share
@SjenkGrow
Follow
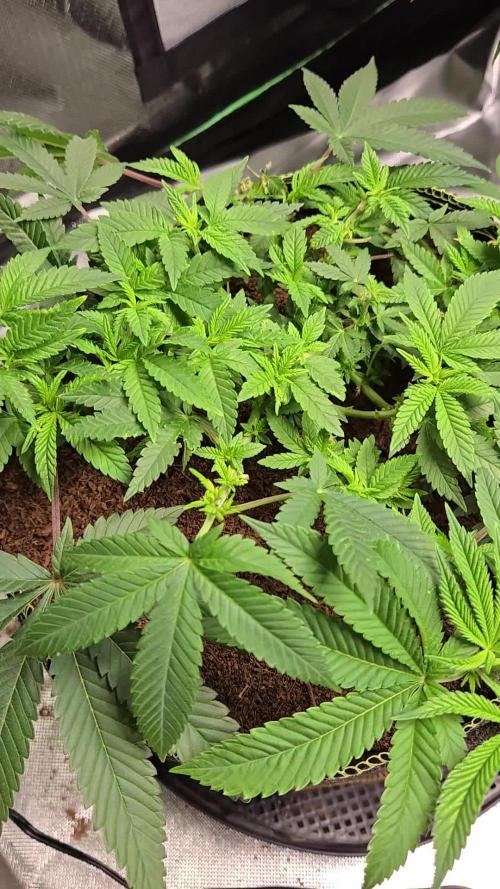
Trying to start the scrog net to spread some branches here and switched to Indian Raga

Likes
22
Share
@420SYL
Follow
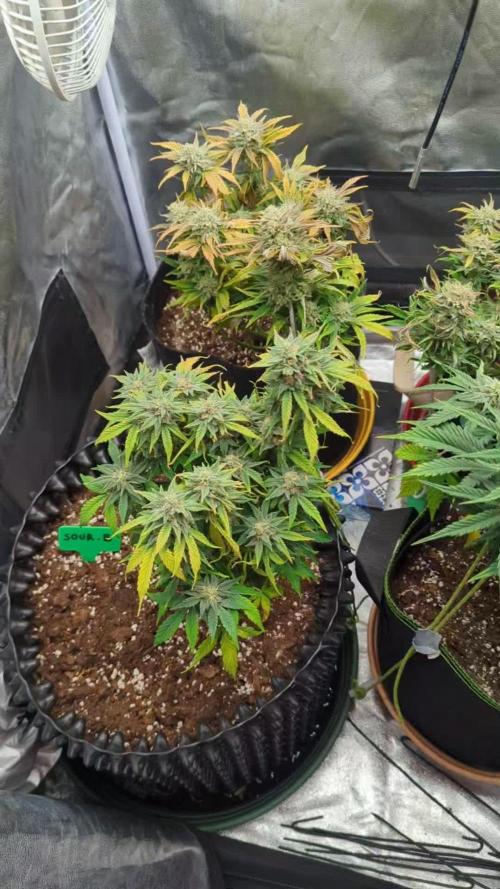
I made a mistake with my last two waterings: the pH was at 7 instead of 6 / 6.2…
My Bluelab pH pen was reading 6.2, and the classic pH drop test was hard to read because of the added nutrients. The plants clearly went into lockout.
I watered at 6.2 yesterday and they already showed signs of improvement; I’ll post a before/after photo.
They’ll make it to the end 💪🌱
The two SM&Q2 already have nicely milky trichomes and a few amber ones — the harvest will be small but high quality ✨
The two Sour B are slower, but they smell insanely good — fruity candy vibes 🍬🍭
Likes
13
Share
@Gg_kush
Follow
Bigger and bigger everyday !!
Gonna be awesome
Can’t wait to see her bloom !
I had to attach the branches, they are very long 😍

Likes
13
Share
@MrGrowDiarie
Follow
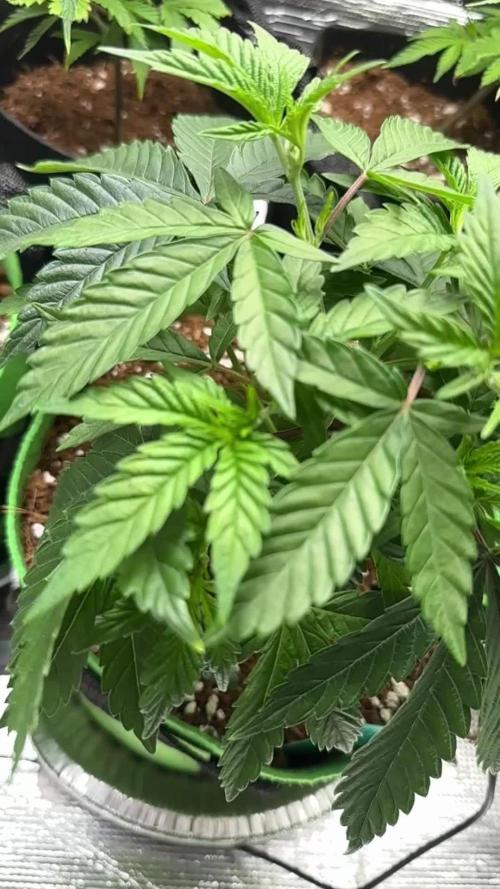
Day 56
This plant is clearly in a much better state than the others. The leaves are standing more firmly with a strong, healthy green color across most of the canopy. There’s no significant drooping, and overall it shows good vigor.
One of the standout differences is the structure: it has developed many more internodes compared to the stressed plants. The spacing is consistent, giving the plant a dense framework with plenty of future bud sites. This compact but vigorous growth suggests the roots are functioning well and nutrient uptake is steady.
While there are still a few minor signs of stress here and there, the plant overall looks balanced and much more capable of handling the transition into flowering. The canopy is filling out nicely, and it already shows strong potential for multiple tops to develop evenly.
Compared to the weaker plants, this one feels “on track” — healthy, structured, and ready to keep building momentum. The priority now is to maintain stable conditions, avoid overwatering, and let the plant continue its natural growth without unnecessary interference.
Likes
10
Share
@Skinnytalls420
Follow
Day 38- 18/01/22 and we are now in flowering everything is looking good I’m still cutting down the plants from my last grow Afghan kush and once I’m done with that I’ll be moving everything that isn’t chemdawg into the HPS tent!!! Day 41-21/01/22 finally got the 3 of them in the hps tent!!!!


Likes
12
Share


Likes
24
Share
@Hawkbo
Follow
Lookin good, no more herms so far as I’ve tightened things up hopefully that’s the last of them for good. I installed a 4Inch AC infinity fan and filter as an intake so I have been able to close all of the vents. At this point the leaf strip has proven to be a solid method, I have nothing to compare bud size at this point but just the extra space it opened up is a plus. I’m sure the lowers will be a little more firm and the plants obviously haven’t had to be fed as often as usual so its saving time, water and nutrients. The added microbes have also allowed me to keep my ppm around 1000 instead of 1080ish without any sign of deficiencies. The Mandarin cookies x Dionysus has a little cal-mag issue but that was a trait from the mother which out of 10+ grows all had a cal-mag deficency.
REMEMBER , IF YOUR SHOPPING FOR GEAR YOU CAN USE THE CODE “BANGDANG” FOR 10% OFF YOUR ENTIRE PURCHASE FROM ANY OF THE FOLLOWING COMPANIES.
@greenbuzzliquids
@rainscience_growbags
@gorilla_grow_tent
@growlightscience.led
*****Gorilla grow tent discounts extend to all companies affiliated with grow strong industries which include..*****
@super.closet
Lotus Nutrients
Kind LED grow lights
Likes
9
Share
@DeepRootsGrowTrees
Follow
TRIPLE G by ROYAL QUEEN SEEDS
Week #11 Overall
Week #10 veg
This week she's going good no issues with the elements she's dealing with the heat fairly good also.
Stay Growing!!
Likes
7
Share
@Philippovic
Follow
Nach genau 84 Tagen war es nun soweit, gegen Ende hin wurde die Blueberry schön dunkel und entwickelte einen hervorragenden Duft!
Likes
9
Share
@Dargaville_Dukes
Follow
Harvest YAY! It's been an epic mission but we made it!! Plant 2 is slightly heavier than Plant 1. I'll update with dry weights in a week.

Likes
5
Share
@MalinaGrow
Follow
Soaked the seeds in water with hydrogen peroxide 10 drops per 200 ml. GHS gave root first both varieties, CG waited 3 days and decided to add a second seed, after 24 hours both gave root :)
Solucion - local Argentinian manufacturer.
Coconut substrate - Plagron.
Water : 110 ppm + 0.5 (HV+HM+HM)=350 ppm.
Wanted to twist the sprout with a Lemon Orange spiral because it stretched out, but broke it in half :(
26.06 - 2 Marshmallow and Milky Dreams.
P.S. the biggest one is Milky Dreams.
Puse las semillas en remojo en agua con peróxido de hidrógeno 10 gotas por 200 ml. GHS dio raíz primero ambas variedades, CG esperó 3 días y decidió añadir una segunda semilla, después de 24 horas ambos dieron raíz :).
Solucion - productor local argentino.
Sustrato de coco - Plagron.
Agua : 110 ppm + 0,5 (HV+HM+HM)=350 ppm.
Quise retorcer el brote con una espiral de Naranja Limón porque se estiraba, pero lo rompí por la mitad :(
2 Marshmallow y Milky Dreams.
PD: el más grande es Milky Dreams.
Замачивал семена в воде с перекисью водорода 10 капель на 200 мл. GHS дал корень первым оба сорта, CG ждал 3 дня и решил добавить вторую семечку, через сутки оба дали корень :)
Solucion - местный Аргентинский производитель.
Кокосовый субстрат - Plagron.
Вода : 110 ppm + 0.5 ( HV+HM+HM)=350 ppm
Хотел скрутить росток спиралью Лемон Оранж, потому что он вытянулся, но сломал его пополам :(
2 Marshmallow и Milky Dreams
P.S. самый большой это Milky Dreams

Likes
15
Share
@Green_claws
Follow
Yes gromies
I gave her canna boost for the first time today
I'm giving around 600ml de-chlorinated water every 2 days, il aways feed every 2 days spreading all different nutrients between them, get a nice balance, watering just enough so the coco goes dry after 2nd day well on top atleast anyway.
Giving silica on its own once a week 0.5ml to 600ml water ph'd to 6.
Removed a few lower leaves and pegged back 2 branches to make room for the many colas now coming threw nicely.
Not sure how this grow is going! it feels slow upto now but she's well into flower now and the stretch is real...
Added midweek..
I could feel her asking for phosphorus and potassium so gave her a little tickle of PK13/14 (0.5 To 500ml ph'd to 6). 1 feed.
Going vertical and filling budding sites nicely.
😛.
Raised the light for more vertical growth before she puts some weight on. 😉.
Thanks for taking your time out to view my diary.
Peace and love 💚
Likes
7
Share
@BIYEI
Follow
Vegetacion (Tiempo estimado 28 dias)
Tercer Semana de Vegetacion
21/12/2023 - 5:00hrs y 22hrs: Se Hace cambio de solucion nutritiva y se limpia el recipiente, se verifican parametros basicos del agua, mantener cuidados especificos, el Ec y PPm Varean por los aditivos.
Agua de osmosis: Ph 6.0, PPm 850-1050, Ec 1.7-2.1, Temperatura 22°C - 26°C, Humedad 75%
Ambiente: Temperatura 22 °C, Humedad 75%, Ventilacion 15%, 18 hrs de luz , 6 hrs de obscuridad.
22/12/2023 - 5:00hrs y 22hrs: Se verifican parametros basicos del agua, mantener cuidados especificos.
Agua de osmosis: Ph 6.0, PPm 850-1050, Ec 1.7-2.1, Temperatura 22°C - 26°C, Humedad 75%
Ambiente: Temperatura 22 °C, Humedad 75%, Ventilacion 15%, 18 hrs de luz , 6 hrs de obscuridad.
23/12/2023 - 5:00hrs y 22hrs: Se verifican parametros basicos del agua, mantener cuidados especificos.
Agua de osmosis: Ph 6.0, PPm 850-1050, Ec 1.7-2.1, Temperatura 22°C - 26°C, Humedad 75%
Ambiente: Temperatura 22 °C, Humedad 75%, Ventilacion 15%, 18 hrs de luz , 6 hrs de obscuridad.
24/12/2023 - 5:00hrs y 22hrs: Se verifican parametros basicos del agua, mantener cuidados especificos.
Agua de osmosis: Ph 6.0, PPm 850-1050, Ec 1.7-2.1, Temperatura 22°C - 26°C, Humedad 75%
Ambiente: Temperatura 22 °C, Humedad 75%, Ventilacion 15%, 18 hrs de luz , 6 hrs de obscuridad.
25/12/2023 - 5:00hrs y 22hrs: Se verifican parametros basicos del agua, mantener cuidados especificos.
Agua de osmosis: Ph 6.0, PPm 850-1050, Ec 1.7-2.1, Temperatura 22°C - 26°C, Humedad 75%
Ambiente: Temperatura 22 °C, Humedad 75%, Ventilacion 15%, 18 hrs de luz , 6 hrs de obscuridad.
26/12/2023 - 5:00hrs y 22hrs: Se verifican parametros basicos del agua y se rellena de un 1 litro mas de solucion nutritiva con los valores ajustados a esa cantidad de agua, la planta empieza a chupar agua cada vez mas, mantener cuidados especificos.
Agua de osmosis: Ph 6.0, PPm 850-1050, Ec 1.7-2.1, Temperatura 22°C - 26°C, Humedad 75%
Ambiente: Temperatura 22 °C, Humedad 75%, Ventilacion 15%, 18 hrs de luz , 6 hrs de obscuridad.
27/12/2023 - 5:00hrs y 22hrs: Se verifican parametros basicos del agua, mantener cuidados especificos.
Agua de osmosis: Ph 6.0, PPm 850-1050, Ec 1.7-2.1, Temperatura 22°C - 26°C, Humedad 75%
Ambiente: Temperatura 22 °C, Humedad 75%, Ventilacion 15%, 18 hrs de luz , 6 hrs de obscuridad.
Likes
15
Share
@Mrs_Larimar
Follow
2022-11-21
Those Plants are frosty like winter.
holy moly
I got 4 female Plants and 2 Phenos
One is shorter, the other one larger, but both are fantastic frosty
tomorrow i show you the ones in the Urban Chili, thses Pics are fro My Floweringroom
Iam using the urban Chili 2.0 and the urban Chili 3.0
the biggest Difference is the Light
the urban Chili 3.0 has 20 watts more
https://urbanchili.eu/en/growbox-specification/
All Plants look fine, lets see what the next Week brings.
so far so good


Likes
49
Share
@Secretflower
Follow
Hello my friends,
...May 17, 2022....Day N°65..
...Flowering day N°10...
My three Feminized Watermelon Candy are fine, there are beautiful, the stretching is here.
I feed them with the Hybrid powder from Green House Feeding Nutrients, you can use it for Veg and Flo 🤘
I gave them some CalGreen from Metrop, the best Cal-Mag of the market.
They are under a MarsHydro TSW 3000 at 50% of power and at 40cm of the canopy.
www.zamnesia.com
www.mars-hydro.com
Thank you very much for passing by.
Wish you only the best with your green projects, peace.
See you soon 💨💨💨
Likes
14
Share
@THCAlien
Follow
Awsome the smell if this girls! And really every leave is sticky. Looking forward to the Smoke!

Likes
46
Share
@pifflestikkz
Follow
This plant was an absolute dream to. Grow, no issues at all with health of plant, just struggled to tame her as she was a a thick strong climber 💪💪.
I'm so impressed with how this turned out, I could have flushed for another 3 days to make it 12days but I needed the space.
After The 2 days of dark I was recommended I can definitely say it has vastly boosted her trichomes and the smell when I opened the tent blew my head away 😍😋
Aiming for a 10-14 day hang dry,
The 10-12 weeks curing in jars with humidity packs.
I will update with a dry bud weight and smoke test 👌
Bud wet weight is just 500g+
Final bud dry weight is 298g.
Of juicy resinous purple and orange buds 😍 smells like sherbert and hang dry smoke test revealed a candy sherbert, no banana yet but hoping like the grow it matures with cure process now.
Hits eyes straight away, sandy bottom kids, giggles, munchies, fun time with Mrs, bed. Full cycle with this one very happy over here 😉😁💚
FAT BANANA AUTO FROM ROYAL QUEEN SEEDS, big thank you to the team, and the breaders. What a pheno I received. I appreciate you all
Processing
Likes
3
Share


Likes
3
Share
@ghost8782
Follow
thanks for the comments guys ! im switching to 20 hour of light tomorrow