
Likes
Comments
Share


@BklynBushRx1
Follow
Just starting vegetative stage as it looks like we made it through a week of seedling stage very nicely ! Watering about an ounce every 36 hours! In all these plants are like 10 days old. Keeping them in ac germ kit ppfd for smaller ones is 185 and other one is 200! Have added nothing just going with the original 75% promix ap with 25% worm castings! See you next week

Likes
28
Share


@Felloffthegrid420
Follow
9 and half foot tall lil yellow low part look like red ants might be eating the bark was 4 or 5 there at the hole on the steam of the plant

Likes
67
Share


@AwfulBuddy
Follow
Hi all buddies!
First crop from hydro nft growth.
Growth went well, I had some management problems in changing nutrients from veg to bloom which delayed the harvest for a week or two.
Sensi Seeds' Skunk # 1F is incredibly resistant to mold and insect attacks, very close internodes ensure low height and compact buds.
Unfortunately I chose the mother phenotype wrong, I found the lowest as I wanted but I lost the fatness of the buds present in other phenotypes, but the game was worth the same and I am very proud of it!
I collected after 94 days of flowering, the last 72h 20kg ice cubes in the tank and total darkness which the last 24h without irrigation.
After cutting I hung the whole plants in the tent for 24 / 48h 19 ° C 55% HR.
Two days of wet trim to 8 girls and I hung their colas in the tent to continue drying.
With a girl i tried dry trim but i will avoid next time.
After a week in the tent I cleaned the colas and removed all the sticks, I placed everything in airtight bags in the refrigerator for 5 days 12 ° C 65% HR (daily check).
Now dark storage room at a temperature of 18 ° C 65% HR.
At the last weighing a few days ago it was more than 500g, from now it does not lose any more weight.
Next week I will take pictures of the weigher and the finished harvest🍀🍀🍀
target!!🍀500g dry/cured🔥
Thank you GD community you are precious for everything, criticism, advice, curiosity, thanks 💚🌱✊🏼
Awesome people here on GD🔥🔥🔥

Likes
11
Share


@Skinnytalls420
Follow
Day 1-12/12/21 I placed the seeds into a glass of water for 24hours! Day 2-13/12/21 I have put the seeds on a wet paper towel on a plate! Day 4-15/12/21 seeds have been put into soil and placed into tent!!!day 6-17/12/21 most of the seeds are showing first signs of leafs

Likes
4
Share

@MandaleApical
Follow
1 mes de flora. Cogollos dulces todos. De izquierda a derecha se mezclan con, mas dulce, incienso, limoncito dulce, uva.


Likes
3
Share


@CreoWeed
Follow
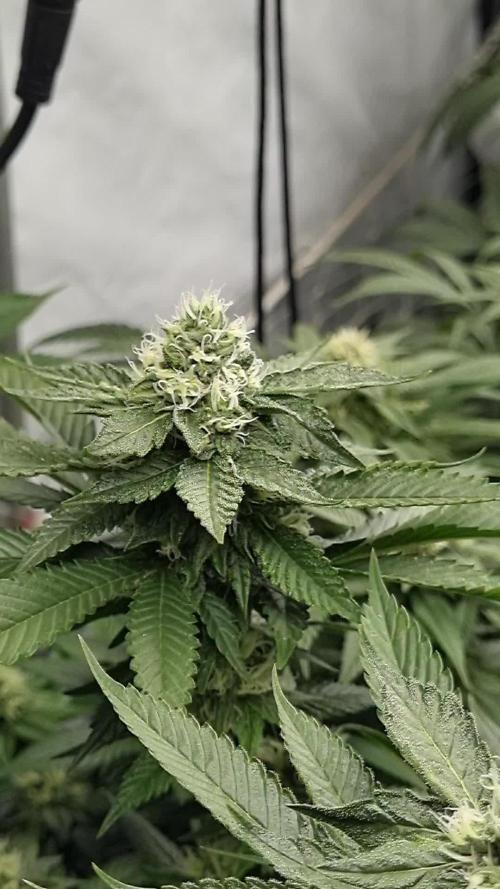
This week can be simplified as EXPLOSION!!
The plant doubled in size and I can see many main branches now, which is pretty awesome!! This is exactly what is LST is for, right!?
I am pretty amazed for seeing this explosion in the 2nd week of flowering and cannot wait to introduce the booster when flowers are going to be a little bigger, in around 6~10 days.
Now I'm keeping training her for at least 5 days, and then I'll stop so she can focus on flowering. At the e moment I'll stop training her she will also be able to have more space for herself in the tent as the other plant are going to be chopped pretty soon (other diary updated).
So stay tuned and stay high nice people!
Cheers!

Likes
62
Share


@masterofsmeagol
Follow
7/26 Rained last night and looks like it will rain today as well. The periods we've been having with rain then sun then rain has really exploded growth. I have tops over my fence already. You can see all the dead leaves I pulled. Plants look healthy but I always worry when I lose leaves like this. Luckily I can look back on my old diary and the paper one before for some peace of mind. I've decided to label this week as flower even though we still have about 14 and a half hours of daylight but we're losing light every week. My plants get shade in the evening. My tarps provide a little shade as well. Everything is stretching incredibly that's why I labeled flower. You can see preflowers starting to form. I hope that's why I lost so many leaves (starting preflower). I mean the plants are healthy. I'll check pH with a soil meter tonight and make sure things are good. I would think with the rain it would lower my pH if anything. Definitely using dry amendments next year and dropping the liquid nutes. Soon I'll start adding flower nutes at low doses and see how the girls respond. Still haven't been able to spray BT for the pillars and my IPM. Hopefully tonight it won't rain and I can spray.
7/27 watered today. Still seeing some leaves yellowing and dropping. I left my pH meter so I'll have to check to see if that's the problem. I've been researching and I may need to adjust my nutrient dosage and add more P. I still haven't sprayed. I found a shit ton of earwigs under the wood outside I use to hold down my tarp. I thought they were predators but maybe not. I'll have to research them. I may have to use captain Jack's instead of BT and hope it combats the earwigs.
7/28 Watered as the soil was dry. Killed some earwigs and tied up a branch that is to close to the fence. I researched earwigs and they aren't beneficial but I've noticed that I no longer have ANY aphids that I could see. I'll check lower leaves with my scope as I haven't checked in a while. My pH meter won't work in ANY of my grow bags. It seems like the bags are just a bunch of roots. When I stuck the meter in a pile of last year's soil (next to the grow) it worked fine and read at 6.6. I don't get why it won't work with the grow bags. I'll have to research and see if I can use test strips or something. Still noticing some random damage here and there but it's time to spray and I just haven't done it. Plants are in that transition stage. All the big clones are at about the same stage. I really hope losing the leaves is normal. Looking at my father's tomato plants I noticed the same thing. I looked at other foliage and trees and I'm seeing similar signs of senscence.
7/29 Fed two gallons to the garden this morning. I was able to get one reading off my pH meter and it read 7.3. Still losing leaves but plants are stretching like crazy. Even the little 5 gallon ones I have been neglecting are forming there "asparagus tops" and starting to transition energy. I think I'll start adding bloom nutes next feed or so. I need to treat the PM. I've been slacking on my IPM. Also noticed some weird looking damage on a bud site. I hope it's not those earwigs. I usually have aphids but this year it seems the lady bugs and my treatments kept them at bay. I'm wondering if the ear wigs that I saw were eating other bugs and ran out and started munching on leaves. Hope not. I plan to make a ear wig trap and I need to research more. Planning on spraying LCPT tonight and cleaning up the cage but we'll see how that goes. Very little wind so I took the tarps down for now. I'll update as I get things done. UPDATE: I inspected tops and bud sites for damage. Random damage mostly on seedlings outside the cage. It's hot today and the mis-labeled indica (it's ONE of the strains listed other than DJSBB AND DREAMCATCHER) in the 50 gallon pot seemed a bit droopy. Granted all those strains are highly indica dominant and it could just be the pheno. I gave them a little water just to make sure. It should hold them over till the rain. I took a small plastic container and made an earwig trap with soy sauce and olive oil. Let's see what I catch. I plan to spray LCPT tonight.
7/30 Rained all night so I couldn't spray like I wanted too. Rain and 49 degrees at 8. My earwig trap caught zero earwigs but I killed a few around it. Noticed damage on a bud site that I'm pretty sure was from ear wigs. My bags are on the ground and I allowed the roots to grow through into the ground so I am hesitant to use something like borax to kill them. I'll have to give this a little more thought. Tarps are still down I'll monitor and update. I was able to get two pH readings but they were the five gallon plants 7.2 and 7.3. I'd really like to lower the pH. My water going in is always good and I even measured the pH of the rain so I hope I'm good. May need to check run off for accuracy.
7/31 Didn't water as it poured last night. Wind is high so tarps went back up. Got a read of 7.3 on basically all plants. I don't get it. I'll have to lower what I'm putting in. I also need to figure out the earwig situation and get off my ass and MAKE time to prune the insides and treat the PM. I did this shit last year when I had COVID so I can do it with a stomach flu. UPDATE: I finally got around to applying the lost coast plant therapy. Two hours later and I'm pretty sure I applied it properly. I took some immediate pictures. I also watered a little before treatment. Found and killed two japanese beetles (which I think are the culprits behind the unknown damage). Fucker was on the top of a starting cola way taller than me. I never would've seen him if I didn't treat. I'm going to need to use a ladder and inspect tops a little more closely. On another not WE ARE IN FLOWER!! No question about it. The "spears" are starting to thicken and beginning to start flowers. It was so much more apparent this afternoon. Probably because I was pruning the interior and defoliating as well as getting close to spray. I'm beyond psyched and im going to start reduced dosages of tiger bloom. I'm also going to try to pH my water lower and see if that doesn't make a difference.
8/1 Soil was wet so I didn't water. LCPT did great at eating up that PM. The plant in the tub in the back seems like it may have a virus or something. It just seems weak. It reveged as well. I'll keep an eye on it. If it continues with a weak appearance i'll get a second opinion and if it truly is a virus i'll trash it. I'm not going to risk the rest of my plants. I'm experimenting with the plant. I have the branches tired down at 90 degree angles. I'm thinking about adding a dry amendment and top dressing. I have work to do next week. Weather has been awesome. Sunny. It was 49 this morning though. 75 at noon.


Likes
44
Share


@Buffynuffy
Follow
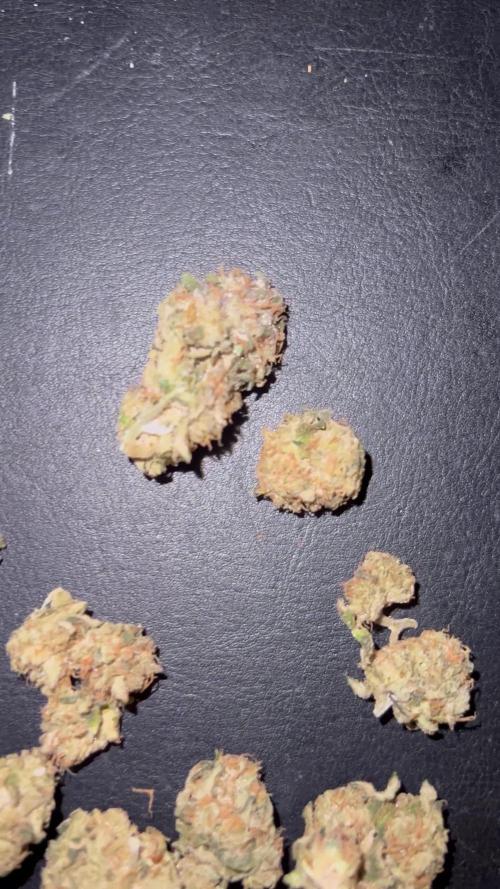
Will post more pictures and thoughts after, it’s done drying and curing
Likes
9
Share


@BeanCrop420
Follow
This girl is coming along really nicely starting to see a bit more too her now. I have up'd the big bud nutrients this week so hopefully it "puts the big in your buds" increasing both their size and quality!
It has been about 2 weeks now since I nearly snapped a branch clean off. I strapped and propped the snapped branch to the main stem as soon as it happen but when I check it the next day it had slipped I did worry as I wasn't sure how long it had been apart but I re-strapped it and hoped for the best. So far the branch still looks healthy and I haven't noticed any issues with it at all. The branch looks as if it is healing really well so hopefully she pulls through.
Happy growing 🌱

Likes
20
Share


@BABS_Babies
Follow
Starting to keep a close eye on the Trichomes. Still clear some cloudy. Stopped feeding, Starting to flush. It’s starting to smell amazing in here.


Likes
18
Share


@TheCannaProphet
Follow
Here we go on another run together and trust me, this will definitely be something different and very interesting as I've been invited to be a 'Test Grower' for Terpyz Genetics.
Formerly Terpyz x Kalyseeds who, for those 'in the know', are known for their breeding of cannabis mutations and the results they've gotten. Terpyz has asked me to perform a pheno hunt on two of their new MUTANT strains; DW IBL x (Pablo Picasso | Lemon Alien NL) x Blue Booby and Z.U.P. SWAG V4 Big Purple and I'll tell you... I'm SUPER stoked to get these seeds germinated and begin to increase my knowledge of growing these mutant strains!
So how this hunt is going to work is this: Germinate 10 seeds(regulars) of each strain, grow out the plants and establish which are Male/Female, remove ALL males and continue to grow and photograph the females picking out the female of each strain which best represents the traits that the breeder is seeking... sound like fun doesn't it!
______________________________________________________________________________________________________________________________________________________________________________________________________________________________________________________________________________________________________________________________________________________
THE STRAINS:
~ Duckweb IBL X Alien Picasso F1) X Blue Booby F1 ~
~ Z.U.P SWAG is (SWAG variegated Ultra V4 (Kalyseeds) x Opalo NL TerpyZ Select F2) ~
Description: [Duckweb IBL X Alien Picasso F1) X Blue Booby F1]
This line brings together some of our favorite Duckfoot lines. The mother plant of this cross: Duckweb IBL x Alien Picasso F1 had intoxicating Caramel Candy terps with Pine and Fuel undertones.
Duckweb IBL from Olympic Seeds pure Indica originating in Afghanistan. It is an inbred webbed landrace with beautiful magenta/pink pistils, good potency and outstanding stability. It has an extremely Uplifting and Happy, Social high associated with Sativa.
Alien Picasso F1 is a cross that we made of a super gassy OG Kush-leaning Pablo Picasso and Lemon Alien, both of which are genetics derived from Kalyseeds.
Alien Picasso F1 (Pablo Picasso x Lemon Alien)
Blue Booby F1 (Puffin F3 X Moon Duck F4) is a Poly-hybrid webbed leaf by Fygtree.
Puffin (Super Silver Haze x Tropica Race (Purple Haze X Indian Summer Kaly Duck))
Moon Duck (Ducksfoot IBL x Vanilluna)
Description: [ Z.U.P SWAG is (SWAG variegated Ultra V4 (Kalyseeds) x Opalo NL TerpyZ Select F2) ]
There's not a lot of information on this strain yet because it's so new but what I've been able to gather so far is, that one phenotype of Z.U.P Swag was a tall plant with a Christmas tree structure had purple flowers, and leaves with prominent purple coloration. It also had good flower structure, and excellent vigor. The only other data I could gather is that the male used was from a Opalo population which was selected in the 2nd generation, with dense flower structure and great terpenes! I'm sure this grow will add to the available knowledge of this strain!
______________________________________________________________________________________________________________________________________________________________________________________________________________________________________________________________________________________________________________________________________________________
WEEKLY UPDATE:
3/23- Week Seven of Veg and the plants, with their plastic pots, aren't losing water as greatly through evaporation as they would if they were in fabric pots. As a result my watering frequency currently is once every 3-4 days and only after checking their medium with a soil moisture probe to make sure that it is not still too wet. I did not water today and only rotated all of the pots 1/4 turn.
3/25- I checked the plants today and went ahead and watered them with .25g of straight well water that was ph'd to 74℉. They are all really taking off now and I have to tell you the DW IBL's are my favorites so far as they just look incredible! 😍
3/27- All the plants medium's were still pretty moist today so watering was skipped. I'll continue my routine of checking their medium daily via a soil moisture probe.
Both strains are looking AMAZING with so many different leaf morphology's, and the variegation in a few really is cool looking! Some of the plants remind me of a pepper plant, others of Basil. They all have great vigor and color and seem to be enjoying the 225w from the HLG 225 that's hung 28" above them. The tent temperature when the light is on is staying a steady 78℉, and the RH running 50-58%. I have one 16" oscillating fan moving air and a 6" AC Infinity exhaust fan removing the heat.
3/29- Well there goes seven weeks in veg for the mutants! So far no other male plants have been identified and hopefully it will remain that way! I'm really looking forward to the next few weeks when I'll be moving a couple of plants outside to finish, the remainder indoors.
Thank you very much for following along and for all the positive comments and ❤️! May ALL your days and grows be Blessed! 🙏❤️

Likes
25
Share


@pifflestikkz
Follow
Day 29
29/07/24 Monday
Nice feeding today with De-chlorinated tap water pH 6.
Gave her 300 ml and she had a small run off.
Getting chunky in the stem now 💪💚
Day 31
31/07/24 Wednesday
De-chlorinated water pH 6 today with Plagron pk13-14 5ml to 5L
Plagron power buds 5ml to 5L
Used 300ml of the 5L solution.
I will be using these on water days from now on as they are advised to be used every irrigation.
We'll see how they perform 💪💚
Day 32
01/08/24 Thursday
Another feed today using de-chlorinated tap water pH 6, there now taking 300ml every evening.
Day 35
04/08/24 Sunday
END OF WEEK 😁
De-chlorinated tap water pH 6 today with Plagron products. 300ml each.
Had a issue with leaf invaders this week, I have treated and am checking every 48 hrs so far seems ok and not progressive.
All plants look great, very healthy, one of the Overdose is way behind and due to space maybe culled at flower I'll see how she gets on.

Likes
23
Share


@adam_pawloski87
Follow
This week has been great ,today is day 78 and the girls are just doin their thang , 1 looks ready for flush already and the rest look about another longer then flush for them aswell,, can’t wait to see how these girls finish out over the next couple of weeks 😍!! Y’all keep them eyes peeled an stay tuned for next week! Peace love an positive vibes to y’all Cheers.💨💨💨
Likes
14
Share


@Jamescarter
Follow
Fifth week and booming I wanna say chop next week but might hold out extra two weeks start flushing yesterday en she's pack with trics sticky as hell well happy I bought purpanater it's the don swer by it now

Processing
Likes
1
Share


@Greenpalace_420
Follow
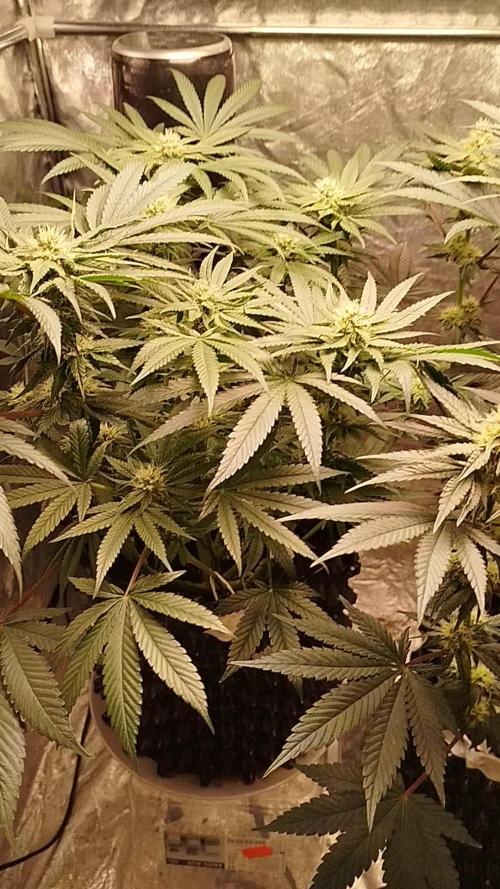
La 3 semana de crecimiento las niñas están en su máxima potencia comprobamos que no tienen falta fe ningún nutriente están super verdes con unas hojas muy grandes

Likes
11
Share


@GreeneRecluse86
Follow
These ladies just didn't want to stop growing. Sadly I had to take drastic action at the beginning of this week. I had to bend a couple branches to keep them away from the light. I am now officially out I'd ceiling space.
Other then that it's been smooth sailing. They've been sucking through some food. I've gone through about 5 gallons a day. I gave them a compost tea on Saturday.
I just cannot wait to see these ladies at their fullest!


Processing
Likes
12
Share


@StratoCaster
Follow
nitrogen deficiency? not sure...but one thing for sure is that i have to move then into bigger pots ASAP!
Likes
25
Share


