
Likes
Comments
Share


@Shivashamboom1
Follow
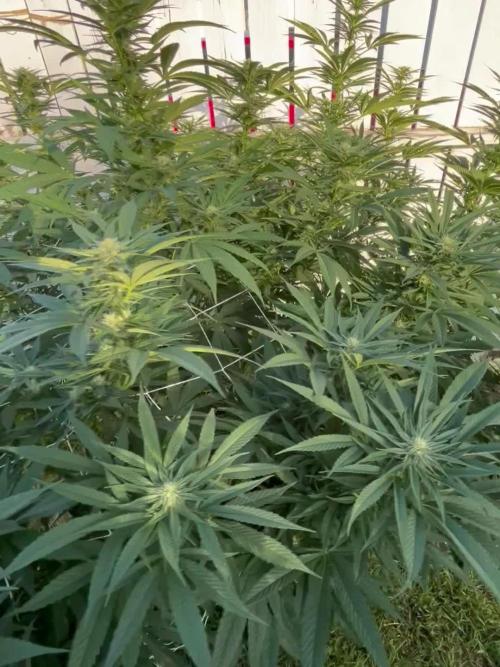
Prima settimana di fiori 12/12...
Stiamo per terminare la prima settimana di fioritura...Si dovrebbero vedere già i prefiori........,.. vediamo tra un paio di giorni 💪🔱🙏

Likes
68
Share


@cRypto666
Follow
Freunde der Sonne :) KURZE INFO DER LETZTE EINTRAG HIER IST IMMER DER AKTUELLLSTE NACH DATUM NACH UNTEN SOLLTEN UNTEN SCROLLEN UM ZU VORHIERIGEN EINTR'GE ZU GELANGEN : <3 WEEED
wollte dir ein text drücken :) hab mich vertippt... aö ich bin heute eine Bewustseinsstufe beim Grown aufgestiegen ! Endlich kann man jetzt Täglich meine Real Talk oder Reaktion ViD/PIC anschauen. Absofort werde ich meinen GARTEN anderts wahr nehme wer rein schaut kann Exklusive Tipps für seinen Garten gebrauchen. Gerne bin ich für Fragen offen und ich helfe wenn ich kann fals nicht findet sich in der Gruppe immer jemand.
DER GRUND IST DAMIT ICH NACHVOLLZIEHEN KANN WAS ICH FALSCH GEMACHT HABE BZW UM WISSEN ZU MANIFESTIRE UND GEWISSE GEDANKENVERBINDUNGEN GESACHFFEN SIND. IM GRUNDE MEIN GROWTAGBUCH ICH TEILE MEINE GEDANKEN MIT EUCH GLEICHGESINNTEN UND WÜNSCHE ALLEN EINE ERFOLGREICHEN GROW brO
cRypto666
2 minutes ago
cRypto666
<LIEBE> BRUDER ICH LADE DIE VIDEOS UND BILDER NOCH HOCH UND ICH BIN MIR EIGENTLICH SICHER ES KÖNNTE DIR GEFALLEN VIEL SPAß
AUF QEEN SEED GIBTS WIRKLICH GUTE BLOGS MIT TOURTORIALS FÜR NEULINGE/ANFÄNGER .
Konnte mir so mein Verständnis und Grundlage die fürs grown wichtig ist gut lernen und Aneignen ! WIRKLICH VIELE UND GUTE INFOS !!
https://www.royalqueenseeds.de/blog-cannabis-anbau-c3
https://www.royalqueenseeds.de/blog-die-10-grossten-fehler-von-cannabiszuchtern-n86
es ist soweit heute beginnt Woche 1 ... BEVOR WIR STARTEN, WICHTIG WASCH DIR GRÜNDLICH DIE HÄNDE UND BENUTZE GUMMIHANDSCHUE BEIM ARBEITEN! SEHR WICHTIG!
Ich freue mich das ich heute wieder das Gärtnern begonnen habe und eine Hällfte der Samen in der Erde sind. Kennt ihr das Gefühl der Vollkomenheit wenn man sich im Garten beschäftigt ? Für mich ist das Therapie und für euch?
Ich spiele mit dem Gedanken anstatt Samen zu growen mir einfach eine Mutterpflanze Anschaffe um mir meine Stecklinge zu ziehen ! Dafür brauch ich aber noch ein anderes Zelt und eine Lampe. Die Mütterpflanze kann dann erst mal wachsen und ich kann nebenbei noch mal ein Durchgang mit Autos schaffen bevor die Steckis fertig sind. Wenn es soweit ist gebe ich euch bescheid wenn ich Samen und Setup bei mir stehen.
So jetzt aufs eigentliche zurück. Ich habe heute erst mal mein Setup geprüft und so gut wie möglich desinfiziert. Es ist verdammt wichtig das nach jedem Durchgang sauber gemacht wird also zb Zeltwände, Boden, Topfe, Boxen, Wasserbehälter. Habe ich gemacht und habe meine ersten Samen in Anzucht Erde gesetzt, befeuchtet, markieren und in die Box. Wände und Deckel mit zersteuber befeuchten und ab unter die Lampe. WICHTIG MACH DIE ERDE NICHT SO NASS ! DAS GEFÄLLT IHNEN NICHT SONDERN HALTE SIE AM BESTEN FEUCHT IN DEM DU ABEND / MORGEN EIN BISCHEN WÄSSERST!
ICH STELLE DIE LAMPE AUF CA 40 cm zum Boden ein bzw der Box. Ein gewisser abstand muss sein um die Fläche komplett zu Beleuchten. Da meine Lampe dimmbar ist muss sie nicht ganz oben hängeng sondern Kann näher an die Pflanzen ran und Stelle den Dimmer auf 20 %. Das reicht anfangs in dem Stadium völlig aus, muss aber dann später angepasst bzw hoch geschraubt werden!
Lüfter I läuft 24/7 und sorgt für optimale Bedinungen! WICHTIG
LAMPE 20/4 HELL/DUNKEL (REGLER STEHT AUF 20 % LICHTLEISTUNG)
DANN HABEN WIR ES EIGENTLICH SCHON GESCHAFFT UND ALLES RICHTIG GEMACHT!
Ich versuche schon so viel wie möglich von meiem Wissen an euch weiter zugeben bzw auf Papier zubringen, ist aber NICHT IMMER ZU 100% Möglich, da es einfach zu viele Informationen sind !
Bei fragen einfach fragen und die Comiunity hilft sicher !!!
KOMMT ZEIT KOMMT RAT ... ich hab 2 Monate Infos eingeholt und Produkte verglichen !
Auf Queen Royal Seeds gibt es gute Anfänger Tipps sogar teilweise mit Video. Mir hat das sehr geholfen mein Grundwissen aufzubauen.
BEVOR IHR DAS GÄRTNERN ANFANGEN KÖNNTE MACHT DIR GEDANKEN WO DEINEN GARTEN STEHEN KANN.
#1 AM BESTEN IHR HABT EIN GARTENZIMMER DER NUR ZUM GÄRTNERN BENUTZT WIRD IST DIE BESTE LÖSUNG DA DU DEINE UMGEBUNG VIEL LEICHTER SAUBERHALTEN KANNST
#2 DU KANNST DEIN GARTEN AUCH INS WOHN. BZW SCHLAFZIMMER STELLEN WENN DU KEINE MÖGLICHKEIT HAST EIN GARTENZIMMER ZU MACHEN. DAS IST NICHT DIE PERFEKTE UMGEBUNG ABER WENN DU ABLUFT RAUSLEITEN KANNST DANN MACH ES ! DU KANNST ES AUCH IN DEN RAUM STRÖMEN LASSEN MUSST DIR ABER BEWUST SEIN DAS ES EVTL DAS SCHIMMELN IM RAUM ANFÄNGT! IST MIR SCHON PASSIERT ! LEITE SIE WENN MÖGLICH AM BESTEN RAUS !
ACHTE DAS DARUF DAS DEINE LUFTFEUCHTIGKEIT UND TEMP KONSTANT BLEIBEN UND ES NICHT EINMAL ZU WARM UND EINEMAL ZU KALT... IHR WISST SCHON SORGE FÜR EINEN KONSTANTE UMGEBUNG IN DEINEM GARTEN. DIE WAHL DER SAMEN IST AUCH WICHTIG DA ES SORTEN GIBT DIE EINE WARME UMGEBUNG EINE KONSTANTE ODER EINE EHER KALTE UMGEBUNG. AM BESTEN IHR PASST EURE SAMEN EURER UMGEBUNG AN HEIST DU WOHNST IN EINEN LAND WO ES EHER WARM IST ALSO 25-30 ° C dann WÄHLE AUCH EINE PASSENDE SORTE AUS!
MEHR GIBTS ERST MAL NICHT ! BIS ZUM NÄCHSTEN MAL!

Likes
5
Share


@CuriosityWebster
Follow
Starting to get the tent more dialed in, got a Govee heater off Amazon and I got it connected to my WiFi and set parameters on it and it works great! Considering getting the humidifier to link up to the same app to fine tune the tent even further!
Some small gnats from the fox farm ocean soil but nothing bad whatsoever, put some sticky traps out (and there’s some dirt stuck on the trap that’s not all bugs)
And spayed some crop control on the soil around the seedlings to help prevent bugs

Likes
19
Share


@Mikado
Follow
04/28 - Seeing a nice amount of stretch, don't think i'll have a problem with height, but they're bushy. Waiting another week to see what I'll prune off before bud starts stacking.

Likes
12
Share

@Northern_Ent
Follow
Aug 2: Mimosa Shot is hitting her stride now. She didn’t like the cooler temperatures as much as Sunday Punch EV, for example, but she’s loving this hot start to August.
Aug 3: done with force flowering and will now just leave her in the yard. So, back up to 15.5 h of daylight here now. Still using far red light at dusk.
Aug 6: Mimosa Shot has stretched again, likely mostly due to 3 days of hot weather.

Likes
9
Share

@Tropicannibis_Todd
Follow
Alrighty Then 👈
Well we just moved into the second week of pre flower , and all is well my friends
Happy Growing

Likes
143
Share

@Tropicannibis_Todd
Follow
👉Alrighty Then👈
We are now just around the corner , looks like it's almost chop time 👏
🤪 We are almost there 😀
👉 I've continue to emend my nutrients plan i am now dialing it down to flush ..... 👈
😳So I will be showcasing just 3 this round even thoe I am growing 7 plants 😳
👉Black Domina From Weedseedsexpress 👍
👉Permanent Marker From Weedseedsexpress 👍
👉Sleepy Joe OG From Weedseedsexpress 👍
The other 2 are repeats cause they are pure fire 👈 You can view these 2 in the 👉Summer Classic Diary 💪 Had issues with the Banana Biscotti germination, so it's way behind and also the extra seed I popped
👉Purple Oreoz From Seedsman 👍
👉Persian Pie From Greenhouseseeds 👍
👉Banana Biscotti From Seedsman 👍
👉Gorilla Cookies From FastBuds
Soil by Promix
Nutrients by Cronks
Lights by MarsHydro & Vivosun
Well this should be fun 🙃
Thanks to all my growmies out there for stopping by its much appreciated 👈
👉Happy Growing👈

Likes
12
Share


@Visions
Follow
If you don't follow my Instagram then you will have to read this portion.
Lineage Breakdown:
Pink Sugar Breath F1 created by UFO Genetics.
Pink Sugar Breath: Platinum Kush Breath(IHG) X Pink Sugar Cookies(UFO)
Pink Sugar Cookies: Sugar Cane(IHG) X Gsc Twister
Pink Sugar Breath F2: Pink Sugar Breath Male(Funk/Purple Stems/Dumper) X Pink Sugar Breath Female(Pink Sugar Cookie Pheno) Bred by Me.
I originally popped a good amount of these testers I created using a funk sugar breath male and a baker dough sugar breath with more of the pink sugar cookie lineage. This resulted in a pheno hunters dream. Each pheno develops massive amounts of resin. Green phenos imo are the best smokes SO far. They range from chemical og funk to og funk and dough. The purple pheno has more of a kush breath with sugary dough to it. Lastly is the pink pheno. The pink pheno develops amazing trichome production with all terps within the mom and pop.
I originally popped these in x3 ran soil. They were broken in half. Overwatered. You fucking name it. I was stress testing this already herm vulnerable gsc twisted/ogkb hybrid. That being said the average grower should have minimum to none herm issues. 3 broke out batch but it was just a small trait from the vigorous stress I gave them. They developed high bract to leaf ratio with an intense sativa high. Growing these require 63 to 72 for a full expressions and an added body buzz with that kush breath high. 9/10.
Flowering expect these to stretch 3x as big. They will need boosters/ extra feeding withing 17 days from flip. These are limited tested F2s. Only available @ [email protected]


Likes
179
Share

@Tropicannibis_Todd
Follow
💩Holy Crap We Are Back At It And Loving It💩 👉FOLKS WE R ALMOST TO THE FINISH LINE👈
Growmies we are at DAY 63 and she's just killing💀it👌
👉We are in full flowering mode and she's doing great 👈 Everything is looking good even the Tiny Cup 🥤
So Shit , I gave them just a tad to much nutes at the start of feeding 👈 But I have since fixed it
So I'm still doing some low stress training 🙃 and some defolation 😳
Lights being readjusted and chart updated .........👍rain water to be used entire growth👈
👉I used NutriNPK for nutrients for my grows and welcome anyone to give them a try .👈
👉 www.nutrinpk.com 👈
NutriNPK Cal MAG 14-0-14
NutriNPK Grow 28-14-14
NutriNPK Bloom 8-20-30
NutriNPK Bloom Booster 0-52-34
I GOT MULTIPLE DIARIES ON THE GO 😱 please check them out 😎
👉THANKS FOR TAKING THE TIME TO GO OVER MY DIARIES 👈
Likes
26
Share


@Myminigrows
Follow
Little summary of the last 2-3 weeks of Flower. Total off 70 days of 12/12 light cycle and 48H darkness.

Likes
9
Share

@JackJolla
Follow
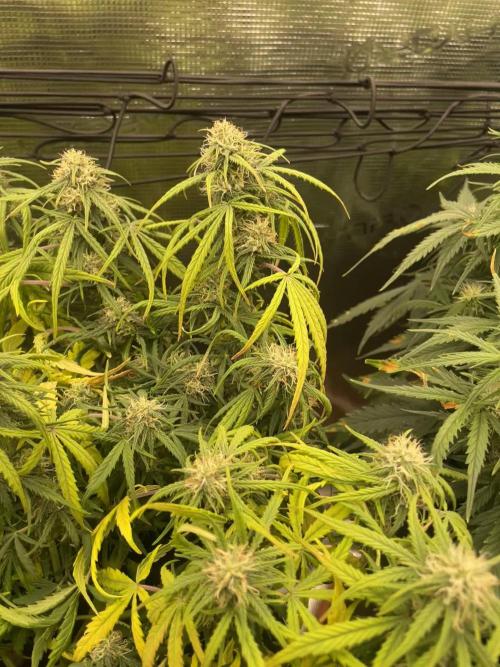
We’ve entered week eight, one of the final weeks, since the genetics I chose are listed as **8–9 weeks from seed to harvest**.
I hope we’re close to the end, because the plants are becoming more and more stressed and I still can’t understand what the problem is. It almost seems like some kind of nutrient uptake lockout.
For now, the maturation of the flowers doesn’t seem to be compromised, and the trichomes are starting to develop a nice color, although the buds still look a bit sparse.
As with last week, Diesel is holding up well, even though she is also starting to show some leaf issues. I just hope this is due to the flowering stage.
The others, however, seem to be getting worse, especially Sunset. Wedding Cake is maturing well, although the spots keep reappearing and some leaves are starting to yellow there too.
Sunset, on the other hand, seems to have slowed down in maturation, and the leaves are getting worse and worse. I’m limiting defoliation because I don’t want to add more stress to a plant that is already suffering quite a lot.
--------------------------------
**End of W8 Update:**
Thanks to the help of this amazing community, Sunset and Wedding have recovered really well!
Diesel, on the other hand, is still struggling, but due to my lack of experience I can’t really tell whether it’s just because it’s reaching the end of its cycle, or if the care I gave didn’t bring the results I was hoping for.
The buds seem pretty mature now, they’re getting richer in terpenes and reaching a good size, but I’m also wondering whether the treatments I gave this plant may have made the situation worse.
I’ll update you again in the next few days! And if you have any advice, guys, drop it in the comments — it’s always more than welcome!
Likes
12
Share


@Jays_Not_Here_Man
Follow
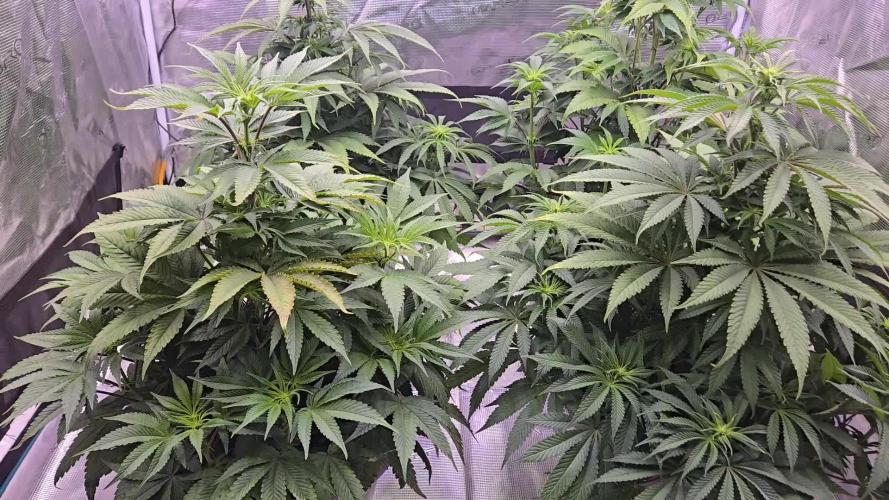
The girls have been very busy making golf balls this week! The cookies are also starting to frost up 🤗
At the beginning of the week there was not much to do, the girls had stopped stretching and were settled in. In my 2x4 tent, all I had to do was tuck fold the leaves to open up the bud sites.
I basically did the same for my big tent. Simply moved some leaves from blocking sites, and plucked just a few that were rather large.
They are still needing to be watered every 72 hours or so. I have been keeping to a feed, water, feed schedule now that we are into flower. I just started to notice that some of the tops are showing some nutrient burn, just a little, and not every plant. This tells me I have hit their limit with the nutrients, somewhere between 700 and 750 ppm. The last watering I did, I watered to about 10% runoff, trying to make sure that there are no salt or mineral buildup that can cause lockout or other issues.
At the end of the week, day 21, I defoliated both tents, not too much, but enough to open up the bottom growth a bit. Also tidied up the lower portion below the trellis, as this just wastes energy and yield from the main colas in the long run. No real issues or problems so far, Happy Gardening Folks! 🇨🇦👊❤️😎💨


Likes
3
Share


@Cultiv8or
Follow
First week of flowering!! I’m glad to have 4 weeks of veg and start flowering. It’s August 17th and this tent can only be out on my balcony until the end of September to early October. So I have about 6-9 weeks of flower time before it’s too cold.
I feed 1L every other day with an 8-10ml per litre of the 3 nutes I’m using
Royal Gorilla is growing ugly , it’s bush is lush and tangled
Day 34 update - Royal Gorilla is actually in vegetation... next week it’ll start flower for sure

Likes
8
Share


@SkunkyDog420
Follow
Hallo zusammen 🤙.
Sie wächst sehr schön und macht keine Probleme.
Rabattcode für den BIOTABS-Webshop https://biotabs.nl/en/shop/ GDBT420, damit erhalten Sie 15 Prozent
Likes
8
Share


@Sur_cannabico
Follow
Cursamos la segunda semana, aún aplicamos bajas dosis de fertilizantes estas pequeñas van bien hasta ahora
9 días
Likes
41
Share


@Bread_n_Buds
Follow
We are very happy with our two girls. We have worked them with two forms of different topping as we have said several times to try the yield and the way of filling and growing the plant.
The first plant that is worked with our favorite topping way is worked at 16 peaks that grew up all high and regular and are filling fine. They are full of white hairs still fortunately and is swelling well for really we are very confident that this plant arirvated at maturation will be productive, beautiful and very competitive.
The second plant is always worked with the topping at 16 peak central but leaving two "side" branches under the central main line. These two branches despite having tried in all ways to keep them low, steal power in the center and grow well and swell, but I think they approached a little too much to light and you are a bit burned the leaves I put it under a more delicate light Now but it's swelling anyway.
They are all two sticks and promise excellent collections I believe over 50 but we don't want to protect us and enclose yourself so therefore we humbly hope that everything goes well and to compare ourselves cheerfully for the contest.
Enhancer of Mother house started very good product no smell, looks very nutrient i would try to drink me too <3

Likes
81
Share


@MOSS_FIGURE
Follow
Week10.. First day flush their plants and check the tricoms everyday.
{Activities}
(Day 64) Flush the plants with water until the ppm is equal to the water used for the flush 🚿
(Day 65) n/a
(Day 66) Watered
(Day 67) The tricoms ready for harvest, 70/30 milky/amber mix.
(Day 68) Harvest
Finish! (Finally hope you like and enjoy my diary)
Thank you so much for checking out my grows. Feel free to leave a comment, push the like or give the follow.

Likes
10
Share


@Rangaku
Follow
XL living up to its name with some mad chunky buds on the go , sticky and sweet she’s gonna be a Monsta by the time she’s done . Just keeping up the defol next few weeks to get the light into the flower and to cut down on humidity.

Likes
21
Share


@Bakeryguy420
Follow
really easy to grow. Had some issues in the begging being underfed and low ph issues. But still grew through all the struggles. Wasnt the biggest yield but wasn't the biggest plant. So wasn't expecting truly much. The purple pheno gave me a zip and half about. The other green one gave me a zip dry. Both smell lovely and can't wait. Will come back next week or so to update smoke report. Also fixing to make cannabutter from some of this can not wait ^_^ . Will grow it again but in a bigger pot maybe.
