


Likes
55
Share


@DogDoctorOfficial
Follow
Test run For Gelato OG and test review for Spider Farmer SF-2000
Day 1 Flower and so far I’m pretty happy with both phenotypes, they are growing very identical both in structure as in smell.
Day 1 Flower and now the real testings begins, so far Ppfd numbers are around 800 Umols this numbers will increase with them girls growing , i have to admit I wasn’t expecting such high numbers, i like what this SF-2000 is debiting, especially wen is puling out the wall 198w 🤩
Day 3 Flower and they are bouncing back great from the hard defoliation, transplant and shuttle times lol i know I should’ve done all in once but they can handle it 💪💪💪
Day 3 flower and the SF-2000 is doing great and not hot at all compared to others same voltaje , so far so good 😊
Day 6 tiny update video online 💚🌱
Seeds @seedsmanseeds Gelato OG 3x - 2 Pop out
Light spider farmer SF-2000 ( test run from seed to stone )
https://spiderfarmer.eu/collections/full-spectrum-led-grow-light/products/sf-2000-led-grow-light
All i grow is medicine for myself, nothing to sell, don’t even ask
Do it with love for the love
💚💚💚 growers love 💚💚💚

Likes
14
Share


@BLAZED
Follow
Week 12 (17-4 to 23-4)
17-4
Temperature: 23.1 degrees (lights on) 19,1 degrees (lights off)
Humidity: 62% (highest) 50% (lowest)
18-4
Temperature: 22.5 degrees (lights on) 17.9 degrees (lights off)
Humidity: 61% (highest) 52% (lowest)
Opened the reservoir for a couple of minutes. ec 1.4 ph 5.7
19-4
Temperature: 22.5 degrees (lights on) 18.4 degrees (lights off)
Humidity: 64% (highest) 54% (lowest)
No pictures.
20-4
Temperature: 24.1 degrees (lights on) 19.1 degrees (lights off)
Humidity: 65% (highest) 54% (lowest)
Light increased from 50% to 60% strength.
I also made a new 10L feed, and added it to the reservoir, there was still 2850 ml in the reservoir, so i can calculate how much they get per watering.
Opened the reservoir for a couple of minutes.
21-4
Temperature: 24.4 degrees (lights on) 19.3 degrees (lights off)
Humidity: 66% (highest) 54% (lowest)
No pictures.
22-4
Temperature: 23.7 degrees (lights on) 19.7 degrees (lights off)
Humidity: 67% (highest) 42% (lowest)
Opened the reservoir for a couple of minutes.
23-4
Temperature: 23.6 degrees (lights on) 17.7 degrees (lights off)
Humidity: 64% (highest) 50% (lowest)

Processing
Likes
13
Share


@rainman
Follow
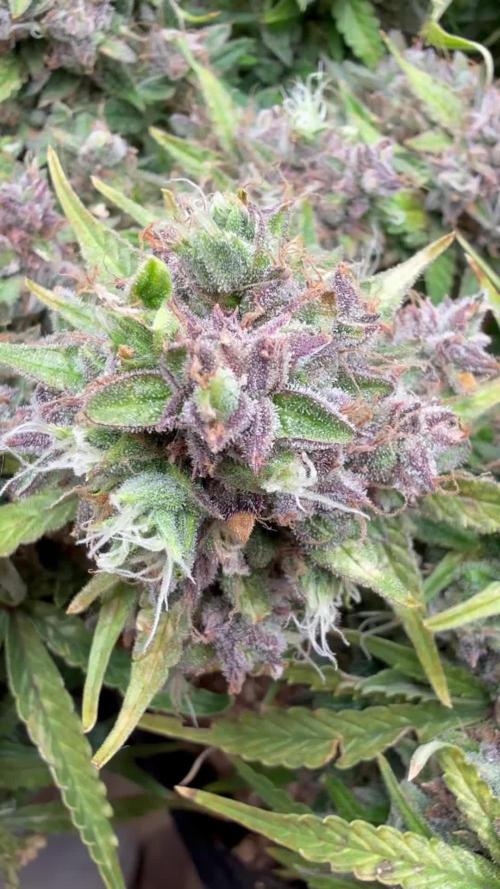
Plant is looking and feeling great. Buds are full of trychomes, sticky icky icky stuff. This week i'll give ripening nutrients and will begin flushing, so i can harvest in the end of next week. Peace.
Likes
8
Share


@Bread_n_Buds
Follow
Our #Test3 from Zamnesia that we hope will soon be available to the whole world, have a wonderful genetic line and promise well from the beginning. It is one of those very elegant plants with small leaves I started to think about how I want to work on these two beauties, one will be worked with topping x 16 buds and various lst while the other will be left to grow freely with main cola. We are trying to answer the question that has no answer, we are ready to give up on main cola_ We in doubt do one and one.
The second week (including a few days of germination) we gave Power Roots 1 ml/l, Pure Zym 1 ml/l, Sugar Royal 1 ml/l, Alga Grow 3 ml/l -
Plagron nutrients are available at Zamnesia in convenient pack formats for all growing styles. I used this one with a simple search you can find the other products.
---- https://www.zamnesia.io/it/12119-plagron-top-grow-box-100-naturale.html
Try a seed of this strain that drives us crazy...
---- Strain coming soon choose another from the big Zamnesia List
Zamnesia Description // Strain Coming Soon!
All the best that mother nature can offer is on ----www.zamnesia.com


Likes
28
Share


@Stork
Follow
Day 15 Mon
PH 5.8
EC 0.8
PPM 420
DLI 20h 10.2
PPFD 142
Water 23c
Day 16 Tue
PH 5.7
EC 1.5
PPM 770
DLI 20h 9.9
PPFD 137
Water 23c
Day 17 Wed
Add Ph down
PH 6.8/5.8
EC 1.6
PPM 820
DLI 20h 18.4
PPFD 153
Water 22
Day 18 Thu
Add water and Ph down
PH 6.1/5.8
EC 1.7/1.6
PPM 840/820
DLI 20h 18.4
PPFD 153
Water 23c
Day 19 Fri
I do little LS
PH 5.9
EC 1.7
PPM 840
DLI 20h 18.4
PPFD 153
Water 21
Day 20 Sat
Add little water
PH 5.9/
EC 1.7/
PPM 850/
DLI 20h 18.4
PPFD 153
Water 21
Day 21 Sun
PH 5.7
EC 1.7
PPM 820
DLI 20h 18.4
PPFD 153
Water 2
Likes
2
Share

@BobbersDown
Follow
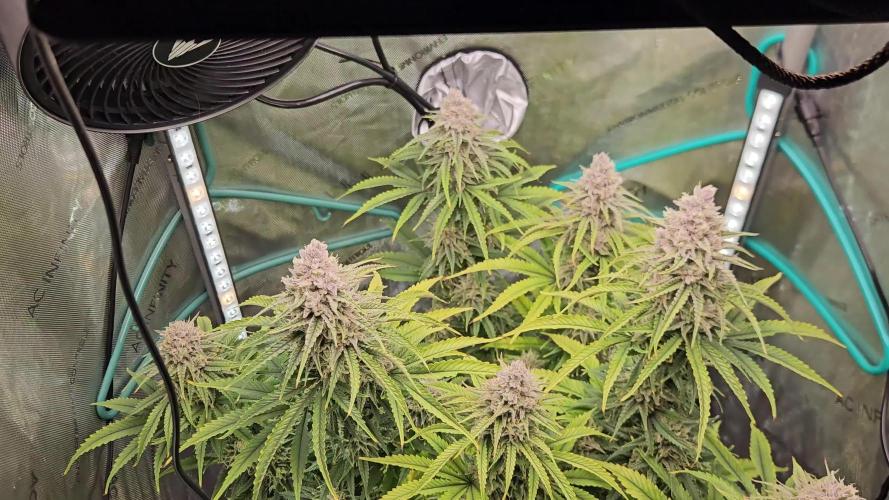
Last feed tomorrow, looking like 10 days until harvest. Can't wait to try this plant out it smells like nothing else! Pretty much cruise control right now.


Likes
1
Share


@Gods_Cannabis
Follow
Super sanas en su primer semana de vegetación, no muestran ninguna deficiencia y creo que les espera un buen futuro a estas pequeñas sin duda crecerán mucho mas.

Likes
19
Share


@Eauderay
Follow
This week I have changed the 400w HPS lights for a 240w Leds, and I have seen great improvements for the rust burn that used to plague me for quite some times seems to have stopped and repair to the parts still viable started, now I know it was due to hight intensity and heat for 12h on those fan leaves that turned them dry and eventually burned them...
I still have to watch out because those Leds are powerful and loaded with Deep red, IR and UV!
They are at 45 cm the closest and 70cm the furthest no bleaching is seen so far, I am keeping a close eye on those leaves tip and if I see bleaching to those I higher up the lights for a while...
I feel like I am dancing around those marvelous plants, sometimes pulling the lights or dimming them, tucking those fan leaves shadowing lower growth whenever I feel they need a break or a hand! Trying to be a cannabis whisperer lol
Added 2 tablespoons of fish blood and bones to top layer with worm castings and bat guano a handful.
Lots of spiky hair on one and the other those are curly.
They look almost the same, lots of trichomes, at least 16% covered and smell kushy and flowery, very nice.
Let's hope the leaves do not get worse and the repair continues, not to forget to offer a prayer to Marie Jane so all goes well! ☺️🌹❤️

Likes
21
Share


@Jays_Not_Here_Man
Follow
This week was fun, trimming my final product from my last grow was a pleasure, not a pain 🤓. It was very satisfying. Received my seeds early in the week and had to wait a few days to get everything cleaned and ready to go, again, didn’t seem like chores… I think I’m hooked!
Started germinating Nov 13/am, tap roots poking out 24 hours later! I’ll wait till they are a bit larger to plant. I’ll be planting directly into 5 gallon fabric pots, no transplanting.
**update**
Germination- seeds were planted after 48 hours. 2 sprouted, 36 hours later, so Day 1 would technically be Wednesday,November 16th…One went down because of the fiend pictured…He’s been hanging out with me more and more in the grow spot, I’ve also been giving him leaves while I trim, when the plants are vegging… I had the tent open, and he came in a little hard to sniff and pulled one sprout right out, and before I realized what was happening, he swallowed it up with a quick lick of his nose… 🤦 Started two more Wednesday PM, both seeds popped, they were planted Friday PM, no sprouts yet… 😌 sigh…. in the meantime, I received my 5 gallon fabric pots, so we’re now running 3 AK-47 from Crop King Seeds, withe the upgraded pots 😊👍


Processing
Likes
21
Share


@Dunk_Junk
Follow
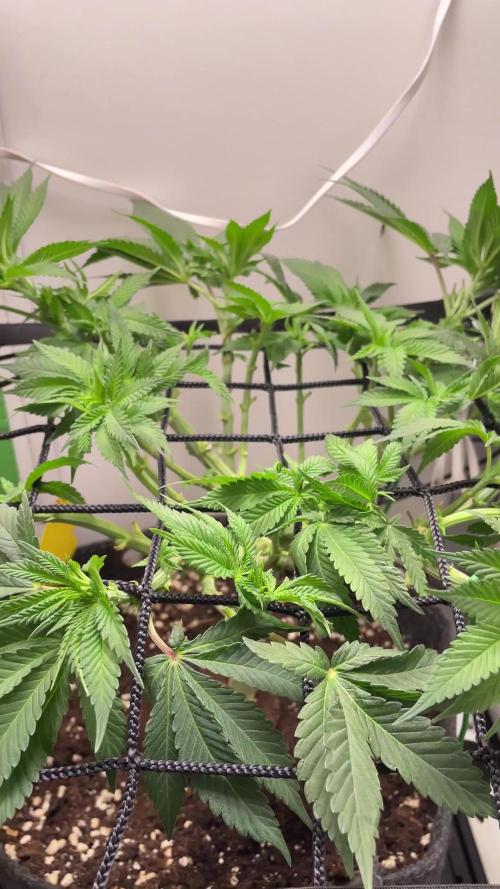
She's growing well.
Maybe 1 more week in this pot then I intend to repot into a 20L airpot.


Likes
4
Share

@Bud_vista
Follow
Welcome to week 7 of my White Truffle grow!
I switched to flowering 5 days ago, 12/12 light cycle. No signs of pistils yet, shes growing nicely, but no crazy stretching. Since this is my first time growing photos, I'm really excited to see how the week goes :)
I need to defoliate a lot, because the humidity is a little too high after watering the plant


Likes
15
Share


@Viccrazyweed
Follow
They have duplicate the size and started to smell a bit, really good vibes about, great color on the leaves and nice looking
Any suggestions will be great!!