
Likes
Comments
Share


@XaXaXa
Follow
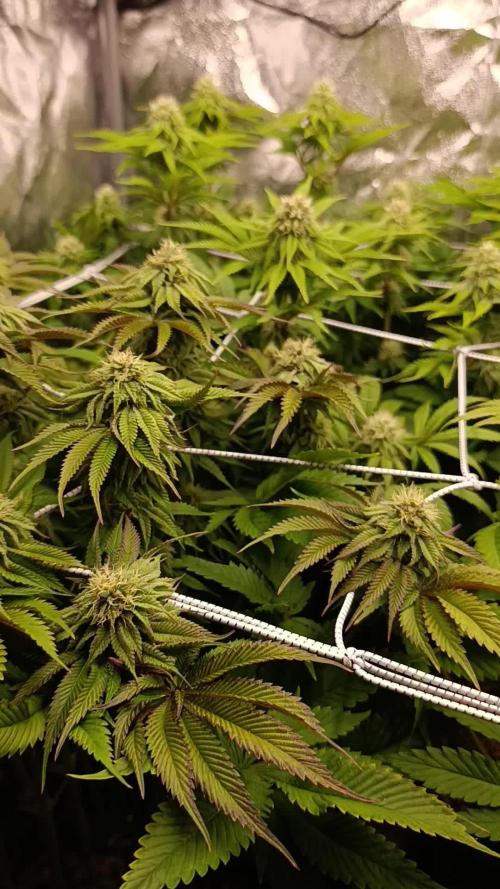
Defoliation, lolypoping, rest stayed the same, feeding 1.9EC,raised up light to 500PPFD, looks fine but I am still nervous about lighter green color on some plants, thinking about lockout or CalMag def
hope someone will guide me


Likes
3
Share

@Catawbiense
Follow
Die fünfte Blütewoche hat begonnen. Bei der letzten Bewässerung gestern habe ich 1 ml/l pk1314 verwendet. Bei der nächsten Bewässerung werde ich wieder pk 13/14 verwenden. Nächste Woche werde ich die Topmax-Dosis auf 3 ml/l erhöhen.
Die Pflanzen sehen etwas gelb aus, weil ich zu früh aufgehört habe, Biogrow zu verwenden. Aber das ist mir lieber als blättrige Blüten. Es gibt viel Harz, insbesondere ein Phänotyp ist stark verzuckert. Die Blüten werden nicht die dicksten sein, aber ich bin bisher zufrieden.

Likes
52
Share


@The_Good_Twin
Follow
29 May 2021
I have been super busy and have neglected my little girls the last few days. I started the flowering stage (12/12 light schedule) yesterday, the 28th. I was going to start it on the 26th, but had trouble with the timer. I’m going to stick to my schedule though. Today starts the flowering stage feeding chart, and for this week I’m using the “Transition to Flower” amounts. The water was chilled to 41.5 degrees F, and I began feeding an entire gallon as well. I fed: CALiMAGic 5ml, FloraMicro 7.5ml, FloraGro 7.5ml, and FloraBloom 7.5ml. The initial pH was 6.7 and needed no adjustment. The TDS going in was 851 ppm. Runoff pH was 6.6, and TDS runoff was 1885 ppm. Tent temp was 75 degrees F, and humidity was 50%. I defoliated the living hell out of her today, and rearranged some of her LST points. I also cut some of the lower branches/stems to make the growth more controlled. I have enough to make several clones if I decide to do that. I’m still trying to make up my mind on that.
31 May 2021
My Blueberry Muffin is looking fabulous!! She has adjusted to her massive defoliation with ease and is looking BEAUTIFUL! I’m very pleased with how she’s doing. Both she and her tent mate are looking wonderful. I’m still using the “Transition to Flower” stage, so here’s what I fed: 1 gallon of water chilled to 51.2 degrees F, with CALiMAGic 5ml, FloraMicro 7.5ml, FloraGro 7.5ml, and FloraBloom 7.5ml. The initial pH was 6.7 and didn’t need to be adjusted. The TDS going in was 1054 ppm. She took the whole gallon and had plenty of runoff. The runoff pH was 6.5, and TDS runoff was 2237 ppm. Tent temp was 79 degrees F, and humidity was 44%.

Likes
45
Share


@masterofsmeagol
Follow
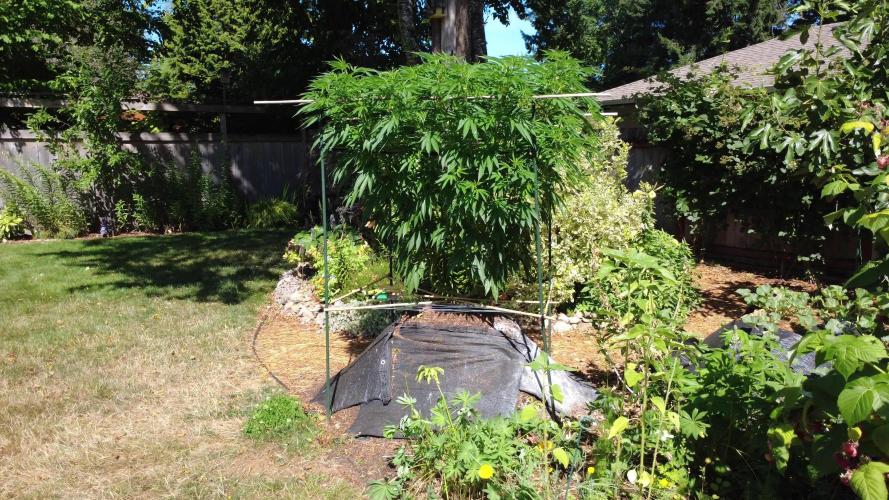
7/3 Hot as fuck today. Japanese beetles were around. I killed a few. I'm going to have to go over and keep an eye on things. It reached 90° today for the majority of the day. I watered around 1pm as I noticed most of the bags were very light. I'm glad I held off on the BT. I've dealt with jpn beetles before so hopfully that won't be an issue. Things are getting big. It won't let me upload any pictures or the video I did. I may upload it to past week. Went back over at night and and plants looked dropy but it was after 7pm and they were just going to sleep.
7/4 Didn't take photos this morning. Found some jpn beetles. That's the damage I've been seeing. I went back over last night to hunt them but I only got two. There weren't any others. No biggie. I'll put some pics up from today after I get back
7/5 Didn't get a chance to check the plants out today. My intuition tingled around 1pm and I had just gotten home and I ran over to check them. They displayed minor signs of heat stress as seen in the pics (due to the super high humidity and 90° weather) and the bags were light. A few were REALLY light. I could see they needed water. I WATERED 4 1/2 GALLONS TO THE GARDEN. DO TO THE HIGH TENPS AND WINDS IVE HAD TO WATER THE LAST THREE DAYS IN A ROW. IVE SLOWLY STRARTED INCREASING VOLUME. I don't want to water until I get a shit ton of run off because I want to keep the nutes in my soil as long as possible. As you can see things are going great. Minor pests but notjing major. They're growing at a very rapid pace. I'll need to add another layer of supports soon and begin to LST some of these girls. I've got one seedling in a 10 gal and I'm pretty sure it's a feminized red runtz but it's in preflower and looks and SHOULD be a female but I haven't seen the white hair yet. Looks like a female preflower though. I do have one auto though in a 5 gallon tjats doing good too. I have a bunch of pics but the internet is too slow. I'll upload tomorrow. Started pouring around 6.
7/6 Poured sheet rain all night. After it had Bern super fucking hot and I watered my plants with 4 1/2 gallons. Oh well. If I didn't water we wouldn't have gotten the rain. The fabric bags makes watering easier. The wind will dry out the medium. We do have some rain in the forecast. A pallet fell over and knocked my 5 gal bucket with tje auto into a 10 gal seedling but it held the pallet up and didn't damage anything. Out of all the ways it coyldve landed it landed just right to not hurt anything. Everything is super healthy. I do have some random pest damage but it's minimal. I'll decide whether to use a spray or not. Didn't take pictures this morning. Was pressed for time.
7/7 Super hot even at 8a.m. Rained the majority of the day yesterday. Plants are getting HUGE. I'm going to have to build a second round of supports and should probably start some LSTing. They seem to like growing natural how they are (besides the original topping and FIMed. You can tell these are ALL very high % indicas. I'm seeing pistols spitting out everywhere. Event horizon and sherb cake seem to be in the lead. The seedlings have realky taken off. The one I put in the 50 has fan leaves the size of my hands.
7/8 Wow it has been extremely hot. It's going to be in the 90's again today. Checked my plants and it seems the GMOs seem to be using more water. Those bags were a little lighter. Seeing how there is no rain in for a few days I had to water. WATERED 3 1/2 GALLONS. LAST SEEDLING FINALLY SHOWED AS A FEMALE.
7/9 Bags are still heavy. Found ONE jpn beetle this morning. Plants seem to be bigger everytime I look.starying the stretch and spitting out some pistols. I took some pics of the pistles. I'll update
7/10 should've started a new week but I didn't. I'll make next week six days. Plants are starting ro stretch. Minor random pest damage but woth the heat they need lots of water. Noticed a couple dead interior leaves so I should probably go through everything and defoliate. I need to add another layer of supports as well.

Processing
Likes
15
Share


@420Consinc
Follow
- WEEK 8 -
----- Day 50 -----
Woo hoo. End is in sight and the plants are still PACKING the pounds on.
Big Bertha is 11 inches long, 2 inches wide.
The hidden massive Gertha is 8 inches in circumference in the middle in just bud alone and isn't even the largest part of this 8 inch long nug...
Fed 1150ppm 13L 6.4pH
5-15+ days left.
2-4 days till I start looking into trichome finish period.
Forgot to take a regular full shot and shots of tropicanna glookies. oh well. Later tonight if I remember.
I stopped bud candy cause I'm using a lot more molasses and its literally a sugar in itself so why put in bud candy which is just sugars... seems redundant.
----- Day 51 -----
Easy day of watching.
Some nice bud shots today. The whole basement smells of weed candy. Back right Tropicanna is pineapple gummy bear, front right is just gummy bear.
Wedding Cake is like sweet weed, you get the regular smell of pot but instead of skunky its sweet but that Tropicanna is just alllll candy no weed smell at all.
I did the first 60x shot today. 5% cloudy 95% clear on the Tropicanna. Long ways to go.
I'll be doing the Wedding Cake later tonight, got side tracked.
----- Day 52 -----
Fed 1200ppm 6.4ph 12 Liters
Tropicanna Glookies is going full blown purple. Should be covered in dark purple coloration within the week.
Wedding Cake is just fat. Super fat large nugs.
Easy day. Forgot to take trichome pics of Wedding Cake will do that later today probably.
Well, the largest bud is 1 foot in circumference now... rofl
----- Day 53 -----
Easy day. Fed some water, they're getting thirsty again.
I'm going to do a 13L feeding , then next day 5L water. So that's what I did today.
I'll be dropping the Kool Bloom Powder & CaliMagic by day 56 and only feed 1/2 strength molasses only.
Will pick the buds off as they finish, not gonna do 1 big chop unless it manages to turn out that way.
Colors are going wild.
Will check Wedding Cake & Tropicanna trichomes before lights out will update pics then.
----- Day 54 -----
1300ppm 13L 6.4ph fed
Here's some pics.
Wedding Cake is nowhere near ready by the trichomes. Barely any cloudy, no amber.
----- Day 55 -----
Tropicanna really turning purple now starting to infect the leaves at top of canopy.
Can't wait for what Day 63 holds for all these ladies.
Not going to check trichomes till probably day 58
Easy day, last fert feed with chemical nutrients tomorrow, after that its just molasses.
----- Day 56 -----
Didnt even bother with ppm/pH.
Molasses. roughly 30-50ml in 13-15 Liters.
Smoked a tester of the Tropicana Glookies (Sativa)
God daaaamn. Shits fire. Extremely strong. Very Cerebral and its not even at its peak yet...
I've chosen Tuesday as Harvest day for both Tropicana Glookies plants (they're clones of each other)
A single Wedding Cake testing nug is drying right now, I'll judge when it gets harvested based on the high, and if not sufficiently near my level i'll give it 2 days before drying another nug and trying again. I want heavy ass couch-lock.
6 days for Tropicana.
Probably 8 for Wedding Cake.
Will send samples off to Canvas Labs for testing like I've done in the past and will be making both edibles and bubble hash and will post those here as they happen.
Once thats done I will see if I can restart veg mode in this grow, and if so I will keep this going until the plants die (and just make side diaries for each individual plant variety grow).
Should be interesting.
*** update ***
Where'd the 1.5 Liter water bottle go?
rofl

Likes
6
Share


@Headies
Follow
this is weeks 5 and 6.I topped them and trained the branches out to the side. Plus I broke one... I tried to save it but it broke again later
Likes
7
Share

@MrGrowDiarie
Follow
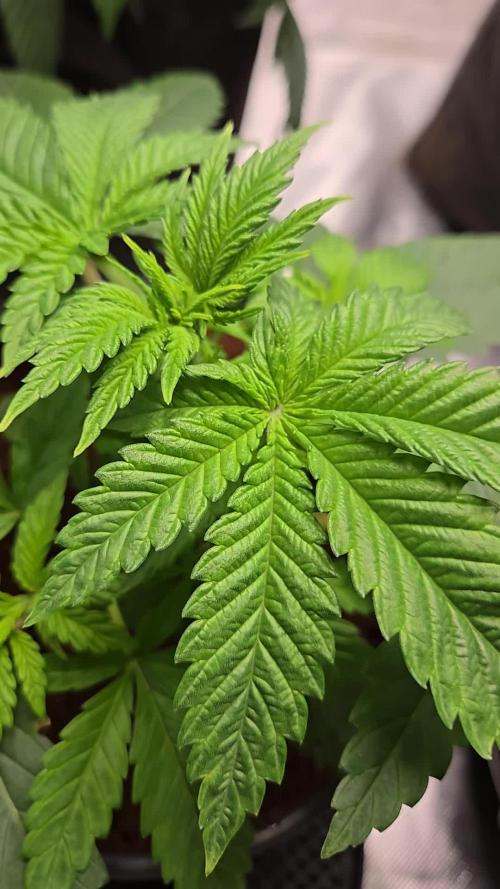
Day 21 - Growth Diary
Three weeks in, the plant continues to show steady progress. The leaves are broader and more defined, with a healthy green color. The structure looks stronger compared to the previous week, and the overall growth appears balanced. The plant seems to adapt well to its environment, and no major issues have been observed. Excited to watch how it develops as it moves into the next stage.
💦💦💦Watering💦💦💦
Week 3
27.09.2025 – Watering 0 ml
28.09.2025 – Watering 0 ml
29.09.2025 – Watering 0 ml
30.09.2025 – Watering 0 ml
01.10.2025 – Watering 500 ml Ph 5.9
02.10.2025 – Watering 0 ml
03.10.2025 – Watering 0 ml
Likes
3
Share
@kvnvn
Follow
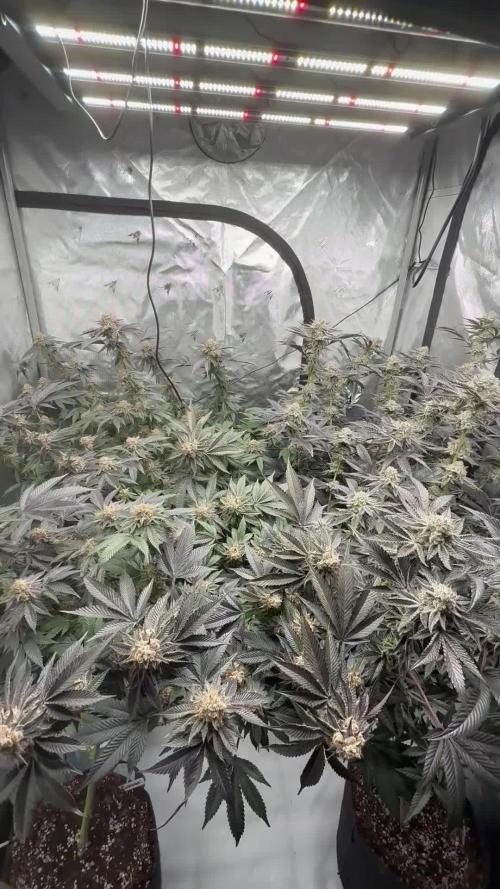
The 5x5 is one week from harvest. I’ve been sailing back nutes and she’s getting her last feed of 1.6 EC before the final flush. Still a bit frustrated that this app won’t allow me to separate my genetics but tent and week on here. I’ll update the 2x4 tomorrow as it’s entering week 3 flower. I also took about 150 clones of all the genetics I wanted to keep during this pheno hunt. We culled a lot of the veg tents.


Likes
18
Share


@Italianganya88
Follow
Die Plants wurden umgetopft und sind unter der grossen lampe gekommen, haben etwas stress anzeichen was normal beim umtopfen ist ,ansonsten sehen sie gut aus .

Likes
3
Share


@Chubbs
Follow
Weekly update. Sorry it was a late update this week I was out of town (Bizcon2024). Wow have they grown, I'd say doubling in size. I've upped the watering to 1000ml daily, this week I'll do a major defoliation and lollipoping. All in all Happy Growing
Likes
17
Share


@Ksouth1
Follow
Last two weeks have gone well. She is growing steadily and becoming a monster. I can't even imagine how big she is going to be by fall. I did some defoilation to allow more light to penetrate further in and I adjusted the lst ties to open her up some. Took a few clones from her that are doing well. Can't wait to get her stuck in the ground. She is going to be the biggest plant I have grown based on her current size. I know I am going to have to brace her branches when flower starts to be safe. Until next time happy growing to everyone!

Likes
5
Share


@HelioCentricGrows
Follow
In flush, 2 smaller ones got cut and just got put into cure bucket. smaller stuff got pressed. 44g in 8.2g out
Likes
4
Share


Likes
12
Share


@Coman
Follow
Harvest is coming closer but not yet. No amber trichomes yet.
Still drinking 3.4L/48 h.
Nice smell, some how hypnotizing, but not that strong. Maybe filter is doing the job.
Did some defoliation 2 days ago, light on the 2 ladys behind, and little stronger on the one in the front, cause I think she’s not fare from ripening.
Likes
4
Share


@MasterKush714
Follow
Yooo gang updateee!!!
Soo bad news first, the small tent with the godfather og mother had sadly passed away and expired, simple put she got way to close to the light AND turns out the air discs I was using were completely swalloed and wrapped up by the roots, so that mega blows.
NOW the good news, I actually have a couple new plants in the large tent with the clones, a GDP that's about 4 weeks in on veg, and a NYC Sour Diesel which is about 2 weeks out from seed, will keep updating on what I do with those, other then that the clones from the godfather og are doing really really well will keep updating as the days and weeks go on thanks for stopping by gang!!!!

Likes
13
Share


@Oyziphar
Follow
This week wasn't as bad as last week 😊 Nights were cold 😰, but not to much rain 😿 and a few hours of sun 😍
Temperatures in the greenhouse were medium : during the day 20°C 💀; min temp 3.5°C ; max temp 31,7°C 😤
Cookies Gelato has turned completely purple 👍👍👍
I defoliated the plants 😙 and had to remove budrot (especially in the Cookies Gelatoes)😨
I took the prettiest Cookies Gelato outside for a photo session in my garden 😍
Probably these will be the last pictures of the plans, before harvesting ! 👍😄


Likes
8
Share

@Arcadium
Follow
Super hot week again, 32c days, she's loving it. Growth slowed a bit, just starting to finally see pistils, so hopefully on track for end of September harvest.
Got a new DJI Mini 4K so I don't need to get on a ladder to get pictures anymore! Just drip irrigation and LCPT spray this week and that's it.
Full 4K Drone video on YouTube @VanIsleTerps

Likes
51
Share


@Mtmtc
Follow
Harvest time for the Gorilla cookies from fast buds. Grown just under a 100w ts600 from Mars hydro, this strain grew more than I expected, but cannot complain with the harvest. Now let’s dry these buds & will do a smoke report when they’re ready to 💨
Likes
4
Share

@CalGonJim
Follow
7/14 4AM MONDAY MUST DEFOLIATE!!!!! I HAVE 4 INSTEAD OF 2...BECAUSE OF MY LITTLE ACCIDENT EARLY ON.. I WILL TAKE ONE OUT OF FLOWER AND RE-VEG TODAY!!!
7/15 420am They are great cutting I took last month or week is great. Amino and mb today!!
Likes
21
Share


@DRO420
Follow
Almost doubled in height over the last week. Looking good , feeding full formula now. Switching to flower next week right after they are pushed down with the trellis net or scrog.
