The Grow Awards 2026 🏆 


Likes
Comments
Share
@GrowDiaries
Follow
Growers' rating for Sensi Seeds with Adam iLL!
Crowning moment! Sensi Seeds gets their rating from the growdiaries.com growers—a true testament to their legacy in the grower's world! #SensiSeeds #GrowDiaries
Likes
7
Share
@tresfrangos
Follow
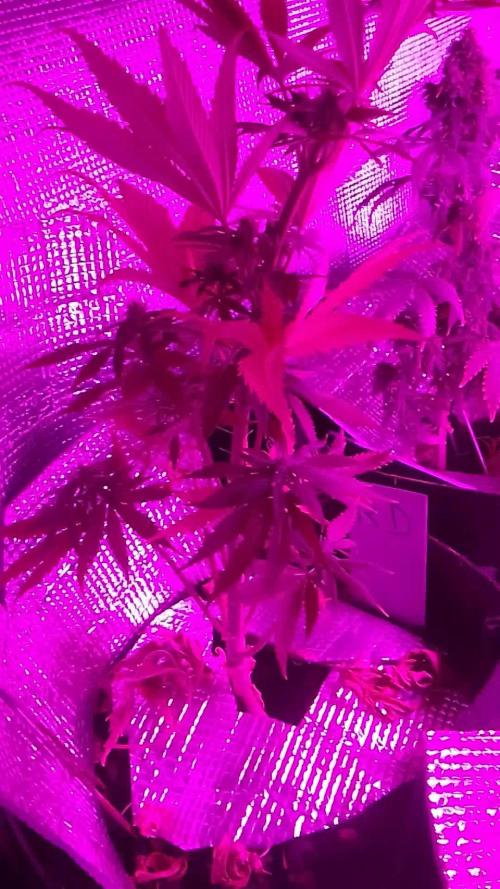
did some light defoliation (lower larger leaves and the ones touching soil) on day 28.
started feeding her bio-bloom as she transitions to pre-flower.
next week will start feeding with top-max as well.
looking healthy but im worried they wont grow as much as expected :(

Likes
Comments
Share
@Tony2jewerlyseeds
Follow
Hace un año exactamente estábamos cruzando uno de estos blíster de dosi- gelato del cual germinaron 3 de 5 semillas regalando nos dos hembras y un macho muy resinoso y oloroso y varias genéticas campeonas y de ediciones limitadas como amerth souer diesel x somango,souer diesel, como le pondría. A ese cruce o a dosi gelato x dosi gelato de hecho esa siempre fue nuestra intención sacar el máximo de semillas posibles de nuestro primer cultivo con semillas importadas primero necesita vamos unas semillas regulares pero de buena calidad y que supiéramos un poco de su genética investigamos acerca de doci-gelato y decidimos que sería la primera base de nuestros cruces sus efectos y aromas nos llamaron la atención aparte de que el nombre estaba de moda abrimos varios blister más como blackberry gum thunder banana moví d y varias que ya no quiero nombrar porque quiero que esos sabores sean invento mío jajajja leeimos un poco de como podíamos hacer semillas y lo hicimos polinizamos 11 hembras originales o estabilizadas que no se escuche feo y 3 hembras regulares una de ellas nos la vendieron con el nombre de Hulk otra como Cherry y la última una buble gum que comparamos su olor y sabor con el de la blackberry gum de seedstockers fue muy parecido a nuestra buble gum pero con notas a moras muy buenas de hecho es un cruce que tenemos contemplado para ver si con una planta macho de buble gum regular y una blackberry gum de seedstockers podemos mejorar aun mas el sabor y el olor en nuestro país de hecho hay buenas cepas regulares hemos probado genéticas con sabor mango,pastel de arándanos,limón ,sandía ,uva y gas,chicle clásico rosa,plátano,zorrillas todas esas genéticas y variedades nos han hecho llegar a pensar que en realidad hay gente que lleva incluso mas tiempo conociendo las semillas importadas o aun mejor importando las para realizar investigar o mejorar las genéticas y sus distintos efectos en el 2012 llegué a acceder a bancos de semillas quedé deslumbrado de la cantidad de nombres que había pero no era 100% seguro entonces no quise seguir insistiendo pero ya se escuchaban nombres como mango kush, Golden Acapulco,cronic el precio era mas elevado que los demas prensados que podiamos conseguir pero eran mejores efectos y aromas ya para 2018,2021
Se empezaron a escuchar nombres como blueberry,amnecia,skunk,pineaple,og,kalifas,jirafa ,puma,gorila,Hulk, chocolopez,candy, arcoiris,cristal,poison,f1,sueño azul , Tutankamón,shark, snow,Jack jerer, y mas llevamos 13 años recolectando semillas de diferentes genéticas de cannabis siempre hemos cultivado esas semillas regulares pero nunca habíamos intentado un cruce para empezar no sabíamos como hacerlo solo sabíamos que no teníamos que dejar crecer el macho.
Para 2022 después de un obsequio que tuvimos de un conocido volvimos a intentar una vez más conseguir semillas importadas nos regaló un tubo con 10 semillas del banco sweet seeds con fecha de empaquetado en 2017 llevándonos ala misma pregunta desde cuándo estaban llegando las semillas importadas y entonces algunas veces fumamos de genéticas originales al contrario de sentirme mal por no ser el primero en decir que traje genéticas originales o importadas a mi país me sentí feliz por que sabía que lo que estaba guardando todo el tiempo desde 2012 puede ser una gran colección de diferentes breeders tal vez tengamos varias ediciones especiales como la cepa froot loops, jirafe pussy,cronic,ak47 , y así fue como logramos contactar con un banco que parecía de confianza y obtuvimos dos blíster de doci-gelato , blackberry gum,thunder banana ,banana blaze y varias más hemos crecido varios de nuestros cruces pero necesitamos seguir investigando más aún para lograr estabilisar nuestras propias genéticas les dejo una foto de nuestro cruce María Sabina.

Likes
16
Share
@Nickeluring
Follow
We're getting close to harvest. She is putting on the last bit of weight and adding some trichomes these last days. Her smell is strong and good.
She'll go down later this week...


Likes
13
Share
@Gram_Solo
Follow
SUPER OG! 😎💎
We got 1 in full swing doing really well
I had some bad soil and lost 1 so I've replanted again in fresh BioBizz Light mix shud be up soon 👍
They we were really stretching so I've lowered the light this week, responding well and growing out now.
Just the start of the journey, here we gooooo!! 🔥🔥🔥😎😎😎

Likes
17
Share
@scooter112
Follow
Watering has jumped up to every 2 days ph 6.3-6.8 with 20% runoff
Flower Fuel has been added to AP,GG and ZK watering's.
Lights have been lowered to 24-28 inches.
White Widow just started flower at end of the week. Still waiting on the Cream Cookie.
Doing light Defoliation to expose bud sites to the lights.

Likes
21
Share
@Jays_Not_Here_Man
Follow
A-Day 88, B&C-Day 84
A-Nearing the finish line, she is in the middle of week 13. She has been getting nothing but water for the past 4 feeds now. She is fading fast. Lots of colours under loupe, I see pink’s and purples. Tricomes are almost all cloudy now and are close to about 5% amber. I’m going to ride her out as long as I can so I can get the other two closer to the finish line as well. Fat buds, some as thick as a pop can! 😎
B- Still getting full feeds of nutrients every other feed, on the off days, just a very lose dose of nutrients instead of just water. She is fattening up and stacking very nicely. Doesn’t have the same structure of A, but then again C, doesn’t look like A at all either. Same seed pack, same environment, slightly different training techniques, but what a difference in pheno expressions!
C- Has slown down some in stacking, most likely due to the length of her buds and how long it takes to make a difference. Very decent at this point, I feel like she is almost 2 weeks behind A, and 1 week behind B in growth, but if she puts on some weight like I think she will in the last 2 weeks, she’ll have a good final weight 😎

Likes
36
Share
@JBoBz
Follow
Hello to everyone stoners, here ends our adventure with our Orange Barb, there was some problem at the beginning due to a poor germination, but in the end it recovered well and I was rewarded with 30g of one of the best weed ever smoked!👽


Likes
9
Share
@Barzogrowops
Follow
I replaced my 2 hawthorne brurple led lights for a new spider farmer sf-1000 I purchased and my plants are loving it. Running 20 hours on 4 off an it's still hasn't gotten tent temp is so much more stable. Lst day 24 bounced back quick and healthy their really taking off did a lil defoliation to expose bud sites

Likes
1
Share
@Kraken85
Follow
Pour un premier cycles : Les bourgeons sont bien gonflés, la croissance est exigentes en nutriments et humiditées pour avoir de meilleurs résultat en Flo. Car en Flo Très gourmants en nutriments. Sa va je trouve que je me suis bien démerdé.
La partie afghane (Mazar-i-Sharif) est une très petite plante qui ressemble à un sapin de Noël.
Grâce au croisement avec la Skunk#1 elle a une performance accrue et une meilleure saveur.
1er Prix Type de Forte Bologne 2008.
2e prix à la High Times Cup 1999.
2e prix Highlife Cup 2002.
Gagnant du prix Soft Secrets Plant Of The Year 2014
Vivement le 2ème Cycles. Si vous avez des remarques, conseils ou autres .... Venez en discutez.


Likes
14
Share
@Korinthius
Follow
Well, this slow started lady has started to take off. Any concerns about her slow start are gone. Root system is extending nicely into her new home, She is not drinking a ton, but that is of no surprise at this age.
I can confirm, I did start her off a little low in her net pot, but next week, when she gets topped, I will be able to add some extra clay pellets for stability.

Processing
Likes
Comments
Share
@Batista
Follow
We are watching trichomes every day and it looks like it is almost ready so we are thinking of harvesting next week. It is already possible to see some amber trichomes. Unfortunately it seems that we are not going to harvest the expected amount, the buds were not very dense and fat, apparently the buds are just small leaves with trichomes.

Likes
2
Share
@DrBud420
Follow
What can I say about this plant, it spent most of the day in the shade, if it had the same conditions as dos si dos, it would eat it for breakfast in terms of yield... 450 g of dry matter and some popcorn... I am very satisfied with but the plant didn't get nearly as much sun as it needs...it didn't fill up, but it wasn't empty either, the heads are nice and fleshy...when I picked it, it smelled like lemon or KeyLime as Barney says...but no on citrus, but really lemon combined with some heavy stench, I can't wait for this miracle to work for some time in the jar...
Next year we will see it in its full glory, so let's try to get a one kilo and a half dry from it alone, that's a bit of a challenge for me...but with this kind of genetics and this kind of variety, I don't think it will be a problem in 100-150 liters of soil for this kind of monster... this year my plants were in 40 to 50 liters of soil and almost each of them produced from 450 to almost a kilogram of dry grass
Likes
7
Share
@Cannabeast40
Follow
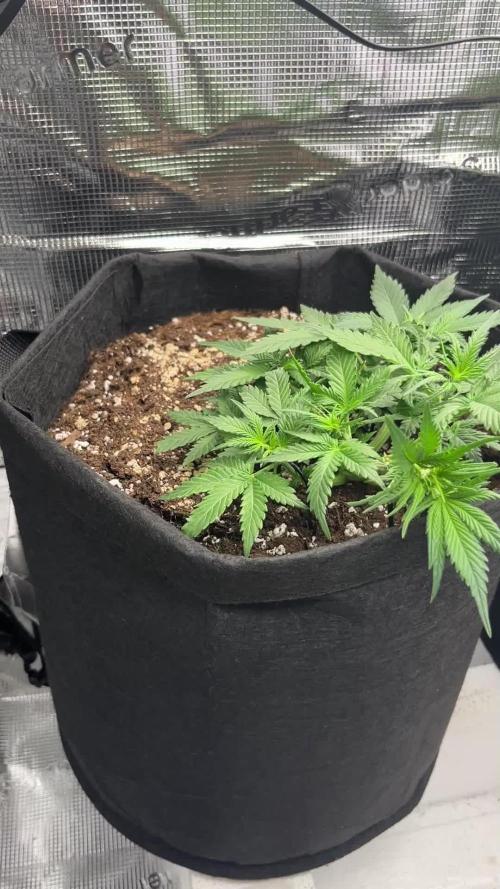
Week 3 and a repot is done and now in day 3. Finally it’s settling down after the repot, which was not pretty at all😂
Hope to get some massive plants this run 🌱
________________________________________________________________________________________
Light from @MedicGrowLED 😎
NEO 780 LED🔥
780 Watt⚡️💥
PPF of 2184 μmol/s & 2.8 μmol/J🔥
Full Spectrum V1/F1 🌈
WiFi smart connection & Smart Aura Control 😱

Likes
26
Share
@PedroAndHisPlants
Follow
My first grow has been a great learning experience, and I couldn’t be happier with the results. From the reliable BioBizz soil and nutrients to the impressive performance of the Spider Farmer SF 1000, everything worked well together. Each component contributed to a successful harvest, and I’m excited to continue experimenting and improving my setup with new gear and techniques.
💚☀️🤙🏼


Likes
3
Share

Likes
7
Share
@OwlGang_Uk
Follow
Week 4 - Sometimes You Got To Lose To Gain Phase 2 - I took off the fan leaves so that the plant would redirect its energy into the stem and branches rather than the leaves. I also cut of the top heads so that the energy would go into the development of the 2 heads below.