
Likes
Comments
Share


@Old_school_grower_dude
Follow
Day 2; 48 hrs the Blackberry Moonrocks seed's root was long enough to go into soil today. I use Happy Frog soil for seedlings. The soil cup will stay on the heat mat insuring the temp is kept at 75°F.
Day1; 24 hrs and the Blackberry Moonrocks has a visible tap root. I'll wait a little longer before putting it in soil. I like to see the root about a quarter inch before planting.
Day 0; germination, paper towel method.

Likes
5
Share


@CreamyNuggets
Follow
Sorry for the long time no update. Work got busy and I haven’t had the time to update this. Flower has gone pretty smoothly and the girls are getting ready to finish up. I have 3 bubba pupils in the tent at the moment, with a reservation privada purple wreck, freedom of seeds Godberry, and a serious seeds AK-47. The bubba pupil phenotypes look to be all the same. Low yielding with some extremely resinous quality buds. The smell is funky and grapey. The bubba pupil buds look like they’ll be all finished up in about 1 week to 10 days. Most of the trichomes are milky, and I have yet to spot any that have turned amber. The purple wreck is starting to purple out and probably has 2 weeks and some change left. The Godberry is probably the most resinous plant, and looks like it will be the second heaviest yielder next to the AK-47. The resin on the Godberry is extremely fruity, and leaves your fingers smelling like a bowl of fruit loops after plucking a few fan leaves. The AK-47 is the fattest bitch of them all. Big colas everywhere across its canopy and they’re falling over because I did not install a trellis on this grow. The AK-47 has an old school funk to it, and has around 5% amber trichomes. I’m thinking I will start to flush her at the start of week 8 (in 3 days) and let her finish up at a full 8 weeks.

Likes
38
Share


@trelorny
Follow
Day 43, 22.05.2024
- Gave a round of drinks to the ladies - they were thirsty!
- installed a De-Humidifier: I've had some trouble to bring down humidity during night time. It was stuck at around 68% and I do not want to give mold a chance - especially in the later flower which is about to come
- the buds are getting darker
- also found a fan leave which shows a yellow color. I understood that this is quite normal at this stage as the plant begins to suck the Energy of the lower leaves which it does not really need anymore. I guess tomorrow I will remove the leave in question and be done with it.
Day 44, 23.05.2024
- Hacked the De-Humidifier to connect it to my already installed VPD Controller: When the humidity rises above a special threshold (depending on the temperature) from now on the Tube Vent, the Intake Fan and the De-Humidifier will lower the humidity. Bye bye never ending Tube Vent running an hello snappy reaction to rising moisture!
Day 45, 24.05.2024
- Realized: This 30€ De-Humidifier is useless :). Deinstalled it and will send it back where it came from
- although it would be time for a drink the soil is not dry enough yet. So I decided to postpone until this evening or even tomorrow
- Decided to give water with nutrients today
- right after watering I recognized brown tips on two leaves. According to my research it could be a) nutrient burn b) light burn or c) Zinc deficiency or of course d) nothing at all and to be ignored :). I will wait for 1-2 more days and see how it evolves. "No panic" I guess...
Day 46, 25.05.2024
No action today.
Day 47, 26.05.2024
- time for another round of drinks! I will cut down the ration to 50% (1.5ml/L BioGrow, 1.5ml /LBioBloom, 0.5ml/L Top Max) though to hopefully counter the slight burn on the tips of some leaves. If it recovers well I will possibly continue giving full bloom fertilizer, but only half grow fertilizer. Each gets 600ml (15% of pot volume)
- Removed 2 bigger leaves from the bottom, that we're getting yellow
- bought a pocket microscope to start checking on trichomes. I know: a little early in the game, but it is a bit tricky to get a good look so I guess starting early does not hurt
Day 48, 27.05.2024
No action today.
Day 49, 28.05.2024
- Gave 600ml water each plus a little shortened nutrition: full bloom & top max fertilizer, but only 1/3 of grow.
- removed a single leaf that looks weird (all yellow, see picture). It is the only leave of that kind, the others look more or less okay.
This concludes week 7. 3-4 weeks more to come.

Processing
Likes
9
Share


@HollowSource
Follow
The ladies are looking amazing. I'm real happy with their progress. They're keeping a real nice distance between nodes.
They got their first feed yesterday at half dose. They've taken it well so will adjust accordingly moving forward.
The Banner is putting out crazy roots. It's almost time to put this girl into the 40l smart pot. The lateral growth is thickening. I'm going to top her as soon as I can and do a bit of lst.
There is a slight curling on the edge of the leaves(?) but other than that there's no other apparent issues.
The Skittles is bossing it right now and will also need to be moved to the smart pot. Brilliant lateral growth and it is pretty much ready to top.
The Blue Gelato and amnesia Haze are on Day 7 and are looking great for moving into their second week. They've been moved into their next pot and I'm hoping they catch up with the other ASAP.
Update:
This lady went into her 46l smart pot on day 18 ant topped at the same time. Time for an explosion of growth and some LST.

Likes
33
Share


@The_Moz4rt
Follow
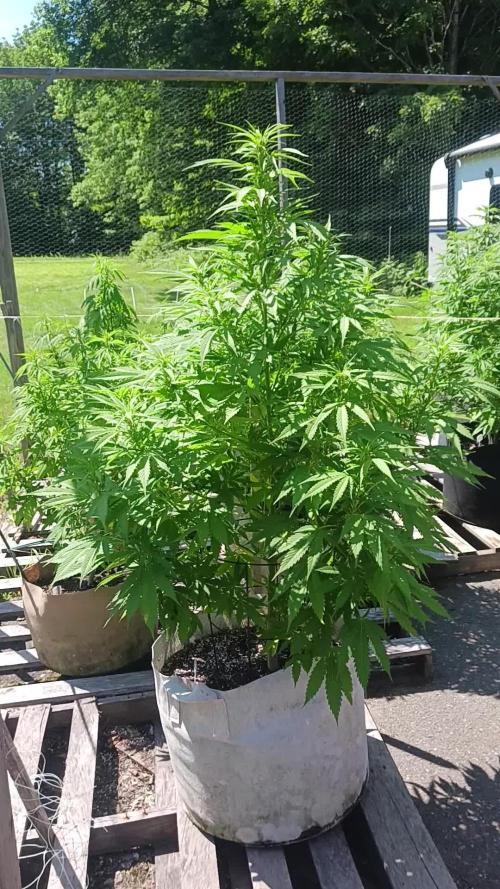
The plant kept stretching during this week. I'm a little bit worried as I don't see the flowers touching each other to form nice colas, but she's healthy so I can't complain, it's my first grow after all. Just hoping in fatter buds and not many popcorns.
She's drinking a lot of water in these days and the EC was higher when checking it before the daily refill. Don't know why she's eating less, but I lowered it to 1.6 again. I give her what she wants.
Keeping an eye on her development and trying to figure out when to add the P-K booster.
No particular problems this week, everything is going ok.
I gave her another (hopefully not too heavy) defoliation at day 59 so i guess I'm not going to touch her again till harvest.

Likes
Comments
Share


Likes
12
Share


@Chubbs
Follow
Weekly update. Sorry it was a late update this week I was out of town (Bizcon2024). Wow have they grown, I'd say doubling in size. I've upped the watering to 1000ml daily, this week I'll do a major defoliation and lollipoping. All in all Happy Growing
Processing
Likes
13
Share


@GrowGuy97
Follow
Got everything moved around & the new carbon filter, fans & lights so hopefully I got better coverage with less power👍🏼 Topped 1 of the Gelato OGs today was getting way taller than the rest we will see how she bounces back! Everything else seems to be going great!
Day 22 topped & trimmed them up a bit
Day 23 started LST on a few
Day 24 started mainline on one of the GZ
Day 25 trimmed them a little more today


Likes
17
Share


@Canna96
Follow
Hey now, hope everyone is having a great weekend. This week went great for the 5 mainlines. I got the final toppings completed for all the ladies, I got them done on the Sundae Driver and Red Hot Cookies on day 38, and the Durban Nights, Green Crack, and the Bubble Runtz topped on day 40 for the final time. At this point there is not much more training left to do, just some minor LST to try and keep all 8 tops per plant level, and some minor defoliation along the way. I am planning to Veg them for 1-2 weeks and flip to flower probably sometime in week 8 depending on how fast they grow. I do have them all on milk crates which are 10" each so I will place them on the floor and adjust the light power probably about the time I flip to flower to accommodate the stretch.
I am still feeding GH nutrients, silica, cal mag, and maxi grow. I will transition to flower nutrients approximately one week after flipping to flower. I have found that it is important to continue feeding plenty of Nitrogen through the stretch. The only way I would transition sooner is if I was running out of vertical space.
Still very pleased with the Spectrum X from Medic Grow. I am running her at 69% and the plants seem very happy and healthy. The heat and humidity are finally letting up in my region so it is nice to be able to open some windows and drop the temp outside the grow tent.
I hope everyone has a great weekend, Thanks for stopping by, Stay Safe and Blaze On!!! 💪
Website: https://medicgrow.com/
https://growdiaries.com/grower/medicgrowled


Likes
26
Share


@Master_weeda
Follow
Bonjour à tous les padawans et maîtres jedis
La senescence ce fais de plus en plus pressente la récolte approche J'effectuerais un dernier arrosage avec 2 litres d'eau ph6.3 pour être sûr que la plante sois bien rincée

Likes
4
Share


@mr_smooke
Follow
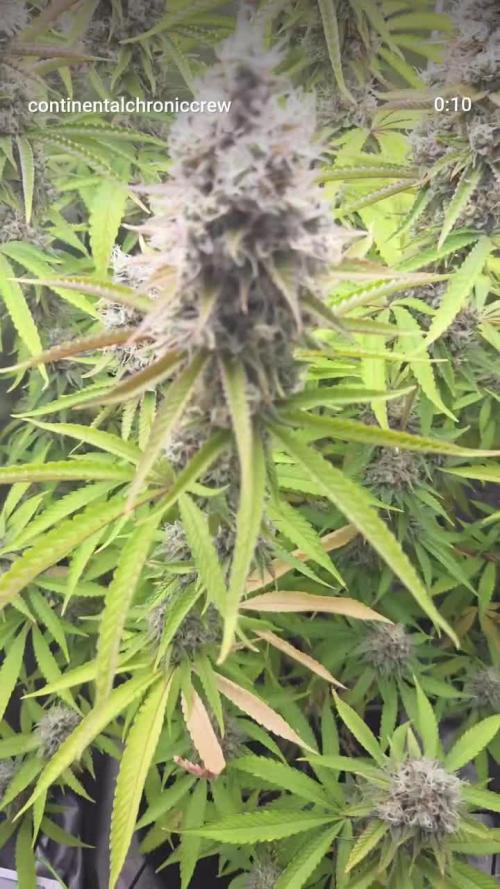
Only tap water for this shiny beauty. she gonna finish in 2 weeks maybe earlier. can not wait for harvest. here is day 43f
Likes
20
Share


@gr3g4l
Follow
Empezó la semana con lluvia y las plantas en algun momento de la pasada se mojaron por lo que de nutrientes bién poco.

Likes
12
Share


Processing
Likes
31
Share


@Endriu
Follow
Hello Bros and Sis!
How you doin?
I'm back with some amazing strains from Royal Queen Seeds (thanks goes to James), Biological Seeds, and finally have the pleasure to try Humboldt genetics! YAY!
Let's start saying that I've upgraded my tent to a 0.90*0.90*1.60m (3*3*5ft), so more space for the beauty and a more neat space for work&play! 😍
This time I've want to grow some Kush, to see and taste what everyone talk about, and something classy like the Royal AK (never tried before) and UK Cheese Auto, I wanna try with my own hands the speed of the fast flowering Speedy Chile and Candy Kush and make a jump into CBD's strain with the Pink Doctor... that's all, guys!😀
The girls are 1 week old and seems fine. A little stretch for them beacuse I prefer that than an heat stress caused by the MH upon their tiny heads.
I try to follow the "Organic path" as much as I can do, and don't feed the plants until they really needed to, and I guess they don't ask for because the soil of choice is Plagron Allmix. I enriched some lightmix by Biobizz with 25/27gr of Vertafort pellets, for the Pink Doc that hasn't popped yet, so maybe I'll upload some new pics in the next days.
As usual come and say Hi!
Ciao!


Likes
34
Share


@AbroCadabro
Follow
Cindy has been flipped to flower! Both plants in my tent have reached their max veg height and width. I did a preflower defoliation and flush and have flipped to a 12/12 light cycle.

Likes
13
Share

@masterofsmeagol
Follow
7/20 Went over this morning to plants soaking wet and heavy rain. Went back around 4pm and plants actually look really good. The rain has stopped for a bit and the girls looked great. Apart from some septoria leaves I needed to defoliate on the first plant I treated. I also noticed a few others on other plants so it's spreading albeit slowly. I treated the three in the middle with their second dose of Plant Doctor at 3tsp/1gal. One gallon administered to each plant via root drench. I think I may treat the other plant showing signs with a diy Dr. Zymes using citric acid as the active ingredient. That way I Gould start treatment right away without having to rely fully on plant doctor. Plus it would kill any pests. Ive seen damage but the birds do a number on them. I dont want to spray my plants with a bunch of chemicals if I don't have too. I shouldve replaced the pallets and cleaned the cage better. I think I did a good job sanitizing as I have no wpm. Just this septoria I probably got when the lady mowing the lawn cut all tjis fucking grass and blew it in my pen, throwing bird seed and I'm sure tons of disease into my grow bags. I literally had to harvest a bunch if fucking sunflowers. It looked like my plants had been mulched. Just with small disease carrying shrubs. At some point some of this stuff has to be on purpose. You CAN'T be that stupid. A couple kushes in the back look hungry. I think I may need to up my feed. I've written to much. I'll keep this updated. Thanks if you made it this far.
7/21 I guess it rained last night. Oh well. It was blue skies for hours before dark. It must've rained late/early morning. I'm sure the app of plant doctor will be fine. Like I said I'm considering using citric acid as a foliar spray to help with the septoria and clean up any pests. I don't have enough pests to warrant spraying. I just don't want to put all my eggs in the plant doctor basket. Today is overcast and windy. The wind has really assisted in spreading this virus. I remove anything I see infected immediately and since these plants are reveges they have plenty of leaves. Plants are really stretching. I know I talk about the septoria a lot but realistically if someone looked through my garden they'd have a hard time spotting it. I don't want to exaggerate the problem but I don't like dealing with ANY fungus or molds.
7/22 It was 55° this morning when I went over. I defoliated some septoria leaves and a few that were fading or damaged. I saw almost a whole leaf eaten so it's probably a good idea to move forward with citric acid. I can add that to the plants I've already treated with plant doctor. This is the first year it's been so noticeable. It's the reveg 10th planet that started this off. Oh well. I've dealt with MUCH worse. Plants LOOK good (other than septoria leaves (on bottom of plant). Today is water day for me but it's been raining and it's a lot cooler today. Bags still had weight to them. I want them to have a proper wet dry cycle. Temps top out at 75° so I'll monitor during the day and if something NEEDS WATER I'll give it to it. I'm suprised I have ZERO WPM. The septoria is much more identifiable but pm is usual present in these conditions bur I don't have a spot of it. I may do some defoliation today. I also need to add supports for flowering but one thing at a time.
EDIT: Went over around noon. 70°. Bags seem to be holding weight (it was easier to tell as ONE plant was substantially lighter than the rest) so I decided to hold off on watering. At least until tonight. There are three plants (at least that are going to NEED water). They look phenomenal now though and we've had lots of rain. Plan is to go over later and get the light ones and mix the water for the others so I can administer it in the morning quickly. I have an early doctor's appointment but I don't to overwater or water unnecessarily just because. But when you grow alone sometimes you need to do things when your able. I have people there that would help if I asked. And I have before but its late . I'm very grateful. I defoliated quite a few septoria leaves. They were all from the bottom of the plant. A couole wete bottom interior. I know there are worse things to contend with but still a pain.
EDIT #2 WENT BACK AT FOUR AND PLANTS LOOKED FANTASTIC AND STILL HELD WEIGHT. THE REVEG MK ULTRA IN EARLY FLOWER "MAY" HAVE STARTED TO DROOP AND "SEEMED" LIGHT. THE LARGE SPECIAL KUSH FUETHEST IN FLOWER BY THE DOOR WAS ALSO EXRRENELY LIGHT. I HAVE AN EARLY DOCTORS APPOINTMENT BUT DONT WANT TO OVER WATER MY PLANTS JUST BECAUSE IM IN A HURRY. ITS COOLER THIS WEEK. 70 TODAY AND HIGH OF 80 TOMORROW BUT DAD SAID THATS NOT UNTIL THE AFTERNOON. I MIXED UP ENOUGH WATER TO WATER EVERYTHING IN THE MORNING IF IT NEEDS IT. I HAVE AN IMPORTANT DOCTORS APPOINTMENT EARLY THAT WILL TAKE ME AWAY AND IM FEELING A LITTLE ILL SO I WANTED TO GET DONE WHAT I COULD TODAY. WATERED THE TWO THAT NEEDED IT WITH TWO GALLONS A PIECE (30GAL REVEG MK ULTRA AND THE BIG SPECIAL KUSH IN FRONT I DIDNT TOP THATS FLOWERING THE FASTEST. EVERYTHING ELSE CAN WAIT.
7/24 Surprisingly the plants still held weight this morning! The looked pretty good too! However its going to be highs in the 80's for the next 7 days. Since the plants still had some heft to them I watered everything just a gallon. I gave the 10s a half gallon and skipped the 50gal container plant. I think this is a good happy medium. I'm still seeing random septoria leaves but still no WPM. I defoliate daily sometimes a couple times. I need to get a minute to myself and add a foliar spray. I'll start with a dih Dr. Zymes while I'm looking into other products like bicilus (i have bt but its a different bicilus) or trichodermia. I need to feed sometime this week too.

Likes
35
Share


@bmvape
Follow
The Northern Light produced almost twice as much as White Widow. As they were in the same basin, I attribute the better performance to three factors. 1. Roots made it to basin faster. The WW's pellet dried out before her roots were in the water as the airstone shifted right under the NL.
2. The second and more powerful light was placed directly over the NL, however, the space is so small that they both should have benfited.
3. I did a better LST job on the NL.
Overall, happy with the harvest. The buds are airy, my fault. The smell is very lemony with a bit of an earthy smell during the cure. Currently, the taste is minty and refreshing, but still a bit heavy. Effects are nice. Noticeable but not overwhelming or tiring. I think potency will come with age,
But both plants tolerated my inexperience and have produced enough fruit to get me by. What else could you ask for out of a first grow?!
Thanks to everyone that helped! Wish I found this community from the start.
