
Likes
Comments
Share


@GrowInBavaria
Follow
12.03.2024 – Ein Desaster mit Hoffnung
Wo fange ich an, wo höre ich auf…? In diesem Zeitraum bin ich umgezogen und musste mir überlegen, wie ich das Ganze manage, damit die Ernte am Ende optimal wird – was sie leider nicht wurde.😅
Die Pflanze war genau in der Zeit fertig, als ich mit meinem Umzug beschäftigt war und in den Urlaub geflogen bin. Also entschied ich mich dazu, sie vor meiner Abreise zu köpfen und aufzuhängen. Eigentlich wollte ich die gesamte Ernte wieder in DryFerms trocknen lassen, doch da ich mein Zeitmanagement dieses Mal überhaupt nicht im Griff hatte, wurde alles ziemlich kurzfristig. Die Buds mussten ja auch vorher noch getrimmt werden. Also ließ ich das bleiben und hängte sie einfach auf.
In meiner neuen Wohnung stellte ich schon mal ein Hygrometer auf, um die relative Luftfeuchtigkeit zu checken – 42 %. Schon ziemlich trocken, aber ich dachte mir nichts weiter dabei. Wird schon irgendwie klappen...
Dann flog ich in den Urlaub. Fünf Tage später war ich zurück. Die Ernte hing bereits einen Tag vor meiner Abreise. Als ich mein Zelt öffnete, sah ich das Desaster kommen: Das Hygrometer zeigte eine RLF von nur 32 % an. Die Buds waren staubtrocken. Die ganze Arbeit – für nichts. Besonders ärgerlich, denn von allen drei Pflanzen war diese die vielversprechendste, sowohl was die Terpene als auch den Ertrag betrifft.
Ich war kurz davor, alles wegzuschmeißen, weil ich mir das Elend nicht mehr anschauen konnte. Schlussendlich entschied ich mich aber doch dazu, die Ernte so gut es ging zu trimmen. Ein Desaster, das kann ich euch sagen! Die Hälfte aller Buds löste sich in Staub auf – kaum setzte ich die Schere an, zerfielen sie.
Am Ende blieben mir doch noch 32 g, allerdings extrem empfindlich. Curing? Keine Chance. Trotzdem wollte ich das Beste herausholen. Also packte ich die Ernte mit zwei Bovedas für sechs Tage in ein Glas – und siehe da: Die Buds nahmen die Feuchtigkeit auf, die sie brauchten! Am Ende hatte ich zumindest halbwegs vernünftiges Material.
Jetzt lagert alles in Grove Bags mit einem Boveda und wird genau beobachtet. Ich hoffe, dass daraus noch gutes, rauchbares Material wird!
Eins ist sicher: Die Dosidos Auto wird auf jeden Fall noch mal gegrowt – und dann richtig ✊!

Likes
14
Share


@PEAKYPLANTERS
Follow
Hello everyone and welcome back to Madame Peaky's Gardens
let's start the dance and bring the light to 12h to trigger the flowering of these splendid girls

Likes
64
Share


@MadeInGermany
Follow
Hey everyone 😊.
This week there was a bit of Pk 13/14 and the buds are starting to explode 😅.
Lots of shoots with nice, big buds 😍.
In the coming weeks, the nutrients will be reduced piece by piece.
Until then, I hope you enjoy the update and stay healthy 🙏🏻🍀
You can buy this Strain at :
https://www.barneysfarm.com
Strain :
Blue gelato 41 clone from mother (Barney's Farm)
☝️
Genetics:
Blueberry x Thin Mint Girl Scout Cookies x Sunset Sherbert
👍
Vega lamp:
2 x
Todogrow LED HLG Quantum Board 100 W ( 200 W )
💡
Flower lamp:
2x Todogrow LED CXB3590 205 W = ( 410 W )
💡 ☝️
Soil : Canna Terra Professional +
☝️
Fertilizer:
Canna Terra Vega , Canna Terra Flores , Rizotonic, Cannazym, CANNA Boost, Pk 13/14, Canna Cal / Mag, Canna Ph - Grow, Canna Ph-Bloom
☝️🌱
Water:
Osmosis water mixed with normal water (24 hours stale that the chlorine evaporates) to 0.2 EG. Add Cal / Mag to 0.4 Ec Ph with Ph - to 6.0 - 6.3
💦 💧

Likes
6
Share


@GoldenWeedGrower
Follow
Legend
Timestamp: 📅
EC - pH: ⚗️
Temp - Hum: 🌡️
Water: 🌊
Food: 🍗
pH Correction: 💧
Actions: 💼
Thoughts: 🧠
Events: 🚀
Media: 🎬
D: DAY, G: GERMINATION, V: VEGETATIVE, B: BLOOMING, R: RIPENING, D: DRYING, C: CURING
______________
📅 D29/V25 - 14/05/24
⚗️ EC: 1.0 pH: 5.2
🌡️ T: 20°C H: 50%
🌊
🍗
💧
💼
🧠
🚀 Back Home
🎬
______________
📅 D30/V26 - 15/05/24
⚗️ EC: 1.0 pH: 5.0
🌡️ T: 20°C H: 50%
🌊
🍗
💧
💼
🧠
🚀
🎬 1 TL video
______________
📅 D31/V27 - 16/05/24
⚗️ EC: 1.2 pH: 5.0
🌡️ T: 20°C H: 60%
🌊
🍗
💧
💼
🧠
🚀
🎬 1 TL video very short + 1 TL video of LST
______________
📅 D32/V28 - 17/05/24
⚗️ EC: 1.2 pH: 5.0
🌡️ T: 20°C H: 60%
🌊
🍗
💧
💼
🧠
🚀
🎬 1 TL video
______________
📅 D33/V29 - 18/05/24
⚗️ EC: 1.2 pH: 5.0
🌡️ T: 20°C H: 60%
🌊
🍗
💧
💼
🧠
🚀
🎬 1 TL video
______________
📅 D34/V30 - 19/05/24
⚗️ EC: 1.0 pH: 5.0
🌡️ T: 20°C H: 60%
🌊
🍗
💧
💼 Big work to prepare her new home
🧠
🚀
🎬
______________
📅 D35/V31 - 20/05/24
⚗️ EC: 1.0 pH: 6.0
🌡️ T: 20°C H: 70%
🌊 16 L
🍗 CalMag - Grow A-B, B-52, Bud Candy, Rhino Skin, Hydroguard
💧
💼
🧠
🚀 The new home for Rey in now ready
🎬


Likes
Comments
Share

@Grow4ever
Follow
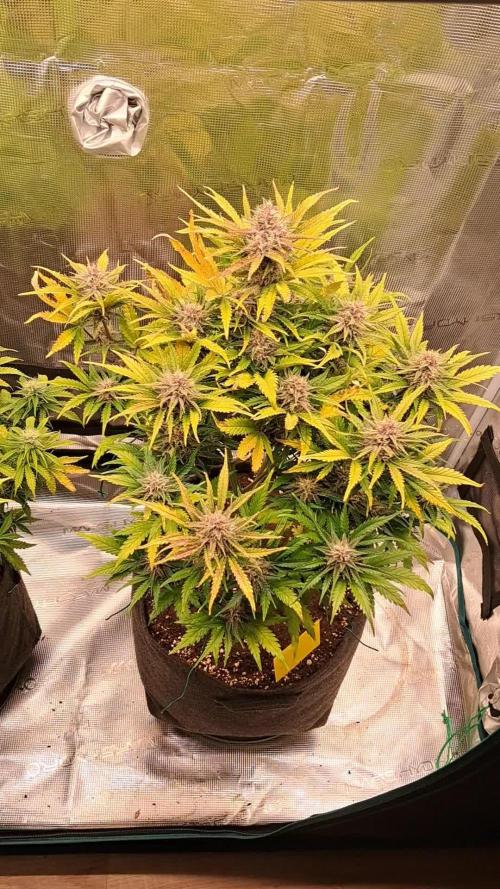
Die PH Probleme machten sich bei allen Pflanzen deutlich bemerkbar. Trotzdem war Sie wirklich vom Geruch ein wahrer Traum. Süßliche, fruchtige Note mit einem gassigen Aromer.

Likes
16
Share


@GGrows
Follow
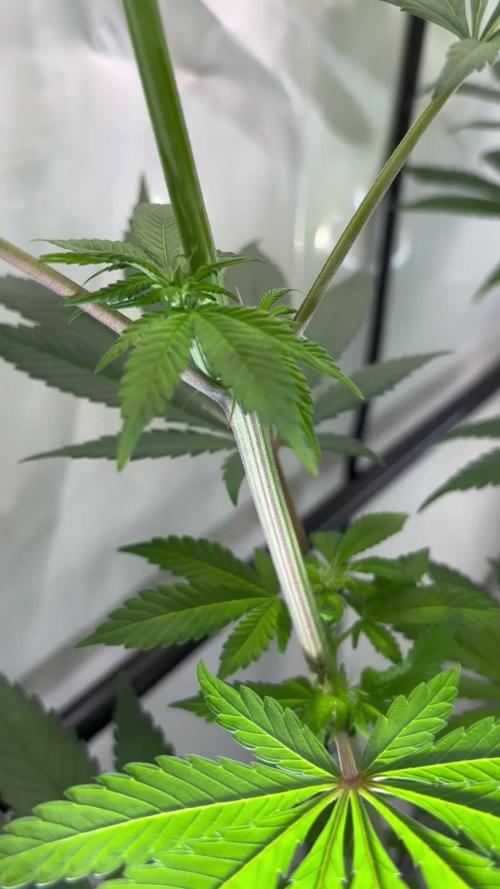
This girl keeps growing. Started shortening her light cycle as she is getting really big. I have bent the main tops so often so that the rest can catch up. She looks great thought... Love this plant.

Likes
2
Share


@Hydro_sweetness
Follow
Hey welcome back in the 6th week of flowering with the Dutch Passion’s Brooklyn Sunrise.
Last week my fan broke down and I had to order some new bottles of nutrients because the CannaZym and CannaBoost/accelerator had gone empty,
but yesterday I received the nutrients and a new fan!
Not to long anymore before harvest! I stopped giving the PK booster, from this week on I will decrease the nutrient values for the coming 2 weeks for the last week I will perform a flush (on most of them).
The Brooklyn Sunrise and the other 2 Colorado Cookies just need a week or 2 extra.
The Brooklyn Sunrise is getting fatter and fatter, buds are getting frosty and dense. Only one of them is turning yellow and im not sure why, I was thinking of a nitrogen deficiency. What do you guys think?
That’s it for now see you all next week!

Likes
22
Share


Likes
6
Share


@Naveplanet
Follow
I transplanted first time in last day of first week. Let's watch about coming week 😊


Processing
Likes
5
Share


@Highdro
Follow
I had a busy week moving the plants into NFT once roots started to show, put them into a tent give them a fan.
Freebie seed shown slow recovery but decided to use it anyway.

Likes
Comments
Share


Processing
Likes
3
Share


@camo420
Follow
NEW BOX: 130x60x120
DIY: storage shelf, solid sheet metal
ELECTRO ################################
thermometer top
thermometer bottom
hydrometer
wlan ip cam (+ir filter)
----------------------------------------------------------------
input: x2 USB PC fan
exhaust: x2 USB PC fan
circulation: x2 USB fan
----------------------------------------------------------------
led panel 1: 300W ASUNDOM LED (Veg/Bloom/Full)
led panel 2: 300W XHGrow Reflector-Series LED (Full)
----------------------------------------------------------------
studio light 1 (vegetation): 36W TaoTronics LED Gold
studio light 1 (vegetation): 50W Balai LED full
studio light 2 (vegetation): 8W VINGO LED blue ligh
studio light 2 (vegetation): 50W Balai LED full
----------------------------------------------------------------
studio light 1 (bloom): 36W TaoTronics LED Green
studio light 1 (bloom): 36W TaoTronics LED Gold
studio light 1 (bloom): 50W JADIDIS LED IR full
studio light 2 (bloom): 36W TaoTronics LED Green
studio light 2 (bloom): 36W TaoTronics LED Green
studio light 2 (bloom): 36W KINGBO LED Deep red 660nm
4x PLANTS ###############################
FastBuds Girl Scout Cookies
pots: 14L
soil: plagron grow mix
Likes
35
Share


@Zengrower
Follow
Hey growmies,
It’s been a while since my last update on the beautiful Frosty Tooth growing in my Minigrow One grow box. The reason for the delay? Growing in the Minigrow One is so smooth that I, as the grower, almost feel unemployed! Of course, I water her daily, but the highlight of my day is pouring the Plagron Alga Bloom into the watering can without spilling a drop 😂.
As you can see, the plant remains beautifully compact and low – all without any help or LST! The lighting in the Minigrow does a fantastic job of keeping her wide and low. This week, I removed some of the large fan leaves at the bottom to make room, as there’s quite a bit happening under the canopy 😉. The side branches are developing wonderfully: low, sturdy, and perfectly balanced with the main cola. Over the next few days, I’ll remove another set of fan leaves, but for now, it’s really just a matter of sitting back and enjoying the view. Frosty Tooth is a beauty: healthy, with vibrant green, large, and strong leaves. I can’t wait to see the first “frosty” buds this lady will undoubtedly deliver!
In terms of nutrients, she’s getting a daily mix of Sugar Royal, Alga Bloom, and Power Buds. Power Buds, in particular, worked wonders during my previous grows, producing dense, trichome-rich buds. I’m incredibly happy with Plagron’s organic nutrient line – it’s been absolutely spot-on.
That’s it for now! Next time, I hope to show you the first buds forming. The Minigrow switched to the flowering phase yesterday. I extended the vegetative phase a couple of times to give her a bit more time, but now the moment has finally arrived ✌️🍀.

Likes
35
Share


@Hashy
Follow
She did quite well for being grown in a 9L pot and got a decent root structure. Because there where 4 plants in the tent this one suffered a bit and got squashed out the way. But she still did a good solid yield.
Likes
54
Share


@Ganjagrandaddy
Follow
Day 9 flower: Orange Sherbet: This girl is a pleasure to grow so far. Her budlets dwarf the others in the room so far and at only 9 days flowering , shows a good indication of the overall finish she should have. she is packing buds on all over her structure now and following her defol on day 7 , she has really pumped them up. The shogun boost is a killer concoction it seems. Cannot fault this lady at all to date. She is slightly tacky now too which is a shock for her age.
Cookie Kush : This lady is a midget !!! She is a lot smaller than other kush strains i have grown but looks healthy enough. I think her housemates dont help as they are all such good growers. She is big enough to keep up with the canopy but will need encouraging constantly to match them at some point.
Likes
4
Share


@QixxGrows
Follow
I might switch the lights in the next days. Depending on her growth.
Day44: Added some water and moved the camera a little further away.
Day45: She felt lonely, so I got her a friend... Theobroma Cacao. New seedling that needs the warmth + humidity. Hopefully surviving winter.
Day46: I decided to take some zoomed in stills of her. To show off her beauty. The purpling of the branches really make this lady something special. In some of the shots it might look like her leaves are yellowing, but it's just the angle of the light. You can see on the photo that I took from the top, that all leaves are a healthy dark green. At least I now have proof that she's a lady. She's short and stubby, but I'm not really growing for amount. I just neeed 50g, after all (hehe)
Day47: She grew like a demon overnight. I'll check the height tomorrow.

Likes
Comments
Share


@Batista
Follow
This week, the buds started slowly fattening up, showing lots of trichomes and smell nice like fresh mango.
Watering got more frequent, about once in a couple days.

Likes
21
Share


@Insaniac_0
Follow
3/18 to 3/24 Veg Days 28 to 34
Week 4
This week is primarily test training and recovery for that. I say test training because in past grows I noticed that some really bad early breaks are fully recoverable by flip.... but how bad is too bad. Thus the test So I plan to break every branch and try to control really bad to not so bad to see what the end results will be. (the worst break picture didnt come out so good, so It's just "after tape" pics.)
Feed this week was 1 top feed of .5 gal at 150 ppm with 6.1ph. 4 days later I turned on the autopots and for the rest of the grow all feeds will be reservoir feeds that I change out weekly. I prepared 3gal of 6.1ph RO water. I used 200ppm of Veg Mix (recipe Week 2) then I added 1ml/gal of CaliMagic (General Hydroponics 1-0-0).
Next week I plan to top cut the branches again and change out the feeds with 300ppm at 6.0ph