
Likes
Comments
Share


@TechDCo
Follow
23/04/2025
Lights On! Sprayed walls 6%HP/L sprayed Domes 0.05% HP/L
Pulled backwards MS with tape to try and shape her.
23/04/2025
Lights Off!
25/03/2025
Lights On!
Placed seedlings in the 5L starting cans.
Lights Off!
Check the VT me like the old me!
26/03/2025
Midday!
27/03/2025
Lights On!
28/03/2025
Lights Off!
30/03/2025
Lights On! Defolled!
Switch to flower in 4days. I need to setup the sativa tent in loft!
Midday! Increased light: 460watts they perked up and are praying!
- "If the truth perished, it'll still stand true that the truth perished"
Likes
27
Share


@adam_pawloski87
Follow
Today is Day 50 !! We have started flower an they are just looking amazing! We have switched up the nutrients for flower, instead of 1 tsp bloom and 3 tsp of veg , we just swap 3 tsp of bloom and 1 tsp of veg !! Can’t wait to see what these laddies do this week!!
Likes
30
Share


@XperencdGmanXG
Follow
Pretty resistant to wpm but still susceptible. I'd like to breed in more resistance but that may lower cbd content. So we will see what she taste like and go from there and
Likes
13
Share


@Bryankush
Follow
Finite finalmente le prime 2 settimane di fiore, da ora in poi ci sarà la parte cruciale. Ha un odore abbastanza forte molto dolce ,molto fruttato e tropicale. Assomiglia come a Mango, Banana o frutta tropicale comunque. Le cime apicali si stanno ingrossando e diventano dure, spero che questa settimana si vedano di più anche quelle più basse.
Giorno 1 leggera defogliazione
Giorno 4 verrà annaffiata con 2L di acqua a 700ppm
Likes
2
Share


@fabialien
Follow
Semana sel 2 de septiembre al 8 de septiembre 8 de septiembre, fotos del dia Jueves 5 de septiembre 2024.
Se regaron con Floralicius plus adicionado con Hidrol-pez + vitaminas.


Likes
52
Share


@The_Good_Twin
Follow
01 Jul 2021
The harvest for my first plant is all done and documented! Yea!! My Blueberry Muffin looks fabulous. Her buds are starting to get frosty and grow, grow, grow! She looks great, and she’s still doing a little bit of a stretch, but it’s slowing down some. She’s still way bigger than her tent mate (Blue Ox), but still way smaller than my first plant. I have a feeling that if she doesn’t produce a lot, it will be my fault since I haven’t been giving her as much care as she really needs. I’m going out of town for the holiday weekend, so maybe they’re used to going without long enough that there won’t be any issue. I’ll keep my fingers crossed 🤞just in case. In feeding, I’m sticking with the Mid-Bloom stage for at least another week, then maybe I’ll adjust them some. Today I gave CALiMAGic 5ml, FloraMicro 7.5ml, and FloraBloom 15ml mixed into a gallon of water chilled to 42.2F. The initial pH was 6.6 and didn’t require adjustment. The TDS going in was 842 ppm. Runoff pH was 6.1 (better than the last time), and TDS runoff was 2548 ppm. We’ve been having a heat wave here, so the temp is creeping up in the grow tent. Today it was 86F, and the humidity was 48%.
03 Jul 2021
My Lady is looking lovely today! I can see by looking at her HST branches that she’s still into the stretch just a little bit because they have increased in height since the other day when I first made a mental note of how they were lying on the top of my support net. Today they are resting about 2 inches above it. Now that growth has been since I put her in the big tent with the net of course, so that was on the 30th just a few short days ago. Some of her leaves are showing some issues, but just on the side with the rotating fan. I’m wondering if it could be drying them out some, and not a deficiency because there are no other issues anywhere on the plant. The same goes for her tent mate, so by rule of deduction it has to be the fan. Maybe I’ll lower the power a bit when I get back? I’m going to be gone for a few days and I don’t want them to get too hot in case the heat wave doesn’t let up. I received one of the new nutrient supplements I ordered and started using it today with the nutrients already in use. Today I fed a gallon of water from the tap. Due to time constraints I didn’t chill it. I fed CALiMAGic 5ml, FloraMicro 7.5ml, FloraBloom 15ml, and started Floralicious Plus 1ml. The initial pH was 6.3 and was not adjusted. The TDS going in was 1242 ppm. The runoff pH was 5.9, and TDS runoff was 2777 ppm. The tent temperature was 79F, and humidity was 53%. Hopefully the Liquid Kool Bloom will have arrived by the time I get back!

Likes
23
Share


@Kakui
Follow
V8, supuestamente hoy haría transplante a los maceteros definitivos, pero, hace 3 días que las plantas están presentando hojas débiles y dobladas hacia abajo, en un principio pensé en que podría ser exceso de agua, pero creo que es exceso de nutrientes, básicamente exceso de nitrógeno, ya que las hojas están con un verde muy oscuro y algunas están presentando manchas color café.
Así que hoy les hice lavado de raíz, con agua EC 0, hasta que el drenaje fue de cercano a 4 EC. Esperaré unos días a ver si se recuperan, si no, simplemente las eliminaré y empezaré de nuevo, ojalá se recuperen.
V9, al final si era exceso de nutrientes/nitrógeno, menos mal que se recuperaron con el lavado de raíces, pensé que morirían, ahora veré como siguen para decidir si hago transplante hoy mismo.
V10, se realizó trasplante a macetas definitivas y un riego suave. Las plantas están todavía en recuperación, esperaré unos días más para empezar el LST.
V12, riego.
V13, se realizó una pequeña defoliación y LST.

Likes
31
Share


@dataTwiiix
Follow
06/06: ça y est l'aventure commence 😎. Encore merci Marshydro pour son support et fastbuds42.com pour tester ces nouvelles vario.
Mis ma troisième graine d'amnesia zkittlez auto, à germer. D'abord 12h dans verre d'eau ensuite jiffy'z. une fois germer direction un pot de 11L.
Likes
6
Share


@CanadianFillmore
Follow
Start of week 5. Week 4 went well, bud site development is going great, she's gaining size and weight, the smell is starting to stand out and she's very sticky.

Likes
2
Share


@Ninjabuds
Follow
The seeds had 100% germ rate and started all very strong and they are all emerging from the soil at an even pace with no stragglers. The plants are just popping out the soil today. I’m excited to grow these new fast buds fem strains. They are breaking out into a different market with the fem seeds. They had the one drop of fem seeds but now these new ones are a whole different story I’m excited. I know they will do great.
Likes
8
Share


@Mikeyvidler
Follow
It is the beginning of the 2nd week, the seedlings are small but still growing. They have gained a few cm in height, the stems and leaves have broadened. One seedling is a little taller than the other, it could be stretching from being on the bottom shelf of the greenhouse. They are also bending slightly to reach the south facing sun during the 5 hours of direct sunlight. To fix this I have swapped shelves to provide even amounts of light on both plants and rotate the pots to avoid them bending too far. I will need a second greenhouse during veg stage for more space, training and also better lighting.
There was a spell of colder wet weather where I am living in BC this week with temps dropping to a low of 10'C over this night i moved the pots indoors to the to be on the safe side. It has been mostly cloudy too so that may contribute to the lack of rapid growth. Periodically spraying the walls of the greenhouse has allowed me to keep the humidity higher for this stage of the grow. I gave the plants their first direct watering of 100ml of water however combined with the wet weather it seems this was a bit too much as i saw the very tips of one plant droop slightly. To remedy this i have not watered again for 3 days, the soil is still moist and the plant has returned to normal. I will go back to using the spray bottle. Patience is key.
You can see the beginning of the 2nd set of leaves sprouting from the middle of both plants showing progress towards the next stage of growing. I am hoping to introduce a quarter dose of organic fish emulsion nutrients by the end of next week if all goes well.
I have also germinated another seed roughly one week behind the other plants to act as a back up. I can only only reasonably grow 2 plants and received 5 seeds so this is acting as a spare for my first batch, it is in a much smaller pot and will need to be transplanted later.

Likes
22
Share


@Slobasian
Follow
You walk into the back yard and it’s a straight face punch of smells. Looking like some indoor rn moved all plants to safer place in case storm hits so now I atleast have a wind break


Likes
24
Share


@Alpha_Green
Follow
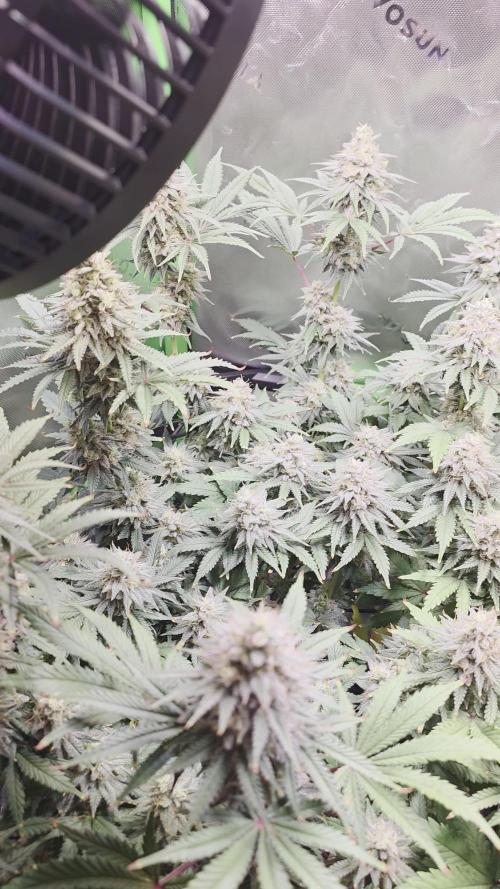
Hello Week 8:
Everything runs like clockwork.
PK tea secret recipe works at full speed. Tomorrow morning there will be the next vaccination. I think then the growth rate will explode generatively exponentially high...
The Sweet Seeds girls should be ready soon, which means their last PK tea and then only gentle watering.
Today finally arrives my Sweet Seeds shipment "Jealousy Z XL" from Spain...
I think that my crowning debut will be in my new Homebox Ambient XL yes !!

Likes
37
Share


@Aedaone
Follow
The temperatures, humidity, height, and watering volume(if measured) in grow conditions are all averaged for the week. The pH is soil pH. Any watering done by me is well water which is 7.6 pH and 50° F. Any listed nutrients are ml/gallon of soil spread evenly across the top of the soil.
Day 1 we had a high temperature of 84°F. We had intermittent storms and showers throughout the day that took care of the watering.
Day 2 we had a high temperature of 88°F. We had on and off rain and thunderstorms throughout the day. The rain took care of the watering. These are recovering well from the nuclear defoliation. They also responded well to treatment.
Day 3 we had a high temperature of 94°F with clear sunny skies. I watered about 5 gallons from the well. I treated these again with Growers Ally fungicide. The warmer nights, blazing sun, and this fungicide have really cleared up that powdery mildew. They've also decided to go all in on flowering.
Day 4 we had a high temperature of 94° with sunny skies. Heat index was over a hundred. It was super hot today. I watered twice about 8 gallons total. Everything looked good after treatment.
Day 5 we had a high temperature of 95 and partly cloudy skies. I watered twice about 4-5 gallons each time with well water.
Day 6 we had a high temperature of 91°F with partly cloudy skies. I watered twice today 4-5 gallons each pot, each time.
Day 7 we had a high temperature of 88°F with sunny skies. I watered 5-6 gallons each pot.
This week was a success. The powdery mildew issue has been cleared up. The Growers Ally fungicide worked great. These girls have rooted into the ground through the pots which is helping some of the 100+heat index days. It's hard to keep these pots moist in that kind of heat. Overall it was a great week.
Likes
30
Share


@Stick
Follow
They both look good so I will keep them all. They were transplanted into 9L airpots and do really enjoy the QuantumBoards. I built a sort of table to collect the runoff, this will allow me to water the babies automatically in a near future. Stay tuned!
Likes
26
Share


@Bakeryguy420
Follow
Start of week 6 of flowering for 4
Getting really frosty !!! Coming to and end of week 6 of flowering
Tangie ,gg4,sweet creme and glueberry all.started.to.get flushed!!! Exciting.for.chop . The hazes are all looking amazing .
Forgotten cookies is amazing =).
Just added grapey walter and douple grape. =)

Glueberry Auto · Expert Seeds
Gorrila Glue #4 Auto (Expert Gorilla Auto) · Expert Seeds

Tangie Auto · Fast Buds
Sweet Cream Auto · Expert Seeds

Amnesia Haze Auto · Vision Seeds

Amnesia Gold · Pyramid Seeds
OGesus Auto · Expert Seeds

Royal Haze Automatic · Royal Queen Seeds

Caramella Auto · Custom Breeder & Strain
Rhino Ryder Auto · Fast Buds

Fugue State · Mephisto Genetics
Likes
36
Share


@nonick123
Follow
Día 87 (26/08) Aplicación foliar de Bacillus thuringiensis a 1 g / litro para evitar a las temidas orugas de los cogollos!
Hace un día nublado (29 ºC de maxima) y NO es necesario regar
Elimino la malla de sombreado de la cara sur, ya que las temperaturas son más suaves después de la canicula
Día 88 (27/08) Riego con 500 ml H2O pH 6,5
Empiezan a bajar las temperaturas a 29 ºC de máxima, y se nota en la demanda de agua por parte de las plantas!
OnionOG Se empiezan formar los erizos y se pueden apreciar los primeros tricomas sobre las futuras hojas de azucar 😍💥
Día 89 (28/08) Riego con 500 ml H2O pH 6,5
Cada planta empieza a ir un poco a su marcha en la demanda de riego dependiendo de su tamaño y estado de floración
Día 90 (29/08) Riego con 250 / 500 ml H2O pH 6,5
He detectado un gusano de los cogollos muerto sobre una hoja! 💥 Parece que los Bacillus thuringiensis funcionan estupendamente! 😁
Día 91 (30/08) Riego con 250 / 500 ml H2O pH 6,5
Día 92 (31/08) Riego con 1 litro H2O pH 6,5 + 25 ml de Humus de Lombriz Liquido
Día 93 (01/09) Aplicación foliar Bacillus Thuringiensis
No es necesario regar tras el litro de ayer y dia nublado con pequeños chubascos!
💦Nutrients by Lurpe Solutions - www.lurpenaturalsolutions.com
🌱Substrate PRO-MIX HP BACILLUS + MYCORRHIZAE - www.pthorticulture.com/en/products/pro-mix-hp-biostimulant-plus-mycorrhizae

Likes
48
Share


@DogDoctorOfficial
Follow
Oh my darling Tropicana Cookies Auto from Fast Buds, you have stolen my heart completely in just five short weeks of growth! Your pre-flower emergence at day 30 was right on schedule, and since then you have been growing with such vigor and beauty that it takes my breath away. You truly are an amazing Girl, and I am so grateful to have you in my life <3 <3 <3
I affectionately call my plants my Girls, and you, my dear Tropicana Cookies, are quickly becoming one of my favorites. Watching you grow and develop over the past few weeks has been a true labor of love, and I am committed to giving you everything you need to thrive.
As we entered into your flowering phase, I knew it was time to start supplementing your diet with the right nutrients. I trust only the best for you, which is why I am using Atus Holland Regulator, Camg, P, and top boosters to give you the perfect blend of organic and mineral nutrients that you need to grow strong and healthy <3 <3 <3
These nutrients are so important to me because I know they are providing you with everything you need to reach your full potential. Aptus Holland Regulator helps me keeping you on point with everything , while Camg provides you with vital calcium and magnesium, P gives you the phosphorus you need for strong bud development, and the top boosters give you the extra boost you need to grow big and beautiful Fruits.
Most importantly, I am committed to using only organic and mineral nutrients for my girls. I want to ensure that you are getting the most natural and pure nutrients possible, so that you can grow into the healthiest and happiest plant possible. I love you so much, my dear Tropicana Cookies Auto, and I am so excited to see what the future holds for us <3<3<3
As always thank you all for stopping by and for supporting me on this journey, i am super passion about growing and fell blessed to have you all with me on this new journey <3 <3 <3
Genetics - Fast Buds Tropicana Cookies Auto
Ligth - LUMATEK ZEUS 465 COMPACT PRO
Food - APTUS HOLLAND
Tent - MARS HYDRO
All info and full product details can be find in can find @
https://2fast4buds.com/
https://aptus-holland.com/
https://autopot.co.uk/
https://lumatek-lighting.com/
<3 <3 <3 Growers love to you all <3 <3 <3
Tropicana Cookies Auto is the perfect variety for growers of all levels, especially beginners as this strain performs very well outdoors and indoors, and can produce up to 500gr/m2 in 56-63 days without needing extra maintenance. Reaching up to 110cm, this strain grows fairly tall with medium-sized branching, showing its mixed heritage. Definitely the right choice for those with a high tolerance looking to get their hands on the strongest autoflowers out there. Thanks to the 27% THC, you can expect an extremely powerful and long-lasting high that’ll boost your mood and give you that extra push you need to start your days on the right foot. This variety offers the whole range of citrusy and woody flavors with a strong candy-sweet background that will keep you coming back for more and more.
Bud description
Tropicana Cookies Auto produces gorgeous dark purple flowers, so expect really dark buds with gorgeous hues of pink, purple and blue, and thick dark-orange hairs that get completely covered in resin by harvest time, giving them an almost shiny-white appearance.
This variety develops a typical Indica-like structure and very few sugar leaves that will make your trimming sessions a breeze. But make sure to store your trimmings as the gorgeous flowers reek of a mouth-watering blend of lemon peels, orange juice, and sandalwood that gives it almost a citrus candy-like flavor that makes for the most aromatic hash and extractions.Smoke report
Thanks to the 27% THC, Tropicana Cookies Auto’s effect starts with an energizing head rush that gets your mind up and running while leaving you in a nice calm state. As the Indica-dominant side kicks in, the powerful cerebral effect gradually moves downwards and hits your whole body with a deep relaxation that leaves you with a joyful stoney sensation that alleviates chronic pain while leaving you in an overall happy and positive state of mind.
It’s the perfect daytime and nighttime strain as it can boost your mood and enhance a night out with friends but can also quiet your mind as you get ready for a good night of sleep. No matter the scenario, expect a powerful high that lasts for hours on end.Plant appearance
Tropicana Cookies Auto reaches up to 110cm and develops a tall main cola with shorter side branches, typical of hybrid strains. You can expect a stocky yet tall main cola with medium-sized side branches and thin fan leaves that fade into a yellowish hue with a beautiful dark purple tint. Thanks to the excellent selection, this variety develops a short internodal spacing that makes the medium-sized flowers look like they’re growing stacked on top of each other. It’s the ideal choice for growers who want to get big yields without having to deal with huge plants, as this monster yielder can produce up to 150g per plant while growing relatively short.
Grow tips
This variety grows super dense buds so make sure to space out the branches by tying them down, this way you improve airflow which helps prevent mold and other pests. Tropicana Cookies auto reek of a delicious sweet and sour smell so make sure to flush thoroughly to enhance the aromas even more. This terpene heavyweight finishes with lots of resinous sugar leaves that make for fantastic hash and extractions so remember to have your trim bucket ready!Flavor
Tropicana Cookies Auto boasts remarkably sweet flavors that resemble a blend of lemon peels and fresh orange juice, with subtle floral undertones that make it the perfect choice for extractors looking for unique terpene profiles.
Expect an overall citrusy zest that’ll coat your whole mouth and leave a delicious tropical candy-like flavor aftertaste. The sweet and sour flavors get balanced out with a herbal background that gets stronger as you exhale and gradually opens up, bringing out the whole range of woody, floral, and spicy flavors, making it the perfect choice for the most flavorful extracts.
Likes
10
Share


@btcywtsitw
Follow
These seeds are doing great. Very happy they both popped and Would love to see an explosion of stretching and vegetation growth. Let's hope for it this week so it can encourage the others.

Likes
3
Share

@Piratenarm
Follow
Die Blüten werden fester und mittlerweile riechen die Ladys schon stark. Ab jetzt gibt es final Part.

Processing
Likes
3
Share


@Tryhard1988
Follow
Uploaded a video of all my strains together she in the left back corner and did a separate video of her by her self this is my favourite smelling plants she's phenomenal she really is
