Check the winners The Grow Awards 2026 🏆 


Likes
Comments
Share
@Elguacho420
Follow
Buenas a tod@s... Octava semana de flora de las Green poison de sweet seed... Más allá de las marcas de "excesos" en las hojitas, q no se x q x q no me paso y a pesar de que podría estar más grande ( fallo mío) la planta está DPM..🔥⚡🤯😱 está y se la ve compactada y tanto está como las demás, se las nota que pesan, que prometen y que yo no subestimaria x su altura, están muy bien y ya en la etapa casi final... Ya no les queda mucho, en verdad el calendario marca que ya está en etapa final, pero les falta aún más días, disfruten del paisaje que en breve se nos va 🙏🏻🙌🏻💪🏻💪🏻😎⚕️
🇦🇷🤝🏻🇪🇦

Likes
13
Share
@BigTuk420
Follow
It was week 13 2 days ago iv just not had much spare time but here is a small video that will make you feel drunk. things are going as good as i can get for now they all just had a quick water. untill next time take it easy peeps... Ps does anyone know who has a good dawg not the nast horrible types that tast mouldy lol thanks


Likes
15
Share
@STAYINGONMYMAINCBATORUNTWO
Follow
She’s a little shorter than the rest only by a couple of inches! I’ve opened her up by defoliating the bigger fan leaves and letting light get to the lower bud sites allowing better quality buds (non airy/popcorns) humidity hit between 50 and 56% and that’s perfect! Will lower in the last 2 weeks to 40% and hold during flush! Thanks for stopping by!

Processing
Likes
6
Share
@Dairon
Follow
Como podeis ver en el video, han duplicado su tamaño en cuestión de 12 días, por lo que ha sido necesario la utilización de tutores y una poda de bajos bien potente pues ya no podré hacerle más, aparecen las primeras flores y con ello iré aumentando la EC progresivamente, pero con mucho cuidado de no sobrefertilizar .


Likes
1
Share
@Chucky324
Follow
Hello. This is the end of week 4 and the beginning of week 5 of veg.
The plants are doing good and growing well.
They are up to about 600 ppm when I water them
Did the rub test on them and was slapped in the face with a strong cat pee smell with a hint of citrus.
The smell will change as they grow, but I thought if was humorous.
Started a new underground comic for your enjoyment. It's Weirdo #13 printed in 1993.
OK. Be Great.
Chuck.


Likes
2
Share
@Weedman268
Follow
Week 3 flower she's been drinking alot, so keeping her water reservoir full. I should top dress but am gonna finish her without top dressing, I believe the soil is healthy enough to do the job,🤞
Processing
Likes
14
Share

Likes
67
Share
@Only4passion
Follow
Smells amazing 🤩 i havent trimm yet just take the big leaves with no trichromes on it as usual drying on custom 📦 box 👌💪💪💪💚💨💨💨
Likes
3
Share
@CaliJ
Follow
watering 250 milliliters per plant.
temperature this week up to 32 degrees, but everything is going well, thanks for the messages, not possible to answer them but it's nice 😁
Likes
2
Share
@Yoro33
Follow
My 2 autos are starting to grow rapidly finally this week after being transferred to the garden in their 2nd and 4th week of veg respectively. The 2 seeds I've started from seed. I have no clue what strain they are or if they're even female. We shall see.


Likes
13
Share
@GloveGreen
Follow
14/09/2021
Hello everyone, welcome to the third week of life of the so dreamed Dark Phoenix of Green House Seeds Co.
I'm very surprised with the development of one of the plants, it grew a lot in the last week getting an excellent performance in my opinion. I would like to know your opinion. Leave comments please.
Speaking of cultivation I keep keeping the temperature around 25°C to 26°C
I raised the EC value to 1.0 ms.

Likes
55
Share
@pifflestikkz
Follow
Day 154
03/10/24 Thursday
De-chlorinated tap water flushing today with flawless finish.
Absolutely gutted...
She has decided to develop seeds and Hermie on me 🤦♂️
Disappointed after such a long investment grow 😔
But we move...
I will flush her rest of week and possibly next week depending on the seed to bud ratio.
Frustrated to say the least 🤣
Picture update 💚
Day 155
04/10/24 Friday
She hasn't got any new noticeable beans yet, only spotted 5 in total, 1 in each top in the far corner, it's so strange. Any advice or thoughts on what may have caused this please comment 🙏💚
Picture and video update 😎
Day 157
06/10/24 Sunday (End of week)
De-chlorinated tap water with Plagron PK13-14 to just help with nutrients.
Again upon looking today I can't see any noticeable new growth of seeds, and she is developing new pistils and bud growth again all across her tops, thank FU£& 😆🙏💚


Likes
7
Share
@Bommhardt
Follow
Day 57: Watered every plant with 1,0 l of fertilized water. Advanced Nutrients Overdrive only for #3 and #4. I think I will harvest these two after week 10.
Day 58: Nothing important to do... just sat there for an hour, watching the ladies grow, and collected some fallen yellow leafs.
Day 59: Watered every plant with 1,0 l of fertilized water. Advanced Nutrients Overdrive only for #3, #4 and #5.
Day 60: Nothing special to do.
Day 61: Watered every plant with 1,0 l of fertilized water. Advanced Nutrients Overdrive only for #3, #4 and #5.
Day 62: Did some defoliation on #3, #4 and #5.
Day 63: Nothing to do today.
Likes
4
Share
@Mishka420
Follow
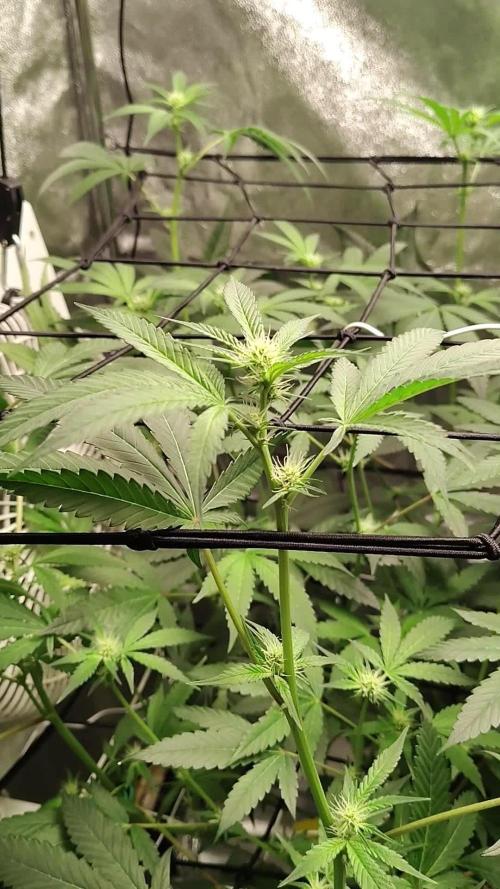
Stretch is fully finished and the plant has settled perfectly into the SCROG net. The canopy is even and well structured, with branches firmly positioned and no further vertical growth.
Flower sites are developing nicely across the canopy and bud formation is clearly underway. Overall vigor remains strong, leaf posture is healthy, and color looks consistent with no visible deficiencies or stress.
Training is now minimal — the SCROG structure is locked in, with only minor adjustments to maintain airflow and light penetration below the canopy.
Feeding continues with the Athena Blended Line (Bloom A & B, Balance, CaMg, Cleanse), with PK supplementation active from Flower Week 3 onward to support bud development and early flower stacking.
Everything looks stable and well managed as the plant moves deeper into the flowering phase.


Likes
Comments
Share
@RavenWoodsAlchemy
Follow
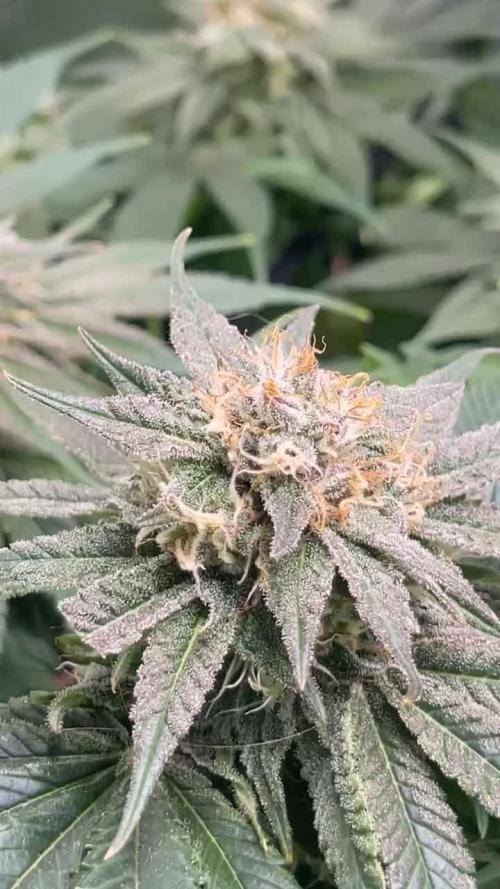
The trichomes are starting to go from clear to cloudy. The pistils are are about 60% brown. It will most likely be another week until harvest. I will check daily and only water with ph balanced water with 2ml of magnesium per gallon. I will withhold all other nutrients after today.