
Likes
Comments
Share


@Grow4Releaf
Follow
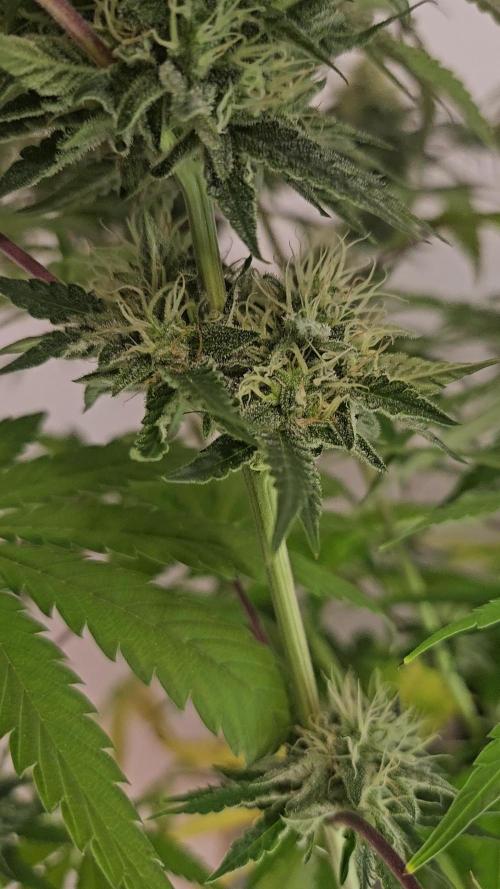
She's moving along well still , looking pretty normal on the other limbs besides the upper main cola lol that things a mess.
Still no computer todo my photos on or background but this app had been helping out. Stupid watermark can kick rocks lol.. but it's free.
She's gotten some of the Tea co super tea blend, but just one feed didn't add to main list of stuff. Besides that she's began to get Green Sensation aswell to see how she can fill out ..
Not really much done other then watching, she's shorter then her sisters so ppfd is on the lower end roughly 600/650 but that'd change once they move or I can lift her up if needed. She's kosher so far tho.
Thanks again for checking this thing out, appreciate everyone's time !!!

Likes
6
Share

@D33jW
Follow
📅 Week 9 – Day 63 / FLO 35
BOX: 80x80 – 250W lamp
🌞 Temp: 26°C
💦 RH: 55%
💥 PPFD: 800+ µmol
🌬️ VPD: 1.5 1.6
⚡ EC: 1.4
The battle continues – never again big plants in small pots 😅
It’s really hard to keep them in perfect condition, there’s almost no room for mistakes.
I’m keeping VPD high to push metabolism and speed up bud development.
Watering is split into two cycles per day, EC around 1.4–1.5.
Fans are set just right – enough to make the leaves slightly move, but not enough to stress the pistils.
Stay tuned – and keep growing 🌱
Likes
99
Share


@DevilsBud
Follow
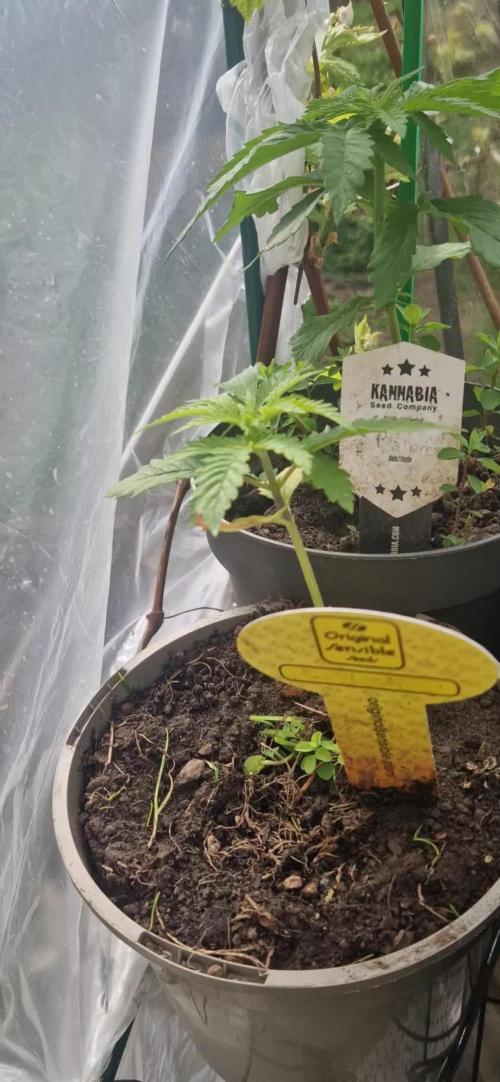
Anesia blackberry moonrock and imperium X will be put in the 100X100X180 with the TS-1000 so they can veg some more the black berry moonrock is looking very short stocky and bushy lest how she developed try the week
Happy growings
visit www.marshydro.eu
for your best gear and use the PROMO CODE: DEVILSBUD
27/10/21
Transplant the black berry moonrock in 11L fabric pots added 5gram Easy Roots - Mycorrhiza Mix to soil
Some info about the Marshydro FC-4800
Superb Quality LED Chips: The whole light is composed of 1206 pcs Samsung lm301b and Osram 660nm chips. More than two times as many LEDs are used to drive the grow lights at low currents and to avoid overdrive. Quality is guaranteed and efficiency is up to 2.8 μmol/j.
Even PAR Distribution and High PPFD Output: The multi-light bar design and the densely distributed light chips enable the LED grow lights to achieve the optimum PPFD required for plant growth over the entire effective coverage area.
Specifically Designed Spectrum: To ensure even plant growth, blue and red light are enhanced on the basis of a full spectrum combination. Not only does this accelerate plant growth, but it also improves the yield and quality of the plants at the same time.
Dimming Daisy Chain Function: The dimming function saves on electricity costs and enables brightness from 10% to 100% for the different stages of plant growth. A single master light can connect up to 30 lights in a daisy-chain system.
Business LED Grow Light: The light's wavy heat sink dissipates heat quickly and the IP65 waterproof allows the light to operate in humid conditions. 180° collapsible feature for easier installation. All these features provide favorable assistance for commercial cultivation.
And some tent info
●【Lock All Light Insid】MARS HYDRO Grow Tent Interior is made of diamond mylar. Non-toxic to the environment, no harm to plants. High-quality 1680D canvas being double stitched, (ALL OTHERS BRAND grow tent is 601D canvas) which is tear-proof for perfect light locking, No light leaks or rips at all.
●【Durability Grow Tent】Stable Metal corner adapters and poles are the trustful supporters of the tent. No rusting nor paint-falling. Quick easy tool-free installation. Carries strong heavy-duty SBS zippers, double layer lining to create a light-proof seal.
●【Easy Observation of your Plants】Special peeks window made by double layers of cloths. Observe the growing conditions of your plants without opening the tent and avoid disturbing plants. The peek window also serves to dissipate heat and ventilate air.
●【Removable Tray Keep Clean】The package includes a removable waterproof floor tray to hold soil and fallen leaves. The tray can be taken out easily to wash. Removable and water-proof makes cleaning easy.
●【Good Ventilation&Fast Assembly】 Circular double-sleeved vent holes with adjustable nylon strap for air circulation by exhaust fan, ducting, carbon filter, or reflector. Better allows proper light, heat, and airflow. Quick tool-free installation. Reinforced by a sturdy metal frame to ensure security and stability, supports up to 140lb. Perfectly safeguard your plants to thrive even in winter

Likes
Comments
Share


@eldruida_lamota
Follow
Vamos familia, actualizamos la tercera semana de floración de esta Amaretto Tarmac de Seedstockers.
Empezamos abonando ya con varios productos de la gama Agrobeta para la floración.
Temperatura y humedad dentro de los rangos correctos, 12 horas luz, 12 oscuridad.
Una lástima que de todas solo aguanto una, y en concreto tiene un color espectacular aún así seguiremos con el diario hasta el final.
Agrobeta:
https://www.agrobeta.com/agrobetatiendaonline/36-abonos-canamo
Hasta aquí todo, Buenos humos 💨💨💨

Likes
4
Share


@ilGerme
Follow
Ok here we are, last week. This is my first try so I don't know exactly when to harvest. Leaves are turning yellow and 50% of pistills are brownish, but I don't know if it's ready looking at the trichomes aspect.
So what do you suggest? I've posted macros of the trichomes for you to help. Need expert's advice.
Thx happy growers!


Likes
209
Share


@Rock_n_Roll_Randy
Follow
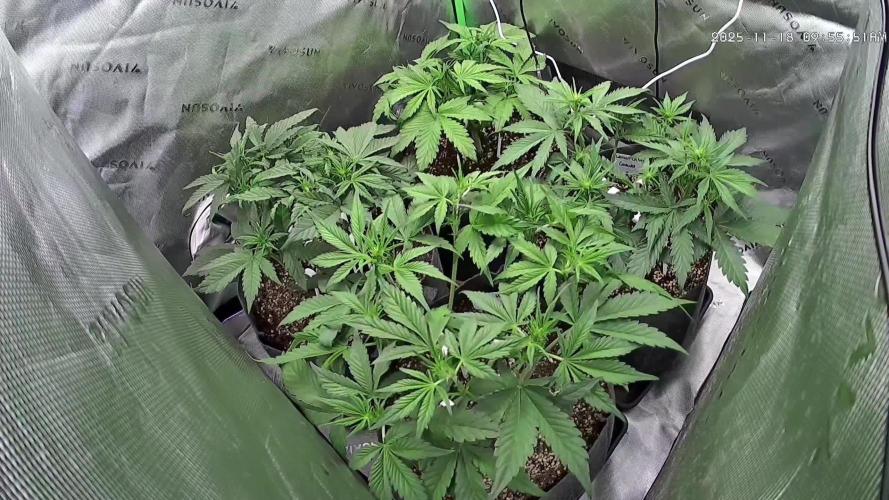
Day 87 for the 54 plant grow. 42 different strains of photoperiods and 12 different autoflower strains in the:
8X8 GROW TENT WITH THE NEW FC-E6500, FC4800 AND TSW2000 AND THE NEW 5X5 GROW TENT WITH A TSW2000 👍and they are being fed GREEN BUZZ LIQUIDS all organic/vegan fertilizers🤘.
I only pinched the tops on 2 or 3 plants but I defoliated every plant ALOT. it slowed the vertical growth alot but it's exactly what I wanted. I can keep track of the plant sizes, how they grew, how healthy they were, how easy they were to grow and how good the final product is👍
ALL THE AUTOFLOWERS ARE CHOPPED.
The girls are loving their MARS MANSION and WITH THE 5X5 INLAW SUITE and everything is doing good and looking nice and getting bigger👍 lots of hairs clumping up now and they are all getting nice and frosty and starting to stink ALOT. MARS HYDRO ALWAYS GETS EM FROSTY👍.I AM NEVER DISAPPOINTED With how awesome these lights are🤘. KEEP KILLING IT MARS🤘👏👏
BREEDERS AND SEEDS:
DIVINE SEEDS:
MAZAR, OPIUM, WHITE WIDOW, OG KUSH, PABLO ESCOBAR, DIVINE INDICA.
AUTO WHITE WIDOW
AUTO PABLO ESCOBAR
AUTO WHITE RUSSIAN
AUTO FRACTAL
AUTO MONTREAL
AUTO OPIUM
AUTO KABUL
AUTO MAZAR.
WEEDSEED EXPRESS:
GREEN CRACK, GHOST TRAIN HAZE, LITHIUM OG, CHEESE.
DOCTORS CHOICE:
DC KUSH, AUTO NIAGARA, AUTO ROCK MACHINE.
EXOTIC SEEDS:
HIPPIE BERRY, MALASANA GELATO, EXOTIC ANIMAL.
GENE/MEME SEEDS:
BLACK HELL.
ORIGINAL SENSIBLE SEEDS:
PURPLE PUNCH COOKIES, WEDDING CAKE, PURE KUSH, GORILLA COOKIES.
SWEET SEEDS:
BLACK JACK, GORILLA GIRL, SWEET ZKITTLES.
EMERALD TRIANGLE SEEDS:
GORILLA GLUE, MASTODON KUSH.
SEEDSMAN SEEDS:
BLACK SUGAR, PEYOTE FORUM, PEYOTE WIFI, BADAZZ COOKIES OG, PURPLE GHOST CANDY, STRAWBERRY BANANA GRAPE, L.A. PEYOTE KUSH, PEYOTE WIFI CBD, FUEL DOG, CRITICAL PURPLE KUSH.
AMSTERDAM MARIJUANA SEEDS:
GIRL SCOUT COOKIES EXTREME, GREEN CRACK.
QUEBEC CANNABIS SEEDS:
BRUCE BANNER, GREEN CRACK, QUEBEC CBD 20:1.
I 💚 GROWING MARIJUANA:
SKYWALKER OG, BANANA KUSH, BLUEBERRY CBD.
FOR EVERYTHING MARS HYDRO VISIT:
www.mars-hydro.com
www.marshydroled.ca
PROMO CODE: rocknroll
VISIT THE ALIEXPRESS STORE:
@marshydro_aliexpress
Instagram: @marshydropenny
https://youtube.com/channel/UChU5ZWwNi-DvnO3oWVU3ceA
https://greenbuzzliquids.com/
#greenbuzzliquids
@GreenBuzzLiquids
https://greenbuzzliquids.com/en/shop/
PROMO CODE: rocknroll
https://www.youtube.com/watch?v=8hEqyS1jPpI
https://growdiaries.com/diaries/112437-grow-journal-by-rock-n-roll-randy/week/593118
Thanks for taking the time to read and check out my diary🤜🤛
FC-E6500 LED GROW LIGHT:
FC-E6500 grow light with 3978pcs OSRAM BridgeLux Diodes & Moso Driver, market-leading PPF 2.7 µmol/J, Max 2.5g yield/watt with 30% higher Average PPE, more cost-effective when compared to same style type lights. Only consumes 650W, perfectly cover 5x5ft (personal), 4x4ft (commercial) grow space. Innovative Precise Uniform Lighting-Built-in removable bars interval & dimmability enable the exact & dynamic PPFD control over each of the plant growing stages, FC-E6500 detachable bars deliverSuperior Heat Dissipation: Real Aluminum heatsink together with 6 slim profile passive cooled bars (THINNER & LARGER surface) and detachable Meanwell Driver, create less heat. save 50% hydro than other old grow lights! Driver can be mounted remotely on the side of a grow tent/rack or on an adjacent wall to remove heat from grow space. Full Spectrum UV IR LED: With Yield Max spectrum (660nm Osram enhanced Deep Red,2800k-5000k,730-740nm IR,380-410nm UV LEDs), Average PPFD the FC-E6500 LED grow lamp enables cultivators to produce BIG FAT Dense Buds, perfect for full-cycle hydroponic, soil, grow tent/grow room.
Dimmable Commercial Grow Light: Cost-efficient, easy dimming & daisy chain With a max up to 20 lights, IP65 Waterproof, master light easily controls the rest. Perfect for commercial & home horticulture.
FC4800 LED GROW LIGHT:
GET THE MAX FROM MARS👍: Welcome one of the newest members of the Mars Hydro family🤜🤛🤘. The Mars Hydro FC 4800 480W LED Grow Light can accommodate up to a 4' x 4' area for flowering. It has OVER 2000 LED chips consisting of the best selling Samsung LM301B diodes which has a Luminous Efficacy of: 220 lm/W
0.2 W, 3 V mid power,
Osram 660nm Diodes, Infrared light and UV LIGHT👍. It boasts the incredible efficiency of 2.8 µmol/J, maximum 2.5gram yield per watt with 30% higher Average PPFD. This High-intensity spectrum is beneficial for plants at all stages - from veg to bloom, and creates Big dense Buds👍. achieve 50% higher yields & quality compared with the old lights! Only consumes 480W for 4x4ft personal grows, and 3x3ft for commerical grow. It comes with a dimmer and daisy chain function with a maximum of up to 15 lights, the master light controls the rest👍. Wide 6-bar design offers even & wide canopy coverage and can maximizes your grow space. slim 180° FOLDABLE DESIGN... YES I SAID FOLDABLE🤘🤣 , making it compact and easy to install, it's IP65 WATERPROOF and will give you no worries while growing in a humid environment and makes it a flexible high performance commercial grow light for enormous SUPER FROSTY yields.😛😛😛. MARS GETS EM FROSTY BOYS👍
AWESOME HEAT DISSIPATION: The Low energy consumption FC4800 growing light has 6 passive-cooled bars and an aluminum heat-sink a removable driver you can upgrade later or have it outside your tent. with zero noise you can save up to 50% in your electricity bill compared to HID's or HPS lights!
It also has a removable driver so you can upgrade it in the future or have it outside your grow space for better heat control in your growroom👍
UPGRADED FULL SPECTRUM: Yield Max Spectrum with enhanced red (Top-Bin Samsung 3000k-5000knm, Osram 660nm Deep Red), speed up blooming & fruiting, perfectly suited for full-cycle growing. The FC4800 LED grow lamp was born for Big Buds, perfect for commercial, grow tent, grow room, hydroponics, and all soil grows.👍
THE BEST SAMSUNG DIODES: THE FC4800 has Top Bin genuine Samsung Osram Diodes, combined with remarkable 2.8 µmol/J Efficacy, 30% higher Average PPFD, 50% less energy consumption, to maximize your yields. They give you a TRUSTED 3 years warranty 100% Satisfactory guaranteed!!!
X2 TSW2000 LED GROW LIGHT:
INCREASE YIELD AND CROP QUALITY WITH MARS HYDRO LED GROW LIGHTS: NEWEST SMD LED technology provides the highest PAR/LUMEN output (1122umol@18") and can make you get 30% higher yield compared to OLD blurple led lights. Max 2.5g yield per wattage and achieve maximum quality and quantity, much better than traditional HPS grow systems
LOW ENERGY CONSUMPTION LED GROW LIGHT: Consuming only 300W true output with 684 LEDS! It saves up to 50% energy than other led grow lights. Perfect for 3.5x3.5ft bloom stage, 4x4ft veg stage. Over 90% light energy can be absorbed by plants, it will have higher intensity in a MARS HYDRO grow tent with diamond design mylar, or by crossing over using multiple TSW2000
HIGH EFFICIENCY FULL SPECTRUM INDOOR GROW: 3000K 5000K and IR 660nm 760nm RED, makes it close to natural light, highly engineered to provide improved growing performance for plants at all stages of growing, rapid plant response from seed to flower; Uniform and wide-beam light distribution for your plant's optimal growth
8x8 GROW TENT:
The MARS HYDRO 8x8 Grow Tent interior is made of a unique diamond design mylar which is highly reflective. (Other companies mylar and reflective rate is as low as 50%, and it won't provide efficient light. They use thick 1680D oxford canvas, and being double stitched, it is tear proof and perfect for locking in the light. Their grow tent keeps 100% of the light inside the tent and helps your plants absorb more light. EXTRA-THICK material means No light leaks or rips at all.👍
Strong Stable metal corner adapters and poles are the trustful supporters of the tent. It's very sturdy, neither rusting or paint flaking off. quick and easy tool-free setup. They use heavy-duty metal zippers, with double layer black lining, by far the best on the market which creates a light-proof seal.
5X5 GROW TENT AND TSW2000
TSW2000 LED GROW LIGHT:
INCREASE YIELD AND CROP QUALITY WITH MARS HYDRO LED GROW LIGHTS: NEWEST SMD LED technology provides the highest PAR/LUMEN output (1122umol@18") and can make you get 30% higher yield compared to OLD blurple led lights. Max 2.5g yield per wattage and achieve maximum quality and quantity, much better than traditional HPS grow systems
LOW ENERGY CONSUMPTION LED GROW LIGHT: Consuming only 300W true output with 684 LEDS! It saves up to 50% energy than other led grow lights. Perfect for 3.5x3.5ft bloom stage, 4x4ft veg stage. Over 90% light energy can be absorbed by plants, it will have higher intensity in a MARS HYDRO grow tent with diamond design mylar, or by crossing over using multiple TSW2000
HIGH EFFICIENCY FULL SPECTRUM INDOOR GROW: 3000K 5000K and IR 660nm 760nm RED, makes it close to natural light, highly engineered to provide improved growing performance for plants at all stages of growing, rapid plant response from seed to flower; Uniform and wide-beam light distribution for your plant's optimal growth
5x5 GROW TENT
LOCK ALL LIGHT INSIDE MARS HYDRO Indoor Grow Tent interior is made of diamond mylar which is highly reflective. (Other brand's mylar and reflective rate is as low as 50%, won't provide efficient light. )MARS HYDRO 1680D canvas, being double stitched, it is tear proof and has perfect light locking. Mars Hydro's grow tent keeps 100% lighting beams inside and helps your plant absorb more lights. EXTRA-THICK --No light leaks or rips at all
DURABILITY GROW TENT Stable metal corner adapters and poles are the trustful supporters of the tent, standing sturdy, neither rusting nor paint-falling, quick easy tool-free installation. Mars Hydro's heavy-duty metal zippers, with double layer black lining, are the best on the market which create a light-proof seal
EASY OBSERVATION FOR YOUR PLANTS. Special observation windows are made by double layers of cloth. Observe the growing conditions of your plants without opening the tent and avoid disturbing plants. The observation window also serves to dissipate heat and ventilate air
FOR EVERYTHING MARS HYDRO:
www.mars-hydro.com
www.marshydroled.ca
PROMO CODE: rocknroll
Instagram: @marshydropenny
VISIT THE MARS HYDRO STORE:
@marshydro_aliexpress2
https://growdiaries.com/grower/rock-n-roll-randy
https://greenbuzzliquids.com/
#greenbuzzliquids
@GreenBuzzLiquids
https://greenbuzzliquids.com/en/shop/
PROMO CODE: rocknroll
https://growdiaries.com/diaries/112437-grow-journal-by-rock-n-roll-randy/week/593118
Likes
5
Share


@Eljardindemargarita_grower
Follow
Buenas
Aquí en la 5 semana de flora
Las peques , van tirando y poco a poco vamos viendo cómo finalizan
No le cogí bien el punto a esta gama de nutrientes , van llegando algo justas a esta etapa
Ya tan solo iremos viendo , que amarillean bastante , pero bueno , no pasa nada , tendremos ,si todo acaba bien , buena cosecha ...
Mil gracias un saludo
Hoy os dejo un vídeo , que por cierto ,está también en mi perfil de YouTube...no dudéis en hecharles el vistazo
Mil gracias

Likes
4
Share


@Kominest
Follow
So this week I decided to defoliate and lollipop . I wanted to wait like atleast some more days but I got bit worried they get to bushy and crowded and now I still have the same feeling afterwards but it looks a bit better to me . Next week I will add some bloom booster with every watering . I removed my humidifier now and think about some more and heavier defoliation and lollipopping but I will let them relax now . Super silver haze is stacking up insane while orange bud is forming some more pine like buds I’d say at this point . No big smells except the classic weed smell coming from the super silver haze . She’s qualifying for a solo grow for the next time for me like the gorilla cookies from fast buds wich I also liked a lot


Likes
15
Share


@Growshh
Follow
The smell is amazing and the swelling even better! Gonna taper the nutes off and wait for them to finish...


Likes
40
Share


@MrJones
Follow
47th Parallel Crowly's Comet
🔹⊱╮🔹╰⊰🔹 GROW Started 03.10.24 INFORMATION 🔹╰⊰´🔹⊱╮🔹
🌞Environment - Maintaining 80F and 65%Humidity
🌾Training - Nothing this week, just letting the flowers stack up; they are getting fat, sticky, and stinky!
⚱️3-Gallon 📊6.2 PH
💧 Feeding - Using Horti Grow 8-11-21, Bloom 5-15-26, Late Bloom 0-24-26, Cal 12-0-0
🌞Medic Grow Smart 8 760 Watts
🕷️ IPM - CannControl from Mammoth and Mosquito Bits as needed
🔹⊱╮🔹╰⊰🔹 PLANT UPDATES 🔹╰⊰´🔹⊱╮🔹
📝 On 05.11.24, This week, we are on Auto-Pilot and just Fertigating as needed; the ladies are stacking up nicely. I am surprised, but they are looking great!
📝Fertigation injects fertilizers into an irrigation system to supply dissolved nutrients to crops.
🗓️05.11.24 Just feeding daily, sometimes twice; today, fed with Hort-Bloom @ 2.7 GRMS Per Gal and Horti-Cal @ 2.5 GRMS Per Gal.
🗓️05.12.24 Just feeding daily, sometimes twice; today, fed with Hort-Bloom @ 2.7 GRMS Per Gal and Horti-Cal @ 2.5 GRMS Per Gal.
🗓️05.13.24 Just feeding daily, sometimes twice; today, fed with Hort-Bloom @ 2.7 GRMS Per Gal and Horti-Cal @ 2.5 GRMS Per Gal.
🗓️05.14.24 Just feeding daily, sometimes twice; today, fed with Hort-Bloom @ 2.7 GRMS Per Gal and Horti-Cal @ 2.5 GRMS Per Gal.
🗓️05.15.24 Just feeding daily, sometimes twice; today, fed with Hort-Bloom @ 2.7 GRMS Per Gal and Horti-Cal @ 2.5 GRMS Per Gal.
🗓️05.16.24 Just feeding daily, sometimes twice; today, fed with Hort-Bloom @ 2.7 GRMS Per Gal and Horti-Cal @ 2.5 GRMS Per Gal.
🗓️05.17.24 Just feeding daily, sometimes twice; today, fed with Hort-Bloom @ 2.7 GRMS Per Gal and Horti-Cal @ 2.5 GRMS Per Gal.
╰⊰🔹╰⊰´🔹⊱╮🔹╰⊰🔹╰⊰🔹STRAIN INFORMATION🔹⊱╮🔹╰⊰🔹╰⊰🔹╰⊰🔹⊱╮
Crowley's Comet / https://www.47thgenetics.com/product-page/crowley-s-comet-10-fem-birdseeds
It's everyone's favorite piece of space rock, Crowley's Comet! The culmination of reversing our Matterhorn cut off Mr. Crowley to Intergalactic Runtz, and the results were out of this world (I had to do it). These ladies were slow to start, but once they hit their stride, they put any worries we had to rest. Compact, short-framed, and robust. They pack beautifully boulder-like flowers that reek of garlic and sickly sweet cotton candy. Dark green to a mosaic of purples, yellows, and silvers. Frost production is off the charts, the internode spacing is tight, and they certainly will impress in their last few weeks of flower. This is one of our favorite crosses in the new fem lineup. If you're looking for your hype fix, here you go.
Yield: Heavy to XL
Flower Time: 63 days
Feeding Schedule: Heavy
Likes
72
Share


@Natrona
Follow
Welcome to week 9. 7/2 today I defoiliated some damaged leaves from Gaia and Circe trying to make them look presentable. The lock out has done damage last will last until they are harvested.
Last week was flushing every 2 days with 2 gallons of water for each plant in the tent. PH of the soil is down from 8 .2 to 7.2 not so alkaline.
7/3 water feed and some pics. I made 4 gallon fertilizer solutions using
TPS1 fertilizer 10ml per gal. I made 1/2 strength at total 22,5ml
Signal 1ml per gal. Total 2.5ml
Ppm total 620
After I fed 4 liters each I followed 3 hours later to test the run off.
Cream caramel Ec .99 ppm 690 ph 5.95 runoff 2 ltr in drip pan
Gaia EC .88 ppm 620 ph 6.82 run off 2.5 ltr
Circe Ec 1.30 ppm 910 ph 6.16 runoff .75 ltr
7/4 reduced light schedule to 15 hrs from 18 hrs.
7/5 flushed all with 2 gal each
7/6 cream Caramel is showing lockout now too😨 even with flushing.
7/7 more flushing.
Last week I mentioned books that I've read that influenced my thoughts, beliefs and how I see the world. I grew up in the 1970s, ( my formative years) in Tidewater Virginia, situated on the Atlantic Ocean. Friends and I went to the beach, not for fun in the sun but to go to the A.R.E. The ARE is Edgar Cayce's, Association for Research and Enlightenment and the Heritage store which was a new age metaphysical crystal shop with crystals, stones, meditation, and yoga classes. I scoured old bookstores looking for books written on spiritualism, psychology, alternative religions, old doctor books, etc. My desire to be a healing practitioner stems from my books from Jeanne Rose in 1970s. She is the first herbal medicine woman in modern times. Florence Scovel Shinn, metaphysician, lecturer, artist- The Game of Life and others written in 1925. Edgar Cayce's trance readings. The older books are out of print but may still be found. There is a River is Edgar Cayce's life story. Hidden Life of Trees is a must read. It explains connectedness.
Interestingly, my great uncle, in his writings (above) references the spiritual laws written in the books mentioned above. From various religious scriptures, the existence of personal behavioral laws, as I would describe as code of honor, as indicated are the ways to true Peace. Throughout my generations the search for spiritual truths have fallen outside the realm of traditional religious formation. From the spiritual sense, I have emerged full circle.
grandparents' and parents' lifetimes, there were world wars. Everyone had a focus on world peace. Mucha's quote on week 8 emphasizes the need to build bridges, to achieve peace.
Sadly, I remember watching the Vietnam War on the news when I was growing up.
Well I started college with dream of becoming a doctor, but changed to business and accounting. During my college years, I worked part time jobs in a stock brokerage firm and jewelry store. From that point on I loved nice jewelry and desired the unusual gemstones that were mentioned by Edgar Cayce. Eventually I started my career in Accounting working in in hospitals, banking and finally in local and state government and higher education. In my late 30's having a midlife crisis, I felt that I really belonged in as a healer. I considered homeopathic school but my daughter was recently born. I did not want to travel to New York and be away from my family. An opportunity missed. My words of wisdom: If you have strong feelings in your gut, the little voice in your heart tells you that "this", what ever this represents to you, is your path. Follow your dream. My gut still gnaws at me.
I graduated with a BS in accounting with a minor in psychology, continues my education thru MBA. My entire career was in accounting and finance. My last position was the Director of Financial Reporting and Revenue. I was happy, loved my job, I had a great staff. My plan was to work until I was 70 as I have good genes for longevity. Cancer changed that. The focus of oncologists is to check the cancer free box at 5 years. I'm working on cleaning up the aftermath of the storm. Yeah, my hormones are still wrecked. Ladies and Gentlemen, tell all the females you know, never take hormone replacement therapy. Try acupuncture, herbal teas, deep breathing.

Processing
Likes
26
Share


@Hawkbo
Follow
Got these transplanted to the rain science 3 gal bags and moved to a 4x4 in the basement where it's a little better environment in terms of vpd. I had a full bag of roots organic soil so I decided to do a soil/coco blend like I did with the current autoflower crop. I also topped every single one of em mid week. Once I get the flower tent all cleaned out and everything I'll be throwing these in there for bloom. Hoping this will be an even better grow than the last since I have both my arms back. I'm doing the update a little early since I was late on it last week, today (tuesday 9.10.19) is day 43 from germination and about day 39 from full sprout. Before this week they were under only about 185w in a 4x4 area so it's been slow growth so far.
These are doing solid, some are a little small and bushy like the purple candy paint and the rocstar breath but not that they have some room to grow maybe theyll pick it up.
Likes
1
Share

@Olduffybastard88
Follow
Greenhouse is reallt heating up goong select some for outdoor growing some for inside tbe mars hydro tent and light and some to finsh in the greenhouse so we will have the best of all worlds and will see witch ones prefrom best

Likes
2
Share


@CogordoAcuatico
Follow
Cosecha finalizada, fue una de las mejores plantas que e tenido, su aroma fuerte a menta y pegamento invadió toda mi casa, ni hablar del tamaño mounstruoso
Likes
11
Share

@ShinWeed
Follow
Vorwort:
Die Bilder dieser Woche sind leider nichts Besonderes geworden. Hab vergessen während des Gießens vergessen zu knipsen, und die Aufnahmen danach sind sehr schwach. Trotzdem dokumentiere ich sie, was wichtig ist.
🌿 Tag 29-35 - Lichtflut, Höhenflüge und erste süße Düfte
Ich, Banana Purple Punch, bin diese Woche förmlich explodiert. Jeden Morgen war ich ein Stück höher, als hätte mich über Nacht jemand heimlich auseinandergezogen. Das Licht bei 100 Prozent hat mich wachgeküsst und irgendwie konnte ich dann nicht mehr aufhören. Meine Triebe arbeiten hart, meine Energien schießen überall hin. Ich weiß, der Gärtner schaut schon kritisch nach oben. Vielleicht beruhige ich mich bald. Vielleicht auch erst später. 🍌
Ich, Purple Haze, strecke mich nur so weit, wie es Sinn ergibt. Nicht zu viel, nicht zu wenig. Meine Höhe passt, meine Breite trägt mich gut. Keine Rennen, keine Dramen, nur ein ruhiger Übergang. Die Energie fühlt sich stabil an, ausgeglichen. Genau mein Ding.
Wir beiden Lemon Cherry Cookies erleben gerade zwei völlig verschiedene Wochen.
Ich, die Schnellere, fühle mich wie auf einem Marathonstartpunkt. Die Blüten schieben kräftig, weiß und deutlich. Mein Inneres summt, als hätte ich endlich begriffen, wohin die Reise geht. Licht, Wasser und Raum greifen perfekt ineinander.
Und ich, die Gemütlichere, nehme das alles Schritt für Schritt. Warum rennen, wenn man auch sauber arbeiten kann? Meine Spitzen zeigen Blüte, aber ganz kontrolliert. Ich schaue mir alles erst einmal an und wähle meinen eigenen Rhythmus. 🍋🍒
Tag 34: Die ersten Düfte werden spürbar, zart und frisch.
Tag 35: 4 Liter Wasser. Der Boden dankt es, wir auch.
Die Woche war hell, laut und voller Bewegung. Jede von uns reagiert anders, jede setzt ihren eigenen Akzent. Die Blüte hat angefangen zu sprechen, noch leise, aber unverkennbar.
Likes
3
Share


@Therbalist
Follow
Found 14 zkittles seeds in the big tasty one. 12 chocolate skunk seeds also.
Buds looking terrible flushing at the minute to see if I can pluck some for hash or smoke possibly.
Tops are going crazy on most plants growing fast!
Will be making my own STS solution to use on most females. Really happy with the strains I've got gonna try and bank them all!

Likes
11
Share


@tangie
Follow
Chopped her two days into week 14.
What else. Buds. There are a lot of them. And they are quite large. And they look like they will require little effort to trim.
What more can I wish for? I am a very happy man.
Upd 1: Trimming is SO SIMPLE! Not much sticking out to begin with, because of the amazing bud structure and me plucking most bud node fans. Solid nugs which are not bothered by anything, so pulling smaller sub-bud fans is very simple too, while the buds are what I would call moist. I'll call this Moist Trim 😄
✂️✂️✂️ Went for the best trimming tools available on the market (well at least my research concluded so) and LOVING every minute of trimming with the B-500SRF. Why would I or anyone else use something less suitable or less comfortable for such a delicate and long job is beyond me, except if you cannot afford one right now, in which case I wish you to experience it one day.
Fiskars are also very good in therms of the blades, coating and cutting ability and precision, but the spring is just too stiff, like way, way to stiff for something that is to be used for hours on end. One might argue that such spring force helps overcome resin buildup, but please just rinse your instrument regularly in an appropriate solvent (ethy, iso, whatever — consider you instrument materials as well) and wipe it after. Why would you let significant amounts of resin to accumulate on such a gentle and precise tool? Kinda defeats the purpose?

Likes
42
Share


@Theia
Follow
Sad news. Due to no fault but my own the sherberts were subjected to some very badly managed environmental factors.
I have been busy building our new grow space and was not checking the plants at the back of the space. The 2 sherberts were there at the back and the RH went on a roller coaster over 4 days with temps swinging massively also due to an unmanaged dehumidifier.. the end result was both sherberts stressed out and grew some pollen sacs and I did not see so the burst and pollinated my entire flower room.
Gutted. But I will push through the last few weeks of flower with all the current grows and see what we get.
I had to chop alot of lower bud. Sacs had burst so I just did a very have clear.
Have I mentioned I'm gutted. And this is not a reflection of weedseedsexpress genetics. I have looked at the data logs for last 9 days and it's so up and down with rh and temp it's no wonder they stressed. Next round less plants and I have to stop with the clones.. no room.
Thanks for looking.
Stay safe😷
Happy grows.🌱🌱


Likes
10
Share


@Ieiogrow94
Follow
Eccoci qui...
Finalmente dopo uno stop per il lavoro torno ad aggiornare il diario con il capitolo finale...
Su questa genetica ho voluto mettere de bimbe e sono rimasto veramente strabiliato dalla stabilità e similarità che hanno avuto tra di loro, le cime sono di un altro pianeta con questi pistilli che esplodono formandone altri in maniera verticale davvero molto bella!!
Grazie ad Anesia Seed e ad Xpertnutrients per la collab e a tutti per il supporto🔥🌲❤️
NE VERRANNO DELLE BELLE