
Likes
Comments
Share


@CanadianFillmore
Follow
End of week 9 flush week, cut the blueberry ladies and put them in the mesh drying rack. Will update in 2 weeks with first smoke and dry weight, assuming she's dry in 2 weeks.
Flush week for the Super Lemon Haze, she'll get chopped this coming Sunday.

Likes
18
Share


@Cockneycultivar
Follow
This week she’s smelling so peng. Literally cannot wait to taste her. I haven’t got a x30 loop eye piece so can’t check the trichomes proper but she looks nearly done. The thc is still milky from what I can see and most hairs are nearly all orange now. I’m flushing her every 3/4 days pure water now from the tap. Leaving her to dry in between last Run off at 378 which is pretty normal for my tap water. Biggest cola at 16.5cm circumference now. So looking forward to giving her the chop. Although She had been showing signs of stress throughout the grow it seems like nothing can stop the hulkberry from yielding a good harvest. Unbelievable I’ll be growing this in again for sure.

Likes
7
Share


@Organic_G
Follow
Ein wunderbarer aber auch anstrengender Grow geht zu Ende. Erstes Mainlining, erste Photoperiodische im Zelt…
Qualität, Resistenz, Geschmack 🤩super
Habe bisher nur einen geraucht, THC hat mich gut weggehauen, hätte ich selbst nicht gedacht
Likes
28
Share


@MadeInGermany
Follow
Hey everyone :-).
This week she continued to develop very nicely 😍.
I started with topping 😊.
The training took it very well and after 1-2 days it grew again immediately 👍.
I decide spontaneously how often I will train it 👍.
It was poured once this week with 1.2 l.
Otherwise there is nothing to report this week.
I wish you all a lot of fun until the next update. stay healthy and let it grow 😀
You can buy this Strain at :
https://www.royalqueenseeds.de/feminisierte-hanfsamen/115-amnesia-haze.html
Type:
Amnesia Haze
☝️🏼
Genetics:
Original Amnesia Haze
👍
Vega lamp:
2 x Todogrow Led
Quantum Board 100 W
💡
Bloom Lamp :
2 x Todogrow Led
Cxb 3590 COB 3500 K 205W
💡💡☝️🏼
Soil :
Canna Coco Professional +
☝️🏼
Fertilizer:
Green House Powder Feeding
☝️🏼🌱
Water:
Osmosis water mixed with normal water (24 hours stale that the chlorine evaporates) to 0.2 EC. Add Cal / Mag to 0.4 Ec Ph with Organic Ph - to 5.5 - 5.8 .
Likes
Comments
Share

@BLAZED
Follow
Week 3 (27-11 to 3-12)
What's good everyone?
We started this week off with removing the 2 bottom shoots.
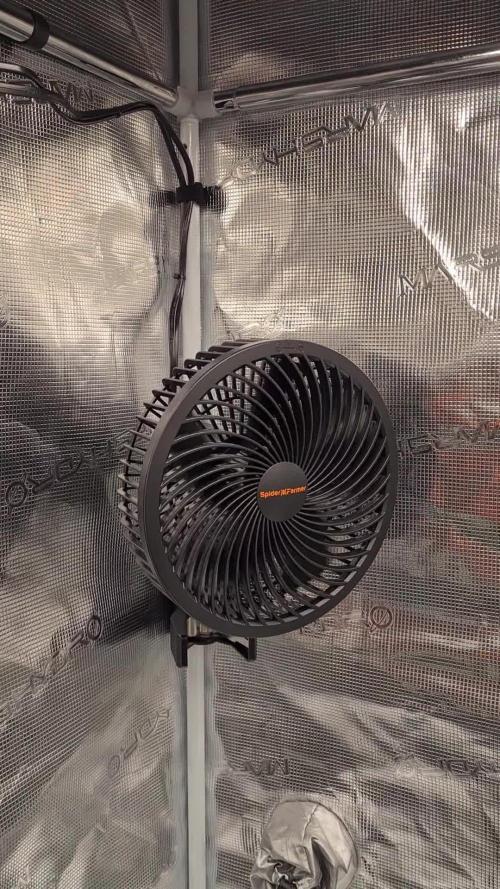
The next day Santa came early 😁 Got 2 new clip fans and the AC5 Power strip from Spider Farmer.
The power strip has 5 outlets you can control in the app, they can be turned on based on a time cycle, humidity or temps.
It comes with a sensor that monitors light, temperature, and humidity.
And a soil sensor that monitors soil moisture (VWC), temperature, and electrical conductivity (EC).
It also has a light adapter to connect 2 lights, that can be controlled in the app aswell.
The app shows the current VPD, i try to keep this around 1.0
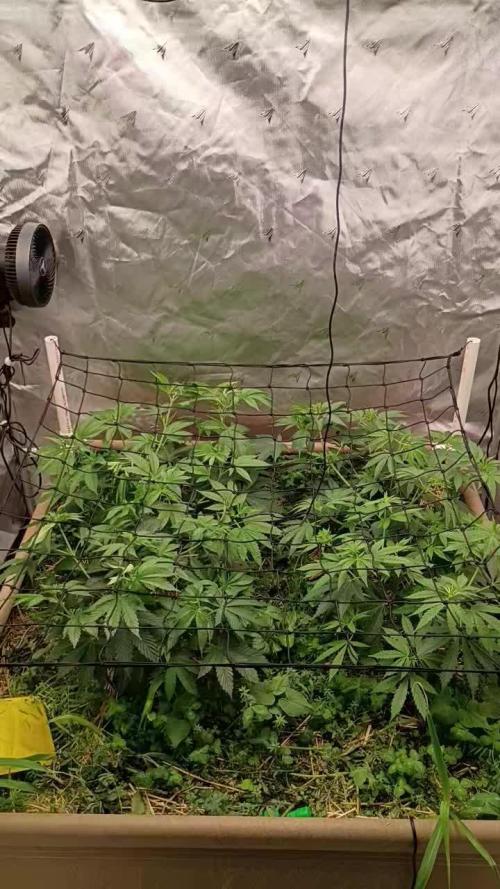
In the middle of the week we topped her aswell.
The next day we increased the light intensity from 30% to 35%.
LUX: 13.000/13.500 to LUX: 15.000/15.500
This week's growing conditions were 17.9°C to 22.4°C with a humidity of 55.5% to 67.6% and watered 2 times with 0.5L.
See you next week!


Processing
Likes
41
Share


@FrostyGardens
Follow
11/03/18
Everything is going well. No issues at all. Plucking a leaf here n there but no real defoilation. Between the Black Magic Soil, and AACT this run has been smooth sailing no deficiencies or leaf damage at all. Humidity still cranked up to make up for the lack of humidity in veg. Will reduce over the next few weeks.
11/05/18
Decided to defoilate today. The plants always look sad to me and I feel bad. They always recover though and come back better then ever!

Likes
2
Share

@Bear_Grows_Green
Follow
12/25 Merry Xmas. The ladies got a priming light feed this morning to get ready to clone in 2 days. Watered on 3 gallons plain water and 3 gallons of the mix the bed was thirsty
12/26 got a priming foliar feed. Very light.
12/27 took all the tops as cuttings for clones
12/29 watered in 3 gallons plain water and 3 gallons of full supplemental feed.
12/30 added trellis light training
Likes
16
Share


@PigBearMan
Follow
Hello.
All photos from flower day 6.
On flower day 3 I switched the Sanlights up to 80%.
On flower day 6 I sprayed the plants with Spruzit, to prevent any kind of insects.
As you can see everything is okay besides that algae but nothing too bad so far. All under control.
See you next week. ✌️


Likes
6
Share


@underfunded
Follow
gave my last feed day 66. flushing from day 68 through the end! thinking shell be down on day 75

Likes
41
Share


@HollowSource
Follow
So the second week begins for this lady. She is growing well and has been moved to her penultimate pot and has exploded since being transplanted! She was fed a half dose of Big Bloom to see how she would respond and seemed to have no issues with it. Im hoping she starts to catch up with the others! She has a curl to her first set of leaves (?) but otherwise looks real healthy.


Likes
28
Share


@MrGrowthSpurt
Follow
What's up Growmies🤟🏽. Week # 8 is in the books🙌🏾
Hello week #9💪🏾
I went a little overboard on pictures this week, they are so happy and healthy that I got carried away. I know we are supposed to post pictures with the lights off, however it's something about the contrast it gives with the lights on that makes it look sexy to me😁.
I have had to tie the stalks of both White LSD plants due to heavy sagging. I'm noticing with this strain the stalks seem to topple over even though the buds are far from fully developed. A trellis net probably would be ideal however I hate them. They are easy to put on but very difficult to take off come harvest. I use garden wire and string them as if they are puppets being controlled by the puppet master🤪.
I continue my feeding schedule with the recommended "bloom" concoction using general hydroponics Flora series trio. I give them 1 liter every 3 days. I have them on a 2 to 2 cycle (feed them twice with nutes and then twice with plan water) I keep the p.h. around 6.1 to 6.6.
Temps and humidity are in the perfect range I'm enjoying it while it last because spring and summer in VA makes it difficult to keep the humidity in check.
All in all everything is going well for me and my ladies. I hope the same for all of you.
Until next week my friends Happy Growing 🤟🏽 and may the grow goddesses bless you all with a bountiful harvest 💪🏾

Likes
11
Share


@ChunkeyMunkey420
Follow
Knats finally seem to be on the way out. Buds developing nicely.


Likes
12
Share


@Rodamis_Prime
Follow
The light has been turned down to 50% for the last week and now She's on her last week of flushing and and starting to get alot of yellowing on the leaves . The bud has frosted up pretty nice now . The buds are rock hard and I am hoping after drying that it will still have alot of weight to it . Not a huge amount of smell to this plant even late in flower. It smells very earthy when you open the tent up but if you touch a bud it smells like lemon citrus with a very strong fuel smell . But it really smells tasty 😋. The next 3 waterings will have a cleanse added to the water I just really want to make sure it's as clean as I can get it since it is my first harvest and I dont want to fail lol . Can't wait to smoke my own weed lol .


Likes
422
Share


@Crashoverite
Follow
Hi all 🧑🌾
Welcome to my 🍌💜👊 week update.
Hope everyone keeping well and having a good week.
Thank you so much for your support on this bananas journey 💜💚💜💚
I am so happy to see how girls are developing in recent days. It's seems that Athena finally stopped her stretch and hoping that Xena will follow her sister very soon. Buds are gaining weight and size rapidly. Lots of nice colours and tonnes of trichomes on those buds already.
Week 10
Dec 18-24
Dec 18-19
Mainly observation. Xena is still stretching like crazy. both girls are developing beautifully.
Dec 20
First watering for this week. 7.5 ltr beetwen both. Runoffs PH's Athena 6.2 Xena 6.3.
Dec 21
Due to lack of light at lower parts of conopy decided for another selective defoliation, lowered a bit tallest branches with colas dangerously close to light by tieing them to netting. Couple cm will make a huge difference here. Could not clear well at the back wall of the cabinet due to limited access.I'm very happy with final result.
Dec 22-23
Joyful observation of my 🍌💜👊girls development 🧑🌾
Dec 24
All is looking great. It's seems that stretch is finally stopped. Girls looking healthy and happy.
Second watering for this week. 8 ltr beetwen both. Both runoffs PH 6.2.
It's the end of this week.
Happy Xmas everyone 🤶🎄❄️🎁☃️✌️💚🌲🎅🎄
Stay tuned for new week update ✨🍀✨✌️💚
Likes
42
Share


@SparkyGrow
Follow
So today’s the day I did my first weed harvest. Never thought I could feel such emotions over a plant but I’ve spent a lot of time with her over the last few months. Hopefully I’ve done her proud.
I planned on doing a dry trim so I took off all the bigger fan leaves to start. I noticed a lot of the fan leaves had some trichs around the base so I kept these. I don’t know if you would class them as sugar leaves but I am going to try and make some tea from them.
In my drying cabinet the average rh% is about 75 so I’m running a small dehumidifier which is bringing it down to about 65% which I think is a bit above the ideal. It’s been hot today and temp in cabinet is around 25 degrees C but due to be cooler from tomorrow.
Anyway I’m off for a cup of tea, I will update with effects and dry weights over the next few days.
Update**
So eddy 2 has been drying for 8 days, and she’s now trimmed and in jars.
To be honest I found her a pain in the ass to trim there was a lot of long spindly buds (I would say airy) so the trim pile is pretty big with a mix of sugar leaves and airy buds. It’s not a problem as I’m definitely going to make some edibles so it’s all good for that.
I’m still really pleased with the amount I got off of her and if her sister produces the same I will be over the moon!
Eddy 2 weights (harvest day 82)
Wet - 623g
Dry Buds - bang on 100g
Dry trim - 51g
Eddy 1 weights (harvested day 97)
Wet - 496g
Smoke Report;
Full disclosure I haven’t smoked weed for 20 years and even when I did it was only now and again at parties. I also don’t smoke. I’ve had anxiety and depression since I was a kid and I’ve been on all sorts of pills to try and help it. After doing some research on CBD and THC I thought I would give it a go! I’m also looking to cut down my alcohol intake and I’m really hoping this is a new way to relax and get that buzz on a Friday/Saturday night. I don’t want to smoke it so I’m going to get a dry herb vape I’m just waiting for it to be delivered.
So here goes:
The tea was a bust! Well unless you like lemony butter water. I don’t think there was anywhere near enough of the good stuff as I didn’t feel a thing.
Still no vape so I bought a cheap bong. FML I think I coughed up a lung 😂😂 definitely got a buzz but I couldn’t enjoy it as my fucking throat was on fire for hours!
STILL no vape so I made one. And that’s more like it. Tasty cool vapour and a nice relaxing buzz after. I didn’t have too much (about 3 hits) as I know I’m a lightweight. For the first 30 minutes or so I was light headed and happy (like after your first couple beers after a long day). Then I felt my body physically relaxing and I just chilled on the sofa for a couple hours watching tv. I went straight to sleep when I got to bed (which never happens) and I had a great nights sleep. Only downside was a headache in the morning but could put that down to many things and it was gone after a coffee
Likes
53
Share


@Roberts
Follow
Merlin Mintz is looking good. She is finishing up bulking. She will go to ph water in a few days for a flush. The next update will likely be the harvest. Everything has gone well. The colas have a nice color, and smell. Thank you Aeque Genetics, Spider Farmer, and Athena. 🤜🏻🤛🏻🌱🌱🌱
Thank you grow diaries community for the 👇likes👇, follows, comments, and subscriptions on my YouTube channel👇. ❄️🌱🍻
Happy Growing 🌱🌱🌱
https://youtube.com/channel/UCAhN7yRzWLpcaRHhMIQ7X4g
Likes
10
Share


@oldschoolS2
Follow
Hey bro's🤣
week 2 after flip stretching a lot already ,,950ppfd at 25 cm
next week we ll lollipop them and keep the feeding schedule ..
just trying bring humidity down at night cycle ..