The Grow Awards 2026 🏆 


Likes
Comments
Share
@CannaArchive
Follow
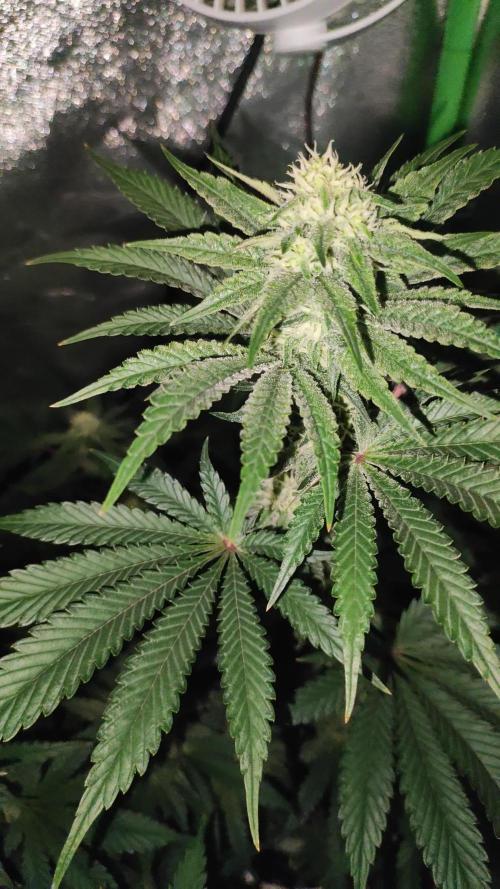
The plant is doing well overall this week! 💪
To handle a few fungus gnats that started showing up, I introduced nematodes into the soil and placed some yellow sticky traps, seems to be keeping things under control so far.
She's growing quite tall now, definitely stretching up nicely, but not really filling out much in width. A true lemony skyscraper in the tent!😂💚

Likes
13
Share
@WeR1plzBlve
Follow
Pre-flower time... Top dress feeding for the first time for this lady added with some worm casting. Switching lights to 12/12 in a few days, Monday but until then each day I'll decrease the lights. Other than that things have been super easy, once again she's strong. She's thick she's healthy she's happy. If I can count correctly I may have about 16 tops, so things will be clear later on In flower. We'll see the true tops. Plus she is putting off a really leafy greeny smell, if that makes any sense. Other than that looking good

Likes
7
Share
@HegauHillsFarmers_M11
Follow
Tag 70 - Beginn der 11 Woche.
Die Pflanze hat sich in dieser Woche gut erholt und die Blüten sehen super aus und riechen dazu noch Wahnsinn!
Ich glaube den pH-Wert zu senken war die richtige Entscheidung!
In dieser Woche habe ich aufgehört mit dem Dünger und habe begonnen die Pflanze zu spülen, dabei gebe ich 1,5 - 2ml/l Flawless Finish von Advanced Nutrients zum normalen Wasser hinzu. Die Pflanze wurde hier an Tag 70 bereits 4x mit Flawless Finish gegossen.
Ich gehe davon aus das ich im laufe dieser Woche ernten werde.

Likes
28
Share
@WEED_SPACE
Follow
Day 24
Watering 2L/plants, first watering 1L /plants, second watering 1L/plants and mix fertilizer 🌈
Day 27
Watering 2L/plants, first watering 1L /plants, second watering 500ml/plants and mix fertilizer, third watering 500ml/plants 🌈

Likes
13
Share
@Bncgrower
Follow
Week completed, these girls are developing great, the flowers already smell wonderful and are very resinous... Looking forward to the next few weeks.
Stay well! 💪🙏
Likes
12
Share
@Ace0411
Follow
Wassup fellas! Ita day 42, which means end of week 6! The plants are definitely healthy and love their 100% organic dieta day more than ferts, resin production is on point and so does the smell. They got dense enough, prolly this will be their lady week of swelling, and then it will be' pure ripening. Well, thanks as always for staying along with me in this journey and see y'all next week!


Likes
14
Share
@BOMbolenath
Follow
Very easy plant to harvest, didn't have too much leaves, so very easy to take out fan leaves and prepare to dry.
Likes
11
Share
@Ninjabuds
Follow
The Blackberry Moon Rocks are looking promising. One of them is growing into this beautiful little bush, and I think it's almost ready to harvest. The other plant is stacking up buds, but I'm thinking it's still a couple of weeks away.
The past few weeks have been so beautiful, watching the plants grow and change. It's amazing how something so small and fragile can turn into something so strong and vibrant. Now that they're getting ready to bloom, it feels a little bittersweet. I'm so excited to see the finished product, but I'll definitely miss having them around while they're growing.

Likes
150
Share
@FrenchxFarmer63
Follow
Bonjour à tous
Bon , la ça vas devenir intéressant , intéressant et compliqué à la foi pour que toutes ces futures belles tête puisse tenir dans la serre sans toucher les bâches 💪😁😁😁
Toutes ces demoiselles ce portent à merveille !!
Pour rappel ,
Arrosage 1 à 2 fois par semaine avec de grosse quantité d'eau + purin d'ortie
Ajout cette semaine de nouveau , fumier de vache
Ajout également de marc de café + BEAUCOUP de peau de banane effilé !!
Vous ne verrez pas apparaître la #Black Domina 0 car celle ci , étant trop grande à du être déplacé à l'extérieur de la serre. Je publierais de nouveau des photos dans quelques temps
Pour rappel , se trouve dans la serre :
Black do 7
Purple 6
Black do 5
Big bud 4
Big bud 3
Purple 2
Black domina 1
La près floraisons est toujours et toujours en cours... Je pense que le stretch de la près floraison est passé... À voir..
Affaire à suivre 🤝🙌🙌🙌

Likes
6
Share
@Sato_Growing
Follow
Going to add week comment soon cause i have a lot of work to dooo ! :P
You can understand i suppose happy new year with a lot of trimming job to do <3

Likes
2
Share
@Bornat1620
Follow
These are the last pics I have from the grow. There are 3 more from the police press release but I won't upload them here.
To sum up,
5x Big Bang on DWC(4 inside the 1.5x1.5, 1 inside the 0.6x0.6)
1x Gorilla Glue on DWC
1x Green Crack on DWC
4x Big Bang on soil
1x Green Crack on soil.
Out of 10 Big Bang seeds the 9 sprouted. (90% Rate)
3 Green Crack Seeds, the 2 sprouted
2 Gorilla Glue seeds, 1 sprouted.
total harvest is 113+72=185g from 2 Big Bang plants on DWC. The rest were never harvested.
I have to take note on the fact Big Bang could manage to carry its weight. Green Crack and Gorilla Glue had to be tied up cause they just couldn't manage it!. Good job on that GreenHouse Seeds.
The life lessons learned from this experience.
#1 : Do not bite off more than you can chew (or less is more)
#2: Do not trust anyone.
#3: Mother Nature gave us cannabis in rather low-THC content and sun for growing it. All the current strains and techniques of growing indoors are a product of human greed wanting more and more and more...I don't want to support this anymore, I'd rather stick to a few landrace seeds picked up from some old stoners and growing guerilla instead. Many might disagree with me on that, but come on guys, who can go against nature if not The One who gave it to us?

Processing
Likes
12
Share
@UK420hydrogrow
Follow
ok so the critical mass x 3 and white widdow x big bud x2 have really exploaded in the last week i can see such a big differnce in just a week of growth. so i decided to do the plants first toppings from 4th node with great results applied this technique along with some light lst training cant wait to see hows these plants progress through the veg cycle im lil worried i may end up having space issues whixh is why im thinking of moving the barnys farm lsd clones outside soon

Likes
25
Share
@Tetiana_Riz
Follow
The week has passed quite normally, and our girl continues to delight us with her growth. She has already grown by a whole 10 cm, and her leaves have become even wider and greener thanks to the Xpert Nutrients fertilizers that we use with pleasure.
However, we encountered some unpleasant situations related to Sensi Seeds. We reached out to them with an issue of seed germination, not only with Skunk but also with other strains from Sensi Seeds. We provided them with all the necessary information about the purchase, although the receipt was not saved due to various circumstances. But, to our great disappointment, Sensi Seeds denied us, citing the lack of a receipt. We provided them with the date and place of purchase, videos, and photos, but it was not enough.
Honestly, we feel deep disappointment from Sensi Seeds' attitude. We were ready to immerse ourselves in the world of their genetics, knowing that many legendary strains were bred from their seeds. But now we are disappointed not only with the quality of their product but also with the lack of honesty and support. We no longer want to have anything to do with Sensi Seeds and will seek other ways to fulfill our dreams.
People, please take a look at the photos and videos and share your opinion. Did I provide enough evidence to Sensi Seeds, or should I have provided a receipt as well? I believe that integrity should come first. Sensi Seeds, you have shown your lack of integrity. People, I appeal to you: no honest and self-respecting grower can stand aside. I ask each of you to voice your opinion.
Likes
12
Share
@Sieben
Follow
I got at least 2 vids this time , in the next week a lil bit more , i use the whole hesi nutrient pack btw and are really impressed what LED and a noob scrog grow results to , don´t get me wrong but its a huge difference to hps and some untopped plants under it ;) , happy about all feedback btw.
The small growing Orange Lemon in mid seems to have a lot more haze DNA .
Left Gran Jefa, right back Fullgas , right Front and mid Lemon Orange.
Likes
22
Share
@ButterfliesLittleFarm
Follow
Hello Diary.
The first week of flowering on my little farm is over, so I started photographing the plants in more detail and I will now start photographing on a black background as well now that they are much more interesting and beautiful. 😍
I changed the light regime in the Box, now the plants have 4 hours of darkness and 20 hours of light.
As you can see in the photos, Fat Banana grew 72cm in the first 30 days which I would say is the average for Automatic on my Farm. Compared to Haze Berry it is slightly lower, but considering the strain, it was also to be expected.
We’ll see how much more it will grow, I hope it stays lower than 100cm. 😏
My plan is to do defoliation in a day or two. Watering has become quite difficult due to the amount of leaves and branches but I think it will come in handy to aerate them anyway.
The flowers develop nicely and there are many of them, Fat Banana is not somehow symmetrical, the branches developed differently, so it looks a little strange, but I really like it because of its naturalness.
I still add BioBizz as scheduled for the current week and add CalMag but only preventively in a smaller dose. Watering is on average every two to three days.
Another Haze Berry who keep her company on the Farm, I put in the middle and put a pot underneath to bring it closer to the light. It is now a real little jungle on the Farm so defoliation is a must.
I am satisfied with how the plants are developing, they have good conditions and I think they are enjoying my "Little Farm". 😎
Let’s take a look at what happened this week.
17/10/2020 - Day 23.
Watering and changing the light. I added BioBizz according to the schedule for the first week of flowering, I replaced Fish-Mix with Bio-Grow. I still add 1.5 ml / lit of CalMag for prevention. p.H. I dropped to 6.6 with Plagron’s Lemon Kick.
After watering I changed the light mode to 20/4.
Temp / Humidity on the farm - 25.2 degrees and 41% humidity.
20/10/2020 - Day 26.
Watering. Same procedure as three days ago. p.H - 6.5
Temp / Humidity on the farm - 26.2 degrees and 43% humidity.
22/10/2020 - Day 28.
Photographing and measuring plant height. Since the beginning of flowering, the motives for photography have doubled , so the number of photos has increased.
Temp / Humidity on the farm - 25.5 degrees and 45% humidity.
Fat Banana Auto - Day 28. - 72 cm
This is it for the first week of flowering, now I still have to do defoliation and then with pleasure follow the development of flowers. See you soon. 🙌

Likes
25
Share
@Grower_Of_Persia
Follow
week intel:
its time for second pruning they grew up too fast and need second pruning as below :
first i remove big fan leaves and only leaves then let them rest for 1 day then the second part of pruning will get done that is removing branches based on these conditions:
1-if the branch is very low and never can make it to the top ,
2- if branch is in shade even after pruning fan leaves ,
3- if there are too many branches at the small space then non of them will get resources so if there is no space for branch then , they must get remove.
everything is perfect!
stresses :
pruning big fan leaves and lower branches + a little E.C stress around 1.7 once a week
feeding:
i feed them 3 times this week with this order :
day 1 : i feed them heavy with silicate +base nutrients(calcium & micros + Bloom) about 884 ppm - 1.7 e.c to cause a little stress.
day 3 : i feed them low dose of Feeding Booster + Karbo Boost around 325 ppm - 0.6 e.c to let them recover a little but not fully recover still a little stress will caused.
day 5 : i feed them with low dose of Top-Max + B-52 around 213 ppm - 0.4 e.c to let them recover the stresses to get ready for another stress next week.
guide of the week :
no more stresses from now on till the end and from next week i'll reduce the amount of nitrogen and calcium to below half to the end.


Likes
142
Share
@PapaNugs
Follow
Another good week in the garden. These girls are finishing up now. Some will be picked over the next few days and some will go another week here. Got some recharge and mammoth P for the first time three days ago. Hoping to finish strong 💪

Likes
10
Share
@Gutismoke102
Follow
She has grown to be a beast. She’s been very easy to grow medium feeder ever other day I keep ppm 400-600 so I’m able to feed more frequently. She loves it stay tuned she just warming up
Likes
10
Share
@MG2009
Follow
10/07/2020
Going to be rooting up a clone this week.
10/10/2020
3 days in and she is perking up some. Fingers crossed for quick rooting!
Lights are on 24 hours 3 way switch on low 12 hours, and high for 12 hours. I will veg on 18 hours for 2 weeks once roots appear, and 2 weeks on 16 hours. On week 5 hope to switch to flower schedule of 11 hours of light and 13 dark. I want to see her tropical side!
10/16/2020
If it has been 19 days since cut taken, she looks pretty good, this week I am starting Grow, Micro, Bloom at seedling and cutting strength. Should see root development soon. And then move to 12 liter DWC bucket.
And then we will start the clock on veg!
(These past 19 days are rooting time)


