
Likes
Comments
Share


@ReinDeer
Follow
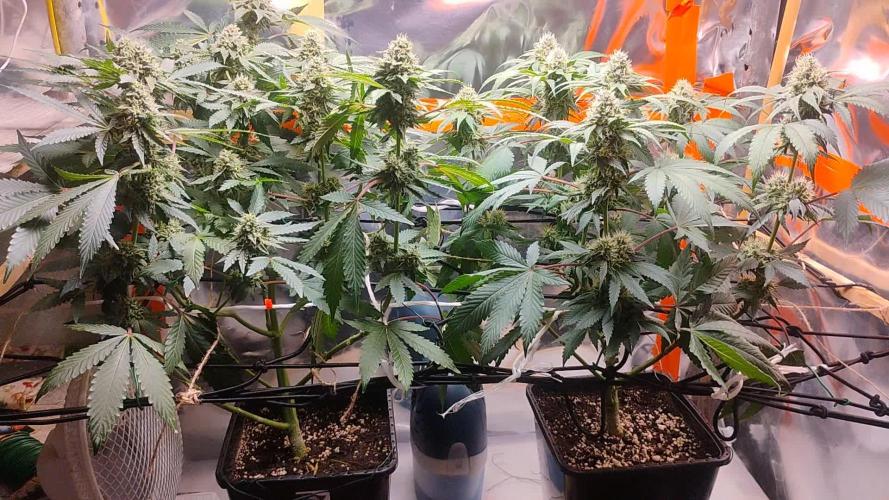
The first week is over and little babies are doing nicely.
As expected the growth is slowly progressing and I can already see small roots coming from the wholes at the bottom of little pots which shows the plants are healthy.
They didn't need much water this week.
I've started adding Canna mixture in little dosages not to cause stress.
Also took some time to add two Bestvas 600 LEDs and made some house keeping and tied all the cables nicely to the skeleton of grow tent.
All in all the plants are doing great, no problems so far and looking forward what this week will bring.
Thanks everybody for all the likes and comments! 👌 Have a great week and healthy grow😁


Likes
10
Share


@sunshinegroww
Follow
Wow wow wow this plant its just inasane its by far my biggest one ,starting to packing up on weight now and boy smells so good and her colours are just amazing defo showing her sativa roots with them long colas not long till we can test this beauty💪🎄🔥💚💡
Likes
4
Share

@MerekKutil
Follow
Ahojte všetci otvárame kútok šťastia v 5.týždni Flower.Mám v sebe nostalgiu na film Critters , keď vidím tieto šišky 😀. Verím, že všetky problémy s xmag calmagom od Advanced nutriens sú už za mnou a môžem sa sústrediť už len na poctivé Vianočné priberanie na váhe mojich paličiek. Teraz chcem už len pre kitky stabilitu, pravidelné hnojky samozrejme všetko na mieru nepotrebujem si naháňať Ego koľko tá kitka zvládne. Lepšie ju držať nech žere je kľudná ako dať veľa rozhodiť ju a budeme na nervy obaja. Stabilita v kanvičke zabezpečí pôžitok pri fajočke. Na veľkú noc sa chlasce 👉 2.5L 👉Bloom A/2.5ml ,Bloom B/2.5ml, Rhino skin 1.2/ml Sugar Royal 2.2/ml Vitamaxpro 1ml, ktorý už dávam preč. Druhá Kitka dostáva 3ml základu Bloom A/B. Teplota deň Max 24.5° noc 21° vlhkosť sa pohybujem 53% vonku je to horšie 4 dni dážď,odvlhčovač sa plní a čakám kedy bude lepšie počasie. Samozrejme to ochladenie pomáha v noci púčikom a teplota v noci je lepšia a vyhovuje im. Tá kitka vľavo je hladná beštia a cucá Hnojky ako vysávač Rowenta 😀.Dnes 3.4 končím 5 týždeň Flower. Borci growu zdar a nech to rastie vždy a za každého počasia Váš kutil ✌️.
Likes
48
Share


@MadeInGermany
Follow
Hey everyone 😁.
Today I start the next aeroponic round 😃.
Since the last 3 runs were with my Gelato (Black Pheno) from Zamnesia, this time I will put my Kosher Tangie Kush Phenotype from Amsterdam Genetic in the Growtool 0.8 😃👍.
Of course, the Gelato (Black Pheno) will continue to be used 👍.
The entire system was cleaned with alcohol and everything checked for functionality :-).
I took 6 cuttings from the little Kosher Tangie Kush mother, of which only one remains in the end (the best).
As always, the water was mixed with osmosis water.
The following was added:
Canna Rizotonic: 3.5 ml per l
Cannazym: 2.5 ml per l
Canna Cal / Mag: approx. 0.2 l per l.
Since this time I want to do a ScrOG with a single plant in the Areo system that fills the whole tent :-).
similar to the second gelato run where I did the ScrOG with 3 plants 👍.
The clones were placed under plastic hoods and sprayed so that they had enough moisture to root.
Now they get 10-14 days to root, then we'll see which one is left over :-).
I wish you all a lot of fun until the next update.
Stay healthy and let it grow 🙏🏻🍀.
You can buy this Strain at
https://www.amsterdamgenetics.com/product/kosher-tangie-kush/
Type:
Kosher Tangie Kush
☝️🏼
Genetics:
Kosher Kush
X
Tangie
👍
Vega lamp: 2 x Todogrow LED CXB3590 COB 55 W
1 x Sanlight S2W 62 W
💡
Flower lamp : 2 x Todogrow LED CXB3590 COB 55 W
1 x Sanlight S2W 62 W
💡 ☝️
Grow Aero System : Growtool 0.8
☝️
Fertilizer:
Canna Aqua Vega A + B , Canna Aqua Flores A + B , Rizotonic, Cannazym, CANNA Boost, Pk 13/14, Canna Cal / Mag, Canna Ph - Grow, Canna Ph-Bloom
☝️🌱
Water:
Osmosis water mixed with normal water (24 hours stale that the chlorine evaporates) to 0.2 EG. Add Cal / Mag to 0.4 Ec Ph with ph- to 5.2 - 5.8
💦 💧

Likes
11
Share


@Gonach
Follow
Al principio de la semana se subió la luz a 70 cm aproz de la planta, reduciendo la potencia al 50%. Se regó a cada una de manera foliar con Alg-a-mic de biobizz para regularizar la deficencia de nitrógeno. A mitad de semana se regó con 3 ml x litro de biobizz a c/u. Cada planta consume aproximadamente 1.6 lt.
Al final de la semana se cambio el ciclo a 12/12 y los resultados como se puede ver en el video.
Gracias a todos x sus posteos....

Likes
48
Share


@AsNoriu
Follow
Day 88. Amazing girl. Trim jail was easy, but she needed few more weeks to properly finish even so high lolipoped colas. Sugar leave trim left for butter and freezed , the rest of foliage and trim goes for bubble hash.
Day 98. 92 g went for curing
Happy Growing !

Processing
Likes
2
Share


@Wuutownwarrior
Follow
Really bad weather this week no sun and rained everyday including storms so had to get a big tomato tent , the ladies really stopped growing for few days worried me but last 36 hours they have started to shoot up
Edit : the weather is great now plants are living it

Likes
23
Share


@HanzGrowz
Follow
Just waiting it out now. No added nutrients, just water. Bubba and Black Dog have exceeded their expected flowering time, and both are at 95% cloudy with 5% or so still clear. Chemdawg and The New can take up to 70 days or more so we’ll see if they’re late too.
Bubba is a foxtailing machine. It was one weekend in early Flower when heat/humidity got out of hand while I was away for 3 days. She hermied a bit and I’ve had my eye out for bananas ever since (find a few every so often). Taking a risk to keep her in the tent with the others but if I catch them early enough the others should be ok. Interestingly I found a YouTube video of a guy that ran bubba and had the same foxtail development (also the same scent description and look overall). Nothing like the gorgeous fat purple budded girl I had last year but the citrus smell on this lime green bud pheno/version is impressive. Curious to see how the smoke compares.
Scent combo from all four plants is amazing!

Likes
1
Share


@Ecotox
Follow
Overall tougher strain to grow but a delight once finished. Found myself doing work around the house or jamming to music more often than not after smoking this strain. Tasted earthy with a hint of mint.


Likes
9
Share

@trustno1
Follow
Hi 👋
Blüte Tag 27
Lady Broccoli entwickelt sich gut, und ab heute gibt es 1ml/l Plagron Green Sensation.
Das LST ist abgeschossen und die Lady darf mit der Bud Produktion beginnen.
Gruß M.

Likes
10
Share


@Kusunokii666
Follow
Ho avuto problemi di over fertilizzazione ora cerco di ristabilire i sali minerali nel terreno, ho toppato nuovamente per contenere le altezze e penso che tra poco piazzerò la rete
Processing
Likes
6
Share


@ganjaman24
Follow
All in all every strain is doing great! Blueberry is the closes to finishing followed by chemdawg and lastly the Somango I just flipped little over a week ago so still have a little while to go with her! Blueberry has a pungent and fresh berries/citrus aroma going on while the chemdawg has the infamous og odor no doubt og is related to it haha. Thanks for checking it out! XD ..sorry for the delayed update


Likes
24
Share


@ValleoGrow
Follow
Growdiaries is really king, and so sick to monitor your plants with every single small detail.
Dry Day 1: humidity level 45-55
Dry Day 2 : 48-56
Dry Day 3:44-52
Dry Day 4: 50-53
Dry Day 5: 45-51
Final weight 96 grams! A bit more light would have improved alot i think and better training, but a fun learning full experience
More info comes along like the days do;)000
Likes
14
Share


@Weedywade89
Follow
Had a little heat issue it was hitting 110 degrees outside for four days straight and about 130 degrees in the GrowRoom didn’t have the funds to get a ac for the room but working on it so my lady’s suffered for a few days
Likes
21
Share


@Swiftgrow
Follow
# Day 50 today from seed happy with the progress for my first indoor grow, learnt a lot.
Wedding cheesecake producing some nice big buds
West coast OG is maturing the best starting to see some nice colours
Sour goo poison is stunted but she is still flowering okay 👌