
Likes
Comments
Share


@mr_smooke
Follow
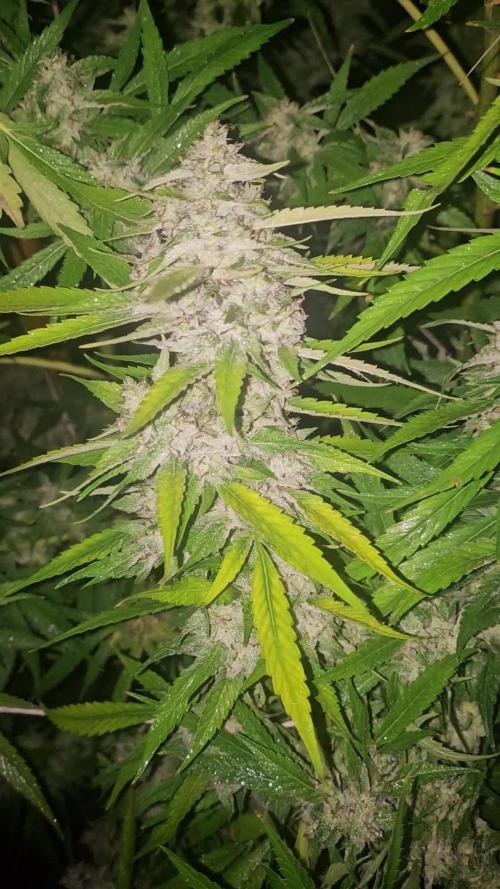
Only tap water for this shiny beauty. she gonna finish in 2 weeks maybe earlier. can not wait for harvest. here is day 43f


Likes
49
Share


@masterofsmeagol
Follow
7/4 SUN was poking out a little bit. Plants loved that little feeding and seen to he noticeable larger this morning. I'm considering starting the nutes. At least the organic ones as well as upping the water intake I've been scared to water with all this rain and my experience last time. I plan on applying BT this afternoon and doing some work on the bottoms of the plants. I also saw a chipmunk in my cage so I have some spots in my fence that need to be patched. I know I can't compare this year to orher years as these are seeds and all the other years were clones. I CAN say for certain that my plants are healthiest they've been out of any of my journals. Previous plants were much larger but I was fighting numerous fungal, pathogens and pests at the sane time. Ear wigs would've lollipopped most buddies by now but I've seen no sign of them. I'm going to apply more poison where they were and add some rat traps inside the cage for the chipmunks. Once I fix the cage I think I'll be good.
UPDATE: Went back over and fixed the holes on my cage from high winds. I found an old wire trap or cage and just cut sections and ziptied them to the existing wire and to the structure thus covering any open holes. I'll need to put lathes aroubdvtge outside because if a rodent REALLY wanted in they could get in. My belt had been wearing thin but I use shit until it breaks (yesterday the heal came off my shoe lol) so I was working hard sweating my nuts off and my belt gives out totally. At least ive got the major stuff done. I took a few videos too. I'm imagining it was this little bit of sun that gave these plants that boost of growth but I'm wondering if the added nutes had anything to do with it. Bags weren't light and I could feel moisture in the soil so I didn't water. I'll check again tomorrow morning. Since I didn't see many plants or even leaves for that matter with damage I decided to hold off ob the BT and the plant doctor. Only time will tell if that was the right decision.
7/5 Plants look fantastic. I see a few more holes in leaves sporadically amd I'm hoping it's pillars. I've seen lots of lightning bugs on my camera though and grasshoppers are abundant. Not one growth shoot has been chewed (knock on wood) which is what the earwigs had always done. I watched a video from last year and by nowcthey had lollipopped all lower leaves. It may not be the best weather growing season wise but despite the rh consistently in the 90's I still don't have pm or fungal pathogens. Need to get the BT out. Didn't water as we've had all that rain. I'll water either tonight or tomorrow morning. Sunny high in the 90s low is 66. Tomorrow looks good too.
UPDATE WENT BACK OVER AROUND FIVE. IT WAS 88 DEGREES SO I WANTED TO CHECK THE GROW BAGS. THE POTS ARE FINE. IT WAS HUMID AS HELL. ONE PLANT WAS SLIGHTLY DROOPY BUT VERY LIGHT AND DRY. I FOUND TWO OTHERS THAT SEEMED LIGHTER THAN THE REST BUT HADNT DROOPED. I MIXED TWO GALLONS OF WATER WITH 1TSP KANGOROOTS AMD PHED IT CLOSE TO 6. I FED THE 3 PLANTS THAT WERE SUPER DRY LIKE A HALF GALLON AND SPRED THE REST OVER THE OTHER EIGHT PLANTS. THEY WERENT DROOPING BUT THEY WERE VERY DRY. I PLAN ON A FULL WATER TOMORROW. I WOULDVE DONE IT TODAY IF THE TEMPS WERENT SO HIGH. ITS RAINED A MONTH STRAIGHT SO I HAVENT HAD TO WATER. I MADE A COUPLE VIDEOS BUT I'LL HAVE TO UPLOAD TOMORROW.
7/6 Another super hot day. I hefted the pots and they still had some weight but I could tell they were dry. This rain has messed up my watering schedule. Well it made it so I didn't NEED to water. These are big plants now. I need to get a schedule to stick too. They're going to probably need a gallon a piece at least. I'm still nervous watering. Right now I'm just reading the plants. I added .5tsp kelp me/you to 1 gallon of water to help with heat stress. I fed an additional two gallons to the garden this morning including the two container plants in the back. They were dry on top too but I know they have water deeper down. Next watering I'll be more consistent and try to give them there 10%. It's great having the bags elevated. I can finally see when I start getting run off. I could even measure the ph of it instead of relying on that meter. Ill check the ph when I go back over. Still a few 🐛 holes but they are few and far between. I really don't want to spray for such a small problem but if I cant find them at night that's what I'll do.
UPDATE: Another 90 degree day. I went back over and gave the garden a gallon of water as they were dry and it didn't rain. Tried to use a soil ph meter to check ph. First couple were 6.4, 6.5 then I got 7.3 and I accidently dropped it. Then I got somethings that were high eights and even one 9! Obviously the Meter shit the bed. I'll lower the ph of the water slightly when I fully water tomorrow and I'm going to measure the runoff.
7/8 I must've messed up the journal again as the dates are off. GAVE PLANTS A FULL WATERING. Each girl got a gallon. I couldn't upload my videos this morning as I had to break up a fight. 3 on 1. Didn't give me a chance to put the videos up. I'll take some stills then I can upload them. I took stills and they all uploaded but didn't fucking save. I'm nit going to keep trying to upload if it's not going to. Noticed a few more holes in leaves and one skeletinized leaf so I need to either spray the bt or something more versatile. I'm putting more poison around the cage and de between the bags. I'll go check things out tonight. Sick of writing a book and uploading to just hace them disappear
7/9 Did a quick video today. Noticed the bags were fairly light despite the plants being soaked amd the pallets wet. I was pressed for time. I gave two gallons to the entire garden. I hope that will hold them over until tomorrow. I'll need to up how much water I give them. Going with a gallon and a half next time. I see more pillar spots and a moth took off when I shook the plants this morning. So I'm gonna have too apply the BT. I figure if I go over before dark tonight I might be able to see aju nocturnal insects around. Luckily my dad feeds the birds and they are always there. I think they help with pests.
UPDATE IT WAS A LITTLE COOLER TODAY BUT MICH MORE HUMID. I WENT AROUND SIX TO MAKE SURE THE GIRLS WERE OK WITH WATER AND TO GIVE THEM A TREATMENT OF BT. I WENT THROUGH THE GARDEN ANDCGOUND THREE LEQVES TO DEFOLIATE AND LITERALLY A COUPLE LEAVES ON TWO PLANTS WITH PILLAR HILESM WHEN I ARRIVED TWO BIRDS FLEW OUT. A HORNET CAME IN WHILE I WAS THERE. THIS DO LESS APPROACH SEEMS TO BE REALLY WORKING. I DODNT SEE NEARLT ENOUGH DAMAGE TO WARRANT SPRAY8NG MY EXTREMELY HEALTHY GIROS WITH ANYTHING. ILL KEEP AN EYE ON THEM AND CLEAN THEM UP A BIT. I DO NEED TO INSTALL THE VERY8CAL TRELLIS FOR SUPPORT. THEYRE PRETTY HEALTHY THOUGH. ONE PLANT IS ABOUT AS WIDE AS IT IS TALL. STILL......PLANTS ARE EXPLODING AND ITS GETTING TIGHT IN THERE. I NEED TO GET THE TRELLIS UP THOUGH.
7/10 I went over and was planning to water. Plants were wet and it's raining. Top of the medium was moist but the bags were light. ONE bag was super light but seeing that we are having showers all day and an additional half inch of rain coming tonight so I didn't water them. Especially since they looked great. Decided to to spray BT yet as the damage is so small and i think the birds have been taking care of the pillars for me. Now I'm wondering if I should've gave that ONE plant a little bit of water but it will be find. Did a video. I'm being careful not to over water. Last year this is when all my buddies were devoured by earwigs. And no senescence like the years before. I think it was hust those earwigs. I haven't lost shot for leaves. Even the stalks are bright green and look amazing.


Likes
9
Share

@masterofsmeagol
Follow
6/22 Some pictures didn't upload but that's probably a good thing. As long as the video went up its good. I need to take less pictures. I'm glad I watered the plants in the back with a premixed gallon last night as we didnt get nearly the rain I thought we would. It's small showers throughout the day. The plants are getting enormous. A couple have revegged. Mostly the 10th planet. The others aren't anywhere near as impacted. Boy are some of these stalks thick. I chose to keep a couple plants that could be grown naturally without topping or fimming. I like to see the structure of the tree bit with humidity like this 98%rh it's easy to get botrytis. That's why it's good sometimes to have multiple bid sites so your proverbial eggs aren't all in one basket. But you do end up with a massive cola. I think that mk ultra with the big fan leavescis just going to be one giant bud. That's what it's looking like. Oh and today is the summer solstice. Longest day of the year.
6/23 WATERED EVERYTHING. USED FIVE AND A HALF GALLONS. EVERYTHING GOT AT LEAST A HALF GALLON. Despite the rain we got and the bags still having some heft I decided to water. It's 80 at 9am. It's supposed to he in the upper 90's today and coukd break 100° tomorrow. I hate that the grow bags are black. That's way to hot for the plants. I should find some empty soil bags and wrap the black fabric for a couple days. A sunscreen might help but I doubt much. We'll see how it goes.
6/24 It's 90° at 9am. It's supposed to break 100° amd stay there a while. Up to 106°. Plants looked awesome this morning. I wasn't sure what I'd find. Today is the worst of the days. If it didn't break 100 yesterday it was damn close all day and the girls look GREAT. I WATERED AGAIN TODAY. I USED 6.5 GALLONS TO WATER THE GARDEN. It was nice cool well water too so they should like that. Branches are getting longer and I'm training as the get bigger. I need to put up the trellis but I'm not doing it in this heat.
EDIT: 90° @ 6PM WENT OVER AND AS PREDICTED THE TWO TENS WERE DROOPING. IM WONDERING IF THEY WILL BE ABLE TO FINISH IM THOSE TENS. LAST YEAR I HAD ONE THAT WAS HUGE IN A TEN BUT IT JUST DEVELOPED INDIVIDUAL CALYXS WITHPUT CONNECTING. CHECK IT OUT ON LAST YEARS DIARY. IF THATS THE CASE I SHOULD KIGHT DEP THEM BECAUSE THEYRE GETTING BIG. I WATERED THE TWO TENS WITH ABOUT A HALF GALLON AND I USED WHAT WAS LEFT OF THAT COLD WELL WATER ON THE 10TH PLANET IN THE 30. SHITS LIGHTER THAN USUAL BUT LOOKING PRETTY GOOD. THE REST CAN WAIT UNTIL THE MORNING FOR THEIR WATERING. TOMORROW TOPS OUT AT 85° WHICH WILL BE MUCH BETTER. IM LOVING MY STRAIN CHOICES RIGHT NOW.
6/25 It's super humid out but much cooler. I think it's like 80 at noon time. I had to water the two tens this morning. I didn't really HAVE to but I did. I filled up my watering can that says it holds 1.5 gallons (but it seems like more) and watered the two tens at least a half gallon and focused the rest on the 10th planet in the 30 and the other one up front that gets lighter than the rest. I was fully planning on watering EVERYTHING this morning but I could feel moisture in the soil and they had weight. I'm pretty sure I made the right decision. Especially with humidity so high. Either way I'll check tonight.
EDIT: WENT TO THE GROW AT APPROX 2:30PM. I HAD BO IDEA HOW HOT IT WAD OUTSIDE. IT WAS 87° BUT THE HUMIDITY IS DAMN NEAR 100%! I HAD WATERED SHIT A KOT LATELY AMD WANTED TO WAIT UNTIL THE MORNING. THE TWO 10'S (WITH GIANT PLANTS THAT IM NOT SURE CAN FINISH IN TENS) WERE DRY AND LIGHT. A COUPLE SPECIFIC PLANTS WETE A "LITTLE" LIGHTER THAN THE REST. I MIXED UP THE WATERING CAN WHICHVIS 2.5 AND ANOTHER GALLON. I USED THE WATERING CAN ON THE PLANTS IN THE FRONT. THE CHEMDOG #4 WAS SIGNIFICANTLY LIGHTER THAN THE REST SO I GAVE IT MOST OF A GALLON. THE PLANTS THAT ARE STILL HEAVY ARE GOING TO HAVE TO WAIT LONGER BEFORE I WATER THEM.
6/26 This morning I came over to substantially lighter bags. I watered everything but the 50 with 5.5 gallons of water. Plants amd roots are getting heavier. My intuition told me to water that 10th planet but it was still wasn't TOTALLY dry. This happens a few times a year during hot stretches. It will be fine by the time I'm back. I've also noticed that the pink kush in the 50 (the only one that didn't use ALL new soil) is a substantially lighter green than every other plant in the garden. Boy I'm glad that heat wave is over. It's 67° at 9:30 that's much better. I'll update as I go. I'm still thinking about light depping the 10s.
EDIT: HASN'T BROKE 70 YET AS OF NOONTIME. I THINK I MAY HAVE GONE A LITTLE OVERBOARD WITH THE WATER. TH8NGS LOOK ALRIGHT AMD THERE'S A GOOD BREEZE SO EVEN IF I DID THEY'LL DRY OUT QUICK. SO MUCH GROWTH SO FAST! THE MK ULTRA WITH THE BIG FAN LEAVES LOOKS A LITTLE SAGGY BIT IT WILL COME OUT OF IT. THE 10TH PLANET THAT WAS DROOPING LOOKS A LITTLE BETTER. IT DID REVEG AND IS STEAIGHTENING OUT TROM THAT. I DEFOLIATED SOME SPOTS TJAT LOOKED LIKE SEPTORIA. BUT THERE WERE BURNS AND DISTORTED LEAVES FROM BEFORE SO ITS HARD TO TELL. JUST A COUPLE LEAVES WITH THAT DOT. TIME WILL TELL. ITS PAST TIME TO GET MY IPM GOING ANYWAY. DURING ONE OF THESE COOLER DAYS IM GOING TO HAVE TO PREEMPTIVELY TREAT MY PLANTS. EITHER BT, CAPTAIN JACK OR PLANT DOCTOR IS WHAT I HAVE ON HAND AT LEAST. I HAVE CITRIC ACID AND K BICARB BUT HOPFULLY NONE OF THAT WILL BE NECESSARY. THE WIND IS FAR TO STRONG FOR A MITE POPULATION TO GET OUT OF CONTROL WHICH IS AWESOME. IM MAINLY WORRIED ABOUT THE PATHOGENS.
6/27 Rained last night but I don't think very much. Its much cooler. Went from 100 to 70 in a day. Plants did good to take those fluctuations. They are still SLIGHTLY overwatered with the mk ultra with the big fan leaves being the MOST over watered. There's a breeze today though and it's sunny blue skies. I think showers ate possible tomorrow at 4a.m. and it says showers throughout tomorrow to which sucks. I wad hoping to get a couple nice days to dry the plants out. The 10s are light again but the soil is still moist. It's hard when it's so hot to water the correct amount. At least it is for me. Killed a couole moths and a pillar. I noticed the first sign of pest damage so it's time to get out and start the IPM. I'm hoping for no pathogens. I'll update as I go along.
EDIT: IT'S 75° AT 11:30. That mk ultra with the massive leaves still looks overwatered. One of the plants in the 10s looks the same but that one is light but the soil is moist. The MK ULTRA is still holding some weight and the soil is still damp. It's not the AMOUNT of water I've given them that's the problem it's the FREQUENCY that ive HAD to water that messed me up. Going from 70° to 100° overnight for several days kinda messed me up. It's improving though. I lifted it and it doesn't seem TO heavy. The soil is still slightly moist. I hope that I don't get so involved with thinking the plants are overwatered that they are actually under watered. I think I need to increase volume when watering and treat each vacant differently (which I have for the most part). I'm usually very measured and careful but it is what it is. No more water for a little while. Other than thecshowers at 4a.m. and the showers expected tomorrow. Surprisingly the small time I was away allowed the plants to show a pretty drastic improvement.
EDIT #2 WENT BACK DOWN AT FOUR TO CHECK THINGS OUT. THE MK ULTRA I WAS WORRIED ABOUT IS DOING MUCH BETTER. EVERYTHING (SANS ONE IN 10) IS LOOKING MUCH BETTER. I DUG DOWN AND CAN TELL THERES MOISTURE IN THAT SOIL IN THE TEN THATS A LITTLE DROOPY. THATS WHY ID RATHER UNDER WATER TGAN OVER WATER. UNDERWATER AND YOU JUST GIVE THEM A DRINK AND THEY PIP RIGHT BACK. WE ARE SUPPOSED TO GET SHOWERS TOMORROW EARLY MORNING. HOPFULLY NOT MUCH. MY INTUITION TOLD ME TO HOLD OFF ON WATERING THAT PLANT IN THE TEN. THE OTJER IS THE SAME WEIGHT AND LOOKS GREAT. WASNT PLANNING ON GOING DOWN SO UNFORTUNATELY I DIDNT HAVE MY PHONE ON ME.


Likes
12
Share


@TurkeyGravy
Follow
Day 17, everything looks good, maybe a little light burn on the largest one. Please check out my video with full audio! Let me know what you guys think. Open to all tips and suggestions!

Likes
4
Share


@losgrowershermanos
Follow
Rega com Fertilizante. Terminando de regar com o ultimo litro feito. Mais ou menos 150 ml em cada planta. 1 ml do liquido por litro + 0,15 g por litro do sólido. Ajustado o PPFD para aproximadamente 500 em cada planta
Likes
Comments
Share

@TTPIMP
Follow
She is stacking up,but not much smell yet. She's getting frosty too. This girl went from around May 20th 2025 it's right around Halloween of 2025 so 16 weeks give or take. One of my best bag seed grows. Her buds were big dense and gassy. She will definitely go down in history my grow history anyway.


Likes
16
Share


@Dirty_Hippy
Follow
Week 8:
What can I say about this lady?
The beefy colas are now gaining the resin that gives this strain it's name.
Super thick and dense.
I pulled lowers on the cola away from the stem to avoid the possibility of bud rot(see video)
It smells like honey and berries... maybe a touch of grape in there.
Super smooth smelling!! Can't wait to smoke it!!!!
Likes
21
Share


@Rollex420
Follow
⚠️⚠️⚠️ I apologize unfortunately I made the mistake of putting an extra week of flowering in the diary. SO THE CURRENT WEEK IS THE EIGHTH AND NOT THE NINTH ⚠️⚠️⚠️
but ignoring this problem..😅 The flush week has begun! these plants have a very clean runoff already from the first irrigations of this week, this due to the previous flushes due to an excess of fertilizers. In addition i bought a little fun and useful gadget to see the trichomes up close and their colors in the final days.. So I added some macro shots, I hope you like the update of the diary! I wish everyone an healty grow. peace and love my brothers ☮️💚
📈📈📈 UPDATE 17/04/21 📈📈📈
Week 9 -Day 63 flower- (92 total days)
I am very happy with how strong these plants remained, despite some problems that have been there..
Anyway even in this adventure i learned a lot and I hope to improve even more over time. 🤞🏻😬
Now i will leave these plants hanging down for a week at least ..once they lost most of their moisture i will do a final trim, put the clean nugs in the jars and let them dry for another three weeks or so.. opening the jars daily to allow the buds a correct final drying.


Likes
80
Share


@Qlimax
Follow
d14 -slow growing flower exploded :)
d15-flowers growing rly fast i can just wach nothing to do yet :)
d17-*fiming* one plant(smallet) with smallest pot for some tests
d18- spoten first pistils alredy.... pre flowering i guess
d20-flowers looking good growing fast :D
d20- started with some LST
d21- Changed MH to HPS and 20h light to 22h light.
d21-This week was nice,didnt do any big changes plants growing nicely onley 1 flower growing complety diffrent then others...all have 4new stems every way this onley have onley 2.....then all have 1 main cola on top this one looks like will have 2 main colas...(4 or 6 now when i FIM it ..will see if i even fim it curecly )
Thats all!
Was fun and i cant wait for harvest day!!!!

Processing
Likes
3
Share


@Therbalist
Follow
Thunderstorms for several days generally cloudy the rest of the time, sunshine on the horizon though!
Next week should be sunny hopefully! 🙏🙏🙏
Likes
11
Share


@Blunt_trauma416
Follow
The pics are a day old and allot has changed since then.. theres allot more yellowing (fading of leaves).. and the trichomes just look big and swollen.. you can see the kinda mushroom like shape easily.. the smell has gotten really nice.. starting to get that really dank pink smell. I cant find my 420 scope.. but it doesnt take a rocket scientist to know she's almost there.. I will chop her down on friday. And start drying it out.

Likes
28
Share


@HydroHerb420
Follow
Looking sweet. Stretch has now slowed down and there’s plenty of frost starting to show. In a few weeks there’s gonna be some beautiful buds if they carry on like this. Slight bit of burn at 1.2 but nothing major. Still nicking the odd fan leaf here and there to let the light down. Don’t really think it affects them when they’re strong like this and I’d far rather have the light getting down there then not. Roll on next week.
Likes
13
Share


@Bryankush
Follow
Settimana di lavaggio probabilmente la sua ultima. Le cime al tatto sono appiccicose ma più che altro farinose , emanano un aroma tropicale favoloso😋
Giorno 3 viene annaffiata con 1L di acqua a 0 ppm
Giorno 7 oggi pomeriggio verrà tagliata
Le cime sono veramente compatte e piene di resina come vedete nel video. Nel vassoio sottostante ci sono a sinistra la cima centrale e a destra l'altra apicale simmetrica.
Likes
7
Share


@Soskar69
Follow
Since the second week I started doing LST on this strain. The plant grew very well, it was easy to train and had a very small amount of leaves, so I didn't defoliate it. Today I have done some lollipopping, taking off the branches that were too small. The buds start to grow in dimension and also start to smell. Also the resin production it's very good, if you try to touch the buds, your fingers will stick together.
Likes
102
Share


@GirlGoneWeed
Follow
Great strain for beginners, easy to grow don't require too much attention or special techniques . She will grow fast, gorgeous and smell very very strong, I didn't think I was going to be able to harvest more than an ounce (because this is my first time) but hey, I'm very happy with my 41G! The buds were skinny but dense in flavour, I wonder why the buds didn't get fat, its because of my LED panels, or genetics? Overall I recommend this strain for first time growers!

Likes
17
Share


@ganzigunnu
Follow
end of week 10
a bit of defoliation...
not expecting but seeing massive yields to come.

Likes
10
Share


@Barcelona_Farmers710
Follow
Esta semana los problemas con las temperaturas sé agravaron a tal punto de pasar los trips de un armario a otro... pero de momento parece controlado farmers!🙏🤟🏻