
Likes
Comments
Share

@eldruida_lamota
Follow
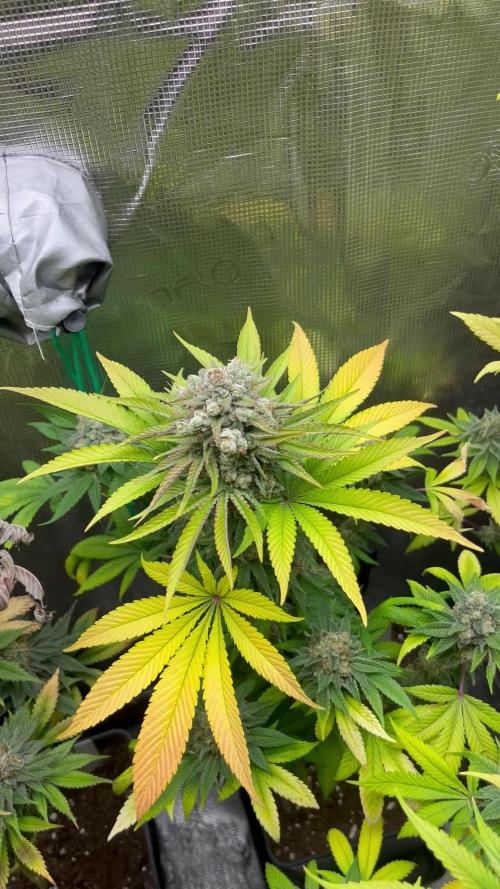
Vamos familia, actualizamos la octava semana de floración de estas Granny’s Home de Seedstockers, salieron las 2 de 3, 66% ratio éxito.
Temperatura y humedad dentro de los rangos correctos dentro de la etapa de floración.
La tierra utilizada es al mix top crop, por cambiar.
De 2 ejemplares me quede con los 2 para completar el indoor, también cambie el fotoperiodo a 12/12 y aplique una poda de bajos, se ven bien sanas las plantas, tienen un buen color progresan a muy buen ritmo por el momento, las flores están madurando y llevan una tricomada increíble, también las tuve esta semana solo agua porque creo que no necesitan más alimentación aún quedando unos días por delante, hasta aquí todo.
Agrobeta:
https://www.agrobeta.com/agrobetatiendaonline/36-abonos-canamo
Hasta aquí todo, Buenos humos 💨💨💨.

Likes
21
Share


@DeeDeeKushner
Follow
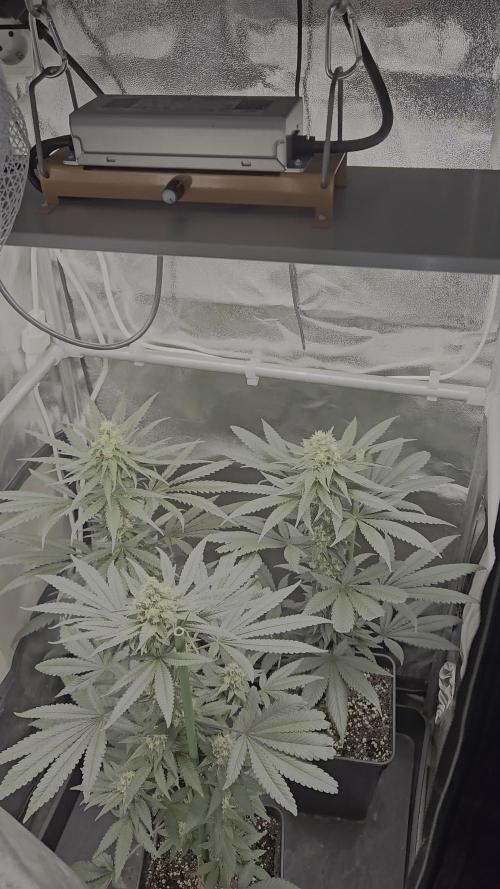
Day 28 of flower and I’m very happy with these two ladies atm. In both vids, you can tell which one will have the fatter nuggs. The plant in the first vid, was transplanted into Fox Farm Ocean Soil and the other was not. I can tell you right now, your grow medium definitely makes or breaks your grow. I will be using FF as medium of choice from here on out. Not much else to say other than they’re done stretching and are starting to fattening up every day. Got a little over 40 days left until it’s harvest time. 42 to be exact! But I’ll catch yall on the next update ✌️🏾

Likes
18
Share


@Jays_Not_Here_Man
Follow
Week 1 (Day 7) Flower- Running with the Indo nutrient line, easy to use, 3 bottles. They were recommended from the friend I got the clones from, and his did great. The girls started to stretch immediately, waited till day 7 flower to start the Flowering nutrient dosages.
Setup:
2x4x5 AC Infinity Tent
X2 LED 600 watt (blurples ☹️)
X2 6” clip on fans for canopy and light heat
Floor fan pushing fresh air from the bottom
Vivosun 4”in-line fan/12” carbon filter
Humidifier in the tent
Dehumidifier In the lung room for excess Rh
Timers set to 11 hours 💡/ 13 hours 🌜💤
Likes
12
Share


@Biggy2k20
Follow
Great experience. Would've grown even taller if it was outdoors. An absolute monster that stinks and is rich in trichomes. Can't wait to harvest fully and try, it looks to be an awesome growth. Some mould spots here and there because of humidity but not a lot now. Washing will be in warm water with lemon juice

Likes
Comments
Share


@Comfrey
Follow
23.-30.07.
Die Woche verging wie im Fluge. Strawberry Haze Auto duftet mittlerweile sehr fruchtig mit Zitrusnoten.
Die Blüten schwellen nach einem krassen Stretch an. Das intensive LST und das Entfernen störender Blätter hat dazu geführt, dass die Blüten sehr gleichmäßig Sonnenlicht bekommen und später in der Blüte die Luft gut zirkulieren kann.
Zwei Tage der Woche standen die Pflanzen unter der Markise, es hat über Stunden heftig geregnet.
Das Gießen läuft wie gewohnt nach Gefühl. An heißen Sonnentagen bis zu 1,5 Liter.


Processing
Likes
27
Share


Likes
2
Share


@Race91
Follow
Usually I start my diary after they all pop but I’m feeling lucky and especially green this round. After numerous failed attempts at getting auto seeds from various sources and not having them pop no matter what I did. I finally got in touch with THSeeds and told them that the Critical Hog auto they sent me were totally bunk and not one popped. They had Truenorth seedbank send me this bubblegum Within a week of my complaint. I’m hoping these are fresh vigorous seeds and after much touch up learning on seed popping Iv decided to go straight from the water cup to the medium which is Black Gold seedlings mix in the center 6 inches of my coco soil so to give them a easy start with no added nutes. So it begins.... Stay tuned fellow growers!

Likes
10
Share

@OrionSparkles
Follow
It is very low for harvest; I have been applying overdrive,3ml per 1,5L, three times in the last waterings, I will apply again one last time and proceed to washing roots. Then I will continue watering only with water until the end, I estimate there will be about two weeks or less left for harvest.👌🏻🐦

Processing
Likes
16
Share


@MG2009
Follow
Good week here #1 is 10" and wider,took a clone.
#2 is nice too she is 8.5" tall , both are healthy i will be flowering soon, I want both about 12" when I flower them. So maybe mid week flip? We see.
Thank you for dropping in hope you have a great day🙏
1/08/19
Mid week both one and two are females, I will try to a good picture to show her pistils.
#1 is 11.5" tall, and # 2 is 9.5" i anticipate flowering plants at start of week 8.
Processing
Likes
43
Share


@Eyeduno
Follow
the one at the back looks abit sad hopefully it perks up otherwise I’ll be using 4 cuttings instead of 3 think I need a new fan aswell you heard the creak onit

Likes
3
Share


@Adam420
Follow
She is the baby of all my plants. When she’s hungry she will out of nowhere have her leaves look down. As soon as she’s fed, in 10 minutes she’s back to normal.
Great smell. Good tops, great bud production at the bottom.
Bottom wants to follower purple so badly but plant doesn’t want to yet

Likes
12
Share


@cookingwithninja
Follow
day 42 images are in last week, I can not count XD. bridal is stacking a lot of weight and is constantly shifting/leaning every morning, good things. I would chop any day but I will wait it out. water, tiny bit of humic and folvic to reduce chloromine, chlorine- air stones
day 45 took a few nugs off on day 42, dried for 3 days. Tried bridal and blackberry. As a heavy recreational, thc is up there! bridal felt like having a blindfold over your eyes somewhat sativa uplift but heavy weight feelings. Very good. Lasted as good as 30%'s. Dr. Thunder was also very nice, nug was smaller so mixed with blackberry to have a small j. Also feels very good indica. Both trials were chopped on week 6 day 1. Very pleased with the results. I was worried bridal was more sativa; which charasteristica I am not looking for. So I believe this is a very good heavy hitter run with 4 plants. I can chop any day, but I am waiting for pink paradise to finish seeds.
day45 took top nugs from bridal party, blackberry oreo bigstuff and dr. thunder. No touching pink paradise!!
day 46 can chop anytime just waiting on pink paradise seeds to finish, bridal party leaning more
day 47 bridal leaning hard from weight.
day 48 stacking, day 48 video

Likes
14
Share


Likes
10
Share


Likes
5
Share


@CanadianFillmore
Follow
Start of week 8. Week 7 went well with this girl. Her nutrient consumption went down as she did not need extra feeding during the week. The buds on this girl are incredibly sticky, more sticky then the OG Kush, but she doesn't have much smell, just a little wiff of fruit. She'll be flushed in 5-7 days, depending on the trichomes. This appears to be another great grow with this strain, but will be the last I grow of her for a while.

Likes
Comments
Share


@Batista
Follow
This week we are only in cruise control, we did the last irrigation with fertilizers and we are planning the flushing for the next week.
We also had problems with humidity due to the weather. We don't have a dehumidifier, so we try other homemade techniques to solve the situation.
The flowers have gained some weight and are changing the smell. We are excited for the harvest.

Likes
2
Share


@PalmaGrow
Follow
Inicia semana 6 buen crecimiento radicales y se nota el crecimiento en las hojas y tallo de prepara para la próxima semana hacer poda apical.
7 - 13 julio


Likes
4
Share


@adam_pawloski87
Follow
@twenty20mendocino Ateam R&D Update ~ Let’s go day 91 an these girls are doing amazing! Looking nice an healthy we will let these girls recover for a few more days from the heavy defoliation and on Sunday we will be giving them the big flip , Let’s go flower!! Updates coming soon !
Sangria has been doing her thing , been drying for12 days now so Sunday we will be giving her the trim and jar her up, but updates coming soon yall!! Let’s have an amazing productive day as well as a great safe weekend, peace love an positive vibes to y’all Cheers an blaze on 😶🌫️💨💨💨💨

Likes
16
Share


@Noob_quest
Follow
Week 8 done and stretch all done.
Pretty happy with the space I’ve filled out now, just need to get through the next few weeks and should be a success.
All look quite different, 3 and 4 super frosty. 1 and 2 not really.
Just not overwatering or over feeding and trying to be patient.
Really hoping they get fat and colourful but will take what I get.
Now smoking the Strawberry pie which has cured nicely from the last run. So nice, feeling very grateful to my earlier self for growing it.
Thanks for reading have a great week 😊