
Processing
Likes
Comments
Share


@DoItBigGrows
Follow
We are going to send these two into flower the second I get my hands on a 3x3. The plan is to move them into the 3x3 until they finish up. Leave the 5 Autoflowers in the 4x4 until they finish then start a perpetual cycle between the two tents. A 3x3 for Veg and 4x4 for Flower! I’m extremely excited about the future!


Processing
Likes
3
Share


@Elysian_Canada
Follow
We just finished week 8 and things are looking great. The plant that was a little late flowering (plant in the back left corner) has stretched up and is now at the top of the canopy. I've noticed these plants are a little bit sensitive to nutrients and don't like being over fed. They have been a very low maintenance group of plants so far though. They stretched out nicely allowing plenty of airflow and light penetration so I haven't had to do very much leaf tucking or plant training, which is exactly what I wanted for this grow!

Likes
6
Share


@Weedzoks
Follow
Welcome to all
In this diaries we start on two cuttings of Royal Domina, from the plant of the first diaries. I chose to put this variety out because it is very resistant and resinous.
Here We Go 🍄

Processing
Likes
4
Share


@Green_Thumb
Follow
Plants look,smell, and feel amazing. I think they've put on most of their weight now and the buds are starting to get really cloudy! I started the slightly older plant in the front on her flush at the end of this week. I believe the one in the back seems to be a week or 2 behind.
Likes
6
Share


@captaincondor
Follow
I watered yesterday with just plain water with a dash of calmag, I am now done feeding her as I am hoping she will be fully mature shortly


Likes
17
Share

@love_2_grow
Follow
I let her go for another week and after checking her trichomes I decided she was done. It‘s not like I had much of a choice anyway as I‘m leaving for a trip in a few days.
I cut her down branch by branch, collecting the stalks and fan leaves in one container and the buds in another. After that the buds went into plastic bags which was then put in the freezer.
She will now chill for a month while I‘m traveling, before it‘s time to wash and turn her into water hash, and finally into fresh frozen rosin.
––––––––––––––––––––––––––––––––––––––––––––––––––––––––––––––––
This grow is generously sponsored by Bio Tabs
Bio Tabs is an organic growing system that uses slow-release tablets of beneficial microbes, mycorrhizal fungi, and nutrients to create living soil that feeds plants naturally throughout their growth cycle. It’s designed to simplify growing and promoting strong roots, healthy growth, and large yields.
Use code GDBT420 for 15% off at the BIOTABS Webshop https://biotabs.nl/en/shop/
––––––––––––––––––––––––––––––––––––––––––––––––––––––––––––––––

Likes
37
Share


@FlavoursUk
Follow
There’s a few things I’d personally change if I was to grow fat Banana again. But this time round she was very resistant to high temperatures and humidity during Flower. She holds on to nitrogen so I’d definitely feed her less on the nutrients as she is a light feeder.


Likes
10
Share


@jahredi
Follow
Both plants started coming along. The Blue Dream has a weird leaf curl. The ends are pointing straight down on some leaves. Also, a little twisting. Maybe some dark leaf veins. I’d be inclined to think nitrogen toxicity, but I’m reusing some soil from may last grow that I had in a huge pile all winter. And I only put .25 tsp per gallon of Big Grow for the last water. I dunno. Just going to go back to regular water and see how it goes. Funny that the HP isn’t showing any unusual signs.

Likes
2
Share


@LittleBigTrees
Follow
New growth is fast soon I will put into a 20 litre pot and give her more space to spread out.

Likes
109
Share


@Prototype0181
Follow
Gave them there last shot of nutes @ Day 46. Gonna do 2 waterings with Canna flush and after that a only RO water dieet. They are coming close💪
Rock on Growmies 💚


Likes
29
Share


@Hashy
Follow
📋Comment
I do like this strain, I wouldn't have joined this competition if I didn't like it.
📋 Data
Seed to havest=105 days.
Veg time=28 days.
Flower time=77 days.
Wet weight=609g
Dry weight=g
📋 Smoke report
Not dried yet but I'd imagine it's just like the other Runtz I have grown.
📋Grow stats for GDG 23
#1 Runtz=g
#2 Fat Bastard=g
Total=g
Lights on.
20hrs×7days=140hrs
18hrs×21days=378hrs
12hrs×77days=924hrs
Total hours=1442hrs
Light power=147.73Kw
Rad power=105.69Kw
Extractor=34.12Kw
4 gang=47.02Kw
Top fan=17.72Kw
Total electricity=352.28KW
Electricity cost @£0.25/Kw=£88.07
Average light power a day=1.4Kw
Average watt per hour=102w
g/watt=(÷)=g/w
£/g=£/g
📋Final word.
This diary isn't finished. I'm just trying to complete as much as possible to have a better chance at the Eternity competition. I will be updating it when I have dried the grow.
Back soon.
Take it easy.
********************************************
Likes
42
Share


@Master_weeda
Follow
Bonjour à tous les padawans et les maîtres jedis
Cette plante est vraiment exceptionnelle! Elle représente la force et j'en suis fier 😍
La semaine 4 est déjà la ! Ma plante est saine le LST ce passe relativement bien je l'ajuste tout les jour je le combine avec la technique du pincage d'Apex cela me permettra d'avoir une canopé plus homogène donc une meilleure pénétration lumineuse et par conséquent un meilleur rendement.
Le pinçage est une pratique courante en horticulture.
Beaucoup de cultivateurs l'utilisent pour améliorer le rendement de leurs plantations cannabiques ou autres.
Il est souvent question de 'taille' des bourgeons apicaux.
Cette taille se pratique également mais il n'est plus alors, à proprement parler, question de pinçage.
A l'instar d'une taille, le pinçage va permettre de stimuler le développement des ramifications tout en préservant les sommités en vue de la floraison.
Il est très utile pour uniformiser une canopée.
Pour réaliser le pinçage, il vous suffit de presser 'fermement' la tige [entre le pouce et l'index] aux environs de l'apex jusqu'à sentir un léger 'crAck'.
Cela aura pour résultat d'endommager les vaisseaux impliqués dans la circulation de la sève [situés dans le pourtour de la tige], la tige conserve toutefois une certaine rigidité.
Pour obtenir le même résultat, il est également possible de vriller légèrement la tige sur elle-même.
L'interruption du circuit d'alimentation entre le ou les apex et le reste du plant va provoquer un déséquilibre hormonal qui aura pour conséquence le développement des ramifications antérieures au point de pinçage.
Jour 25 j'arrose mon pot normalement avec un quart de son volume en eau toujours avec un PH de 6.3 à cette eau j'ajoute 0.7 gramme de greenhouse feeding enhancer pour favoriser son développement racinaire.
Par la suite je n'aurai plus qu'à ajuster mon LST jusqu'au stretch et surveiller mon arrosage, Je pincerai mes apex suivant la pousse de la plante pour uniformiser la canopé.
Petit rappel de ce que est le LST et comment le pratiquer le plus efficacement possible:
Quand commencer à appliquer la technique LST
De nombreux cultivateurs commencent la manipulation dés que les plantes possèdent entre 3 et 6 nœuds ou une paire de feuilles. Durant cette première étape de la croissance, le tronc encore flexible est pliable sans risque qu’il ne se casse, même si au fur et à mesure du développement de la plante il sera de plus en plus difficile de le plier. Nous pouvons continuer à guider la croissance des branches durant toute la culture, même durant la floraison, ce qui pour cette étape représente un grand avantage face à la taille, qui n’est pas du tout recommandé une fois que la formation des têtes commence, cela stressera en effet la plante, ce qui aura pour effet de retarder la récolte.
Comment appliquer la technique de guidage LST
Si nous sommes prudents, la flexibilité naturelle des fibres du cannabis permet de plier leur tronc et branches avec une relative facilitée, même durant la floraison des plantes.
En utilisant une corde fine, nous pouvons accrocher la pointe de la plante à la base du pot par exemple ou à un tuteur que nous aurons planté dans le substrat. Nous plierons le tronc avec précaution et nous le fixerons avec la corde, à partir de là, nous pouvons augmenter progressivement la tension de la corde, chaque jour un peu plus, jusqu’à obtenir la position souhaitée. Soyez attentif à la réaction de la plante, essayez de ne pas appliquer trop de pression sur la corde et rappelez-vous que la flexibilité des branches peut varier d’une plante à l’autre.
Pour obtenir de meilleurs résultats, il suffit de suivre quelques règles simples. Pour commencer, nous devons choisir une corde fine mais pas trop pour ne pas blesser les troncs au fur et à mesure qu’ils grandissent et qu’ils deviennent plus gros.
Nous pouvons utiliser des crochets en plastique souple ou de n’importe quelle autre matière flexible pour éviter d’endommager les plantes. Spécialement en intérieur, utiliser des cordons en plastique de couleur (voir les diaries de @Silky) est très pratique pour voir facilement les accroches et faciliter le travail au milieu du réseau formés par les cordes, les tuteurs, les mailles ou les supports que nous aurons dans la culture. Bien entendu, en culture extérieure et surtout en guerilla nous ferons juste le contraire et nous utiliserons des matériaux de couleur qui n’attirent pas l’attention pour que notre jardin reste discret.
Pour stresser les plantes au minimum, la mieux est de réaliser ces manipulations le soir ou juste après que les lampes en intérieur s’éteignent, ce qui leur permettra de se remettre durant la nuit. Normalement, le jour suivant nous pourrons observer comme les pointes des branches que nous avons pliées se dressent de nouveau vers le haut à la recherche d’une source de lumière.
Je combine un pincage d'Apex (explications plus haut) au LST cela me permettra d'avoir une canopé plus homogène donc une meilleure pénétration lumineuse et par conséquent un meilleur rendement.
Que la force soit avec vous 💪

Likes
8
Share


@Herbman420
Follow
Hi everyone week five here just going into flower swapped to 2 ml of biobiz bloom and 1.5 mL of biobizz grow ph6.8 in to flower naw and going strong she has changed so much in a week im ferry happy with her . thank you for seeing my diary and tune in for next week and remember it's 420 somewhere
Likes
59
Share


@JeyGanesha
Follow
Prima settimana di fioritura,tutto procede più che bene,,anche questi altri giorni si sta riprendendo ogni giorno di più. ..

Likes
18
Share


@Borberad
Follow
Hoffe nach den Überraschungen in der letzten Woche verlaüft diese wieder ruhiger. Habe den Leitwert des Drain bei beiden Pflanzen auf ph6 und 2000 microSiemens Ende letzter Wiche reduziert bekommen. Interessanter Weise waren die Leitwerte bei den Pflanzen trotz exakt gleicher Wasser/Düngergabe um den Faktor 2 auseinander. Der ph-wert lag bei beiden bei 4,8 [Warum auch immer]. Hab die Werte durch Spülen mit Leitungswasser und Osmosewassermix mit Leitwert 500 auf die oben beschrieben Werte gebracht und hoffe das die Damen es mir verzeihen und mich trotzdem in 3 Wochen mit reicher und vor allem leckerer Ernte belohnen werden. Gieße jetzt jeden 2Tag, so viel, dass genügend Drain entsteht um die Werte zu kontrollieren. Drain liegt bei Ph ca. 6,0 bei max 2,5mS andernfalls wird mit Osmose oder Leitungswasser (0,8mS und Ph7.2) gegegengehalten. Da sie in Stofftöpfen stehen, ist es hoffentlich nicht so dramatisch etwas zu viel Wasser zu bekommen.
Processing
Likes
Comments
Share


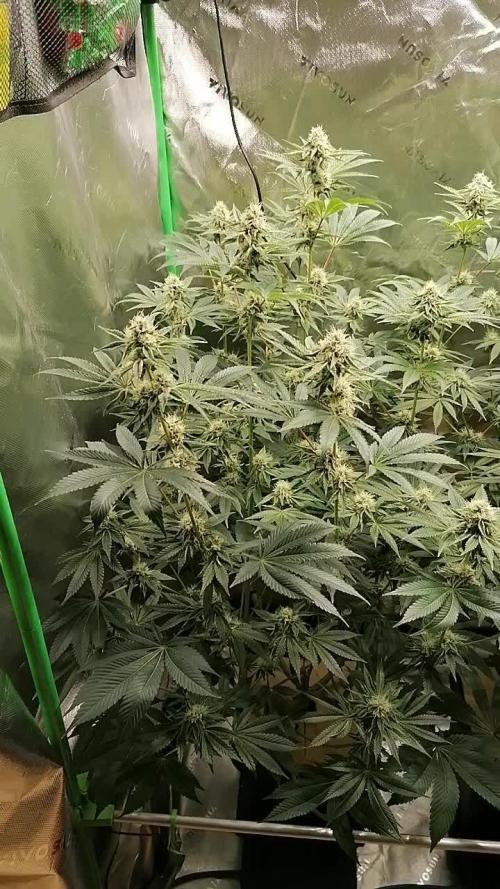
@YEGGrow
Follow
Lots of good growth this week. Continuing to tie branches down as she grows. Doing 1 last tie down session tonight, and starting a gradual switch from 18/6 to 12/12 accompanied by a gradual lowering of the blue spectrum over the next next week.
Likes
30
Share

@Brujha77
Follow
Start 5. Blütewoche
Der Strech scheint langsam fertig zu sein und bisher machen sich die 3 recht gut.
Heute gab's für jede noch 1l Wasser mit 1g/l Greenhouse Feeding BioEnhancer. Ende dieser oder Anfang nächster Woche bekommen Sie dann nochmal nen Composttee.
Hin und wieder werden paar Blätter entfernt. Ansonsten ist nur zuschauen angesagt🥀🥀
Blütetag 31
Die 3 haben heute ihren Composttee bekommen (Wurmhumus, Biotabs PK Booster Composttee und Kelp Mehl) und es wurde nochmal gut Entlaubt.
Der 50l Tank reicht aktuell noch knapp 6 Tage, die 3 Damen sind ganz schön durstig😎😎


Likes
19
Share


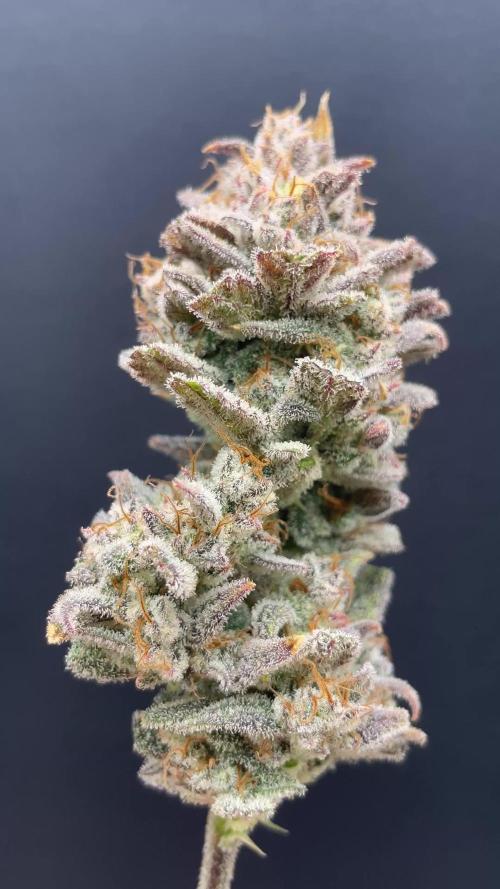
@adam_pawloski87
Follow
What a fun run this was ! These Ogreberrys finished up from 81 days to 102 days with nice hints of gassy , sour purple , sweetness and glistening with frost! These ladies will cure up for a month an will be ready to test out ! So much fun , I highly recommend this strain if your looking for some oooy gooohy resiny grape smelling nugs !
