
Likes
Comments
Share


@TheGrowNovice
Follow
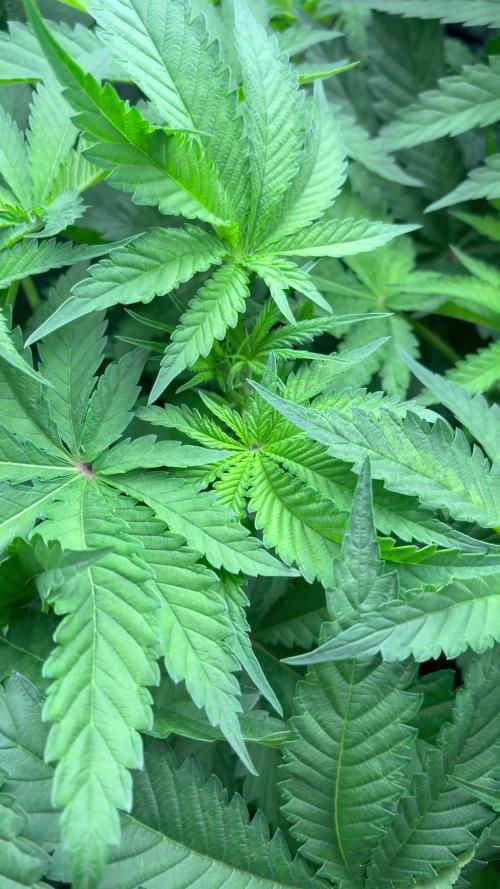
This is my second grow. Started from seeds. 2 in big pots (I don't know the exact volume, around 30l-40l) and 4 in smaller 18l pots. I assumed that not all plants would grow nice so I thought it would be a good idea to start with 6 plants, and if they all grew I could give three away so that I have enough space (3 plants for 1 square meter).
Problem was that the people that wanted the plants, could only take them in like week 14, and then they should already be in flower. Remember the word "should".
So I sticked with 6 plants in a very confined space..
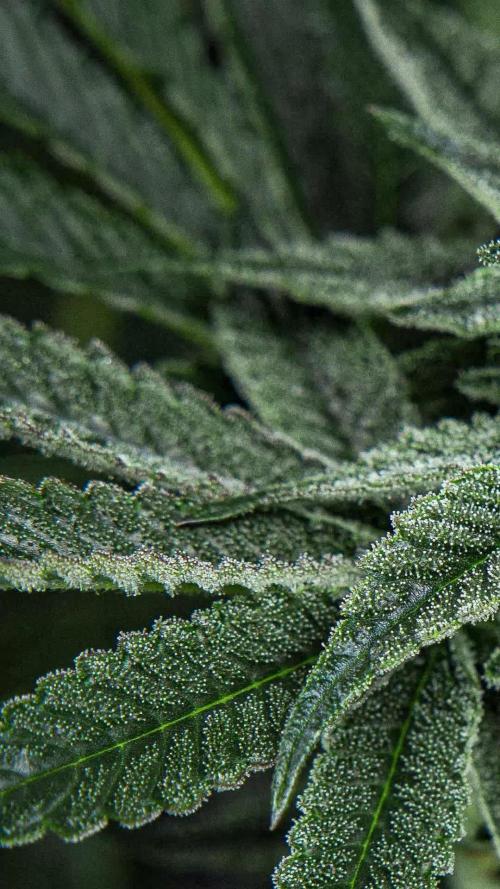
As described in the Video, this was before heavy defoliation. A few days later I flipped the light schedule from 18/6 to 12/12. At this point I had already done LST and a combination of FIMing and Topping. The two big ones and one small are Mandarin jam and the other 3 in the small pots are Super Skunk.
I think it would have been a better idea to put them in flower earlier.

Likes
14
Share


@MrWigglyJiggly
Follow
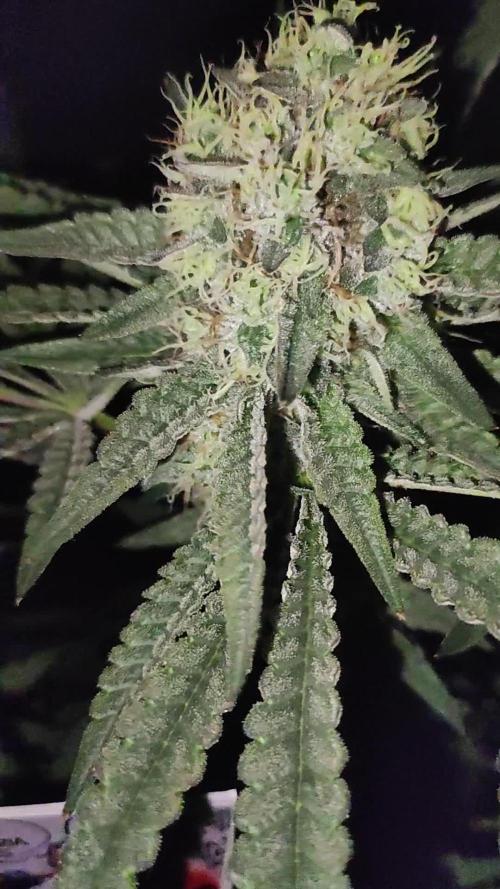
What a journey this has been. This girl weighs(dry) 263grams plus 23 grams(untrimmed lower nugs) could have pulled out 350g if let her veg a bit longer. The taste is like sweet candy and soda a hint of citrus. The effects are as follows, creative, giggles and energetic but once its nearly gone out. You will feel really sleepy and when you wake up you will feel really hungry. Anyways, thank you guys who have been following my journey. Next grow will be seeds from Sunkentreasure seeds

Likes
29
Share


@coldweave
Follow
Hey all sorry for the late update. Got really busy with work and just wasnt uploading. I had to cull phat Gary cause she was a genetic herm, I’m talking pollen sacks all the way up the main stem. I’ve seen a few stress sacks here and there on the lowers but nothing like this. I added a video of it so you might know what to look out for.
It’s my first experience with exotic genetix and while I have heard of them having herm issues before, I have never had anything quite like phat Gary. But, on the other hand, this Gary Poppins #2 is the best smelling plant I’ve ever had. She smells like a straight strawberry soda, just this very fizzy strawberry scent. It’s unreal. Gary Poppins #1 has a similar terp profile, but not as loud and she’s frosty as ever. Both the perm marker s1’s are identical. Both look exactly like the perm marker flower I’ve bought from seed junky in the past. Very lime green buds with light oranges hairs. Smells just like a permanent marker.
Couldn’t be happier with how this run is going, well except Phat Gary. Still haven’t decided on Exotic Genetix yet. I guess we will wait and see how Blueberry Gary comes out, she’s currently in week 6 veg. Shout out to the mad scientist Jbeezy though, this perm marker is unreal. When I saw he was releasing s1’s I couldn’t believe it. Gonna wash this entire run for some fresh frozen. I would absolutely love to get this Gary Poppins #2 smell to transfer to some live rosin. Will update this when we finish and I’ll make a diary for blueberry Gary and Gastro pop from compound genetics when I get a chance. Until then, happy growing all
Day: 52F - Week 8
🌡️:79 Fahrenheit
💦:50%
💡:75% @ 14 inches


Likes
5
Share


@High_And_Hydro
Follow
- Ich hab die erste Woche des Biobizz Allmix Düngeschemas gestartet und gebe wie immer erstmal vorsichtige 100%, da meine Erde an sich durch den Kompost recht potent sein sollte.
- Außerdem hab ich mit meinem Calmag-Rechner mein Leitungswasser angepasst. Die Werte könnt ihr auf den Bildern sehen.
- Den PH-Wert passe ich ebenfalls auf 6,5 an.#
- Die Lampe bringt zur Zeit etwa einen PPFD-Wert von 350 - 360 µmol/s/m² bei 18 Stunden Beleuchtungszeit (DLI von 22 - 23 mol/d/m²). Sie wird aber nur eingesetzt bis es warm genug draußen bleibt. Tagsüber stehen sie jetzt schon draußen, sofern es nicht regnet oder stürmt.
Die Purple Haze macht sich hervorragend und sie ist ganz vorne mit dabei. Das freut mich wirklich, da ich die immer mal sehen wollte. Ist vermutlich nachvollziehbar. 💪😁👍

Likes
31
Share


@JeyGanesha
Follow
Gorilla 🦍 cookies bellissima plant una delle 2 gorilla si è allungata più dell'altra.cmq continuano a dare il meglio di sé.

Likes
1
Share


@whereist2
Follow
Nutrient deficiency?
or
over feeding nutrients?
Normally feed 3days nutirents 1 day ph water
messed up my feeds which made me feed nutrients for 4 days instead of my intended 3days
which may of caused yellow tips. only on a couple of the leaves i (THINK) i might of caught pretty early
Flushed with ph 5.9 water saturday 18-1-25
as of 19/1/25 24 hours later no signs of it getting worse or on any other leaves
decided to cut big fan leaves of to try and direct the growth more to the nodes
going to leave it an hour or 2 to see how she reacts to what ive done then if all is good i shall feed with nutrient
Nutrient mix 5litres
H202 2.5ml
Silicate 3g
Calmag 5ml
Micro 5ml
grow 5ml
bloom 4ml
Ph 0.1ml
22-1-25 no feed for two days to see how it holds up..(Its holdin up)
last feed was 20-1-25
just some light LSTand defoliation today on 22jan just to keep all branches around the same level
the banana cookies that was planted same time seems to be a bit behind and is not on the same path
Likes
91
Share


@Salokin
Follow
Hi Growmies,
I'm excited to share some big news today! Although there have been some unexpected twists, it's all part of the incredible journey of gardening.
I've just completed the harvest, a tad earlier than initially planned, due to finding a bit of mold in one of the buds. Despite this minor hiccup, the trichomes were already at a decent 10% to 15% amber. So, all things considered, the timing ended up being pretty spot-on. The harvested weight was a solid 609 grams after trimming, which is quite a feat!
A lesson learned for next time: perhaps I let her grow a few too many buds, leading to a denser canopy than ideal. But on the bright side, the aroma is absolutely divine. I sampled an airy bud that had dried a bit, and wow, it packs a stronger punch than its clone mother. And the flavor? Pure, unadulterated cheese – no hint of pineapple here!
Now, the anticipation builds for the final dry weight, which I should know in about 3-4 days. It's always exciting to see the fruits of our labor fully realized.
A huge thanks to everyone who's been following along on this journey. Your interest and support mean the world.
And now, the adventure continues! I've started on Epic Buzz by Anesia Seeds. The diary for this new chapter is up and running, and the seedlings have already sprouted, marking the beginning of another exciting phase.
(https://growdiaries.com/diaries/185718-grow-journal-by-salokin)
I can't wait to share more updates with you all. Here's to the continued growth and learning in our gardening adventures!

Likes
3
Share


Processing
Likes
5
Share


@sercultiveta
Follow
35 dias de actividad en el indoor, foto periodo de 20 horas de luz y 4 de oscuridad


Likes
30
Share

@Cauli
Follow
Week thirteen for Candy House.
Day 39 of 12/12.
She's just doing her thing and despite some watching and watering there wasn't much to do this week :)
She looks like she's getting some rock solid nuggets and is so damn frosty! Looks like all that beating and torture thankfully did not stop her ^^
Really love this phase of a plants life, when all the work is showing in a steady progress and the most needed thing is patience.

Likes
10
Share


@ZzTooRightOGzZ
Follow
Week 3 going well so far.
Done a bit of lst to her but not much.
Week 4 fead her with 25ml off grow auto from living Soils.
Likes
2
Share


@OutdoorOperations
Follow
Both are really shooting up. I’m noticing a real difference between using 5 gal pots vs larger containers. Planter size has a huge impact on plant size as one would assume.. But, does it have any impact on quality?
I guess we will find out in a few months. Again, learning and experiments.
Sooo soo hot… was afraid they would show signs of fatigue but they were good..not really trying to push dry back too much in these temps
6/27 saw signs of caterpillars and accidentally broke off an upper branch
Likes
8
Share


@Fuzzel
Follow
Put the plants in a environment (-> tent) where I could control temp. and humidity better. Plants #2 and #3 moved from their 200ml pots into 8L fabrics on day 25. Could have waited a few days with that, since barely any roots where visible. Applied some Dynomyco and water with very low amount of Hesi TNT to all plants on day 25.
At about this point my excitement grew, since growth was finally accelerating and a little smell proofed that this was at least the right kind of plant. Slowly introduced the GCxSolo at about 35cm distance on day 19 and increased its output from 25-100% over 2 weeks.
Likes
14
Share


@Ezzjaybruh
Follow
These girls taking off like crazy.
Growing under this badass Smart 8 from medicgrow
Still at 40% until stretch has subdued I’ll crank it up and help pack the bud on.
2 left in the single bucket were topped,
2 I have in the basement under different lights.
We’ll focus on the MedicGrow light plants here.
Check out MEDICGROW website
https://medicgrow.com/
Really excited to see what it can do I’m flower. Love the Bloom button which increases red spectrum when wanted/needed…
Currently running at 40%
Official Website:
https://medicgrow.com/
Facebook:
https://www.facebook.com/medicgrowled
Twitter:
https://twitter.com/medicgrow
Instagram:
https://www.instagram.com/medicgrow420/
YouTube:
https://www.youtube.com/channel/UCNmiY4F9z94u-8eGj7R1CSQ
Growdiaries:
https://growdiaries.com/grower/medicgrowled
https://growdiaries.com/grow-lights/medic-grow

Likes
111
Share

@Salokin
Follow
Hello Growmies,
Here we are at week 17 of flowering with our Northern Lights by Zamnesia, and the excitement is palpable. Let's dive into the updates from this incredible stage of growth.
Our Northern Lights is flourishing beyond expectations. The buds are incredibly dense and continue to swell daily. This remarkable growth is a testament to the resilience and genetic quality of the plant.The trichomes are predominantly cloudy now, with a few beginning to turn amber. This is a crucial indicator of maturity and potency, suggesting that harvest time is approaching. The tent's aroma is becoming increasingly potent, a sign of the buds' maturing profile. I'm keeping the tent closed more often now to manage the strong smell. This intense aroma is a clear indicator of the quality and health of our plant. Looking back at the initial issues we faced, it's incredible to see how beautifully our Northern Lights has turned out. Her resilience and our adaptive approach have led to this stunning result. The EC level is now stable at 1.3, and she seems to be responding well to it. Over the next two weeks, I plan to gradually decrease the nutrient levels and then start the flushing process. This gradual transition is essential for the final quality of the buds. Your continuous support and engagement have been pivotal in this journey. Your shared experiences, tips, and encouragement have been invaluable. I'm eager to hear your thoughts and insights as we approach the final stages.
Thank you for being part of this adventure. Your involvement has made this journey even more enriching. Stay tuned for more updates as we near the end of this flowering stage. Here's to the continued success and beauty of our Northern Lights!
Likes
53
Share


@Secretflower
Follow
Bonjour à tous.
Le 18 août début de la 5ème semaine et jour 29 pour mes 10 White Widow. Durant la semaine dernière, elles ont grandi leurs feuilles mais niveau hauteur c'est des bonsaïs (10 centimètres en moyenne ), j'halucine lol, j'espère qu'elles vont grandir en hauteur pendant cette semaine.
Tout va pour le mieux.
Peace and Grow for All..😇😇😇

Likes
9
Share

@TheCalyxLaboratory
Follow
Week 2 of Flower: Absolute Power Mode & Defoliation Day 🚀🌿💎
Welcome back to the Lab! 🔬 We are officially wrapping up Week 2 of flower, and things are getting absolutely insane inside the testing facility! 💥 "The Gassy One" is running on pure high-octane fuel right now, pushing all genetic limits with a massive, aggressive growth spurt! 📈🏃♂️💨
Growth & The Great Stretch 📊📏
The plant vitality is completely unmatched! 💪 These ladies are throwing down serious node growth on a daily basis. 🌿 Since we are dealing with a heavily performing, vigorous hybrid, the internal hormone shift is causing an absolute explosion in height and canopy expansion! 🚀 The stems are getting beautifully thick, and they are begging for the light. 🔋 At the exact end of this week, we hit the perfect sweet spot to finally strip them down and unleash their full potential! ✂️⚡
The Defoliation Ritual & Stress Management ✂️🍃🕵️♂️
With the tent packing out completely from wall to wall, it was time for a heavy, calculated cleanup! 🛡️ We went in and executed a radical defoliation and lollipoppen to open up the entire structure. 🌳
The Goal: Getting that pristine, intense light from the Mars Hydro all the way down to the lower nodes, maximizing micro-climate airflow, and keeping the environment perfectly dialed in! 🌪️🎯
Quick Check: During the cleanup, I meticulously inspected the node junctions under the dense foliage. 🔍 Spotted a couple of micro-hermie signs (tiny 0.5mm pollen sacks) hidden deep down due to the extreme stretch stress. 🛑 Caught them early at a completely immature stage, neutralized them instantly with water, and plucked them off. 💦 Everything is perfectly safe, clean, and back on a pure female track! 👩⚕️✨
Nutrition & Environmental Metrics 🥥⚙️💧
The Athena Ag Blended Line combined with the automated AutoPot System is proving once again why it’s a commercial-tier cheat code! 🏆 The root zone is chugging nutrients nonstop, maintaining beautiful, deep, vibrant green leaf colors, and the foliage is actively "praying" to the light! 🙏☀️
Here are the exact laboratory specs for this week:
EC: 1.8 ⚡ (Feeding heavy to match the massive stretch demands!)
pH: 5.7 (Perfectly stabilized for optimal hydro/coco nutrient uptake!)
PPFD: 700 µmol/m²/s 💡 (Pure photon power dialing in the energy!)
No real pistil explosions just yet, as the plants are currently dedicating 100% of their energy into building the ultimate structural frame. 🏗️ Once this furious stretch slows down over the next few days, we are expecting a massive breakout of white hairs and the first real bud formations! ❄️🔮
Stay tuned, the lab is locked, loaded, and ready to dominate Week 3! 🔬🔥👑
Likes
16
Share


@m0use
Follow
This #40 and #42 plants from Ganja Farmer Seeds where the best out of them all, this is a bias review though as they where not all grown in the same bucket system as these two and thus could not grow to their true potential. The bugs where solid rock hard and crystaly They are true keepers if your wanted a good performing auto for shits and giggle outdoors. The major downside is how easily they got pests and how the pests preferred them over the other weed plants. this is a bit concerning to me and makes me wonder why. More to come.
@GanjaFarmerSeeds, If you like the images or videos I can send you raw files that have not been shrunk and contain no watermarks, if you feel I am in the top 3 of your BDOTY Contest that is :D

Likes
16
Share

@Bncgrower
Follow
Final stretch, next week it's time to flush them. The smell is really strong when I open the bedroom door, I believe in an extremely satisfactory result.. ❄️💪🌲
***The photo of the trichomes ended up getting mixed up, so I'll post photos of all the plants.
Likes
61
Share


@Natrona
Follow
Auto Opiym is in flower and with some cooler night temperatures in upper 50s low 60s the buds and leafs are changing colors🤩 The feeder leaves are yellowing and the sugar leaves are changing to purple 💜 . I top dressed with 2 tbsp bloom soil as fertilizer. Her limbs are spindly ans can't support the weight of her buds. I added a hoop to support branches but many just bent over the wire. I don't see many amber trichomes so I wait.
