
Likes
Comments
Share


@German_GrowLab
Follow
Einen wunderschönen guten Tag, liebe Grow-Community, und herzlich willkommen zur fünften Woche meines kleinen Outdoorprojekts!
Wir nähern uns mit großen Schritten der eigentlich interessanten Phase meines Gartenprojekts. Jetzt mag der ein oder andere sagen, dass die Pflanze im Vergleich zur letzten Woche kaum Fortschritte gemacht hat, und evtl. habt ihr recht. Allerdings möchte ich zu meiner Verteidigung sagen, dass das Setup so für mich sehr neu gewesen ist und ich zwar indoor „gelernt“ habe, ich jedoch die letzten Grows fast vollständig outdoor kultiviert hatte (seitdem es legal ist, selbstverständlich ;)). Außerdem sehe ich die letzten Wochen noch als Anzuchtphase, also alles halb so wild :).
Aber genug der Ausreden :), was stand diese Woche an?
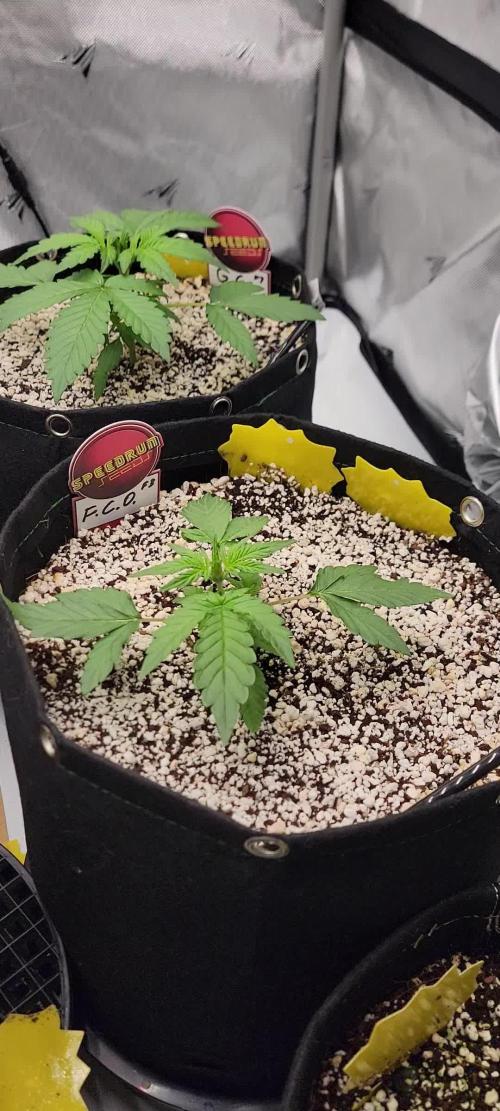
Da sich der „Auswilderungszeitpunkt“ jetzt wetterbedingt doch noch um eine Woche verschiebt und die kleinen Substrat und Topf geschuldet den ersten Mangel aufweisen, habe ich den kleinen mal ihre erste richtige Düngung verabreicht (Greenhouse-Powderfeeding 1 g/L). Eigentlich sollten sie schon rausgesetzt werden, allerdings traue ich diesem ganzen Warm-/Kalt-Mumpitz nicht. Da gönne ich den Damen lieber noch eine Woche in ihren künstlich beleuchteten vier Wänden. Ebenso musste ich die Pflanzen untenrum etwas ausdünnen, da die älteren Blätter leider mangelbedingt irreversibel geschädigt waren.
Der Tee wird für ca. 24 Stunden mittels einer Aquarienpumpe in Kombination mit Sprudelsteinen belüftet. Je nach Dauer der Belüftung enthält das Endprodukt mehr Mikroorganismen (24 h), bei länger gebrauten Tees enthält dieser weniger Mikroorganismen, dafür mehr gelöste Nährstoffe und Enzyme sowie Aminosäuren, welche als Futter für bereits bestehende Mikroorganismen fungieren. Um das beste Ergebnis zu erzielen, müsste ich mein Setup noch mit einem Heizstab ergänzen, welcher die Wassertemperatur konstant zwischen 20 und 23 Grad hält.
Für den Tee benötigen wir:
Ca. 15 L Wasser
30 g
1 l Regenwurmhumus
Eine handelsübliche Aquarienpumpe + Sprudelstein
Melasse (fungiert als Nahrung und begünstigt die Vermehrung der Bakterien). Der Wurmhumus steuert die Mikrorganismen sowie Huminsäure bei, welche das Pflanzenwachstum unterstützen. Ich verwende ausschließlich Regenwasser, da es weder Chlorrückstände aufweist noch einen niedrigen EC‑Wert (ca. 0,05) hat.
Wo liegen die benefits?
Fördern den Gasaustausch der Pflanze, indem sie dafür sorgen, dass sich die Stomata schneller und weiter öffnen (wenn als Blattspray angewandt).
– Beimpfen den Boden mit nützlichen Mikroorganismen (Pilze, Bakterien, Protozoen, Nematoden etc.) und sorgen dafür, dass ein Boden-Nahrungsnetzwerk aufgebaut wird, welches die organischen Stoffe im Boden zersetzt und diese für Pflanzen verfügbar macht.
Morgen werden die Kleinen dann mit dem Tee gegossen. Alles, was übrig bleibt, benutze ich dann, um die bis dahin hoffentlich fertig gemischte Erde anzugießen, bevor sie eine Woche in den Endtöpfen fermentiert.
Aber dazu wie immer im nächsten Bericht mehr. :)
Euch wie immer einen schönen Restsonntag
Und wir hören uns nächste Woche.
Peace.


Likes
114
Share


@TheFoxFarmer
Follow
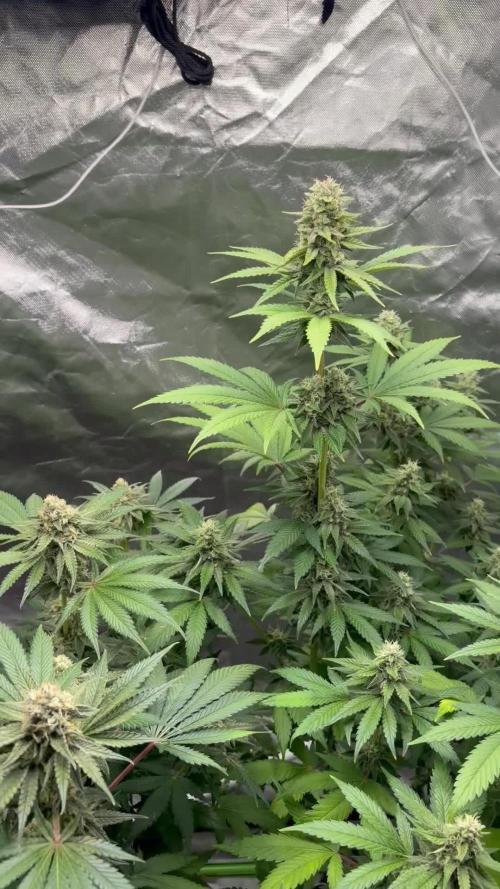
Week 1 Flower
The twins are finally in flower and looking extremely happy and healthy. They were thrown into flower on day 55 veg (day 0 flower). They we're lollipopped towards the end of the week, on day 6. I also pinch the tops of the main stems of each branch that is growing taller than the rest, to slow it down. This not only allows the other tops to keep up, but it will also thicken the stem and make the branch stronger.
Their base nutrients were changed to a 1:1:1 (G:M:B) ratio throughout transition. Silicon is increased while they're stretching, as they are growing at a much faster rate. Cal-Mag and Epsom Salts were also increased slightly, and will be kept at this level until they're stopped later in flower.
You can clearly see the difference in structure between these two pheno's, now they're in flower. Unexpectedly, Twin2 hasn't stretched as much as Twin1 in this early stage in stretch, and is sidebranching like mad. With that being said, I think Twin1 is looking slightly better and a more beautiful plant. Time will tell... 🌹
Slo Mo vid of Twin1 on Day 7 📽️
Thanks for following and happy growing! 🐺

Likes
14
Share


@Chi_K24
Follow
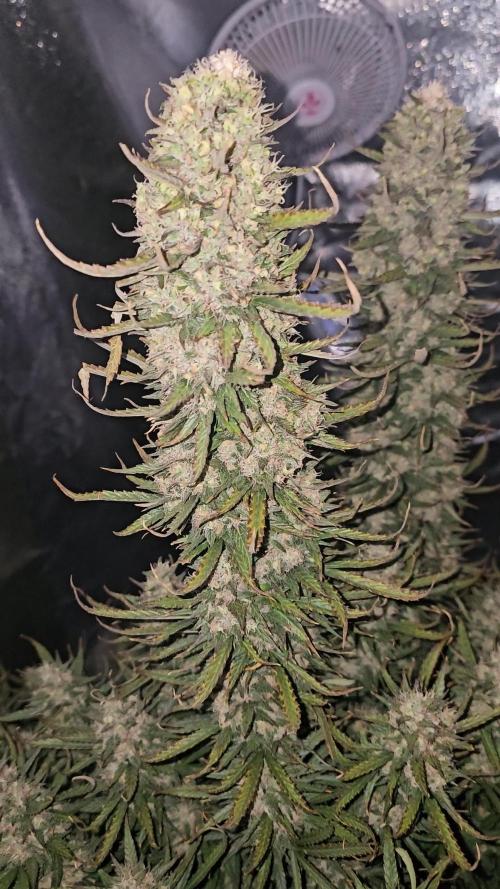
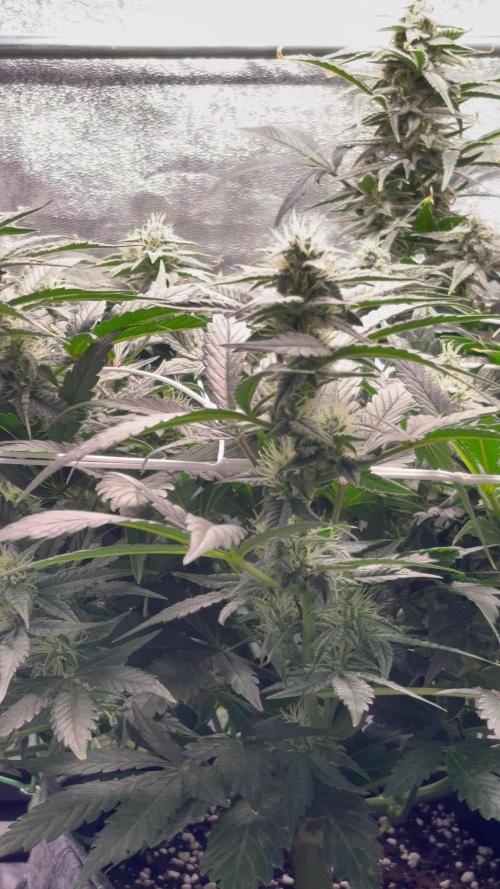
Hey folks. Into week 16 (week 7 into flower) and the ladies are doing great! Again putting on some mass! Temps have been optimal hover around 12-25degs, night to day respectively.
They are starting to stink up nice, lots of pine, kushy undertones and a hint of pepper! Sounds and smells insane. Its not loud yet but the aromas hanging out on the deck are amazing with a gentle breeze!
They are packing on some serious mass and producing an amazing amount of resin. Hope you guys enjoy the vids and pics.
Keep the peace :)
Chief Keif

Likes
4
Share


@CannaIGrow
Follow
Plant is growing well. Transplanted them from a 1 gallon pot into a 3 gallon pot this week.


Likes
175
Share


@the_curious_grower
Follow
another week had passed and i am in full joy. the weather is really good lately with a lot of sun and rain in the evening. gorilla breath #1, the Sapphire scout and Sugar breath #1 are literally becoming bushes. the gorilla breath #2 and the Sugar breath #2 aren't quite growing nicely as the others and tend to have gaps in their canopy which have to be filled up. since i am only home in the weekend i don't have the amount of time to spend on the plants as i wished. they are becoming stronger in smell by the week and have a really complex smell with hints of diesel, cinnamon and vanille from the Sugar Breath's, some hints of diesel, grapes and berries from the Sapphire scout and hints of Chocolate diesel with vanille from the gorilla Breath's.

Likes
32
Share


@WhiteWidow
Follow
All good so far, will post some divided pics later on when flowers start forming..
Orinoco and critical plus are close to being double in size since i flipped lights to 12 12, they are gonna be huge :)


Likes
1
Share

@Oneman
Follow
The two Water Egg strains have not developed and are stunted and deformed. I dropped the seeds before germination in the carpet. I found them but they must have picked up some bacteria or something. they are the only two that are weird and slow. I pulled them. I'm thier place went Speedrun Seeds Final Boss F2 and Terprantula Autoflowers Midnight Comet. Sowed directly in pots. Midnight Comet is in Gia Green amended coco cori and perlite 5 gallon fabric. Final Boss will be in Autopot 5 gallon fabric fed with the others.


Likes
11
Share


@blackcald
Follow
3d week go on. Topping on plant A. Add nutrients every 2d day. Down ph to 6.3. Start LST on plant A.

Likes
9
Share


@Herbz_Unkraut
Follow
another resin monster from seedstockers, with a very special scent, full of flavors! grinded it smelled like peppermint, and vaped it has a great sweet creamy taste!

Likes
11
Share


@Skinnytalls420
Follow
Day 1-12/12/21 I placed the seeds into a glass of water for 24hours! Day 2-13/12/21 I have put the seeds on a wet paper towel on a plate! Day 4-15/12/21 seeds have been put into soil and placed into tent!!!day 6-17/12/21 most of the seeds are showing first signs of leafs
Likes
29
Share


@ChiefGrowAutoflowers
Follow
Still battling humidity although I think I have finally came up with a solution that allows my co2 too flourish as well. I connected my outlet carbon fan to my humidity control and changed my settings to the green ban of my vpd chart. I’ll keep you guys in the loop on that.


Likes
14
Share


@Viking_s_farm
Follow
Ciao a tutti, cari amici coltivatori guerriglieri e non!🤙🏼 questa terza settimana è stata abbastanza impegnativa perché ho iniziato ad applicare la piegature (o Lst come la si voglia chiamare). Solitamente uso questa tecnica perché trattandosi di una varietà autofiorente è meno stressante per la pianta e abbinata ad una “regolare” defogliazione permette di ottenere dei risultati interessanti in termini di raccolto. Oltre a questo, la parola d’ordine di questa settimana (fortunatamente conclusa) è solo una: FREDDO! infatti, dopo un inizio settimana di temperature piuttosto miti, la temperature sono diventate più fredde. Ah…che sia chiaro, quando dico "freddo" mi riferisco a temperature più basse dei valori ottimali che comunque che rendono più stentato lo sviluppo e la crescita della mia piccola bimba (dovrei cercare un nome da darle😅). Nel complesso però la mia piccolina boxeuse si difende alla grande!🥊
01/05/2022. 1l d’acqua:
Ph: 7.0
Ppm: 397
T: 24º
Altezza:7,5 cm
T Max: 29º
T Min: 18º
Hum Max: 87% Hum min: 46%
Sembra in buona salute, ha un colore verde vivo ma la crescita sembra un po’ lenta. Ancora niente prodotti.
01/08/2022. 1l di soluzione nutritiva:
Ph: 6.20
T: 21,6º
Ppm: 679
Temp. Max (lampada accesa): 27,4°
Temp. Min (lampada spenta): 18,1°
Hum. Max: 71%
Hum. Min:49%
Oggi si iniziano a dare un po’ di nutrienti, io utilizzo la linea dell’advanced nutrients ph perfect Grow/Micro/Bloom come Base (1ml x 1L di acqua demineralizzata per ciascun prodotto) più B-52 e Voodoo Juice (2ml x 1L d’acqua demineralizzata). La piccola non presenta problemi, ha un’altezza di 10 cm e sta sviluppando il 3° internodo, se continua così tra qualche giorno si inizia con LST.
01/10/2022. Oh oh…😲 le foglie più giovani mostrano una leggera clorosi ai bordi con venature leggermente più scure, potrebbe essere dovuto a un Ph sbilanciato oppure a una carenza di calcio e magnesio. Forse conviene darle una leggera fertilizzazione tramite spray fogliare.
01/11/2022. Bene, la clorosi fogliare 🍁 perdura quindi proviamo a risolvere il problema con uno spray fogliare :
Advanced Nutrients Sensi Cal Mag Xtra: 2ml x 1L d’acqua.
Una bella spruzzata generale sia sulla pagina superiore delle foglie che sulla pagina inferiore in modo da permettere agli stomi di assimilare la soluzione.
Iniziato LST piegando la cima apicale fino a farle quasi toccare il bordo del vaso.
Processing
Likes
40
Share


@Teamdirtbag2
Follow
Thanks again Short Stuff
Tha Shiznit this one should get real nice. For sure.
Tha Shiznit is an Auto strain of the highest possible quality. The Urban Dictionary describes the phrase, ‘Tha Shiznit’ as ‘The greatest, the best ever, simply the shit…’ and this autoflowering strain matches up to that description.
Tha Shiznit is a complex hybrid of Amnesia kush, Diesel, Master Kush and Jack Herer so you have some serious genetic quality in the mix.
Shiznit produces medium to large, plants which can easily surpass 1m indoor. She has larger internodal spacing with chunky buds forming at each internode. She will generally have a thick central stem and a dominant main cola, large fan leaves and thick clustered buds. This plant is extremely resinous as you would expect for a strain with so much Kush heritage and in a percentage of plants you can expect to see some pink and purple coloration.
Tha Shiznit gives off a classic old school skunky flavour/fruity and some phenotypes express a unique strawberry smell. When smoked you get an intensely strong flavour on the inhale with the fruity aromas coming through on the exhale.
This strain was tested at Spannabis 2014 and recorded THC levels of 20.6% which for an autoflower strain is quite incredible. These high levels of THC mean Tha Shiznit is one of our most potent straisn and produces a powerful cerebral high that keeps you chatty and motivated.
Tha Shiznit is a very straight forward strain which can handle plenty of nutrients and requires little attention. If grown with some care she can easily produce 60g+ per plant.

Likes
7
Share


@eldruida_lamota
Follow
Vamos familia actualizamos la cosecha de las gelato Olandese de Dutchfem .
La verdad que el secado muy bien 7 días en Malla y a los botes, 40% humedad y 24 grados es la temperatura ambiental que han tenido en el secado.
Por lo demás de miedo os la recomiendo.
Gracias a DutchFem, Agrobeta y Mars hydro , sin ellos este proyecto no sería igual 🙏.
Agrobeta:
https://www.agrobeta.com/agrobetatiendaonline/36-abonos-canamo
Mars hydro:
Code discount: EL420
https://www.mars-hydro.com/
Buenos humos.

Likes
4
Share

@MO_PureLeaf
Follow
Die Cream Caramel Entwickelt sich super! Den Geruch den die Pflanze verbreitet is eine starke fruchtige aber leicht erdige Note. Es macht Spaß die Pflanzen zu kontrollieren um zu sehen wie die terpene sich entwickeln. Und sobald die terpene so aussehen wie ich es haben will.. dauert es noch ein bisschen. cal/mag dosiere ich bei 1ml/L.
Likes
16
Share

@Peca1973_Vv
Follow
I took two off last night, and these other two have a few more days to work...now they only drink water and smell great 😊 and I won't say any more... the pictures say it all, I also expect a very good yield 😁
Likes
6
Share


@TheMayor4434
Follow
In week 8 iv come to the sad realization that nearly all of the plants are at different stages of development. Dispite all the seeds being germinated at the same time. So iv had to take them off the wilma systems and am feeding them manually and there all on different diets. Which is an absolute headache especially as there is 16 plants to tend too. I think iv bit off abit more than I can chew for my first grow I maybe should have started with a couple of plants. I think the large wilma setups are designed for clones really so you know they are all going to progress and eat the same amount at once. It's not for autos . There all looking healthy though:)


Likes
38
Share


@IbeBryBry
Follow
Has a nice skunky smell. Just going through her thing.
Shout out to AMS(Amsterdam Marijuana Seeds) for this beautiful Afghan Feminized.
She is completely done with her stretch, has starting stacking her bud sights and started to produce noticable trichomes.
Giving her nothing but RSO, tiger bloom, black strap molasses and CalMag. Possibly add Bestie BloomZ this coming week.
Still have along way to go, but definitely be worth it. 🔥 🎄 💕
