The Grow Awards 2026 🏆 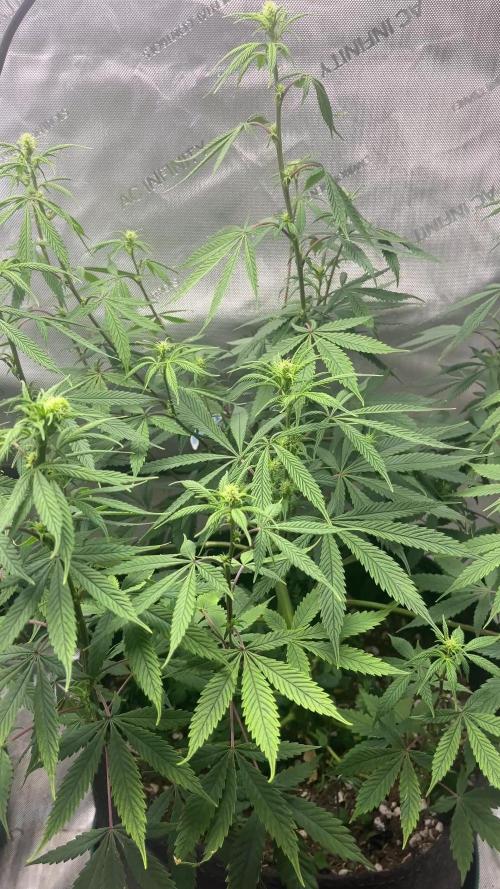


Likes
1
Share
@LokalGrenz
Follow
7/22
Did some light deflation nothing crazy
Had turn on the dehumidifier humidity been getting to high besides that everything seems cool
Likes
29
Share
@GreenHouseLab
Follow
Iphone 7 is a piece of garbage nevertheless these buds still make it shine hard. Smell of cheetah piss hoping it will be very unique smoke and effect.
Enjoy hope all are having killer success with their grows, ✌️
GHL
Likes
47
Share
@terpproducer
Follow
👇 This week:
---
Watered again as usual with the standard Plagron scheme + Calmag (last feeding with Alga Grow) (PLEASE CHECK YOUR WATER BEFORE USING CALMAG)
Phosphorus foliar spray - red stems pretty much gone now
PPFD at canopy height approximately 350-400, VPD ~1
Performed a major defoliation again
Ordered more Autopots 😂
---
Happy growing and thanks for checking out my report! I really appreciate you! 😁💪🙏


Likes
17
Share
@420DeepGrow
Follow
Gracias al equipo de Seedsman Marshydro XpertNutrients y Trolmaster sin ellos esto no sería posible.
💐🍁 Tangerine Snow F1 Fast:
Esta gran cepa es un cruce de cuatro vías 75% sativa de (Boost x Tangelo) con (Lavender x Power Plant). Este híbrido Fast F1 proviene de la genética Cali y cuenta con excelentes terpenos cítricos, alta producción de resina para extractos, altos niveles de THC, muy buenos rendimientos y excelente resistencia al moho. Tangerine Snow F1 Fast se puede cultivar tanto en interior como en exterior. Los tiempos de floración en interiores son de entre 8 y 10 semanas, mientras que el tiempo de cosecha en las latitudes del norte es en septiembre, mientras que en el hemisferio sur los productores cosecharán durante marzo. Las regiones climáticas recomendadas son cálidas, secas, húmedas y cálidas. Se trata de plantas altas, semiramificadas, que superan los 200cm y que presentan un alto vigor con muy buena uniformidad. Al igual que muchas otras variedades con fuerte dominancia sativa, Tangerine Snow F1 Fast ofrece una excelente resistencia al moho, así como a las plagas y enfermedades de las plantas. La combinación de terpenos cítricos y mucha resina la convierten en una cepa de muy buen extracto, cuyo método de "lavado" produce muy buenos rendimientos de hachís. El perfil de terpenos cítricos recuerda a las mandarinas y mandarinas y también tiene notas dulces. La producción de THC ha sido verificada en laboratorio en un fuerte 24%, mientras que el CBD es bajo. El efecto es edificante y energizante, perfecto para usar durante el día y las primeras horas de la noche.
🌻🚀 Consigue aqui tus semillas:
💡TS-3000 + TS-1000: se usaran dos de las lámparas de la serie TS de Marshydro, para cubrir todas las necesidades de las plantas durante el ciclo de cultivo, uso las dos lámparas en floracion para llegar a toda la carpa de 1.50 x 1.50 x 1.80.
https://marshydro.eu/products/mars-hydro-ts-3000-led-grow-light/
🏠 : Marshydro 1.50 x 1.50 x 1.80, carpa 100% estanca con ventanas laterales para llegar a todos los lugares durante el grow
https://marshydro.eu/products/diy-150x150x200cm-grow-tent-kit
🌬️💨 Marshydro 6inch + filtro carbon para evitar olores indeseables.
https://marshydro.eu/products/ifresh-smart-6inch-filter-kits/
💻 Trolmaster Tent-X TCS-1 como controlador de luz, optimiza tu cultivo con la última tecnología del mercado, desde donde puedes controlar todos los parametros.
https://www.trolmaster.com/Products/Details/TCS-1
🍣🍦🌴 Xpert Nutrients es una empresa especializada en la producción y comercialización de fertilizantes líquidos y tierras, que garantizan excelentes cosechas y un crecimiento activo para sus plantas durante todas las fases de cultivo.
Consigue aqui tus Nutrientes:
https://xpertnutrients.com/es/shop/
📆 Semana 7:
Ha sido una semana algo complicada, tormentas, frio y lluvia han ralentizado el crecimiento, espero que pronto lleguen dias soleados, continuo con 1/3 nutrientes recomendados en cada riego.


Likes
1
Share
@Growing_Spartan
Follow
August 25th
Buds are getting more dense and picking up their trichomes nicely, only issues have been temp swings from 87F-72F and RH from 32-45, adjusting the setup to have smaller ranges

Likes
1
Share
@Marmotaaaas
Follow
Esqueje de gorilas glue y de blue berrys
Me las dieron en flora crecieron arto ya van super bonitas las flores bien olorosas y pegajosas se les iso el scrog y an abierto los brazos a todos lados
Likes
20
Share
@Mamaweed
Follow
Last week with fertilizer
Purplematic is Beautiful
Strong buds
Trichomes are almost ready !

Likes
18
Share
@ButterfliesLittleFarm
Follow
Hello Diary.
The second week of flowering is behind me. I did a little defoliation this week, I honestly didn’t dare remove more leaves and branches, I didn’t know how they would react to it. Maybe I needed more?
The temperature is still high, sometimes rising to 29, 30 degrees, but mostly around 28. Humidity in the air is an average of about 55% but sometimes rises to 60%. The problem is frequent rains this summer which creates high humidity in the air and this affects the humidity in the box as well. But plants tolerate these conditions very well.
The flowers are developing nicely, and they have started to smell as well, but let the pictures speak for themselves.
Green Gelato is twice as small compared to her roommates, but there is still a big crowd in the box. Gelato grew with very dense branches and spread more than it grew in height. The 120 x 60 box size is perhaps too small for three plants (two Hulkberries and one Green Gelato), so the real jungle is in the box.
Due to the height of the Hulkberry in the box, and the spreading branches, it has become difficult to take them out every week for photography, but I am extremely careful with them.
The Green Gelato has grown to 48 cm and does not look like it will grow much in height. Probably due to the excessive distance from the light, which I had to raise because of the Hulkberry which reached a height of 1m.
18/07/2020. - Day 30.
Defoliation. I removed the leaves at the very bottom of the plant to make it easier for me to water them, after that I watered the plants but this time I didn’t put BioBizz, I just watered them with clean water.
21/07/2020. - Day 33.
Watering. This time I gave them BioBizz, on schedule for the second week of flowering. I also added CalMag 1.5ml / L, preventively. While they don’t show they’re missing anything, I’ll keep adding CalMag.
23/07/2020. - Day 35.
Photography and height measurement.
Green Gelato Auto - Day 35. - 48cm
That’s all for this week, see you soon.
Likes
3
Share
@HowtoBubatz
Follow
The plant is doing well overall this week! 💪
To handle a few fungus gnats that started showing up, I introduced nematodes into the soil and placed some yellow sticky traps, seems to be keeping things under control so far.
She's growing quite tall now, definitely stretching up nicely, but not really filling out much in width. A true lemony skyscraper in the tent!😂💚

Likes
21
Share
@Herbie
Follow
Having just started a Sweet seeds + speed Auto, Red poison auto from sweet seeds was next on my list to be grown with Jack 47 in my arsenal after that.
I'm already growing some sensible seeds strains so I didn't want to dip into them.
I considered buying a seed for the 'one girl one cup challenge' aka Solo cup competition but knew I'd send myself crazy deciding which I should use.
I had half decided I wanted to go Indica dominant as an entry for their shorter size anyway so...... after looking at images online of the Red Poison, I thought it would actually be a good choice.
"....So a 16oz cup is a what now?"
pint - no
litre- no
half pint - no
500ml - nope
473ml - yes, ah ha!
473ml = Nothing, the size doesn't exist in the UK.
online I can get 10 delivers fow a few quid. I'm not paying that, I'll find something.....
Closest ( It's near perfect to be honest) I found was an, ahem... recent... 30 and fab cup. I've videoed it's contents as proof
I'm thinking as Indica she's gonna drink a lot (compared to sativas in my opinion) but I also have no drainage.
Even though I think she may be a big drinker, I'm not worried about her drying out so much, she'll quickly bounce back from a drying out with a drink. I'm more worried of Over watering
I still need to (at time of writing this) actually make a homemade tent first, buy some (probably 2) cheap bulb fixtures, I've still got some foil blanket left from other tents I've made and I've got some spare house hold LEDs I'll bang something together......

Likes
28
Share
@MadeInGermany
Follow
Hey everyone 😃.
This week she has done great 👍.
It was done again on all the drifted topping and sprayed one last time with neem oil so that the last trips are finally gone 😁.
We haven't had any pests for so many years and all of a sudden we have such little shit parts 😅.
This week it was poured twice with 1.2 l of water.
GHSC enhancer was added during a pouring (1 g per l)
The tent was cleaned every day this week and the plants were checked for health.
The humidifier is filled once a day.
Next week I will decide how I will continue the training because I have space again in the flower tent 😀.
Until then, I wish you and your families a good start into the new year 2021 🙏🏻.
Stay healthy and let it grow 🍀
You can buy this Strain at :
https://www.royalqueenseeds.de/feminisierte-hanfsamen/115-amnesia-haze.html
Type:
Amnesia Haze
☝️🏼
Genetics:
Original Amnesia Haze
👍
Vega lamp:
2 x Todogrow Led
Quantum Board 100 W
💡
Bloom Lamp :
2 x Todogrow Led
Cxb 3590 COB 3500 K 205W
💡💡☝️🏼
Soil :
Canna Coco Professional +
☝️🏼
Fertilizer:
Green House Powder Feeding
☝️🏼🌱
Water:
Osmosis water mixed with normal water (24 hours stale that the chlorine evaporates) to 0.2 EC. Add Cal / Mag to 0.4 Ec Ph with Organic Ph - to 5.5 - 5.8 .
Likes
21
Share
@Stick
Follow
This week was half veg half bloom. I may have to find a new home soon so I've decided to flip all my plants into flowering by the middle of week 08. This lovely AK-420 is the smallest plant in the room, but probably the cutest. Her tight nodes are ready to explode with flowers and her stalks, hidden beyond large leaves, are strong enough to support heavy buds. She had a slight Calcium deficiency that was treated immediately and the recovery was quick. I'm confident she will become a nice bush. She no longer has the canopy ring, in order to "let her breath" and grow vertically. Wait & see! 😎

Processing
Likes
6
Share
@ganjaman24
Follow
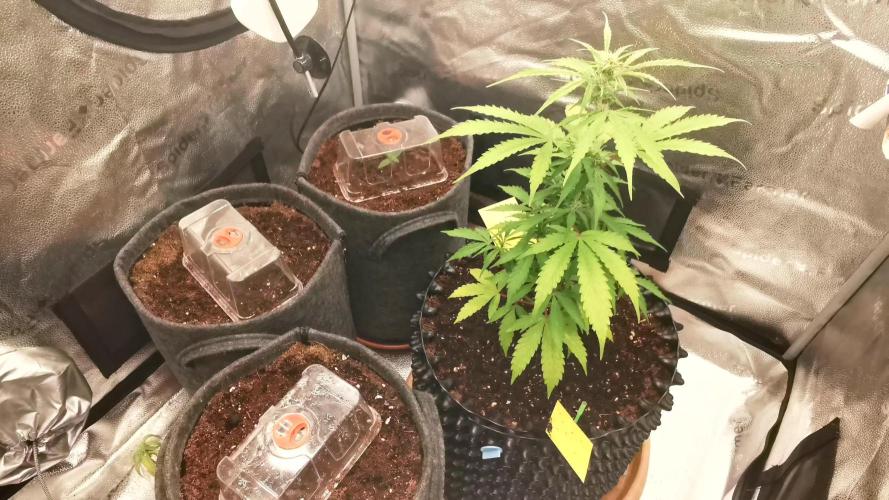
Just got a new 600w mh/hps light for now it’s in my current setup with my 250 n it’s dimmed to 50%, only reason I mention is b/c the plants seem to be loving it!! They’re 12 days old from seed, still just ph’d water for them! So far so good :P


Processing
Likes
8
Share
@DankStank
Follow
This week we are ready to bring the Pineapple Express and blue dream inside for a dark period for chopping. The sour diesel and northern lights should be ready next week. Expert haze is pre flowering and the clone is showing small roots.


Processing
Likes
22
Share
@DankBudz
Follow
Well day 63 in flower and still maybe only 25% red hairs.
022320 - day 68 flower, still 50% white hairs, almost time to start watching trichs 😁.

Likes
3
Share
@OldskoolHed
Follow
Good week. Putting on a nice coat of frost and stinks like skunky sweet candy. Doing really well for a 2 gallon in a small tent.
Likes
10
Share
@SnoopyShaggy
Follow
Some leaves are alredy yellowing indicating harvest time is nearing. I also shock stress the plant by reducing nutes to avoid harshness from my smoke. Just banana compost tea+plain water. Since this grow is in a supersoil, dropping the BigBud nute off in last 3 weeks to allow the microbes do its work.
In 2weeks once trichomes are ready, i will chop one of the plant.
Them colors on the strawberry is magical. Cant wait to dry them and cure to see the effects.
Likes
19
Share
@Changman
Follow
The ladies are looking incredible and so far they are still stretching, might add a secondary trelis net