The Grow Awards 2026 🏆
Likes
Comments
Share
@Gembel94
Follow
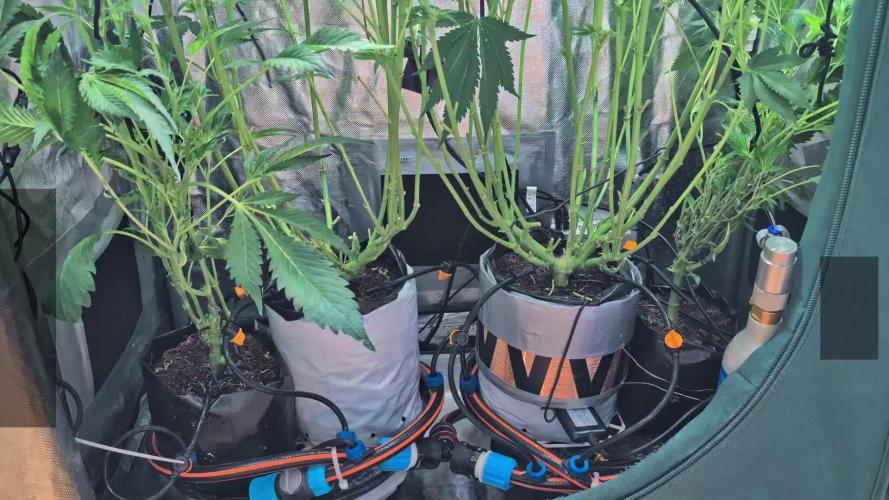
Grow-Report – Blütewoche 2 (Tag 8–14) Strain: Neon Runtz (Wizard Trees) Medium: Coco, 15 L Stofftöpfe Zelt: 1,40 × 0,70 × 2,00 m Lichtsystem: Spider Farmer G4500 + UV/IR-Supplement Bars Steuerung: Spider Farmer Controller + Meross WLAN-Steckdosenleiste Lichtzyklus: 12/12 (18:00 – 06:00 Uhr) Luftentfeuchter: Klarstein DryFy Pro Connect 16L (seit Dienstag im Einsatz) ––––––––––––––––––––––––––––––––––––––––––––––––––––––––––––––––––––––––––– Düngung – Woche 2 Basisdünger: - Cali Pro Bloom A: 1,5 ml/L - Cali Pro Bloom B: 1,5 ml/L - CalMag Agent (Canna): 0,5 ml/L Zusätze: - Emerald Goddess: 2 ml/L - Honey Chome: 2 ml/L - King Kola: 2 ml/L - Root Wizard: 4 ml/L - PowerZym (Hesi): 2 ml/L ––––––––––––––––––––––––––––––––––––––––––––––––––––––––––––––––––––––––––– IR-Supplement (Spider Farmer IR-Bar) - Morgens aktiv: 05:45 – 06:30 Uhr (15 Minuten vor bis 30 Minuten nach Lichtstart) - Abends aktiv: 17:30 – 18:00 Uhr (30 Minuten vor Lichtaus) - Gesamtlaufzeit: 1 Stunde 15 Minuten täglich - Verwendung: durchgehend aktiv über die gesamte Blütezeit - Funktion: Unterstützt die Phytochrom-Umstellung, reduziert Stress beim Lichtwechsel - Wirkung: Tagesrhythmus stabilisiert, aufrechter Wuchs ohne Überdehnung ––––––––––––––––––––––––––––––––––––––––––––––––––––––––––––––––––––––––––– Gießverhalten & Luftfeuchtigkeit - Tägliche Gießmenge reduziert auf 2,5 Liter pro Pflanze - Grund: Sehr hohe Luftfeuchtigkeit durch äußere Wetterbedingungen (Regen, hohe Umgebungsluftfeuchte) - Luftentfeuchter hält RLF derzeit bei etwa 65 %, trotz Dauerbetrieb - Entlaubung durchgeführt zur Verbesserung der Luftzirkulation im unteren Bereich - Drainmengen kontrolliert, Wurzelzone gesund, keine Staunässe oder Fäulnis ––––––––––––––––––––––––––––––––––––––––––––––––––––––––––––––––––––––––––– Pflanzenzustand & Entwicklung - Pflanzen zeigen kräftiges, vitales Wachstum - Erste Blütenansätze sind sichtbar - Leichte Harzbildung beginnt, Geruch nimmt zu - Keine Nährstoffprobleme oder Mangelerscheinungen zu erkennen ––––––––––––––––––––––––––––––––––––––––––––––––––––––––––––––––––––––––––– Visuelle Entwicklung – Tag 8 bis Tag 14 - Pflanzen befinden sich klar im Übergang vom Stretch zur Blütenbildung - Zu Wochenbeginn längere Internodien, am Ende kompaktere Triebspitzen - Entlaubung hat für gute Luftführung gesorgt – freie Stängel, keine Stauzonen sichtbar - Gleichmäßiger Stretch und Lichtverteilung durch SCROG/Gitterführung - Laubgesundheit sehr gut – sattgrün und glänzend - Gesamtbild: stabil, gut trainiert, sehr homogen ––––––––––––––––––––––––––––––––––––––––––––––––––––––––––––––––––––––––––– Ausblick auf Blütewoche 3 - IR-Licht bleibt vollständig aktiv, unterstützt weiter Einschlaf-/Aufwachprozess - UVB bleibt weiterhin deaktiviert (geplanter Einsatz ab Woche 6) - Gießmenge ggf. leicht erhöhen, wenn Luftfeuchtigkeit sich weiter stabilisiert - King Kola und Honey Chome werden fortgeführt - Ab Montag: Start des Purolyt-Einsatzes zur mikrobiellen Stabilisierung → Anwendung als Blattspray bis zur Ernte geplant → Ziel: Schimmelprävention & erhöhte Hitzetoleranz bei Sommerbedingungen - Beobachtung der Bud-Struktur und Geruchsentwicklung im Fokus
Likes
62
Share
Hello again guys and welcome to day 89! The girls are taking their time but finally the trichomes are turning milky. As you can see from the videos, they still aren’t quite there yet. I really want them to reach their maximum potential instead of rushing it. I think in maybe a week or so they should be ready! Thanks for stoping by
Processing
Likes
12
Share
@Buurman
Follow
A really hot week last week, The lamp doesn’t make it any easier but steady at 28 degrees now. OG auto in its final days I think, leaves are starting to turn yellow so I’ve started a flush, it’s a beautiful plant, 80% of the plant is covered in bud, I’ll post some good pics before harvest. Not gonna be a crazy yield but for the size of the plant really decent. The feminized OG are all exploding with bud sites, amazing how fast it’s going the smell is getting better by the day Gorillas are cute! Flowering a little slower but a lot bushier and the leaves are sooooo pretty! Started to give more water and upping the dosage of nutes since I’ve not seen any signs of over feeding might as well try it out Okloveyoubye ❤️
Likes
11
Share
sooooo... I have now harvested the plants and they looks so pretty 😍😌 I'm really proud of myself to have produced such THICC BUDS!!! 😅😍 and the smell is so awsome 😵 this strain is a 11 from 10 👌 a realy big Thanks to Royal Queen Seeds for this 2 awsome strains 💪 A detailed rating comes after drying with a detailed score board 😄
Likes
2
Share
@zarx8787
Follow
Just showing y’all how beautiful this strain is. Even tho the buds didn’t turn out purple I’m hoping the pheno on my other girl is a purple type
Likes
52
Share
This is how things are looking for the King's Juice at the end of Week 8 of Flower, I have uploaded a video where I am checking out the Trichomes using my USB jewelers loop. Any questions just ask away guys. 👍🏾🌱💚....... Also a guy I know that has finished their King's Juice before me, has finished the cure, had a smoke and told it that I will absolutely love the smoke 🤤🤤 by the way she smells I can only imagine the flavour!
Likes
7
Share
Plant continues to grow strong! Canopy is dispersing well and getting good light penetration through the leaves.
Likes
16
Share
@Ensign420
Follow
Introduction - Week 14|07 Summary - Ensign's log, stardate 9437.65, Great week of growing! Wow what a good week! Growth in the main tent has all around been incredible! Submitted my first submission to the Global Grow Cup! Filmed a video of the solo cup container (marked with the ticket/order number) that will be used for the competition. Also had to fill and prove the solo cup holds 2 cups of soil. Now I need to root a clone (for the first time), transplant her into this cup, and submit my 2nd entry before the 30th of this month. As far as my first attempt at cloning, have already begun the rooting process! Managed to take cuttings from 3 out of the 6 phenos in the main tent (the first cutting was also my first time topping). Soaked the cuttings for two days before planting them into Coco Coins. So far everything has gone surprisingly well! The clones are now rooting under the propagation dome with the vents fully closed. Will check for roots soon! At the end of the week, growth was just raging! Was planning on flipping to flower in a week, but decided to begin the first week of flower next week! Thus this is the last week of veg. Plan to flip to 12/12 next Monday! Onwards to next week! [START OF WEEK 14|07] ========================================================== Garlic Budder #1 - WEEK 14|07 - Full Veg Wk5 Garlic Budder #2 - WEEK 14|07 - Full Veg Wk2 Garlic Budder #3 - WEEK 07 - Full Veg Wk5 Garlic Budder #4 - WEEK 06 - Full Veg Wk4 06/03/24 → 06/09/24 This Week's Estimated Goals ---------------------------------------------------------------------------------------------- DLI: ~26 mol/m²/d PPFD: ~400 μmol/m²/s VPD: ~1.0 kPa This Week's Meter Readings & Averages [Lights On: 16:00 - 10:00] ---------------------------------------------------------------------------------------------- DLI: 24.56 mol/m²/d PPFD: 379 μmol/m²/s VPD: 0.91 kPa Soil %: [32.7, 37.6, 37.9, 34.1] ========================================================== Day 01 - Monday - 06/03/24 - Total Days: 098 ----------------------------------- Daily Averages [~23:00] - Temps: 80.7°F [27.1°C] - Humidity: 74.4% - VPD: 0.90 kPa - Soil %: [31, 34, 39, 35] ----------------------------------- - [09:57]: Quick morning check! --- #1 is looking a bit droopy, but almost lights off (at 10:00) so not concerned. --- Nice! Mainly wanted to check on #4 and she is looking great! She’s perked back up and looking good! - [23:08]: Evening check. --- Wow! It’s a jungle in here! --- #1 has gotten too big? Nah!? Keep on growing girl! --- #2 is growing and definitely getting bigger! Growth just looking really weird. --- #3 has continued to get larger and is looking quite uniform in growth! --- #4 is growing and looking perky again! --- Even the original #1 and #2 phenos (in the back) are looking good! --- Wow! #4 is really getting close to the light. - [23:14]: Checked down both fill tubes. --- Both reservoirs were completely dry! - [23:27]: Checked the Ecowitt soil moisture sensor data: --- 30% - [CH01 EB1 - Garlic Budder #1] --- 34% - [CH02 EB2 - Garlic Budder #2] --- 39% - [CH03 GFP - Garlic Budder #3] --- 32% - [CH04 FPT - Garlic Budder #4] - [23:32]: Poured 4 cups of distilled water down EB1’s fill tube. --- Poured 2 cups of distilled water down EB2’s fill tube. - [23:38]: Checked the humidifiers. --- Refilled the 4X4’s humidifier with distilled water. --- Tomorrow, plan to defoliate and start cloning for the first time! --- Going to take multiple cuttings from both #1 and #4 for sure, but still deciding on the rest. --- Getting hyped! Day 02 - Tuesday - 06/04/24 - Total Days: 099 ----------------------------------- Daily Averages [~23:00] - Temps: 81.4°F [27.4°C] - Humidity: 74.3% - VPD: 0.93 kPa - Soil %: [29, 35, 38, 32] ----------------------------------- - [11:59]: Time to film the first entry for the Global Grow Cup! --- Going to be using BuildASoil 3.0 potting soil. --- Filming the video using a stand and my phone. --- This video is mainly to establish the container that the plant will be grown in. Also to prove that the container is a 16oz container and that it can hold 2 cups of soil. --- The ticket (order) number also had to be written on the cup. - [12:36]: Done! --- The video had to be done in one continuous shot with no edits (my original submission does not have the logo). --- There was also a photo that needed to be shot which shows the cup filled with 2 cups of soil (just like the video, the original image submission did not have the logo). --- I think I did everything correctly, but also sent an email for verification of submission and validation. --- Getting hyped! --- [*smokes a bowl] --- Going to defoliate today along with for the first-time, going to take cuttings for clones! --- After a bit of online research, decided to split the cloning process into two days. --- Today going to take cuttings and will soak them in a solution of aloe for 24hrs. Afterwards will change the water out and use straight distilled water. --- Then in a couple days, plan to transplant into coco plugs (Coco Coins) for rooting. --- For optimal results, also be using a rooting hormone (Clonex). --- Well.. Here goes nothing! - [17:01]: Evening check. --- Wow! #1 is looking huge! Her main top is stretching above the lower canopy which is continuing to bush out. --- #2 is growing along. Growth is gnarly and a bit droopy, but she’s getting taller! --- #3 is looking great! Still a bit small, but she is continuing to get larger. --- #4 looks like she needs a watering. --- Both plants in the back are also looking surprisingly great as well! - [17:05]: Checked down both fill tubes. --- Both reservoirs were completely dry! --- As far as today's defoliation, going to leave #2 and #3 alone and will focus my defoliation and cloning on the rest of the plants. --- This will be my first attempt at cloning, also going to try topping for the first time today. --- No pressure Ensign. What can possibly go wrong right? - [17:27]: Time to start the cloning and defoliation process! --- Filled a measuring cup with 3 cups of distilled water. ------ Added 3/4tsp of Horticultural Aloe ------ Added 1 more cup of distilled water --- Mixed the solution and poured an even amount into three separate solo cups. --- Made sure to mark two of the cups (#1 and #4). The unmarked one will be for any other clones from amongst the 6 phenos (if any at all). - [17:43]: Time to top and defoliate #1! --- Using a pair of brand new trimmers (AC Infinity), --- Gently cut the main stalk to even out the canopy. --- Then trimmed and cleaned most of the nodes leaving the top node or two. --- Also trimmed the leaf fingers a bit before placing the top cutting into the cup of aloe solution. --- Now for the rest of the cuttings! --- [~45 minutes later] - [18:32]: Managed to finish defoliating and cutting the rest of the clones. --- Took two more lower cuttings from #1 (3 clones total). --- Took 3 lower cuttings from #4 --- While defoliating, decided to try and clone the original #2 pheno as well. Took 4 small cuttings. --- Similar to the top cutting, trimmed and cleaned each lower node for each cutting before placing them into the cups. --- Before finishing up the 2nd cutting, I noticed the first cutting (the top cut that was also trimmed) was drooping. --- So I did not trim and the leaf fingers for the other cuttings. --- In total there were 10 cuttings taken for potential clones. --- My main focus was to take cuttings and to clean up all the lower growth from both #1 and #4. --- Defoliated and cleaned up the back original phenos as well (also trimmed back the cover crop). - [18:35]: Temporarily placed the cuttings onto the floor of the 4x4 tent. --- Took the trimmings (about 3 cups) and spread them onto the top mulch of #1 and #2. --- Time to set the environmental controls for the 3x3 veg tent. - [18:43]: Within the AC Infinity App, --- For the Veg Tent [3x3] controller, --- Adjusted the 'Vegetative [18/6]' Schedule for the grow light. ------ Set the Mode to ‘On Mode’ ------ Set the START/END times to 04:00PM/10:00AM ------ Set the MAX to 1 --- The IonBoard S33 is now utilizing around 60.8W (at intensity 1 out of 10). --- Adjusted the 'Vegetative [18/6]' Schedule for the exhaust fan. ------ Increased the Humidity’s HIGH trigger value from 81% to 87% --- Adjusted the 'Vegetative [18/6]' Schedule for the humidifier. ------ Decreased the VPD target value from 1.5kPa to 0.8kPa - [18:52]: Moved the cuttings into the 3x3 veg tent. --- It begins! I think. --- Going to let these cutting drink some aloe for a day before switching to straight distilled water. --- Hmm. Could be the white floor of the 3x3 veg tent, but have noticed the S33 has a whiter spectrum whereas the FC-6500 seems to be warmer in color. --- Anyways, - [18:58]: Poured 4 cups of distilled water down EB1’s fill tube. --- Poured 2 cups of distilled water down EB2’s fill tube. - [19:06]: Filled a pump sprayer with 5 cups of distilled water. --- Focused mainly on the straw mulch of #4. --- But also misted the straw mulch for the rest of the plants a bit. - [19:12]: Checked the humidifiers. --- Refilled the humidifiers with distilled water. - [19:44]: Going to be using Clonex rooting gel before planting the cuttings into Coco Coins (pre-soaked with microbes and aloe). But before that begins, going to transfer the Clonex gel into a squeeze bottle. --- Gently peeled back the seal on the original Clonex bottle. Just enough make a tiny opening, --- Then slowly and carefully poured the gel into an empty squeeze bottle. --- Also removed the sticker from the original bottle and placed it onto the new one. - [19:54]: Perfect! --- Instead of applying the gel to the cutting, going to be applying the gel to the Coco Coin. --- This squeeze bottle will make applying the gel a lot easier. --- Will take PPFD readings tomorrow. --- Also will change out the aloe solution to distilled water. --- I really hope I didn’t screw things up before they could even begin. --- Don’t die on me ladies! --- Please. Day 03 - Wednesday - 06/05/24 - Total Days: 100 ----------------------------------- Daily Averages [~23:00] - Temps: 81.9°F [27.7°C] - Humidity: 75.5% - VPD: 0.90 kPa - Soil %: [29, 36, 38, 36] ----------------------------------- - [09:40]: Quick morning check! --- #1 is looking a bit droopy, but looking okay. Topping is a high stress technique so going to take some time to recover. Don’t plan on flipping the main 4x4 tent to flower for a good week or so which should be enough time. --- #4 looks great! The defoliation seems to have no effect on growth. Nice! - [09:41]: Also quickly checked on the 3x3 veg tent, --- Nice! The cuttings are looking great! --- No yellowing and they all seemed to have turned up towards the light. --- So far so good! - [22:53]: Evening check. --- #1 is continuing to dominate this grow! She has spread wide and looking incredible! --- #2 is looking gnarly, but getting there. --- #3 is getting larger! But still a runt. By far, her leaves are the darkest of the bunch, but she is still growing! --- #4 looks happy and growing along beautifully! Wow! - [22:55]: Checked down both fill tubes. --- Both reservoirs were completely dry! - [22:59]: Poured 5 cups of distilled water down EB1’s fill tube. --- Poured 2 cups of distilled water down EB2’s fill tube. - [23:05]: Checked on the 3x3 veg tent. --- Ooo yea! The cuttings are still green! Nice! - [23:07]: Took PPFD readings. --- The cuttings were around 121 μmol/m²/s which gives a DLI of 7.84 mol/m²/d --- Nice! These levels are on the lower range for seedlings (~100-300), perfect! I think. - [23:14]: Swapped the aloe water out to straight distilled water. --- Going to let these cuttings soak for one more day before planting. --- Please don’t die girls! - [23:15]: Checked the humidifiers. --- Refilled the humidifiers with distilled water. --- Ooo yea! --- Tomorrow is the big rooting day! Day 04 - Thursday - 06/06/24 - Total Days: 101 ----------------------------------- Daily Averages [~23:00] - Temps: 81.9°F [27.7°C] - Humidity: 75.2% - VPD: 0.91 kPa - Soil %: [32, 38, 38, 34] ----------------------------------- - [16:20]: Evening check. --- #1 is a bit droopy, but growth is looking green and healthy. --- #2 is looking bigger! She’s also looking sort of droopy. --- #3 is growing along nicely! Looking good girl! --- #4 is looking great! A bit droopy but plan to water today. - [16:23]: Checked down both fill tubes. --- EB1's reservoir still has some water. --- EB2's reservoir was completely dry! - [16:23]: Checked the Ecowitt soil moisture sensor data: --- 28% - [CH01 EB1 - Garlic Budder #1] --- 36% - [CH02 EB2 - Garlic Budder #2] --- 37% - [CH03 GFP - Garlic Budder #3] --- 30% - [CH04 FPT - Garlic Budder #4] - [16:30]: Using a pump sprayer, --- Misted the straw mulch of #4 with 6 cups of distilled water. --- Focused mainly on the straw mulch. --- Also misted the straw mulch of #3 (in the grassroots fabric pot) a bit. - [16:43]: Poured 5 cups of distilled water down EB1’s fill tube. --- Poured 3 cups of distilled water down EB2’s fill tube. - [16:52]: Checked the Ecowitt soil moisture sensor data: --- 56% - [CH01 EB1 - Garlic Budder #1] --- 44% - [CH02 EB2 - Garlic Budder #2] --- 40% - [CH03 GFP - Garlic Budder #3] --- 45% - [CH04 FPT - Garlic Budder #4] - [17:01]: Took general PPFD readings. --- #1 was around 379 μmol/m²/s which gives a DLI of 24.56 mol/m²/d --- #2 was around 333 μmol/m²/s which gives a DLI of 21.58 mol/m²/d --- #3 was around 293 μmol/m²/s which gives a DLI of 18.99 mol/m²/d --- #4 was around 378 μmol/m²/s which gives a DLI of 24.49 mol/m²/d - [17:09]: Took the weekly height and light distance measurements. --- #1 was about 21" tall. --- #2 was about 13.5" tall. --- #3 was about 9.5" tall. --- #4 was about 19.25" tall. --- Hmm.. - [17:19]: Adjusted the right oscillating fan a bit. --- Re-angled the CloudRay S6 oscillating fan upwards. Been noticing that the air has been hitting the tops of the plants so easing off a bit (#1 is still getting hit, but she’s huge so not too worried). - [17:23]: Back to the measurements! --- #1 was about 9.5" away from the grow light. --- #2 was about 17" away from the grow light. --- #3 was about 17.5" away from the grow light. --- #4 was about 11.5" away from the grow light. - [17:46]: Checked on the 3x3 veg tent. --- Cuttings are still green! They do look a bit droopy but no signs of yellowing. --- Okay! - [17:55]: Time to begin the rooting process! --- For my first attempt at rooting, going to be using Coco Coins pre-soaked in saponins, microbes and aloe. --- To further help with rooting, going to also be using Clonex rooting gel. --- Filled a measuring cup with 4 cups of distilled water. ------ Added half of 1/64tsp of Quillaja Saponaria Extract [60] ------ Added 1/16tsp of Horticultural Aloe ------ Added 1/8tsp of Mycrobe Complete --- Mixed the solution thoroughly. --- Time for the Coco Coins! --- 10 cuttings means 10 Coco Coins. - [18:09]: Dropped 10 Coco Coins into the measuring cup. --- The coins immediately started to expand. --- A bit too much.. Oops! --- Poured the solution and Coco Coins into a pitcher. --- Added 2 cups of distilled water to the solution (now at 6 cups). --- Great! The coins are pretty much fully expanded, but going to wait a bit longer to fully saturate each coin. --- [~20-30 minutes later] - [18:42]: Great! --- Took the seedling and flood tray from the AC Infinity propagation dome and placed all 10 Coco Coins into the slots. --- Gave each Coco Coin a quick shake to remove excess solution. The coins were not dripping with solution but still pretty saturated. --- Arranged them into 3 groups with the cuttings in mind. --- Also tried to keep the pre-made holes intact. --- Time to inoculate the Coco Coins! - [18:54]: Using a squeeze bottle, --- While keeping the nozzle from making contact with the coco, gently filled each pre-made hole with Clonex rooting gel. Just enough gel to fully cover the hole of each coco coin. - [19:00]: Time to plant the cuttings! --- Gave each cup a misting of distilled water. Focused on wetting the top growth with water. --- Okay! --- To avoid mixing cuttings up. - [19:01]: Starting with the original #2 pheno cup, --- For each cutting, --- Using a pair of clean trimmers, made a final 45° cut about 1/2" from a bottom node. --- Then stripped away and scared the protective membrane below the node before planting. --- Made sure the node was about 1/2" below the surface of the coco. --- To help with planting, while inserting each cutting, gave the Coco Coin a gentle squeeze to loosen the coco. This also helped to ensure the coco and gel was in good contact with the cutting. --- Once the cutting was planted into the Coco Coin, made sure to place back in the same spot (made sure to keep the cuttings in their groupings). --- Once a cup was complete, made sure to keep the label with the group. --- Re-misted the top growth as needed to keep it wet. --- Also wiped the trimmers with isopropyl alcohol in between cuttings (plan to use 10% bleach solution for next time). --- Repeated this process until all 10 cuttings were cut, planted, and in the tray. --- The coco coins fit perfectly into the tray and don’t reach the bottom. Nice! --- The bottom air gap is important. --- Poured a bit of distilled water through one of the empty slots into the bottom of the tray. Just enough to fill the bottom of the tray, but not enough to reach any of the Coco Coins (~1/4cup). - [19:35]: Placed the propagation tray with cuttings into the 3x3 veg tent. --- Placed the first layer of the propagation dome on before giving the sides a misting of distilled water. --- Also sprayed the top of the propagation dome before covering the cuttings. --- Vents are all fully closed. - [19:40]: Placed the bar lights onto the top of the dome before configuring the controller. ------ Set the START/END times to 04:00PM/10:00AM ------ Set the bar light’s intensity to 2 (out of 10). --- Also made sure the propagation light controller’s time was in sync with the Controller 69 Pro. - [19:47]: Took PPFD readings. --- The cuttings were around 136 μmol/m²/s which gives a DLI of 8.81 mol/m²/d --- The PPFD levels are similar to the floor. --- Perfect! --- Going leave the IonBoard S33 on during this rooting process. --- Will check back tomorrow to cycle the air under the dome. - [19:56]: Checked the humidifiers. --- Refilled the humidifiers with distilled water. - [20:17]: Quick night check! --- Ooo yea! Growth is raging and looking perky! --- Mainly checked on #1 and #4 which were looking incredible! --- Keep on growing ladies! Day 05 - Friday - 06/07/24 - Total Days: 102 ----------------------------------- Daily Averages [~23:00] - Temps: 82.7°F [28.2°C] - Humidity: 76.2% - VPD: 0.89 kPa - Soil %: [37, 40, 38, 35] ----------------------------------- - [10:03]: Decided to increase the ambient temp in the 3x3 veg tent. --- Within the AC Infinity App, --- For the Veg Tent [3x3] controller, --- Adjusted the 'Vegetative [18/6]' Schedule for the heater. ------ Increased the Temp target value from 78°F to 82°F --- Hopefully this will help to keep the veg tent at a more consistent temp. - [22:26]: Evening check. --- Ooo yea! The garden is looking incredible! --- #1 is looking perky and just bushing out! Wow! --- #2 is getting big! Growth is weird and leaf fingers are huge! Just going to let her grow. --- #4 is looking happy and growing along like a champ! Nodes are starting branch out and she is turning into a bush! - [10:28]: Checked down both fill tubes. --- Both reservoirs were completely dry! - [22:33]: Poured 5 cups of distilled water down EB1’s fill tube. --- Poured 3 cups of distilled water down EB2’s fill tube. - [22:40]: Checked on the propagation dome (inside the 3x3). --- Ah yea! Looking great ladies! --- Lifted the top of the dome to let some fresh air in for a bit. --- Wow! --- Leaves still look nice and green! --- So far everything looks great! --- Just going to continue on! - [22:53]: Checked the humidifiers. --- Refilled the humidifiers with distilled water. - [11:01]: Decided to adjust the humidifier for the 3x3. --- Within the AC Infinity App, --- For the Veg Tent [3x3] controller, --- Adjusted the 'Vegetative [18/6]' Schedule for the humidifier. ------ Increased the VPD target value from 0.8kPa to 1.5kPa --- The higher VPD level will essentially turn the humidifier off. --- I won’t be needing the humidifier for a good week so might as well save the water. Day 06 - Saturday - 06/08/24 - Total Days: 103 ----------------------------------- Daily Averages [~23:00] - Temps: 81.6°F [27.6°C] - Humidity: 74.9% - VPD: 0.91 kPa - Soil %: [35, 40, 37, 31] ----------------------------------- - [07:40]: Quick morning check! --- #1 and #4 are looking perky and happy! --- Also checked on the propagation dome, --- All cutting still look green! Hyped! - [20:02]: Evening check. --- Wow the garden is raging with growth! --- #1 has blown up! She has clearly recovered and growth is ramping up again! --- #2 is stretching upwards! --- #3 is now the smallest of the 4, but still getting larger! --- #4 is looking incredible! Wow! Growth looks perky and happy! - [20:05]: Checked down both fill tubes. --- Both reservoirs were completely dry! - [20:10]: Poured 6 cups of distilled water down EB1’s fill tube. --- Poured 2 cups of distilled water down EB2’s fill tube. - [20:16]: Checked the Ecowitt soil moisture sensor data: --- 35% - [CH01 EB1 - Garlic Budder #1] --- 40% - [CH02 EB2 - Garlic Budder #2] --- 36% - [CH03 GFP - Garlic Budder #3] --- 27% - [CH04 FPT - Garlic Budder #4] - [20:19]: Using a pump sprayer, --- Misted the straw mulch of #4 with 5 cups of distilled water. --- Focused mainly on the straw mulch. --- Also misted the mulch of #3 a bit (in the fabric pot). - [20:27]: Checked propagation dome (in the 3x3), --- To cycle the air under the dome, lifted the top off for a bit. --- Ooo yea! Everything is still green and looking great! --- Keep on rooting ladies! --- Oops! - [21:45]: Checked the humidifiers. --- Refilled the humidifiers with distilled water. Day 07 - Sunday - 06/09/24 - Total Days: 104 ----------------------------------- Daily Averages [~23:00] - Temps: 81.5°F [27.5°C] - Humidity: 74.8% - VPD: 0.91 kPa - Soil %: [36, 40, 37, 36] ----------------------------------- - [08:18]: Quick morning check! --- Nice! The main tent is looking great! #1 and #4 are both raging with growth! --- Checked on the propagation dome (inside the 3x3) and the clones are still looking green! --- Wow! Everything is going almost too well! Just keep on growing! - [19:08]: Evening check. --- Garden is just exploding with growth! Seems everyone has fully recovered from the defoliation and topping! --- Wow #1 is bushed out and looking incredible! --- #2 is growing really starting to get large! Growth still is funky, but stoked none-the-less. --- #3 is starting to fill in the pot! Getting larger! --- Wow! #4 is getting taller and looks healthy and green! - [19:12]: Checked down both fill tubes. --- Both reservoirs were completely dry! --- Wow the canopy is really starting to get taller and closer to the light. May need to raise it up soon. --- Absolutely surprised how low the light levels have been throughout this entire cycle. Barely moved the light and have not increased the intensity past 2 (out of 10). Less is really more. --- Anyways! - [19:18]: Checked the Ecowitt soil moisture sensor data: --- 36% - [CH01 EB1 - Garlic Budder #1] --- 41% - [CH02 EB2 - Garlic Budder #2] --- 37% - [CH03 GFP - Garlic Budder #3] --- 34% - [CH04 FPT - Garlic Budder #4] - [19:19]: Poured 6 cups of distilled water down EB1’s fill tube. --- Poured 3 cups of distilled water down EB2’s fill tube. - [19:24]: Checked propagation dome (in the 3x3), --- To refresh the air, lifted the top off for a bit. --- Sweet! Still green! Wow! --- Using a spray bottle, misted the top growth with distilled water. - [20:35]: Checked the humidifiers. --- Refilled the humidifiers with distilled water. --- Wow what a week! --- Growth has been just insane in the 4x4 tent! All plants have fully recovered and have just exploded with growth. --- I think it’s time to flip to flower! --- Also, I’m absolutely baffled about how well the cloning process has been going. --- So far no issues! --- Not complaining, but just surprised. Keep on growing ladies! --- If all goes well, should have fully rooted clones soon ready for transplanting (into solo cups of course). --- Absolutely hyped for next week! --- Maximum warp Ensign, Engage! [END OF WEEK 14|07]
Likes
42
Share
@Natrona
Follow
Week 15 days 99-105 . I'm am flushing all plants with 1 gallon of filtered water each. I've reduced the light cycle from 18 to 14 hours to reduce heat stress. It may reduce yield as well based on comments I've read in other growers diaries. An oz per plant would be nice. Of course more would be better but an oz makes a pound of cannabutter. Reducing the light hours is reducing the purpleness in the stems of og kush and gorilla glue but Purple chill still has purple stems The Natrona sisters spend their nights in the garage where the temps are 10-15 degrees cooler than in the day temps in the tent. Night temps ranged this week between 63-66 with rh 51-76%. The high rhythm comes after a rain. During the day, I'm keeping the tent open while circulating 2 fans. Day Temps can reach 80 so it gets hot in there. flooded each plant with 1 gal of water. From here forward I will be flushing all plants with filtered water at 1 gal for each plant every other day. Monday, flushed with 1 gal of water. Starting this flush, I added ice to the top of the soil before watering. See photo. This is a stress technique used to force plant phenotype colors. I don't think it will work for mine as I over fed. While I have 3 different strains, they look the same with blue green dominance. Thursday, flushed with 1 gal of water. Starting this flush, I added ice to the top of the soil before watering. See photo Saturday, flushed with 1 gal of water. Starting this flush, I added ice to the top of the soil before watering. See photo Sunday photos I'm not seeing any change in leaf or bud colorations from flushing out the fertilizers nor from the ice treatment. General comments" After putting the plants in the garage during the night, morning soil temperatures are within a degree of the night air temperature. This has been about 15 degrees cooler (50s) than the tent temperatures (75+). This week our weather has been unseasonably warm so the night temperatures have been 63-71 with Rh 51-70% Tent temps in the day 75-80 and RH 47-59%. Special thanks to @DreamIT for showing me how to add music to video. Check out my Gigi video above for a short clip.
Likes
1
Share
@Dabcik
Follow
Aumentato distanza lampada e ph dell’acqua di irrigazione. Le piante stanno bene hanno un bello stretch che sto cercando di tenere sotto la rete. Ora i fiori iniziano a formarsi
Likes
33
Share
Bonjour à tous les padawans et maîtres jedis Si vous voulez des buds d'apparence bien givré et "gras" c'est ici les gars. Les trichomes sont bien laiteux et certains sont ambrés je fini mon rinçage et je procéde à la récolte bientôt Les bourgeons sont bien purples ils sont vraiment beaux un vrai plaisir à les voir mûrirs Je me languis la récolte
Likes
32
Share
Doubled the nutes this week, ive never followed the feeding chart because the regular feedings were enough. Since I'm outside and i figured I'd give it more to work with since I am trying to pull an obscene number with the size pot I'm working with and veg time. The nodes on the side branches are big enough now to be trained and stretched, this should help me get to 2lbs as I continue to train them out. Had some crazy high winds today, I called that free training.
Likes
23
Share
@nonick123
Follow
Día 20 (13/05) Todas las plantas muestran las preflores! Día 21 (14/05) Baño de sol de 2 horas! Día 22 (15/05) NYC Sour D Auto empieza a mostrar algo de clorosis intervenal... El gran @Thecannalife420 me diagnostica deficiencia de Mg Aplico foliarmente Sales de Epson Día 23 (16/05) Las plantas han reaccionado muy bien a las sales de Epson! Riego 750 ml H2O + Regulator 0,15 ml/l + CaMg-Boost 0,25 ml/l + Startbooster 0,25 ml/l - pH 6.2 Día 24 (17/05) Las plantas salen al exterior! 😍 Les aplico heno como mulch (acolchado) Día 25 (18/05) Riego 250 ml solo agua todas las plantas Día 26 (19/05) Riego 250 ml H2O + Regulator 0,15 ml/l + CaMg-Boost 0,25 ml/l + Startbooster 0,25 ml/l + TopBooster 0,2 ml/l- pH 6.2 💦Nutrients by Aptus Holland - www.aptus-holland.com 🌱Substrate PRO-MIX HP BACILLUS + MYCORRHIZAE - www.pthorticulture.com/en/products/pro-mix-hp-biostimulant-plus-mycorrhizae
Likes
Comments
Share
@Doncuero
Follow
Tanto CHeery Lemon como una AK ultra , apartir de la semana 9 ya las plantas entran en los 63 dias. Y empiezan a cerrarse. Lo que es recomendable empezar a regar una ultima dosis con comida y ya solamente agua hasta la fecha de corte.
Likes
12
Share
@thonhash
Follow
Esta semana añadimos el otro led ts 1000 para seguir regulando (añadiendo más potencia lumínica) Agregamos paja,para una mejor retención de la humedad y no se seque primero la parte superficial de la tierra (uno de nuestros mayores errores al querer calcular si todo el cepellon está seco o sigue teniendo algo de humedad,por consecuencia,al volver a regar ,sigue con ese pequeño exceso de humedad) ,con el objetivo de conseguir una mejor vida en nuestro suelo ,con todos los nutrientes orgánicos y la clave,enzynabis,crearemos una buena simbiosis,y lo más importante,natural.
Likes
8
Share
Likes
37
Share
@Roberts
Follow
Candy is starting her second week of flowering. She is doing well and had a solution change today to flowering nutrition. She will get more aggressive defoliation come next week. Possibly some hst. Thank you Divine Seeds, Spider Farmer, and Athena nutrition. 🤜🏻🤛🏻🌱🌱🌱 Thank you grow diaries community for the 👇likes👇, follows, comments, and subscriptions on my YouTube channel👇. ❄️🌱🍻 Happy Growing 🌱🌱🌱 https://youtube.com/channel/UCAhN7yRzWLpcaRHhMIQ7X4g.
Likes
27
Share
1/20/2023- So much to do pre grow and over the next 16 days, absolute first order of business is that I have to take down my current Grow---TIMBER-- Then I have a list of things I have to get done in order to be ready to start this grow 1 Feb. With that said T - 2 days until start 48 hour Flush T - 2 days until Start 48 hours of Light T - 4 days until TIMBER!!! Items that need to be done before 1 Feb 2023 1. I need to clean the tent out 2. I need to clean the equipment- Proper Sanitization between grows in Hydro is a must!!! 3. I need to get the hole in the ceiling above my tent repaired- For my last grow I had a deep sink installed in my grow room, to make Hydroponics a little bit easier and have a water source in the same room. The seals on the pipes they were installing broke and leaked through the ceiling causing some damage all the way across my grow room, I was already weeks into my grow and couldn't risk them working above my tent and it would have been very awkward positon for them to be working in as well, so have to get this done quickly between chop and germination. 4. I have to install my new light- I was using a Vivosun 4000 and for this grow I am switching up to a Spider-farmer SF 7000. 1/20/23- For this upcoming grow I am working with M/F photo seeds so I ordered 4 Sex determination kits. I recieved my my 4 Sex determination testing kits from Rimrock Analytics today. I will be using these to test my plants at week 2 of Veg so that when/if I take clones I know I am taking them off females. As well as I don't want to accidently pollinate my tent during this grow I am looking for big beautiful buds not seeded buds. :-) 1/24/2023- Harvest of current grow- Started at 2:00pm and finshed wet trim and firt batch into the freeze dryer. 1/25/2023- Next batch into the freeze dryer and cleaning all my equipment for this Grow. T-1 Day until the workers are supposed to be here to fix the hole in the Grow Room. T-3 days until I instll my new Gorilla Grow Tent and my New Light Spider Farmer SE-7000 for this grow. T-7 Days until Start of Germination 1/26/2023- Harvest is done ran through the Freeze dryer and dry tim completed. 1/27/2023- Grow Room repairs completed. Hole is gone Letting the paint dry before I install the new tent. T-2 days until Install the New Gorilla Grow tent and the new Light T-3 days until I put the hydro equipment in the new tent T-5 days until Germination 1/29/2023- Day 0- Final Pre Germination activities Germination Start T-3 days The paint on the ceiling was dry and it was time to finish prepping for Germination. I got the following items knocked off my list. New 4X4 Gorilla Grow Tent is up and ready New Spider Farmer SE-7000 Light is installed- Thanks Moony Grows for the suggestion and for the Code that got me some money off and free shipping (Moonygrows)!! I turned the lights all the way up to max and set the timer to 18/6 0600-0000. I will keep an eye on the temperature and humidity without my plants and see how hot it gets with the new light. I put my Hydro system back together and put in 40 gallons of water into it, time to monitor for leaks the next few days. I Setup my cloning machine for Germination Days 3-11 1/30/2023 let me break down the situation, ROOM in the TENT.. Enough said.. No really I tried putting my exhaust system up in the new tent with my new light, The light is so big corner to corner that it really didn't give me enough room for the lights be be raised, with the exahust hanging the buckets my plants are Starting in are 2 and 1/2 feet off the ground, great for plenty of room for roots but not so great for upwards space for the plant to grow. In a 6' 11 tent with the exauhst in side and hanging that only gave me a little over 4 feet of grow room to play with. My last grow if you saw my diary, anyone could tell I was struggling to keep the buds off the lights. No good, Since space was such an issue I was running my carbon filter inside on the ground but It really needed to be up sucking the heat out not shooting the cool out. With that setup I was sucking air through the filter and pushing it out the tent at a bottom exhaust hole cold out. Wasn't doing me any good for my heat. I was hitting temps of up to 85 degrees. I bought a portable AC unit and have been running it in the grow room to try and keep temps below 85 and I have had to lower the power on my lights during grow also not ideal.. With that said a friend of mine MoonyGrows (Check out his diary) took the time to look at my issue send me a picture of my grow tent setup with detailed instructions on how to suck the air out from the top but putting my filter and fan on top of my tent so no room issue and I am sucking the air out from the top where the heat is instead of pushing the air out from the bottom where the cool is... THANK YOU MoonyGrows For taking the time to help me get this straightened out.. Now I have room and I have the exhausts working right and now my temps with everything at 100% are topping out at 80 this dropped the temp by 5 + degrees at 100% max. T-2 days until Start of Germination Prepped my seed tray with humidity dome Prepped my Rapid Rooter plugs. I Used RO water, and I added a few drops of Hydrogen peroxide to Oxygenate the water. I then PH balanced between 5.7-6.0 the same that they will be getting in the Cloning Machine and when they get to thier final grow pod. I perfere the 5.8x range and I hit 5.84 for these rapid rooters. If you want to see a complete video on the process HowWeedGrow has an amzing video that shows step by step how to do it and explains it better than I ever could including how to plant the seeds. Which I will cover when I get to that step on Wed. https://www.howweedgrow.com/how-germinate-weed-seeds-cannabis-rapid-rooters/ 1/31/2023 T-1 day until Germination Start All set and ready have my Rapid Rooter plugs ready to go have my seeds out.. Have my seed tray warming up tonight. Tomorrow morning right into the Rapid Rooter then strait into the tray. I will spray the dome to start the humidity in there. 2/1/2023 Germination Day!! Let the games begin! 0600am Put the seeds into the Root Riots. And then put the seeded Root Riots into their first home the Seed tray. I have them under the light 24/7. Sprayed the dome 7:30pm Sprayed the Dome to keep humidity going on the dome. 2/2/2023 Day 1 of Germination Sprayed the Dome in the morning Sprayed the Dome in the evening 2/3/2023 Day 2 of Germination Roots are starting to come out the bottom of the root riot plugs and the heads are slowly popping out of Number 4 just below the surface. Afternoon- Number 4 has popped up Evening- Number 3 has popped up as well. Happy Dance!! 2/4/2023 Day 3 - Germination Surprise Surprise Surprise- all 4 have now poked their heads up.. Happy day!! 100% Germination succeeded. Now major milestone to track is how many are female and how many are male. I will take look at the roots this afternoon/evening and see if they have enough root to go into the cloning machine for the next 7 days before they go into their Hydro Pods. Day 3 - Germination - Evening.. Roots looked good and they were tall enough to make it into the cloning machine. Now that they are all in the cloning machine I have switched the lighting to veg state 18 on 6 off. 2/5/2023 Day 4 - Germination - Morning All the Ladies (fingers crossed) looking great stretching nicely and look nice and green, Photo synthesis underway.... UPDATE!! After a very interesting POD cast on FSTS by Dr. Bruce Bugsbee from Utah University, I have shifted my lighting to 24 hours on through seedling and then I am going to shift to 20 hours on the rest of Veg. 2/6/2023 Day 5 - Germination While Checking on my conditions inside the new tent last night, I found that the Humidity was down to 39 Percent. I added an AquaOasis Cool Mist Humidifier, the reason I selected this humidifier is that I needed one that could be turned on and off utilizing my Inkbird Humidity Controller IHC200 that I have my Pro Breeze Dehumidifier currently running with. Root structures are starting to get there about 1/4 of an inch. 2/7/2023 Day 6 - Germination Everything seems on track more roots poking out of each today. They are each getting a little taller as well. Checked in the evening and number 3 was drooping the Root riot plug on the bottome was dry and the roots were not in the water yet. I raised the water just enough that the longest root that was sticking out is now hitting the water. 2/8/2023 Day 7 - Germination Everything looked good while checking in on them this morning number 3 is now full up and no droop again. 2/9/2023 Day 8 - Germination T-2 days until Plant into Forever Pods and we start week 1 of Veg .. :-) Surprising thing to me is that number 1 and 2 were later in popping then 3 and 4 but the roots are growing longer in 1 and 2. 2/10/2023 Day 9 - Germination Number 1 and Number 2 are definitely ready for transplant today.. Based on how they were yesterday and where they are today I am hoping by tomorrow 3 and 4 are ready. Today they look to me where 1 and 2 did yesterday.. I really hope 3 and 4 catch up by tomorrow since.. T-1 day until transplant to new/ final home for grow. Need the roots long enough to have some clay down in the basket to keep the root riot out of the water and only roots in the water.. 2/11/2023 Day 10 - Germination Today they got placed in thier forever Home, 7 days from Sprout and 7 days until Week 1 Start. PPM- 180 this is water out of the Tap Temp Water: 70.7 Temp Tent: 77 Humidity: 40% I have a humidifier going 24/7 to try and bring this up.. I also have Humidity Domes on each plant. 2/12/2023 Day 11 - Germination Sprayed the domes, all are looking good.. Nothing much to do at this phase but Keep monitoring the PH level in the system and making sure they have a comfortable home. T-6 days until Week 1 start 2/13/2023 Day 12 - Germination Sprayed the domes, They were looking a little yellow today so I moved the light down to assist. Nothing much to do at this phase but Keep monitoring the PH level in the system and making sure they have a comfortable home. T-5 days until Week 1 start 2/14/2023 Day 13 - Germination Sprayed the domes, They were looking a little Florissant yellow today, with what looks like slight burn on the tips, I talked with a fellow grower and we agreed that It was probably that I was drowning them, Yes you can drown you plants even in Hydro, but only early on.. :-) It usually happens with the water being too high, which soaks not only the roots but the medium (root Riot plug in this case). I lowered the water from touching the bottom of the pot to about 1" away. This will probably take 3-4 days to resolve. I will continue my daily monitoring. T-4 days until Week 1 start 2/15/2023 Day 14 - Germination Sprayed the domes, continue my daily monitoring they look a little darker green instead of lime green now that I lowered the water levels in the system, so I think that I might have resolved the issue but it will take a few days for recovery to happen. T-3 days until Week 1 start 2/16/2023 Day 15 - Germination I looked in on them this morning, 3 and 4 look like they are doing well and recovering nicely. Number 1 not so much it has brown spots on the leaves, this very well can still be a side effect of the overwatering but I decide to go ahead and add Nutes earlier than I was planning just incase. I was going to wait until Saturday but I think intervention is necessary now especially after drowning them early on. I added 1/2 what I am planning on adding for week 1 start. I also think I am going to adjust my chart to add 1/2 2 days after plant from now on. I don't think it would hurt it to have some Nutes to pull from. .25ml/Gal Calmag = 12.5ml 1ml/gal GH FloraMicro= 50ml 1ml/gal GH FloraGro = 50ml 1ml/gal GH FloraBloom = 50ml T-2 days until Week 1 start = I will drain the system and start it over on Saturday with Week 1 Nutes. 2/17/2023 Day 16- Germination I didn't even want to post today after looking in on them this morning, 3 of the 4 are now showing signs of dronwing.. Brown spots on the leaves, the water levels were still too high.. I drained about another inch out of the tanks.. Will see how quick they recover.. I start week 1 tomorrow and will have to ensure my water levels are at least 1" away from the basket on this round.