


Likes
33
Share


Likes
3
Share


@Jaschkoo0
Follow
On Day 29 i mixed 2l of rain water with 4ml of calmag some melasse and 5ml of bio grow and gave each plant 1l.
On Day 33 i gave them each 2l. I mixed 4ml of calmag 4 drips of supervite and some melasse with an ph of 6.5 .
On Day 35 i gave them 1.5 l for this i mixed 3l of water with 30ml of Lab 3ml of alfa boost 3 drips of supervite some melasse and 3mlbof calmag. Bevor i watered them i put 3 scoups of feeding biobloom at the top of the soil then i watered them and added some weeds from my garden at the top so the soil stays wet any longer.


Likes
162
Share


@Lukush
Follow
1 week , hear we go , so excited of this strain, cant wait to see her beautifol buds structur 😎😎
Hope and im shoure yall enjoy
Have a good day growmies 🌲🌲✌️✌️

Likes
6
Share


Processing
Likes
33
Share


@ganjaman24
Follow
Nutes at 1/2 strength..picked some supplements to aid in taste/flowering so excited to see how she finishes! 😋😋
Likes
207
Share


@PEAKYPLANTERS
Follow
Hi guys, What's up?
Welcome back
My beautiful girl continues to give me immense satisfaction like when a daughter gets good grades at school.... that is, you know you've done a good job in any case 😄🤗
I hope you like it too

Likes
39
Share


@Roberts
Follow
Bubble OG Gun autoflower is growing great. She had her first solution change today. I switched her to blooming nutrition since she has pistils started. Everything is going really good , and smooth. She will yield good if I can keep her trucking along at the pace she has been going. Thank you Ganja Farmer. Spider Farmer, and Athena nutrition. 🤜🏻🤛🏻🌱🌱🌱
Thank you grow diaries community for the 👇likes👇, follows, comments, and subscriptions on my YouTube channel👇. ❄️🌱🍻
Happy Growing 🌱🌱🌱
https://youtube.com/channel/UCAhN7yRzWLpcaRHhMIQ7X4g


Processing
Likes
61
Share


@Dunk_Junk
Follow
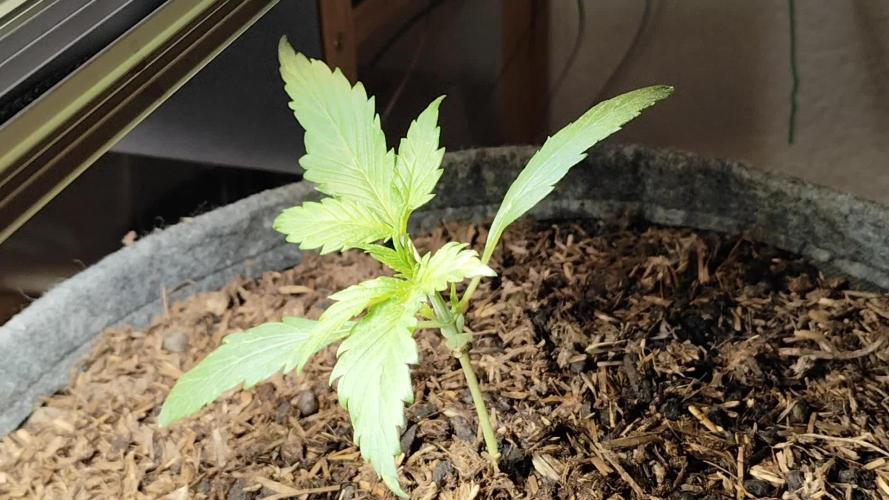
Germinated then placed into her 20 Litre airpot with fresh compost.

Likes
6
Share


@PoshGrow
Follow
Welcome to Auto Alaskan Purple Grow by PoshGrow!
🍀 Week #7 2020 September 3th - 10th.
General Info:
When planted: 2020 July 23th.
Week: 7
Days: 42 - 49
Last Update Day: 2020 September 8th.
Plants: 5 Alaskan Purple Auto.
Equipment:
Tent: MarsHydro 1mx1mx2m or 39"x39"x72".
Light: HLG 260w V2 Rspec QB Kit.
Exhaust: 4" 322 CFM fan + Viper Carbon Filter.
Intake: 4" 100 CFM Inline Fan.
Oscillating Fan:
Lower: 4" Ram Fan.
Upper: 9" Voxon Box Fan.
Humidifier: Taotronics TT-AH001.
Dehumidifier: Pavlit MD750.
Soil: NPK soil 40% Compost, 50% Peat Moss, 10% Agroperlite.
Pot: 7 gallon Fabric Pot x 5pcs.
Nutriens: Fox Farm Trio.
PH Correcton: Chemoform pH-Minus Granulat.
PH Pen: Cheap Chinese one, I callibrate it every time I use it.
Water pump:
Digital microscope: cheap Chinese USB X4, 1600X.
Comment
This week not going to do any training at all, I will let them just be happy lol 😆✌️
Watering every 2 or 3 days, every other watering I use nutritions.
Everything going as planed, these girls going to be massive!


Likes
107
Share


@DogDoctorOfficial
Follow
Get ready to step into the mesmerizing world of my Purple Lemonade FF, as we embark on an exhilarating journey through Week 6 of flowering.
A Standing Ovation for Fast Buds' Mastery
Hold onto your gardening hats because this week's update is an ode to @Fast_Buds, the creative geniuses behind this botanical masterpiece! With an immense shout-out, let's celebrate the magic they've woven into the Purple Lemonade FF. She's not just a plant; she's an embodiment of their dedication, expertise, and passion for excellence.
Trichome Wonderland: Where Magic Meets Science
Now, let's venture deep into the world of trichomes—a magical realm where science and enchantment collide. These tiny, glistening structures aren't just eye candy; they're the heart of the matter. Trichomes are like nature's jewelry, sparkling with resinous elegance. And guess what? They're not just about looks. These beauties are the treasure troves of cannabinoids, terpenes, and other compounds that make your plant a powerhouse of goodness.
Colors and Aromas: A Symphony of Abundance
As we dive into this purple symphony, let's take a moment to appreciate the colors. It's not just about visual appeal; those shades of purple are like whispers from the plant itself. They tell a story of cool nights, warm days, and the dance of chlorophyll and anthocyanin. And the aromas? They're a melodic overture to the flavors that await, a sensory adventure that will delight the senses.
Buds of Grandeur: Embrace the Beauty
Size, my friends, is a matter of grandeur in this garden. The buds have grown into mammoth proportions, dripping with resinous promises. Each nugget is like a tiny universe, a world of wonders waiting to be explored. It's a testament to our care, a tribute to the nurturing journey we've embarked upon.
Celebrating Nature's Artistry: A Glimpse Within
And now, as the sun sets on this week's chapter, here's a snapshot from the heart of the grow room. Feast your eyes upon the breathtaking sight of my Purple Lemonade FF, standing tall and proud amidst her leafy companions. It's a sight that encapsulates the joy of cultivation, the artistry of nature, and the wonders we've unlocked together.
Embrace the Journey, Savor the Beauty
As we venture onward, let's continue to embrace the journey and savor every moment. The trichomes, the colors, the growth—it's all a reflection of our dedication. With every leaf we nurture and every bud we tend, we're cultivating more than just plants; we're cultivating a connection to the heart of nature.
Thank you for joining me on this awe-inspiring voyage. Until the next chapter unfolds, keep those hearts and plants thriving!
Genetics - Fast Buds Purple Lemonade FF
Ligth - Lumatek ZEUS 465 COMPACT PRO
Food - Aptus Holland
#aptus #aptusplanttech #aptusgang #aptusfamily #aptustrueplantscience #inbalancewithnature #trueplantscience #fastbuds #dogdoctorofficial #growerslove
With true love comes happiness <3 <3 <3 Always believe in your self and always do things expecting nothing and with an open heart , be a giver and the universe will give back to you in ways you could not even imagine so <3 <3 <3
All info and full product details can be find in can find @
https://2fast4buds.com/
https://aptus-holland.com/
https://autopot.co.uk/
https://lumatek-lighting.com/
<3 <3 <3 Growers love to you all <3 <3 <3
" Arising from a cross between purple and citrus Cali genetics, Purple Lemonade FF (Fastflowering) offers a complex high made up of perfectly balanced cerebral and body effects that are ideal for daytime use. Expect an extremely enjoyable high that boosts your mood while deeply relaxing your whole body and getting rid of muscle pain. This meticulous cross produces up to 550 g/m2 of some of the most beautiful purple buds, with pinkish and reddish hues that will catch everyone’s attention. The beautiful purple buds are ready for harvest in 7-8 weeks and come hand-in-hand with unbelievably sugary citrus terps that are just as refreshing as a cold lemonade on a hot Summer day. It’s the ideal variety for the sweet-tooth stoner seeking strains that deliver both in quality and quantity of resin.
Bud Description
Purple Lemonade FF grows chunky, spade-shaped buds that boast a whole range of pinkish-purple hues with rich, dark orange pistils shooting out of every direction. This variety stands out for the, oftentimes, lilac trichomes that give them a gorgeous pink tint and make for outstanding purple concentrates. The buds give off a delicious tart lemon aroma that reveals a sweeter, more fruity scent as you break the buds open. Definitely a must for flavor chasers and those looking for pungent terpene profiles. Smoke Reports
Purple Lemonade FF offers an effect that’s just as unique as the flavor. Expect a potent uplifting high that gives you that energy boost you need to get things done while 100% happy and stress-free. The effect gradually transforms into a wave that works its way along the limbs and through the muscles, deeply relaxing your body and putting you in the right mindset to go through a busy day with a huge smile on your face. This is an excellent all-day smoke as it not only increases energy but can also help combat chronic pain, migraine and stress. Plant Appearance
This feminized photoperiod variety develops a thick and strong structure, growing a medium-sized main cola with multiple shorter side branches, typical of hybrid strains. Purple Lemonade FF develops fairly short internodal spacing with gorgeous purple buds growing stacked on top of each other, making it the perfect choice for growers of all levels looking to get lots and lots of top-shelf purple weed, as this variety can produce up to 550 g/m2 in a 7-8 week flower cycle.
Grow Tips
This is a super fast feminized photoperiod version that takes approximately 7-8 weeks to flower with a 5-week vegetation cycle,, this means you can have faster harvests by shortening the veg cycle or have a longer veg cycle for bigger yields. Purple Lemonade FF (Fastflowering) makes for a great candidate for growers of all levels as it’s a vigorous strain that will thrive with basic maintenance both indoors and outdoors. This is a resin powerhouse so make sure to have your trim bin close by as all the resinous sugar leaves will make for the most mouth-watering hash and extracts. Flavor
Expect a long-lasting citrus zest that taste just like it smells. Purple Lemonade FF reeks of a delicious blend of sweet fruits and tart citrus that’ll make your mouth water. On the inhale, expect sour flavors that taste just like lemon candy with hints of orange and a really subtle earthy background. And on the exhale, the citrus flavors open up, giving place to a more sugary berry fruitiness that leaves your whole mouth tasting like an extremely sweet weed-infused lemonade.
Likes
Comments
Share


@radagastgrower
Follow
A planta que parecia que juntava mais água de fato demorou mais pra secar e acho que a colheita foi um pouco antes da hora, ela aguentaria e se beneficiaria de mais uma ou duas semanas. Acabou que ficou mais fraca. Dei mole na forma de tirar o SCroG também e posso ter perdido um pouco pela falta de habilidade, vale mais a pena já cortar e pendurar pra secar somente os galhos e não a planta inteira, até pra retirar do SCroG.


Likes
132
Share


@Crashoverite
Follow
Hi all👨🌾👋
Welcome to my another week update
Hope everyone keeping well 🧑🌾
Week 4
Feb 23 - Feb 29
Very good week. Girls are growing nicely. Finally a bit of work around my babies. On Feb 24 applied LST, girls responded perfectly. Leaves tucking on daily basis. 2 watering with 1L each on Feb 24th (half nutrients dose) and second one on Feb 28 alongside with 2 foliar feedings(100ml water and fish mix). So far this grow is just a pure joy. Both girls are strong and healthy.
Wishing you all a wonderful week✨🍀
Much appreciate all your likes, follows and comments. 🙏💚❤️💜
Peace and love brothers and sisters 👨🌾✌️💚
Links
https://2fast4buds.com/seeds/TROPICANA-COOKIES-AUTO
https://www.biobizz.com/
https://fishheadfarms.com/
Likes
41
Share


@Santica_Garden
Follow
So this is how the ladies are looking at the end of Week 4, day 28 from Seed. I have added a video with better explanation of how things have been going for the ladies up until now. Happy Growing guys, any questions just ask away! 👍🏾🌱💚

Likes
5
Share


@BettaN
Follow
The LST really opened up the girls and helped them to increase volume.
During the week PE finally got some more training, it feels like she opened up nicely.
It is not very comfortable to grow 2 plants in a 60*60cm tent.
Likes
Comments
Share

@Growbody
Follow
Hallo und Herzlich willkommen zu meinem neuen Grow mit der Forbidden Runtz double XL Automatic von Grower's Choice. Diese schreiben: "Eine Kreuzung zwischen „Forbidden Fruit“ und „Runtz“. Eine Sorte von Growerschoice mit sehr hohem Terpengehalt. Die Aromen waren das Wichtigste bei der Auswahl und Kreuzung dieser Genetik". Sehr süss und fruchtig soll sie sein, ganz genau mein Fall.
Die URL findet ihr hier:
https://www.growerschoice.nl/de/feminisierte-selbstbluhende-hanfsamen/forbidden-runtz-xl-auto.html#additional
Tag 24: Die Forbidden Runtz double XL Automatic von Grower's Choice bekommt kleine Seitenäste.
Tag 25: 1,0 Liter Wasser.
Tag 26: Die Forbidden Runtz double XL Automatic von Grower's Choice wächst etwa 1 cm pro Tag und bekommt etwas LST.
Tag 27: 1,0 Liter Wasser.
Tag 28: Noch etwas LST.
Tag 30: 1,0 Liter Wasser.
Schön, dass du dir den Grow angesehen hast. Bleib neugierig 👋😎

Likes
33
Share


@nonick123
Follow
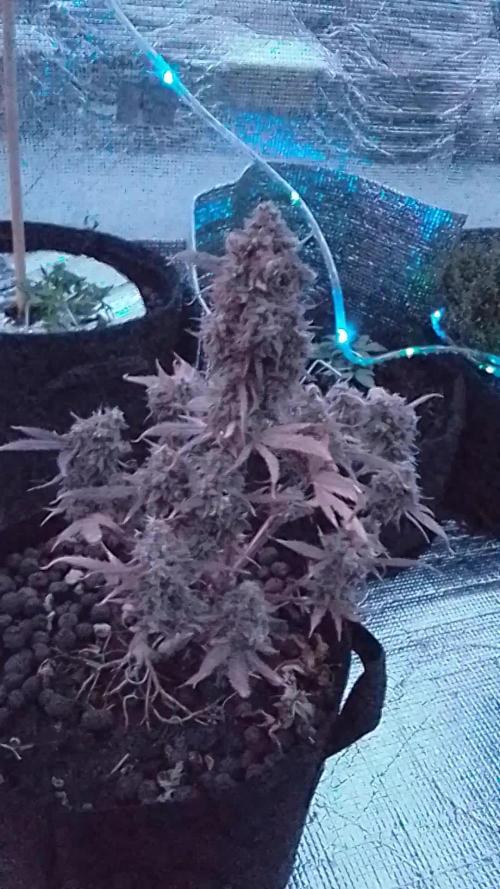
Día 64 (17/03) Riego con 500 ml H2O EC 0,45
Estamos en el día 36 de floración y empieza a mostrar una senescencia preciosa 😍💥
Día 65 (18/03) Riego con 500 ml H2O EC 0,45
Día 66 (19/03) Dia 39 de floración y la senescencia empieza a avanzar en algunas hojas. Unos colores preciosos!
Riego con 150 ml H2O EC 0,45
Día 67 (20/03) Riego con 500 ml H2O EC 0,45
Día 68 (21/03) Riego con 500 ml H2O EC 0,45
Día 69 (22/03) No riego (vacaciones)
Día 70 (23/03) No riego (vacaciones)
Queda 1 semana (teórica) para la cosecha!
🚀 FastBuds 15% DISCOUNT code "NONICK" 2fast4buds.com @fastbuds.official
💦 BioTabs 15% DISCOUNT code "GDBT420" biotabs.nl/en/shop/ @biotabs_official
🌱Substrate PRO-MIX HP BACILLUS + MYCORRHIZAE @promixmitch @promixgrowers_unfiltered
💡2 x Mars Hydro FC1500 EVO Led Grow Light (2024 NEW FC 1500-EVO Samsung LM301H 150W LED) - https://marshydro.eu/products/fc1500-evo-led-grow-lights/ - https://www.amazon.de/dp/B0CSSGN5D8?ref=myi_title_dp