
Likes
Comments
Share


Likes
4
Share


@RdSkM
Follow
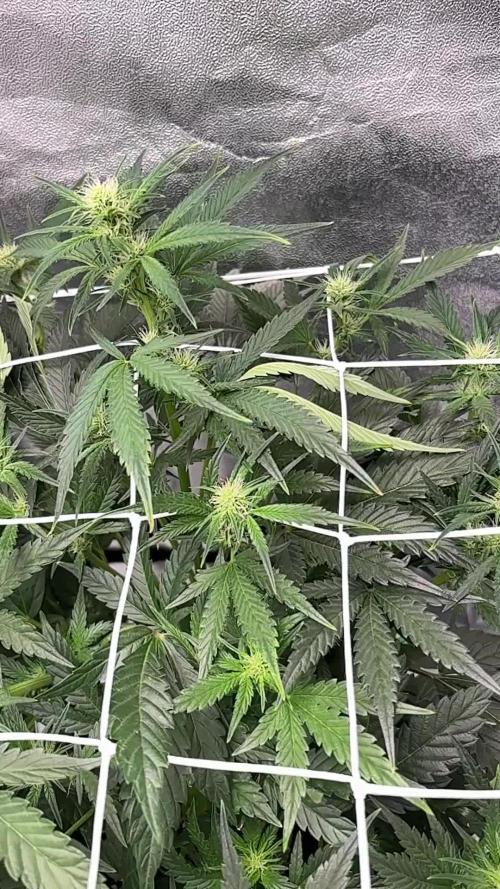
¿Qué opináis, eh?...
Otra más de mi colección que se va a proceso de corte y secado (luego de manicurar, claro).

Likes
28
Share


@Trickybis82
Follow
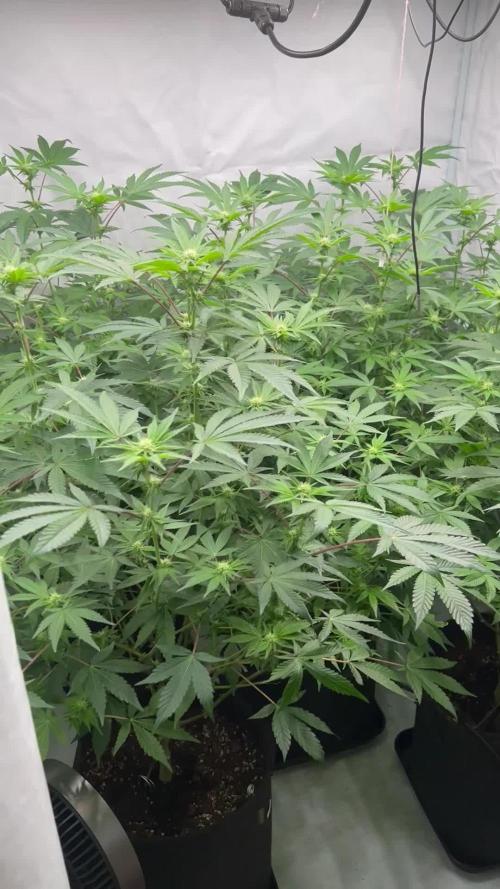
Hello growmies,
Quick update the girls are doing fine and are loving life at present everything is going well and they are starting to really bud up.
Not alot more to add at this time. :)
Adios amigo


Likes
13
Share


@Aleks555
Follow
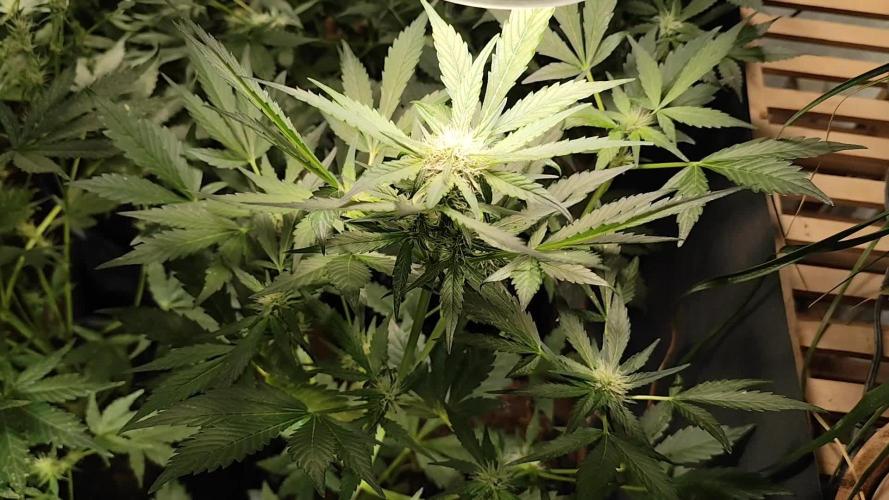
Divine Seeds - Opium
After 122 days of growth and 74 days of flowering, it's time to say goodbye to this stunning beauty and bring in the harvest! The buds are massive, dripping with resin, and have an incredibly strong, alluring aroma. We are absolutely thrilled with how she turned out!
We decided not to weigh the buds while they’re wet; we’ll wait until they’re dried to get the final weight. But from the looks of it, we expect a very satisfying yield.
A huge shoutout to Xpert Nutrients for their exceptional support, reliable service, and, most importantly, their outstanding fertilizers that have consistently helped us grow such powerful, high-quality plants. Year after year, your products prove to be a key element in our success.
We also want to express our deepest gratitude to Divine Seeds for providing such superior genetics. We’re beyond impressed with Opium and are excited to grow even more from your incredible lineup in the near future.
And yes, we’ve already sampled her, and the smoke is nothing short of premium quality. The strength and flavor are exceptional, leaving no doubt that this is top-shelf cannabis. It’s a true connoisseur’s dream!
Thank you again to Xpert Nutrients and Divine Seeds for making this grow so successful and enjoyable! We can’t wait for our next adventure with your products and genetics!


Likes
32
Share


@JurKush
Follow
after some problems he is recovering by giving him only water and canna cure this week
31st day it seems to be recovering, today I browsed through it 😎
Day 34 it seems to have improved already. I just give him water for a few more days

Likes
7
Share


@NandB
Follow
Raised lights an inch and switched to FF Grow Big 10/ml/gal. Working on getting humidity up and temp down, such a conundrum. Added humidifier outside the tent next to the vent in. Plants look really good. The Pineapple Chunk is the biggest still but a little less dark green than the Presidential and Fruity Pebbles. Fruity Pebbles was the smallest but at the end of the week it seems to be almost as big as the Presidential.
Likes
19
Share

@MistaOC
Follow
17.01. F15
The plants have now reached a height of around 80 cm, and the stretch is almost finished, slowly coming to an end. Bud production has clearly started, and overall the plants are looking very healthy, strong, and well structured.
Over the past days, intensive defoliation and lollipopping has been carried out, but deliberately not all at once. Instead, a small portion is done each day to keep stress levels as low as possible. Due to the heavy branching, a large number of small side shoots had formed, many of which were removed to improve airflow and create a more open plant structure.
Overall, the grow continues to run very smoothly and according to plan, once again strongly supported by the Biotabs nutrient system. One major advantage is that no CalMag, no dolomite and no additional corrections are required. Feeding is done strictly according to the Biotabs schedule, otherwise following an “only water” approach – with outstanding results so far.
Powdery mildew is still present, but only at a very minimal level. Occasionally, 2–5 affected leaves appear and are removed immediately. In addition, the entire room and the plants are treated twice a week with a water–Purolyt solution. Compared to the previous run, there is a very noticeable improvement, and the effect is clearly visible.
At this point, the grow is running fully on track, and the photos and videos speak for themselves.
Likes
17
Share


@GreenHouseLab
Follow
This stuff packs a nice punch, one pheno showing off those cherry terps its 🔥🔥
Likes
4
Share


@Greengrower_Latam
Follow
Lollypoping for all the ladies, left lot's of stems cut half way, a couple of week later I corrected it.
Processing
Likes
10
Share


@JohnnyGrower
Follow
Esta semana los nutrientes siguen de la misma manera, es notorio el exceso de Nitrogeno por ende se disminuira en los próximos riegos, se realizaron podas apicales en los clones que no les hice anteriormente para que alcanzaran más altura. Dentro de esta semana instalare la malla scrog Kanovi para guiar los vigorosos brotes.
Además esta semana ya esta retomando el crecimiento la planta madre variedad Tangie la cual cumplió su ciclo de propagación por esquejes y porfin florecerá.
Leo comentarios, opiniones y recomendaciones


Likes
4
Share


Likes
254
Share


@Green_fiend
Follow
The plants produced really well couldn't be happier, makes me wonder if mistakes weren't made and neglect didn't happen how they would of turned out but no point dwelling on what could of been.
Can't be happier with the outcome and will be back with a dry weight and smoke report.
Big shout out to my gromies you know who you are for all the support you have given.
Thank you to @NutriNPK, @Fast_buds & @eleen marshydro for all the products you have sent me
Likes
44
Share


@Chedderbob112
Follow
Thanx for al the Support guys well appreciated there are some people on hear that a seriously do respect and consersider 💯 percent real deal growmies but hit me up ye never wee might end homies stay safe stay blessed n stay baked @chedderbob112


Likes
5
Share


@Foxbud420
Follow
I cut down a lot of leaves for airflow.
Had some issue with mildew. Had humidity of 63%. A few days ago i turned my dehumidifier on 50%. The mildew is gone respectively i dont find some anymore.
Now i use the Booster from Greenhouse Feeding.
Had hot days last week with max. 31.5C* now its 25/26.


Likes
9
Share

@Growbody
Follow
Herzlich Willkommen zu meinem neuen Grow mit der Frostbanger Auto F3 von 2Fast4Buds. Die "Eltern" sind (GG4 Auto F6 x Bruce Banner Auto F5) x Sour Diesel Auto F5 und das ergibt eine F3 feminisierte dreifache Polyhybrid Autoflower. Klingt schonmal heftig. Der Strain ist beim Autoflowerworldcup 2025 zur stärksten Autoflower gewählt worden. Mit dem Versprechen, süsse, cremige Aromen zu produzieren, muss ich diese Pflanze testen.
Die 20 Liter AirPots 7th gen., die Sonnenerde Bio Hanferde, BioBizz Wurmhumus, Sonnenerde Bio Faser, BIONOVA x zamnesia MonsterBud Mix Living Soil, zamnesias SmartStart und Plagrons Seedbooster Plus werden bei diesem Grow wieder verwendet.
Tag 37: 2,0 Liter Wasser.
Tag 39: 1,5 Liter Wasser.
Tag 41: Die Frostbanger Auto F3 von 2Fast4Buds hat einen enormen Blütenzuwachs. Sie ist nochmal 12 cm gewachsen. 1,5 Liter Wasser.
Schön, dass du dich für meinen Grow interessierst. Freut mich, wenn du wieder reinschaust 👋😎
Likes
149
Share


@CBD_Sweden
Follow
Hi all the happy people here in GrowDiaries.
This is my second cultivation ever and it will be fun to try a bigger space than my closet grow.
First, I'm just going to say I'm done with the construction of my new growroom.
I put some pictures on the construction here in week one.
The room is 2.14 meters by 1.7 meters and has a ceiling height of 2 meters.
It provides a floor area of 3.6 square meters.
I use a 54 Watt Lightwawe T5 for germination and 2 Pcs 400 Watt HPS lamps.
I have a channel fan that replaces the room air about 40 times an hour to get a comfortable theme in the room, the air enters a fresh air intake from the outside.
The air is purified through a carbon filter to then leave the room to the rest of the basement.
Then I use that heat to heat the rest of the basement.
I will use 8 pcs 15 liter Autopots to grow with and a 100 liter water tank that supplies the pots of water and nutrition.
I will grow completely organically in soil and will watercure my buds to get the best possible medicine for me.
But there are no cultivation rooms to be displayed here, so I continue with what is most important.
Today I have put my seeds in my moisture dome and hope the seeds have germinated within a few days.
I am very excited to see how the new growroom will work and how this Blue cheese Auto from Royal queen seeds will turn out.
Blue Cheese automatic cannabis seeds are a cross of Blueberry Automatic and Cheese Automatic that has been perfected over five years of breeding and careful selection. The result is a feminized, autoflowering strain with superior yield, flavor, and effects to either of its distinguished parent strains.
THC: 16%
CBD: Low
Yield Indoor : 325 - 375 gr/m2
Yield Outdoor: 60 - 110 gr/plant
Height Indoor: 40 - 70 cm
Height Outdoor: 60 - 110 cm
Flowering: 7 - 8 weeks
Harvest month: 9-10 weeks after planting
Genetic Background: Blueberry x Cheese x Ruderalis
Type: Sa 35% In 40% Ru 25%
Effect: Cerebral and uplifting
Climate: Mild
..............................................................................................................................................................................................................................................................................................................................................
Update 2017-08-15. All 4 seeds have germinated and planted in small pots inside the humidity dome.
I'm so glad it worked so well and now it's just hoping they'll start growing and become 4 big healthy girls :)
...............................................................................................................................................................................................................................................................................................................................................
Update 2017-08-16. I have mixed my own soil today. Its 40% sieved peat harrow H2-H4 0-30 mm, 45% sieved peat harrow H4-H6 0-30 mm. 5% sand and 10% of compost soil. And i use 15% of perilite and mix it all together.
................................................................................................................................................................................................................................................................................................................................................
Update 2017-08.20. Nr1 and 2 grow and thrive.
Number 3 just got rid of the seedpod and is folding out the sheets.
Number 4 is a bit shy and can only be seen if you look carefully into the soil.
.........................................................................................................................................................................................................................................................................................................................................
Update 2017-08-21. Nr 1 and 2 is doing well. Nr3 is trying to catch up and Nr4 is still shy.
--------------------------------------------------------------------------------------------------------------------------------------------------------------------------------------------------------
2017-08-23. Transplanted 2 girls from humidity dome and the small germinating pots to 15 liter autopots. The other 2 girls have to wait a little more before transplant to the autopots.
................................................................................................................................................................................................................................................................................................................................................................................
2017-08-27. The girls have settled in to there new home of the 15 liters autopot after a little transplant chock. Now the real week 1 starts for me and the girls.
--------------------------------------------------------------------------------------------------------------------------------------------------------------------------------------------------------
2017-08-28. New pic and movies.
---------------------------------------------------------------------------------------------------------------------------------------------------------------------------------------
2017-08-28. Nr3 is transplanted in 15 liter autopot.
-------------------------------------------------------------------------------------------------------------------------------------------------------------------------------
2017-08-29. New movie of the girls. Its no water for 3 days now for Nr1 and 2 so the roots develop more and match the plant above the soil. The temp controlled fan is awesome, its easy to set what temp you like to have in the room. Right now its 28 celcius. And humidity is 56%.
------------------------------------------------------------------------------------------------------------------------------------------------------------------------------------------
2017-08-29.
Hello to you who read my diary, I just want to say that I am pleased that you have chosen to check in with me and in my diary.
I just want to say that I do this for myself and for a steady flow of my medicine.
Everything you read and see in my diary is 100% honest and I will never distort or beautify anything here.
I document my crops so that I can learn from my mistakes and also to look back at those different crops.
I try to update with pictures every day and with text if something special has happened in the garden.
This is my strainhunt for the best medicine and the beginning of my journey with cannabis and the cultivation of it.
-----------------------------------------------------------------------------------------------------------------------------------------------------------------------
2017-08-30. Cleaned the room this morning, just vacuuming and cleaning with chlorine solution. Im testing the fan to control temp and humidity, it works great.
Added some pics with measurements and movie. Everything is looking great right now.
---------------------------------------------------------------------------------------------------------------------------------------------------------------------------
2017-08-31. New pics and videos.
---------------------------------------------------------------------------------------------------------------------------------------------------------------------------------
2017-09-01. New pics and videos. Gave each of the girls with 2 ml Alg-A-Mic, 4ml Bio-Grow, 4ml Bio-Heaven and 10 ml Formulex mixed in 2 liters of water.
I hope they like it :)
-------------------------------------------------------------------------------------------------------------------------------------------------------------------------------------------------------------------------------------------
2017-09-02. New pics and the girls liked the water and nutrients yesterday.
-------------------------------------------------------------------------------------------------------------
2017-09-03. New videos of the girls this morning. Nr1 and 3 looks great and nr 2 is looking a little funny, maby a little stressed.
Kl. 16.00. Did some defoliation on the girls. Added video.
Kl.. 23.00. New videos, defoliation and leaftucking.
-----------------------------------------------------------------------------------------------------------------
2017-09-04. Kl. 11.00. Week 3 starts. Trying to LST the girls and defoliate/leaftuck. New picks.
KL 23.00. New video.
--------------------------------------------------------------------------------------------------------------
2017-09-05. KL 08.00. Cleaned the room this morning, just vacuuming and cleaning with chlorine solution.
KL 12.00. The girls got 2 liters of water each with nutes in it, added a video.
----------------------------------------------------------------------------------------------------------------
2017-09-06. KL 08.00. The girls woke up after their beauty sleep, the leaves are always a bit down after 6 h of darkness, but they will stretch now when the HPS lamp starts.
Everything looks good and I keep trying to tuck the leaves so they get the maximum amount of light where needed. Added pics and video.
The Nr 3 girl is still a little bit behind the other 2 girls and all the 3 girls look like there 3 different pheno of the same plant.
KL 23.30. Did some LST.
----------------------------------------------------------------------------------------------------------------------
2017-09-07. Day 21 from sprouting, Nr3 is 17 days from sprouting. I have never tested PH in my grows, when growing organic in soil iv learned that it adapt PH by it self. But im curious by nature so i had to test.
Kl 10.00 Tested PH in the soil, it was 6.9 and tested my tap water and it was 6.8. Added a video of the girls, its 10 H after defoliation, LST and leaftucking. I think its looking good.
Kl 22.30. New pics.


Likes
6
Share


@Lastix
Follow
Last week of vegetative, I start the change of light cycle so it goes into flowering.


