


Likes
Comments
Share

@RatmanJR
Follow
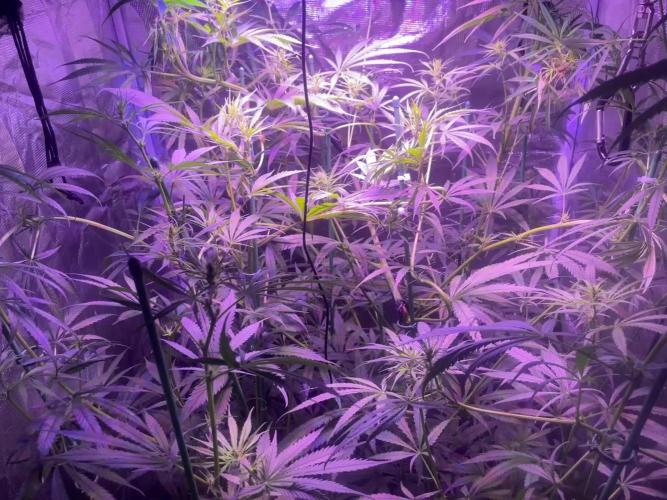
July 5th. 21 days post flip
Clone#1:
Got chopped a few weeks back had balls.
Clone#2
Really liking this one going into flower. Buds seem to be the closest in structure so hoping to get some semi dense bugs from this one. Will see how it develops!
Clone#3
Started off real small and absolutely exploded in stretch. Bud structure is interesting so far not sure how it’ll end up we will see!
Clone#4
This thing has been and continues to be an absolute monster. Least dense bud structure of all three though. This one might be a sativa sativa.
Mothers/father
All are growing well. Going to get topped tmmr on the 6th to stunt them again to slow them down while the clones finish.
All 4 clones
At one point two of them were touching the light and almost all the tops were within an inch or two of the light. After this they were growing well above the lights. This caused bleaching on the ones within inches and burnt the two that touched the light. I’ve since super cropped them violently to force them back under the light. At this point all the tops are about 6 inches from the light but they seem happy. I still have one top a couple inches away that I’m using as a test to see how much light these things can handle. So far they are monsters with handling the lights. You can see the tops within 6 inches are no longer pointing leaves upwards. The one within an inch is pointing upwards to decrease its surface area.
Nothing but water so far and will continue to be nothing but water they don’t seem hungry yet. Will give build a flower in a week or two.
You’ll notice I didn’t provide the heights this week for the plants. At this point it’s just because how difficult they are to measure. Praying they stop getting taller within the next few days.
Very little smell so far, I expect to start getting something here in the coming weeks.
Gob bless and happy growing guys!



Likes
2
Share


@Sense63
Follow
Mal sehen was wird ..was wird 👉😏
Gude zusammen,
am 8.4.25 wir eine 30l Wassertank und mit einem Tropf-Blumat und 3 Verteiltropfer pro Topf angeschlossen nach etwas einzustellen bin ich jetzt in einem Bereich von 5-6
bei der Blueberry OG ist echt gut was los 😑👉
Mal sehen was wird ..was wird 👉😏
Stay High
Let's see what will happen ..what will happen 👉😏
Gude together,
on 8.4.25 we connected a 30l water tank and with a drip blumat and 3 distribution drippers per pot after some adjustment I am now in a range of 5-6
the Blueberry OG is really good 😑👉
Stay high



Likes
39
Share


@Growergreg
Follow
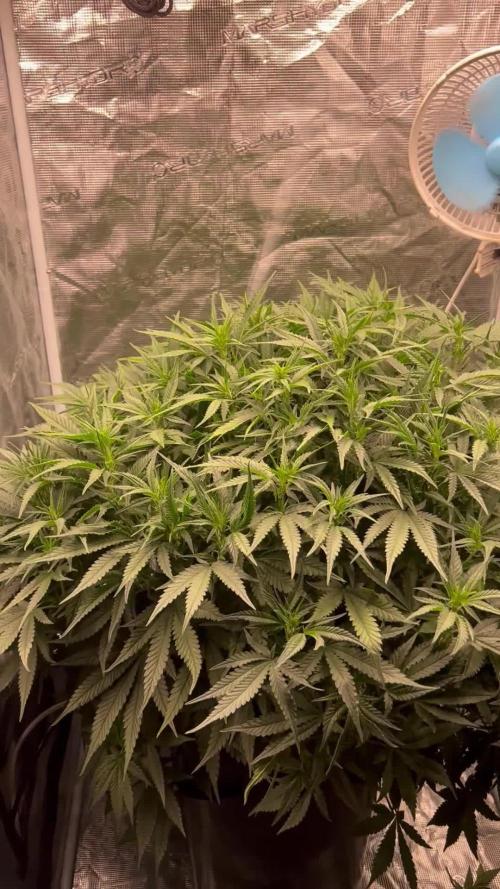
Potted up four gorilla girl xl in to 5 gal pots, using plagron light mix.🇬🇧
moistened the The soil gently in advance with 1l regular tap water and 4ml root juice. Using gloves pushed the seed just under the soil. dusted over With a bit more soil, added A tiny bit more water gently as possible and finally covered with humidity domes
*Day 2, all four seeds germinated over night, chuffed! removed Humidity domes
*Day 3, Two of the Four seeds are expressing yellowing, one just Having 1 yellow leaf. I’m guessing this was down to the seed case partially being stuck. and or bad ph. Ph up and down on route.
*Day 4, mixed up a litre of cal-mag buffed Tap water, left out to dechlorinate/come to room temp and watered accordingly. Plant’s #1 and #2 progress. Plant 3# yellow leaf dropped. Plant 4# stunted but think she’ll be ok
*Day 5, gave mini feed bio- grow and cal-mag then ph to 6.0. I changed the light cycle to 18hrs on, 6 off also
*Day 6, possible nitrogen toxicity:/, just water from now


Likes
2
Share

@RatmanJR
Follow
June 14th update
Clone#1
Got chopped last week had balls
Clone#2
22 inches growing really well. Much like number 4 in terms of verticals growth but significantly less width. Might be good for people who have less square footage but taller tents
Clone#3
18 inches. Short and squat. Interesting structure giving what this plant should be. I bet this one will yield small but interested to see how she progresses/smokes
Clone#4
28 inches. Massive vertical growth and side branches are trying to take up the whole tent. Will see how it flowers but its body is preparing for a lot of weight. I expect this one to yield huge
General Update
3 remaining females growing very nicely. I’ve never actually seen a cannabis plant that looks like this, seems straight out of the early propaganda but I guess it is a land race.
Aside from flipping to 12/12 I’ve also turned on the red leds which will help once flowers start forming. I’m going to continue to give just water at this point.
I expect the plants to stretch like crazy giving they are pure sativas but we will see especially with the squat one.
I’m also going to be putting in some thin sticks to help support the side branching, if I don’t do this once she starts flowering it will start tipping over
Mothers/father plants don’t look too happy. That defoliation I did last week did a number on them. I am seeing new growth so they will all recover. Next weekend I’m moving them into slightly larger pots with newer soil too make them happy.
God bless
June 19th update
Put in a ton of supports before we get too deep into flower. God bless

Likes
22
Share


@sunshinegroww
Follow
She’s been topped too as all of my plants
Very short plant but anyway decided to top and then leave her alone for a week or two looks very healthy


Likes
10
Share


@Troy_Farms
Follow
I pollinated a side bud of this girl and her seeds are developing quickly. Which is exciting for the sake of future grows. Other then that the buds are not super big at all but look super quality so I am happy with how things are progressing. As the week comes to an end the trichromes are really coming in and she is starting to smell very nice. I think one more week of flowering to fatten up a little more and then I will flush to finish. I learned that I started to feed flowering nutes to early and so my first two autos did not get super tall as a result.
Learning a lot with my first indoor grow and first time with autos, I read a really solid breakdown of Autoflowers lifecycle that was super informative. I'll leave here, and post it with my final harvest post here. Knowledge is power 😎
LIFECYCLE OF AN AUTO
A common question I see is when to switch autos from veg to bloom. Many people are under the impression that as soon as they see the first flowers it's time to switch. Perhaps a little explanation of the life cycle of autos will help to clarify this.
Weeks 1 - 3. Once you've started your seeds and they break the surface of the soil, they are in their seedling stage. The first set of leaves to appear will usually single fingered, followed by a second set that may still be single fingered or perhaps 3 fingered. Once that second set appears growth will start to accelerate as the new leaves provide more photosynthesis. This process will continue, more new leaves, faster growth. Depending on the type of soil in use, mild vegetative nutes can be introduced at week 2. By week 3 most plants will start to show their sex. Males will start to produce pollen sacks and females will display pistils.
Weeks 4 - 6. The plants are now entering a pre flowering stage. During this time the plants should exhibit explosive growth, often as much as a new set of nodes and 1" vertical growth a day. This is the time when they will gain most of their vertical height. Many people make the mistake of switching from vegetative to flowering nutrients at this point, assuming that since they see flowers it must be the proper time. This is incorrect. If the switch to flowering nutes is made at this time the vertical growth will stop and the plant will put it's energy into producing buds. If you need to keep your plants small, or want them to finish earlier, they by all means switch nutes at this point. But if you want to get the most out of your plants continue feeding vegetative nutes until you see the vertical growth slow and stop. Depending on the strain that will usually be sometime during week 5 or 6.
Weeks 7 - 9. By now vertical growth has stopped and the switch to flowering nutrients has been made. The buds will start to fill out and put on weight, becoming hard and tight. Pistols will start to change from white to brown, orange, red, etc. By now the plants will also have developed a strong smell. Toward the end of this phase the large primary and smaller secondary fan leaves will begin to turn yellow. This is an indication that the plant is moving toward the end of it's life.
Weeks 10 - 11. At this time flowering nutes should be discontinued and only plain pHed water fed to flush the remaining nutrients from the soil and improve the taste. Yellowing of the fan leaves will continue as the plant draws the stored energy from them. Eventually they will die and fall off. By the time that the smaller leaves that come from out of the buds will also start to turn yellow. Then it's time to harvest.
I know that many of you are thinking that the seed bank said the plants will finish in 8-9 weeks, so why are you saying they take 10-11? The claims made by the seed banks are somewhat deceptive. If you switch to flowering nutes at week 3 or 4 the plants can finish in the times the seed banks say but they will remain small and not reach their full potential yield. Years of growing by myself and others has shown that autos do best if you follow this time line.
Of course, there will always be variations depending on the strain, the environment, nutrients, etc. This information is meant to only serve as a general guideline.

Likes
9
Share


@pascal_dop
Follow
Bis auf ein paar kleiner Fehler läuft der Grow bisher eigentlich echt gut 💪
Likes
27
Share


@CannbellFarms
Follow
Sunday 24/03
- started flushing early, don’t want any of the bulkier plants to go too far into the amber territory!
- will flush for 3 days, twice a day til Tuesday night, then harvest time!
Likes
15
Share


@IsseyBukkake
Follow
We've made it to week 3! (10/12/20)
I'm very happy with how the girls are going, they have definitely put in a HUGE amount of work over the past 7 days.
Plants 3 & 8 are very similar(extremely fat leaves & extra bushy)
Plants 1 & 5 are similar (smaller phenos reacting to nutes slightly differently)
& Plants 2, 4, 6 & 7 seem to be a cross between the previously mentioned phenos(not too small and not too big/bushy & reacting to nutes fine)
Feel free to compare Week 1, 2 & 3 to see the differences.
Nutes are staying the same this week, although I will be spacing feedings out a little bit further(18 hours-ish), as well as feeding straight PH'd water once a fortnight.
I am contemplating hooking my simple drip-to-waste irrigation system up, although the girls are pretty close to the medium still and the halos sit 5-10cm above the medium, meaning fan leaves would be drooping onto the wet halos, so I'll give it another week and see how they're doing :)
Update 11/12/20 - day 22
The girls have beefed up quite a bit over the last 24 hours, I'm really looking forward to seeing a stretch soon :)
No feeding today & will water plain ph'd water tomorrow.
Update 12/12/20 - day 23
Gave the girls straight ph'd water today with little run off.
Veg growth is really starting to boom now, looking forward to seeing where this grow goes!
I'm gladly accepting any tips or tricks, as I'm still only a beginner to indoors.
Update 13/12/20 - day 24
Girls are looking great today, not much to report.
They didn't get a feed or watering today as the medium was still wet after a pure watering yesterday.
Update 14/12/20 - day 25
There's been a big increase in growth over the past 24 hours.
All the girls besides the 2 smaller phenos look 100% happy, the smaller ones have looked a little weird since day 1(Weird as in colour of the fan leaves look deficient of something, but I'm not sure what.
The girls will be getting a full feeding today.
There's still no signs of sex but they are feminised seeds.
Update 15/12/20 - day 26
Girls are looking happy today.
Temps are back to normal after a heat wave in my city(its only going to get hotter from here on out).
No feeding/watering today, pots are heavy/wet enough.
Started using iphone for photos now, my only lens for my DSLR is useless for most grow related photos.
I will upgrade my lens before next grow.
I received my new silenced fan today! I couldnt be any happier :)
It is a silenced Sigilventus SE-A150J, which I have set-up with a brand new Can-lite carbon filter.
I went from a rocket loud eBay fan to a completely silent inline EC fan :D
I hope the girls like the silence!
Update 16/12/20 - day 27
The girls are continuing to boom! and I'm over the moon about it :D
I gave them a full feeding today.
I have seen white pistils coming out of calyx's on most of the girls, so i'm hoping they start to flower soon.
I'm having weird issues with my humidity, it seems to be fine at 40-50% for 70% of the day, but the remaing 30% of the day it goes up to 60-65%.
Temps stay the same in the 5x5 tent, I have ducted air-con in the house which is on most of the day.
Thanks for viewing! :)

Processing
Likes
25
Share


@rainman
Follow
Everything is going good, buds are getting purple. Smell is very sweet, and is very similar to LSD-25 smell. Gonna cut leaves in coming days.
Day 50 - 5L with nutrients.
Day 55 - Cut a lot of leaves, left plant completely naked. I think it will need 3-4 weeks until harvest, so its good time to defoliate. 5L with nutrients.
Peace.


Likes
25
Share


@Mr2toke
Follow
Milky Way F1 grew so nice, this run was pretty automatic!
Plant 2 grew big, and she had the least amount of problems in the cycle.
LST worked well on her, even though I got there late.
Likes
56
Share


@Master_weeda
Follow
Bonjour à tous les padawans et les maîtres jedis
Pour cette semaine 3 au jour 19 ma plante fais 21 centimètres et son septième noeud apparaît je décide donc de pratiquer un LST sur ma plante.
Pour ce j'utilise du fil de fer galvanisé que je plante directement dans le substrat en faisant attention de ne pas endommagé les racines car n'oublions pas que ce qui pousse dessus pousse aussi dessous.
Jour 17 je pulvérise du une solution composé d'une cuillère à café de savon noir mou (marque briochin) dilué dans un demi litre d'eau en prévention d'éventuels nuisibles.
Pourquoi le savon noir mou ?
Savon noir : quelle utilisation pour le jardin ?
Le savon noir est un produit naturel dont les propriétés nettoyantes sont connues depuis l'Antiquité. Utilisé pour l'entretien de la maison et pour les soins corporels, ses vertus antibactériennes et insecticides en font un allié précieux pour le jardinier bio.
Le savon noir est fabriqué à partir de potasse et d'un corps gras de type huils végétale comme l'huile d'olive, de lin ou de maïs.
Produit naturel et biodégradable (s'il ne contient pas d'additifs, comme cela peut-être parfois le cas), c'est un très bon produit nettoyant, pour les sols, la cuisine, la vaisselle, le linge, etc... Très polyvalent, il est également économique, comparé aux multiples détergents classiques du commerce.
Le savon noir se trouve sous forme de pâte molle et brune ou sous forme liquide, dilué avec de l'eau. C'est du savon noir liquide dont on se sert généralement au jardin, car son utilisation est plus simple. Il s'achète dans les magasins bio ainsi qu'en grandes surfaces ou jardineries.
Attention : la recette du savon noir de ménage et celle du savon noir utilisé en cosmétique ne sont pas forcément les mêmes ; les savons noir de ménage (multi-usages) peuvent contenir davantage de potasse afin d'améliorer le pouvoir dégraissant (irritant ou desséchant pour la peau), voire même certains additifs chimiques.
Au jardin, ce sont en priorité les propriétés antiseptiques et insecticides du savon noir qui sont utilisées.
Le savon noir liquide est utilisé pour lutter contre les pucerons, les cochenilles, les araignées rouges, les aleurodes, les psylles et autres thrips. C'est un insecticide de contact ; il tue les larves et nettoie le miellat qui englue les feuilles.
La recette de l'insecticide à base de savon noir (mou pour ma par marque briochin) est simple à réaliser : une ou deux cuillères à café de savon noir mou (briochin) diluées dans 1 demi litre d'eau tiède (dilution à 5 %) ; une fois la préparation refroidie, pulvérisez-la sur les plantes atteintes, en prenant soin de ne pas oublier l'envers des feuilles. À renouveler 1 à 2 fois si nécessaire, pour être totalement débarrassé des indésirables.
Comme il est de mise pour la plupart des traitements, ne pulvérisez pas la solution à base de savon noir en pleine journée, sous le soleil (ni sous la pluie !) ; procédez le matin de bonne heure ou patientez jusqu'à la fin de journée, lorsque les températures sont en dessous de 20°C.
Jour 18 Je corrige mon LST suivant la pousse de ma plante ...
Pour ma par c'est la manière dont je procède mais petit rappel de la technique du LST
Quand commencer à appliquer la technique LST ?
De nombreux cultivateurs commencent la manipulation dés que les plantes possèdent entre 3 et 6 nœuds ou une paire de feuilles. Durant cette première étape de la croissance, le tronc encore flexible est pliable sans risque qu’il ne se casse, même si au fur et à mesure du développement de la plante il sera de plus en plus difficile de le plier. Nous pouvons continuer à guider la croissance des branches durant toute la culture, même durant la floraison, ce qui pour cette étape représente un grand avantage face à la taille, qui n’est pas du tout recommandé une fois que la formation des têtes commence, cela stressera en effet la plante, ce qui aura pour effet de retarder la récolte.
Comment appliquer la technique de guidage LST
Si nous sommes prudents, la flexibilité naturelle des fibres du cannabis permet de plier leur tronc et branches avec une relative facilitée, même durant la floraison des plantes.
En utilisant une corde fine, nous pouvons accrocher la pointe de la plante à la base du pot par exemple ou à un tuteur que nous aurons planté dans le substrat. Nous plierons le tronc avec précaution et nous le fixerons avec la corde, à partir de là, nous pouvons augmenter progressivement la tension de la corde, chaque jour un peu plus, jusqu’à obtenir la position souhaitée. Soyez attentif à la réaction de la plante, essayez de ne pas appliquer trop de pression sur la corde et rappelez-vous que la flexibilité des branches peut varier d’une plante à l’autre.
Pour obtenir de meilleurs résultats, il suffit de suivre quelques règles simples. Pour commencer, nous devons choisir une corde fine mais pas trop pour ne pas blesser les troncs au fur et à mesure qu’ils grandissent et qu’ils deviennent plus gros.
Nous pouvons utiliser des crochets en plastique souple ou de n’importe quelle autre matière flexible pour éviter d’endommager les plantes. Spécialement en intérieur, utiliser des cordons en plastique de couleur (voir les diaries de @Silky) est très pratique pour voir facilement les accroches et faciliter le travail au milieu du réseau formés par les cordes, les tuteurs, les mailles ou les supports que nous aurons dans la culture. Bien entendu, en culture extérieure et surtout en guerilla nous ferons juste le contraire et nous utiliserons des matériaux de couleur qui n’attirent pas l’attention pour que notre jardin reste discret.
Pour stresser les plantes au minimum, la mieux est de réaliser ces manipulations le soir ou juste après que les lampes en intérieur s’éteignent, ce qui leur permettra de se remettre durant la nuit. Normalement, le jour suivant nous pourrons observer comme les pointes des branches que nous avons pliées se dressent de nouveau vers le haut à la recherche d’une source de lumière.
Que la force soit avec vous💪


Likes
3
Share


@Mr_nugs_lover_David
Follow
Excellent strain this black cherry punch by Pyramid, super sweet and fruity strain, very nice smell, powerful effect, very good for relaxing and sleeping at night after a nice dinner. High quality strain, my all 5 plants of black cherry punch smell exactly the same I'm glad I've grown this strain this year 🍒👊💯💎🇺🇲


Likes
15
Share


@Babylongrower42
Follow
Week was fine, I was a little busy again, made just one feed and one watering with no nuts and put de ScrOG ON in the middle of the week (DAY 09).
So thats it, sorry about my minimalist description lol