The Grow Awards 2026 🏆 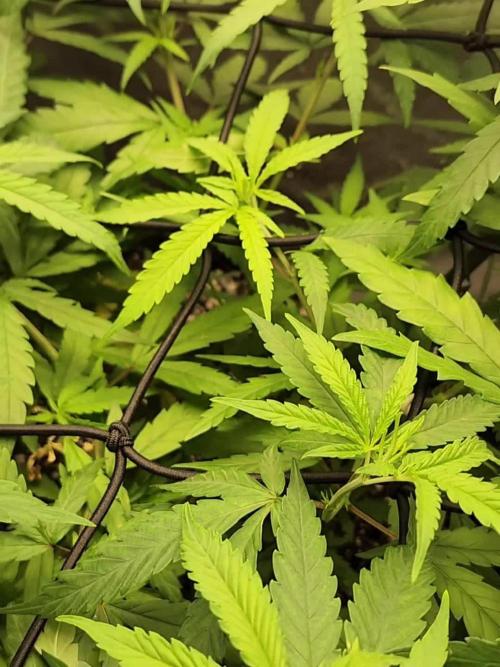


Likes
4
Share
@GREENPHOENIX6262
Follow
09/07 - Reveg still in process - Mother plant in recover from clone clipping - unhealthy clones disposed - cutting new clones this week - Myco and Superthrive feed increased - Net dropped an LST.
09/10 - Mother reset in motion - clones are healthy and rooting effectively - humidity 89% at 18 hrs.

Likes
7
Share
@gr3g4l
Follow
Una semana muy tranquila, nada en especial .
Máximo fue quitar tres o cuatro hojas por planta que hacian mucha sombra.
Una semana viendo engordar los cogollos :-)
A very quiet week, nothing special.
At most, I removed three or four leaves per plant that were casting too much shade.
A week watching the buds fatten up :-)


Likes
6
Share
@OrriSakki
Follow
Week went good I think, Janis added 6 cm, they are using less water, so the end/beginning is soon, but that's the whole point I don't have a clue when it is best to start harvesting process, should I wait for these white pimples are more amber ? I changed back to 18-6 I felt Janis getting tired and am trying to get her smile more, would it change if I added more light ? I am going to do so, when the postman arrive.
Likes
9
Share
@Pretty_Baked_420
Follow
So after my 29th April update last week, I have only given ph’d water, I do have some nutrient burn but hoping that I can sort this out over the next few days, it’s my 1st issue I’ve had but my own doing due to giving too many nutrients as not reading properly. In a way am pleased because I won’t be making that mistake again. I did take a couple of huge fan leaves off that I considered “light blocking” on day 18 and she seems to have recovered well. Other than that it has been a good week.

Likes
7
Share
@FourTwenty_Plants
Follow
I almost stripped them naked kinda but I need to get more light to the lower bud sites otherwise they are pretty much popcorn.
The Green Gelato is happily starting to produce flowers while the Lemon Cherrys are taking their time to stretch one of them is almost 130cm tall and that was the 1 that was the most behind in the early weeks ahhahaha.
Date: 26.08.2024


Likes
5
Share
@Samsemilla
Follow
Die Blüten werden schön schwer und bunt.
Das Wetter stellt sie auf die Probe und fordert Opfer.


Likes
11
Share
@NidoR420
Follow
Last week of Ozz! I’m getting some nice trichromes. Surprisingly, she doesn’t smell much, but she’s still beautiful. She also has the best ratio of buds to leaves out of the three plants of the same strain. I’ll start trimming Dorel by Friday and #4 this weekend to free some space. Then it’ll be Ozz’s turn on Sunday or Monday. The relative humidity levels are getting dangerously high, but the temperatures are still fine until next week. Since she’s covered, I have good hopes she’ll hold. No additional bud has rotted since two weeks ago :))
Just finished trimming Dorel and will do #4 tomorrow. Fan leaves were super frosty so I kept them to cook, ended with 17g of trim (only fan leaves and too small buds) as well as 37g of dry buds. Not much but it was the smallest plant of the 3 by far, I wasn’t expecting more. First taste test was really conclusive, looking forward to testing again after some curing!
Edit before I complete the harvest section, all 3 plants cut and just Ozz remaining to dry and trim. Terrible outcome for #4 as I had to throw more than half of the plant away due to bud rots. I’m still really confused about what happened: the day before harvest I noticed and removed 3 bud rots from the plant - so far so good. All remaining buds were fine, but when trimming I realised every single top was maroon-ish at the base and I could clearly see a start of mold when opening some of them. Although I could clearly confirm what it was with a 30x lens, the white spots were extremely scarce and small (less than 1x1mm each time). It doesn’t seem really coherent with how it should have spread. Nonetheless, I didn’t take risk and threw away any bud where I could identify white mold with the lens, and put aside the ones where I had a doubt in pop corns (the “7g maybe”, cf below) to track the evolution.
A quick summary of the harvest so far:
- Dorel: 250g wet, 37g dry / 17g trim (54g total)
- #4: 450g wet, 33g dry / 7g maybe / 29g trim (62-69g total) + a lot thrown away
- Ozz: only weighted the two bigger canopie I cut, 162g+142g≈300g wet. It represents around half of the whole plant (probably less, but stem included), so around 5-600g wet total. Still have a few days before I start trimming, but considering the hassle I might start early to not be overwhelmed.
Likes
27
Share
@Trickybis82
Follow
Again,
J8st added 80ml into 20ltr of fresh water then brought p.h down to 6.0/6.1. Just running this last feed before I start Flushing for final 14days.
Be back next week.
Please and love growmies.
Likes
2
Share
@heinzhammer
Follow
Raised EC to 1.9-2.0 ish
pH 5.8
Raised the Lights to the maximum height.
Tops-to-Light-distance around 25-30cm
Buds are bulking up daily!
This run is smooth as hell. No deficiencies, no pests, plants look happy from beginning until now....
Lets hope the last 5 weeks will be ok!

Processing
Likes
5
Share
@Christmas
Follow
The branching beast is doing well, but it's time again to bring her in a good shape.
Also I'll set the LST new cause of the fast growing one of the branches started splitting up.
So see ya next week when I maybe repot her in a bigger pot and cleaned her up!

Likes
2
Share
@Ninjabuds
Follow
The strawberry gorilla has come out of the soil and it pushed itself up very well without having to dig it up out the soil. This is one plant I’m excited for I hope it grows to look like the photos
The temps are rising around here making it some much easier to start seedling than in the winter with heater on full blast
Likes
22
Share
@Muscaria710
Follow
21.04.2025
was geht?
ich bin absolut überwältigt von der Kombination Autopot und Biotabs----
die Lady ist himmlisch
und auch schon fertig , also nach dem letzen Fotoshoot ist dann ernte angesagt
ich denke das sind über 200g - wir werden es shen
die buds sind wunderschön, eine anhäufung von vielen kleinen knospen zu wunderbar dichten Buds
glitzer und klebrig
die lady duftet den ganzen Raum voll
immernoch frisch, fuchtig- keine komischen untertöne ( die kommen dann beim schneiden denke ich
also nächste woche fotos machen und dann wird geschnitten😭
xxxxxxxxxxxxxxxxxxxxxxxxxxxxxxxxxxxxxxxxxxxxxxxxxxxxxxxxxxxxxxxxxxxxxxxxxxx
Ich gehe mit der "Just Add Water"- Strategie von Biotabs-
Zusätzlich nehme ich Green Senstation von Plagron bei jedem Gießen dazu
Ds bedeutet ich mische alle Dünger und Pflanzenhilfstoffe in die Erde, und gieße dann nur noch mit Wasser.
Das einzige, was man beachten muss ist ein niedriger EC in der Erde ( um die 1.2 -1.5)- sont wirde es den
kleinen zu " heiß"
ich nutze organische , torffreie Erde mit Holzkohleanteil und diversen additiven ( myco/ Bacterien etc.)
und Zach habe ich " supersoil- Living soil"
INFOS DES ZÜCHTERS
Marke Zamnesia Seeds
Eltern Gelato x Zkittlez x Ruderalis
Genetik Auto Hybrid
Blütentyp Autoflowering
Blütezeit 9-10 wochen von der Saat bis zur Ernte
THC 23%
CBD Gering
Innenhöhe 100cm
Außenhöhe 120cm
Ertrag Innenanbau Bis zu 500g/m²
Ertrag Außenanbau Bis zu 150g/Pflanze
Gattung Feminisiert
Erhältlich Als Feminisierte Samen
*
Laut Züchter, wenn unter idealen Bedingungen angebaut
Likes
99
Share
@Magnetous_tryko
Follow
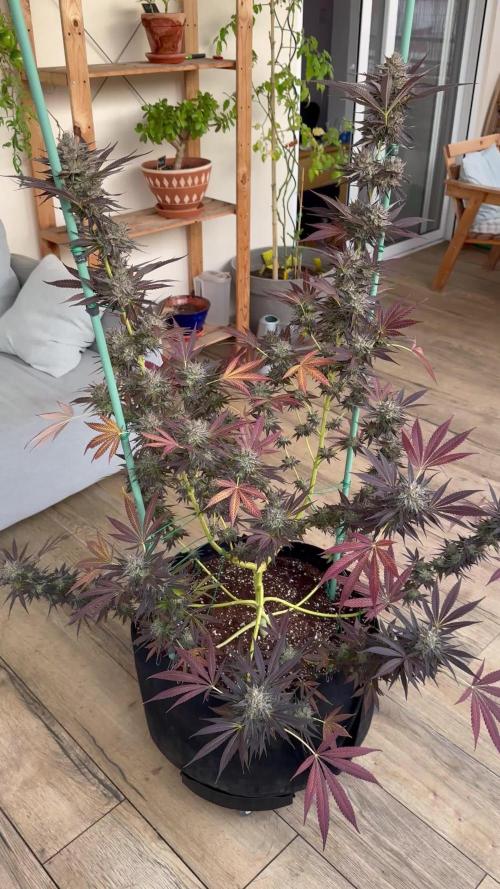
End of this winter grow! Those ladies have been a pleasure to grow even if the very low temps may have had a negative impact. I also messed up by boosting them a bit too much before the flush but I think it helped densifing the buds in the end. Smell is awesome, trichs density is good as well as bud density, can't wait to vape test her!!
My first attempt in lst was maybe more hst like, broke a few branches, stressed them too much... So I will be more gentle next time and I hope the hardware I'm working on will help me in that.
Likes
14
Share


Likes
87
Share
@Roberts
Follow
Auto Banana Kush is growing good under the Medic Grow Mini Sun-2. She was a pain to get started, but is off and running now. I did have a minor ph swing but I corrected it over last day or two. She got her first lst today, and her root tips pruned. Thank you Medic Grow, Athena, and Weed Seeds Express. 🤜🏻🤛🏻🌱🌱🌱
Thank you grow diaries community for the 👇likes👇, follows, comments, and subscriptions on my YouTube channel👇. ❄️🌱🍻
Happy Growing 🌱🌱🌱
https://youtube.com/channel/UCAhN7yRzWLpcaRHhMIQ7X4g


Likes
2
Share
@Fleetwood
Follow
Still just want to keep the defoliation to a minimum. I wanted to have a grow with the plants 'O Natural' with no topping or other techniques. I thinned out almost all but the top 2 sets of fan leaves
