


Likes
Comments
Share


@DogDoctorOfficial
Follow
🌸 Week 3 Flower – The Jungle Takes Over
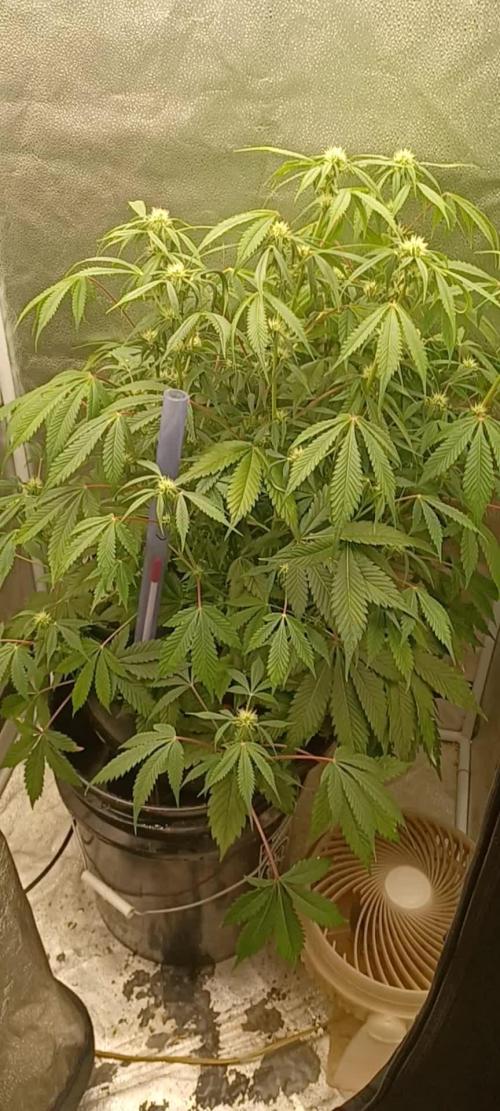
The girls are now towering at 1.20 m, turning our tent into a proper green jungle. Both phenotypes are thriving with thick stalks, lush foliage, and a dense network of branches promising a spectacular flower set. This week was all about control and balance.
✂️ Defoliation & Growth Management
Although these plants have been allowed to grow naturally so far, their explosive stretch meant I had to step in. I performed a strategic defoliation, not because the plants were weak, but to:
• Improve airflow through the canopy.
• Ensure light reaches lower bud sites.
• Slow vertical growth and help prevent them from outgrowing the tent.
Even with a high ceiling, there’s still a risk of running out of headroom during the last stretch. Defoliating at this stage also redirects energy to bud formation instead of excessive leaf production.
Note: During this process, a few branches were accidentally broken while moving them out for photos. I left this in the report and photos as a learning moment, large plants can be tricky to handle. This may be the last out-of-tent photoshoot before harvest.
🌱 Structure & Bud Development
• Both phenotypes are highly branched, with bud sites forming all the way down the stems.
• First signs of proper bud stacking are visible, with white pistils everywhere.
• Plants look symmetrical, vibrant, and full of energy — a promising start to mid-flower.
💧 Feeding & Nutrition
Base nutrients:
• Aptus Regulator – 0.25 ml/L
• CalMag Boost – 0.25 ml/L
• All-in-One Liquid – 1 ml/L occasionally (soil already contains slow-release pellets)
Bloom boosters (Plagron):
• Green Sensation – 1 ml/L (multi-action bloom stimulator, PK booster, and terpene enhancer)
• Sugar Royal – 1 ml/L (amino acid-rich biostimulant, improves aroma & resilience)
• Power Buds – 1 ml/L (early flowering booster to promote faster bud set)
This combined recipe ensures the plants receive balanced macro and micronutrients while enhancing flower development, resin production, and terpene expression.
pH & EC:
• Feed solution pH: ~6.0–6.1
• Feed EC: ~1.04 mS/cm (soil EC still at ~2.96 mS/cm, so feed is moderated)
🌡️ Environment
• Soil temperature: 24–24.7°C
• Air temperature: 29°C
• Humidity: 67%
• VPD: 1.37 kPa
Conditions are slightly warm, but the plants are coping well.
⸻
📌 Summary
Week 3 of flower has been a turning point, from a lush veg canopy to a budding powerhouse. Strategic defoliation will help manage height and airflow, while the combined Aptus + Plagron feeding strategy aims to maximize flower density, aroma, and overall plant health. The structure is impressive, with a sea of potential bud sites that promise a heavy, aromatic harvest.
📲 Don’t forget to Subscribe and follow me on Instagram and YouTube @DogDoctorOfficial for exclusive content, real-time updates, and behind-the-scenes magic. We’ve got so much more coming, including transplanting and all the amazing techniques that go along with it. You won’t want to miss it.
• GrowDiaries Journal: https://growdiaries.com/grower/dogdoctorofficial
• Instagram: https://www.instagram.com/dogdoctorofficial/
• YouTube: https://www.youtube.com/@dogdoctorofficial
⸻
Explore the Gear that Powers My Grow
If you’re curious about the tech I’m using, check out these links:
• Genetics, gear, nutrients, and more – Zamnesia: https://www.zamnesia.com/
• Environmental control & automation – TrolMaster: https://www.trolmaster.eu/
• Advanced LED lighting – Future of Grow: https://www.futureofgrow.com/
• Root and growth nutrition – Aptus Holland: https://aptus-holland.com/
• Nutrient systems & boosters – Plagron: https://plagron.com/en/
• Soil & substrate excellence – PRO-MIX BX: https://www.pthorticulture.com/en-us/products/pro-mix-bx-mycorrhizae
• Curing and storage – Grove Bags: https://grovebags.com/
⸻
We’ve got much more coming as we move through the grow cycles. Trust me, you won’t want to miss the next steps, let’s push the boundaries of indoor horticulture together!
As always, this is shared for educational purposes, aiming to spread understanding and appreciation for this plant. Let’s celebrate it responsibly and continue to learn and grow together.
With true love comes happiness. Always believe in yourself, and always do things expecting nothing and with an open heart. Be a giver, and the universe will give back in ways you could never imagine.
💚 Growers love to all

Likes
2
Share


@Yiyis_Grow
Follow
Lámpara: Bestva Quantum Board LED LM301B
Sustrato: 2 Jiffy fino : 1 Floragard
Especies: Charlotte Dream CBD - Auto Dark Purple - Purple Kush - Triping 25 - Gelato Ice
Acontecimientos :
1. Las automáticas que me enviaron de regalía empezaron a florar muy pronto y van a dar muy poca producción. No vuelvo a poner automáticas gratis en mis indoor.
2. Las Charlotte Dream han crecido de forma brutal comparadas con las demás.
3. Se está empezando a hacer LST a algunas de las plantas, otras se quedaron al natural.
4. Luz 20h/día, nutriente y viento.
Buenos humos


Likes
9
Share


@Chupadeos
Follow
La temperatura en la zona que vivo está muy alta y es casi imposible tenerla más baja,y no puedo instalar aire acondicionado,así que están con mucha ventilación y agua.ellas se ven muy sanas y con muchas ganas de absorber abonos,han reaccionado muy bien al cambio de foto periodo,después de tener estás temperaturas tan altas ellas no muestran signos de problemas se ven muy sanas y fuertes ,en el futuro veremos qué tal van bajo temperaturas incluso más altas ,aunque personalmente las veo perfectas para soportar lo que venga, estas pequeñas nos van a sorprender.


Likes
133
Share


@PapaNugs
Follow
Transplant went well today. The girl got three weeks in the tiny pot and barely grew any roots. Surprising honestly. Gotta water more thoroughly I guess. But all is well and will start the beginning process of training soon.
Lights at 40% power.
Here are the lights details:
Medic Grow Mini Sun-2 150W LED
Model: MN150-022
Spectrum mode: V1
Efficacy: 2.8 umol/J
Thanks for stopping by!
You can find the light on Grow Diaries:
https://growdiaries.com/grow-lights/medic-grow/mini-sun-2-150-watts
You can find the light on Medic Grow's website:
https://medicgrow.com/

Likes
9
Share


@AUTOBUDDHA
Follow
Fantastic week. Lots has changed. Plants are stacking something fierce!
I cut out the nitrogen completely this week, qnd that's how it will stay for the duration of the rest of the grow. I have found with autos, i have had the best luck when I push them hard with nitrogen up until this stage in growth. I then cut out the nitrogen completely and up the bloom nutes quite dramatically.
For the rest of the grow I will feed every watering. Water at a 6.4 ph.
Gro- 0ml per gal
Micro- 10ml per gal
Bloom- 15ml per gal
Bug bud- 5ml per gal
Very much looking forward to watching this batch swell!!
This is the biggest plant in my grow at 27 inches tall so far! She may pick up an inch or two.
Beautiful plant. And a mutant at that.
3 branches from each node instead of 2. Really cool.
Great looking plant. Heavy stalk.


Likes
28
Share

@Roberts
Follow
Auto black Opium is doing good.i changed her solution to the blooming mix today. She is starting to develop her colas. Even is look great. Thank you Divine Seeds, Athena, and Spider Farmer. 🤜🏻🤛🏻🌱🌱🌱
Thank you grow diaries community for the 👇likes👇, follows, comments, and subscriptions on my YouTube channel👇.
❄️🌱🍻 Happy Growing 🌱🌱🌱
https://youtube.com/channel/UCAhN7yRzWLpcaRHhMIQ7X4g.

Processing
Likes
12
Share


@2Stones1Bird
Follow
Checkout my Instagram @smallbudz to see the Small budget grow setup for indoor use, low watt, low heat, low noise, step by step.
04/01/2020 - Did the last defoliation, removed about 1/4 of plant material.
06/01/2020 - Fed her 1.5l of 6.5PH water with 0,3ml Cal Mag (Atami) 0,25ml of Grow, 0,6ml of Bloom and 0,5ml Max, and 1ml of each: Heaven, Alga-mic and Vera, noticed some run off, I use about 1/3 of the nutrient dosage on the chart, to achieve about 200/300PPM (500 scale).


Likes
10
Share


@HideAndFly420
Follow
Day 29, I’ve been slowing a little bit with fer too loser as I m going into flow and I used an all mix soil from biobizz that’s already charged with an high ec, I don’t wanna risk any over, I left it for one week with just water and regulator, the development of roots will help to absorbs the ec present in the soil so I will restart to fertilise next week.
I’m using the complete line from aptus and I’m really satisfied I see how healthy the littles are.
I will have my lamp 40 cm for this week and I’ll
Move to 33 at the end of this week
Day 32 this OS is flowering supersoeedy, I can already see buds, i had one of last lst just give her a more clean structure.
I stopped to fertilise in the last 5 days, I just gave ph controlled water and yesterday 0.5 lt of water with just regulator and calmag. I wanted the plant to eat all the nutrients I gave during veg, I think this worked pretty well as I I saw her growing every day and I can. See an healthy nice green on leaves .
I think that max tomorrow I’ll start again with fertiliser.
Day 33 the orange sherbert is really running fast.
I restarted feeding her today, flowering feedings started.
Let’s goo
Let’s goo!!
Likes
15
Share

@DE_BW
Follow
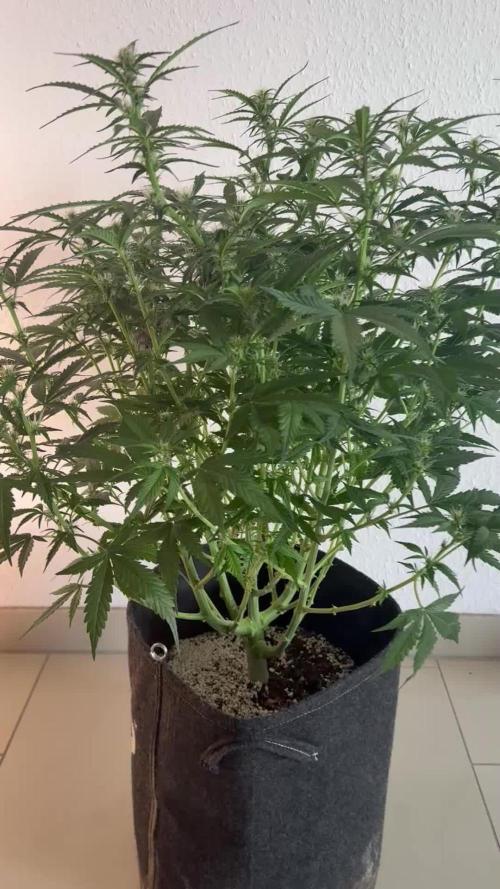
Week 2 of flowering was a major turning point, with the plant stretching heavily while developing a very bushy structure and a large number of bud sites. I performed supercropping on the tallest tops to control height and create an even canopy, along with a heavier defoliation to improve light penetration and airflow. She responded extremely well, showing strong recovery, high water demand, and continued vigorous growth. Bud formation is still in the early pistil stage, but the structure suggests a high-yielding plant with many evenly developed colas.


Likes
57
Share


@DankeyeBeaverjuice
Follow
Excellent week of growth, we're in the second week of flower on the two little ones so I have begun the pollination process. The donor plant is almost as tall as me now it's ridiculous how big this plant gets. If I was doing a flower run Id have a staggering amount of cannabis at the end, as it is I have enough pollen to impregnate all of Canada lol, best steer clear of my facility lest you want a baby :)

Likes
26
Share


@QGrows
Follow
This was a great strain for my first grow! The plant was forgiving of my several mistakes throughout the grow and just kept bouncing back. I had self-created problems with over watering, not enough nutrients toward the last few weeks (I started flushing and scaling back nitrogen too early, thinking I had a nitrogen issue).
I'm waiting to review the smoke and high until after curing. I tested the THC and it's coming in at 17.5%-18%.


Processing
Likes
13
Share


@Ferenc
Follow
It was easy to harvest she was very small jut cut it quickly without stalks the wet weight is 17 g of the buds, nicely coated with THC and it was approx 70% milky and 40% amber trichomes. Hopefully good time to be harvested. This site has changed can not update and edit the comment section. The smoke is nice it is kind of relax and strong high. Not the best but not bad at all. I like it.

Likes
10
Share


@berlinbeginner
Follow
Blueberry Muffin F21 by Humboldt Seed Co.
BBM4 ( the tallest one) smells incredibly fruity.
The others havent developed a strong smell yet
Likes
18
Share


@Luca90
Follow
Week four was definitely the week when the plants started to really grow bigger, I started some LST at my way cause even if I check thousands of videos I end it up doing what I thought was better for my plants, I perhaps was a bit late so it wasn’t stretching as I thought it would have, maybe I shouldn’t have wait this long, but again first time learning a lots.. I let the plant grow with LST only in week 4 in week 5 I introduced a scrog I made myself cause I thought that I couldn’t keep doing lst because I started too late
Likes
7
Share


@Cthoff
Follow
Well am happy with the outcome and the way I grew it. I might do things slightly different next time. Be more proactive instead of reactive.
4.65 oz was the total weight (dried + trimmed)
Smoked a little already before curing and was such a smooth and clean hit. No harshness in my throat and it was a clean high but more of a head high. That should change after a few weeks of curing in jars but nonetheless a comfortable high!

Likes
3
Share


@CaptonianMoneymaker
Follow
Had little issue with under feeding but up all doses by 10ml per 2 litres