The Grow Awards 2026 🏆 


Likes
15
Share
@Master_weeda
Follow
Bonjour à tous les padawans et maîtres jedis
Je me suis régalé de cultiver cette souche d'une incroyable robustesse et qui m'offre un très bon rendement.
Merci à tout mes aïs grower's qui m'ont donné de bons conseils et la force pour mener à bien ce projet

Likes
15
Share
@AllieO
Follow
2/9 NL: slow going, but going.
2/11 NL: few more weeks? Gave pH balanced water today. Pistels seems to be darkening, which is encouraging. Going to check trichomes this weekend... Hopefully mostly cloudy at this point!

Likes
3
Share
@biglittlebird
Follow
Holky začínají svůj předposlední týden , ted už se pojede jen základ hnojiv v polovičních dávkách , s úrodou budu asi spokojeny .
Jedna devčice tam vyčnívá z řady s nejvíc cukrem, ale každá tam má něco do sebe .
Za mě dobrý 👍 problémy žádné velice nebyly a snad už ani nebudou, jen jedna špatně pobrala to zvýšení hnojiv v tom 6.tydnu (trošku listy popálené ).


Likes
10
Share
@barlobruz
Follow
08/30/2021
- Noticing more gnats than usual. Could be overwatering, anaerobic soil conditions, or both.
- Going to set up fly traps, starve both the plant and the gnats of water for about a week.
- Will observe any stress responses due to an extended dry period.

Likes
16
Share
@ChewiesGrow420
Follow
Today on day 17 from date of birth Iam preparing a worm casting tea. In a cheese cloth bag ,Made up of 2 cups of worm castings 2 tablespoons of unsulfured molasses,2 tablespoons of mineralized phosphate (bat shit) ,2 tablespoons of soluble seaweed extract . 2 tablespoons of alfalfa meal 2 tablespoons of all purpose 4-4-4 all Gia green products other than. I also sprinkled in some great white premium mycorrhizae inton2 gallons of water. Tea will brew for 24 hours before applying.

Likes
24
Share
@Doubleb84
Follow
Running into some rookie mistakes with PH and nutrients 😫. Getting her healthy again with help from friends though! Love this light so much!!

Likes
6
Share
@Lovemabud
Follow
Smooth sailing it was this week that's for sure. No further issues with the automated watering, temperature was mild and pretty much maintained a good grow temp for the entire week. Unfortunately I know the mild temps won't last, one day of 26c forecast for this week so once again the internal temp of the tent will rise into the 30s. Oh well, can't do anything about it and as long as the plant stays as happy as it currently is then no problems from my side.
Gave the plant a minor defoliation at the start of the week, with the intention of getting as much light to the lower bud sites as possible, with next to no impact on the plant. Buds are certainly plentiful, now I'm just waiting for the time to be right to adjust the nutrients to really give them the best opportunity of reaching their full potential.
At the moment plenty of potential this plant is offering. The trichome production is still on the low side but also expect this to change once they start fattening up.
Not much else to report. This plant is pretty much taking care of itself I'm happy to say.
Likes
25
Share
@DrGanj
Follow
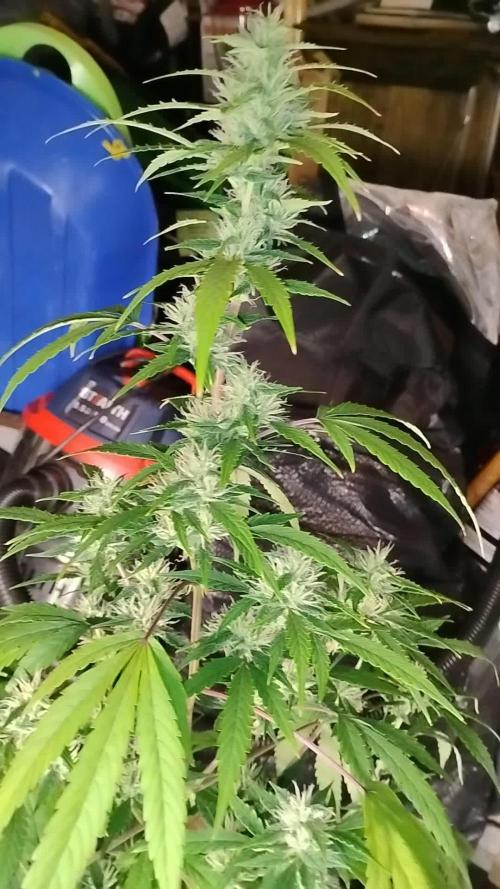
This plant was a dream to grow, wish I'd taken cuts. Halfway through dry at 7 days. Drying at 55 - 60 % RH and 17 - 19 degrees C. I anticipate she'll be done between 10 - 14 days total dry time and I'll then trim and update weights on this Harvest.
133.75g total after trim. She's a nice smoke, very happy.

Likes
24
Share
@SkunkyDog420
Follow
Hallo zusammen 🤙.
So das war es für sie ✂️🤙.
Hat Spaß gemacht die Pflanze wachsen zu sehen.
Danke an Dutch Passion für die kostenlosen Samen 🤙.

Likes
37
Share
@Capo420
Follow
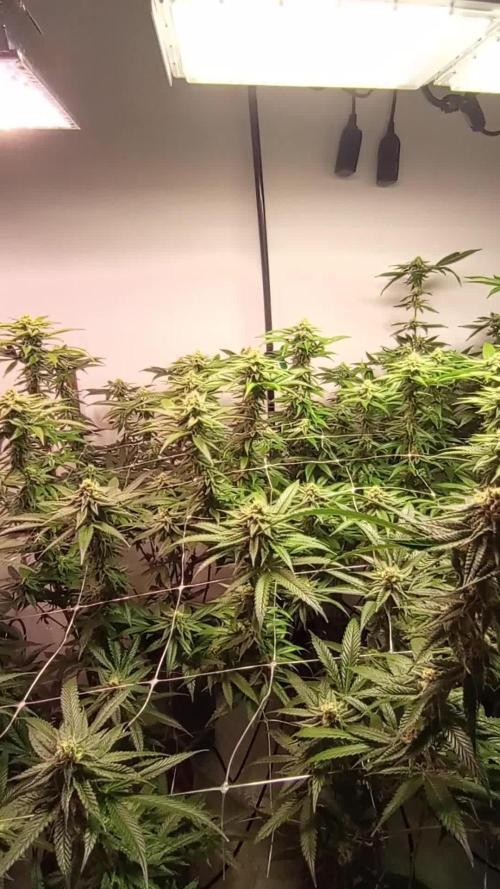
Been an awesome week!😎
Lots of things going on last week.. We started LST, made a few LST adjustments, gave the ladies a haircut, and further refined the nutes👍
Looking forward to seeing some signs of flowering this week. 🙏
I used to believe I was a man of patience 😅
Stay tuned for pics and videos throughout the week.🙌
Happy Growing!
🤙💚💪🌱😎🌱💪💚🤙
Likes
46
Share
@eldruida_lamota
Follow
Vamos familia que ya actualizamos la cosecha de estas Candy Rain de Zamnesia, para el concurso POWER BUDS Plagron x Zamnesia CONTEST.
Ya era hora de cosechar, estoy bastante contento con los resultados.
Vaya flores que se han marcado repletas de tricomas, y las flores se marcan aromas dulces y afrutados.
Es una variedad bastante fácil de cultivar y muy resistente, crecieron desde el principio bien vigorosas, sin problemas y al final de todo recompensó.
Las condiciones ambiéntales han sido máximas en 25 y mínimas en 20 y una humedad estable en torno al 36% al final de floración y en el secado.
Os comento que tengo un descuento y para que compréis en la web de Zamnesia de un 20%, el código es ZAMMIGD2023
The discount 20% and the code is ZAMMIGD2023
https://www.zamnesia.com/
Espero que disfruteis este diario, buenos humos 💨💨

Likes
5
Share
@Ninjabuds
Follow
I got rid of one if the gas tax x obama runtz this week it was just not keeping up with the group. I'm already making a few if the plants wait to flower so other plants can catch up the one I killed was 10 days behind the next plant in the tent. On the other hand the plant still alive it's still small but soon as it got topped it reached fir the sky and started trucking along
This past week, the plants went from being weak little plants that had just been top and now they are on there way to being nice and sturdy. I could flip them to flower now if I wanted. I plan on letting them grow a few more nodes on each branch before I give them the flip. My hopes is I get longer colas if I let it ride out longer in veg cutting off all the lower growth b4 flower. I have had the light on 25% still but today I raised it up to 3o% I like to have them handling 40% nicely before I turn them to flower
Likes
4
Share
@Growstopher
Follow
4.21.25
3rd week of veg tie down method going good. Definitely going to have plenty of space for light.
Hoping to get couple more weeks of veg in before she’s flowers! Time will tell very soon!
Thanks for checking out grow
Likes
5
Share
@Lasninasverdes
Follow
En nada empiezan la semana 9. Estoy orgullosos de mis niñas van muy bien😍

Likes
6
Share
@AestheticGenetix
Follow
8/9/25 I'm not sure if she stalled a bit or what but she seems happy but not a whole lot seems to be changing with her. Added some dr earth 394 and threw in some dying leaves because I noticed some worms hatched from when I added the home made worm castings
8/14/25 she has really started to fill out this week.
Applied some cal mag in the form of uprising foundation. And will continue to add microbe charge
Still tweaking the auto water set up. Trying to keep it between soaked and only partially watered. Maybe it's the drip heads.

Likes
1
Share
@PigBearMan
Follow
Hey there.
Plants are developing pretty good.
EC is ~ 1,6 and pH is ~ 6,0.
I don‘t know what else to say besides everything‘s fine so far.
Stay high 🤘✌️

Likes
11
Share
@wiz4rd
Follow
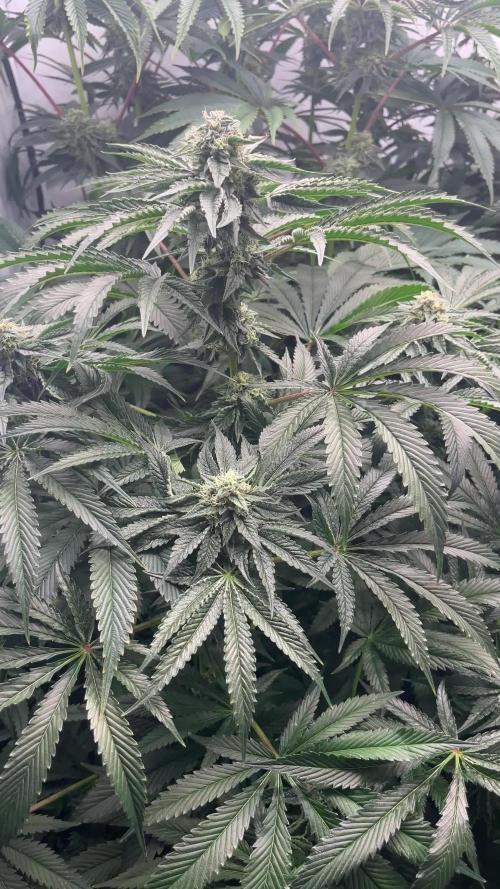
The plants look really happy, with a rich and vibrant color. They are now growing taller more slowly, but the side branches are getting thicker. The buds are becoming really fat and are completely iced out with trichomes. The calyxes continue to swell, and more trichomes are visible, starting to turn slightly milky. Some of the white hairs are slowly turning brown. I estimate about 2-4 weeks until harvest. The scent is simply delicious, with a pleasant creamy berry aroma. The buds are also incredibly resinous, making your fingers sticky as soon as you touch them.
The plants are only lightly defoliated, with dead leaves selectively removed and small shoots trimmed only at the bottom of the plant.
The ladies are also extremely thirsty. Besides the regular fertilized watering, they also receive tap water from the bottom, which they usually absorb within a few minutes.
I also made an extra video to better show the size of the buds, and using the flash at night highlights the trichomes even more.

Likes
4
Share


