


By continuing to use the website or clicking Accept you consent to our cookies and personal data policy and confirm that you are at least 18 year old. For details please see Privacy Policy and Terms
Accept

Likes
16
Share


@Mrg7667
Follow
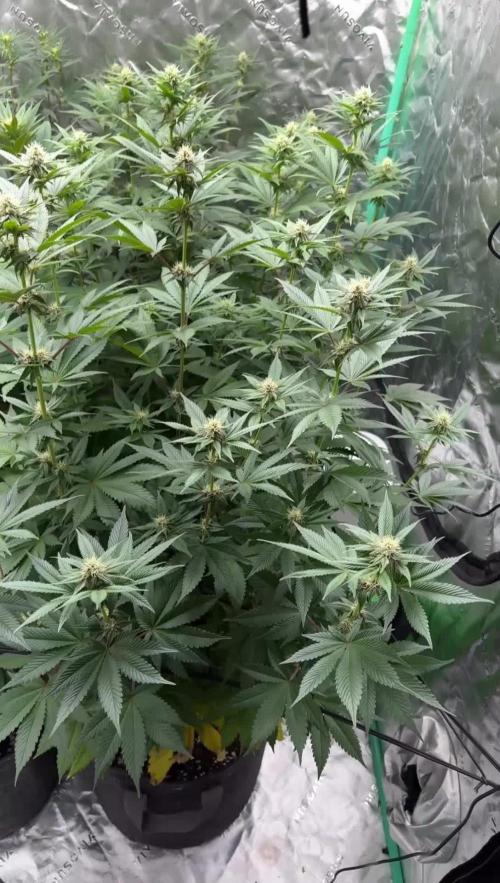
Day 74 and there getting chopped today! I thought the harvest was going to be broken into two separate weeks considering the times on the Choco was listed about 7-10 days sooner then the DD (wich was listed at 70 days for flowering)
However looking at the tricombs on the Chocolate Marshmallow most pheno didnt start getting amber untill the DDs did as well! A couple DD pheno could have maybe gone a couple more days but we will see!
Going for reveg on all the pheno, since i didnt get to take any clones. We will see how it goes!

Likes
Comments
Share


@Algar
Follow
Wk 14 or 26wks in total. I had my weeks alittle confused 12 weeks grow stage.
Southern europe, long sun days are now over, extra hot sun is now bearable and the plants have double in bud size in 2 weeks. All I can say is Sticky, Sticky and more Sticky.

Processing
Likes
6
Share


@Greenbean15
Follow
Getting bigger and bigger, I’m expecting big yields off the ScrOGed plant. The plant in the big tent is beginning to fatten up, especially the bud that was pollinated... both are still shooting new pistils everyday. The mother plant was cut around day 70 but I’m thinking these could go further than that, only time will tell!


Likes
14
Share


@Fullmeltalchemist
Follow
D15 - 9.27 - Cruising along, just watering them once a day
D16 - 9.28 - I planted carrots and transplanted the rest of the seedlings. They are all in the same space. That one LA Sunset never really started to thrive, but I'll keep it for now.
D18 - 9.30 - I topped my first plant for mainlining. I picked the strongest FWW with the most growth tip at the 3rd node and just went for it. She may be a little young, so I left her fan leaves for support. I've decided to do 3 groups of two for this grow, in an attempt to experience how these different strains respond to different techniques - Pair 1 will be mainlined with 8 mains, Pair 2 will be mainlined with 4 mains and Par 3 will not be mainlined but traditionally topped to 4 mains.
D19 - 10.1 - Topped the first Black Sugar for mainlining. Her growth tips are really nice looking.
D20 - 10.2 - Have them all topped 👌

Likes
53
Share

@Mrs_Larimar
Follow
2025-03-21
i had a wonderful Time at Spannabis
i met old and new friends
my Girls were "alone at home"
No Problem here- because of the automatic watering system from Autopots
and the control of VPD , light , and heating with the growbase from Growcontrol
Today i installed the Airpump system for the Autopot, and let it run for an hour
the instllation was supereasy and took me 10 minutes
Girls were doubeling in size ( horizontal and vertical, and most of them showing Flowers( Preflowers)
looking fresh and happy- having already
9- fingered Leaves.
xxxxxxxxxxxxxxxxxxxxxxxxxxxxxxxxxxxxxxxxxxxxxxxxxxxxxxxxxxxxxxxxxxxxxxxxxxxxxxxxxxxxxxxxxxxxxxxxxxxxxxxxx
Growing Environment Setup & Specifications
Lighting System
Model: Sanlight EVO 5-150
Quantity: Up to 5 units
Power Output: 320W per unit
Maximum Total Output: 1600W
Environmental Control
Management Unit: Growcontrol Growbase Pro
Humidity Management:
Dedicated Humidifier
Dedicated Dehumidifier
Temperature Control:
Primary: System-controlled
Secondary: Additional Radiator for supplemental heating
Air Management
Air Circulation: 2x Stand Fans
Air Extraction: Exhaust Fan with Filter System
Irrigation System
Primary: Autopot XXL Pot System
Water Storage: Flexi Tank
Root Zone Aeration:
Airdomes
Dedicated Air Pump
Growing Medium
Type: TERRA PRETA MJ-Mix
Nutrients
System: BIOTABS
Method: "Just Add Water" Strategy
Type: Organic-based feeding
BREEDER INFO:
Toffee Pudding Auto is an extremely potent autoflowering strain that delivers high yields and a great potency together with a wonderful taste. We selected from a large number of Anesia Scout Cookies plants for flavor and THC-content and finally crossed the best phenotypes with a selected Banana MAC and only added a hint of Ruderalis genetics in the next breeding steps to maintain the autoflowering properties. Toffee Pudding Auto forms round sparkling buds that have a very high resin production. The buds exude a wonderfully sweet and exotic aroma during the flowering period that will have you already dreaming of the harvest. After the harvest has dried, the rock-hard, glittering nuggets give off an intoxicating smell of caramel and bananas. Her smooth, creamy smoke lingers on the palate long after the exhale, reminiscent of a fresh caramel cookie with a fruity dressing. In addition to its great potency, the strain is characterized by its short cycle time and high yields. With a THC level of 26%, Toffee Pudding Auto is one of the strongest autoflowering strains on the market. This automatic indica-dominant strain produces a full-body high and is the perfect choice for unwinding in the evening or chilling in the sun. The high offers hard-hitting indica effects that can induce some couch-lock, especially in less experienced smokers. With her, you can enjoy a feel-good high for hours. Growing Toffee Pudding Auto Toffee Pudding Auto is very easy to grow making it a good choice for novice growers. But even experienced growers will be amazed by her stable character and huge yields. The journey from germination to harvest takes only 60-65 days and produces exceptionally good results both indoors and outdoors. The plants reach an average height of 80-120 cm and are suitable for a SoG. Toffee Pudding Auto grows perfectly on all substrates, but her enormous terpene profile can best develop in organic cultivation. She offers you everything you would expect from a modern autoflowering strain: strong and healthy growth, high resistance to pests and diseases and of course extremely potent yields of up to 550g per sqm or 230g per plant outdoors. Therapeutic effects Toffee Pudding Auto provides different therapeutic effects which include pain reduction, muscle relaxation, sleep support and also brings positive feelings.

Likes
24
Share


@Jays_Not_Here_Man
Follow
Very saddened by the turn of events, 3 herms, 2 different grow environments, but each tent had another strain growing along with it. No seeds or problems with the Cookies strain… I had no power outages, no light leaks, no schedule changes, and performed relatively little defoliation during flower. To me, this cannot be attributed to stress, as they showed no sign of stress or deficiency’s throughout the grow. Long story short, booooooo.

Likes
8
Share


@GrowingABushWithButch
Follow
It's Day 25 Week 04 Of Flower For My 02 Kombucha Cream By atlasseed . And For My Snow White and SpliffStrawberry By Spliff Seeds Amsterdam . So Yesterday was Feeding Day All 04 Plants Received 4ml of Quad.AG Products Humonic, 4ml Of Emerald Harvest Nutrients CalMag and 8ml Of Hygrozym By Hygrozyme 4 Growers . I ph this mix at 6.1 Ppm on this mix is at 291. Now on Runoff my Kombucha Cream 3-Part had a Ph of 6.4 and Ppm is at 1490. My Snow White on Runoff as a Ph of 6.3 and Ppm is at 822. My Kombucha Cream 2-Part on Runoff as a Ph of 6.3 and Ppm is at 933. My SpliffStrawberry on Runoff as a Ph of 6.1 and Ppm is at 698. My Kombucha Cream 3-Part Is starting to spike up so I will Keep a closer eye on her. Now let's talk a little about Water Temperature before you feed your plants. On this run I been watering my plant with water temperature at 24 Celsius to 25 Celsius and I am seeing a big defrence on my plants. Also when I feed with Emerald Harvest the ph will spike up a little. And when I feed with the Humonic my ph will balance. Quad.ag Humonic is a fantastic ph balancer and a Great Root Builders in the early veg stage. I can go on and on with Humonic but all keep that for another post 😜. All 04 Lady's are Stacking Up like Champs and getting really Frosty.
HAPPY GROWING GROWMIES 🤘🏻


Likes
39
Share


@Randyb4
Follow
Day 85 First day of Week 12, day 11 of flower
Day 86 Day 12 of flower
Watered Plants with 4 gallons of distilled mixed with spring water with 5.3ml/gal of micro, 4.6ml/gal of grow, and 6.0ml/gal of bloom. PH- 6.4@72°F. Plants look good, buds/hairs forming. Really tight node spacing.
Day 89 Day 15 of flower, first day of Week 3 of flower
Watered with 4 gallons of distilled water with ½tsp/gal of recharge pH-6.6@63°F.
Day 91 day 17 of flower
Watered with 4 gallons of distilled water with 3ml/gal of "Fish Shit" pH-6.3@70°F.
Plant A- 34¼" from the floor, 25¾" from the soil.
Plant B- 31¾" from the floor, 22½" from the soil.
Plant C- 30¼" from the floor, 21¼" from the soil.
Plant D- 34½" from the floor, 25⅜" from the soil.

Likes
4
Share


@tangielope
Follow
Ate agora é tudo indo bem, a menina ta lindona.... Se alguem se perguntar porque ela se chama D-jay é em homenagem ao lutador jamaicano do street fighter, quando eu comecei a cultivar dei um nome da cada personagem as plantinhas algumas n foram p frente e deu game over como bison, sagat, E-Honda, ryu e zangief algumas morrem outas eram machos... Acredite autos machos ja tive 3 e eram p ser feminilizadas .. vai entender...
Atualizando .... Ela esta crescendo muito, impressionante com certeza no momento é a rainha do baile...

Likes
37
Share


@DogDoctorOfficial
Follow
🌱 Week 1 Update: Terpyz Mutant Mentha de Croco Journey 🌱
Hey Grow Fam! The Mentha de Croco sprouts are officially a week in, and they’re already showing off their unique personality, each one growing at its own pace. They’re rocking some funky vibes and loving life inside the dome! Here’s a full update on their progress, care, and setup for Week 1.
Living Environment: The Humidity Dome Setup
The seedlings are living in a humidity dome, where we’re keeping the relative humidity (RH) close to 100%. This level of RH mimics a tropical environment, creating the ideal conditions for delicate young plants that need extra hydration support as they begin to develop roots and leaves.
Why High Humidity?
• Encourages Strong Root Development: At nearly 100% RH, plants focus on root growth while pulling in moisture directly from the air, helping them establish themselves early on.
• Protects from Stress: The high humidity reduces transpiration (water loss through leaves), which prevents drying and keeps seedlings hydrated.
• Promotes Healthy Leaf Growth: With constant access to moisture, the leaves expand smoothly, giving each plant a strong start in the vegetative phase.
Growth Status & Observations 🌱
These little mutants are showing some funky characteristics and growing at their own unique pace—a perfect reminder that no two plants are the same! Each seedling has sprouted its initial set of leaves, and I’m seeing great promise in their vigor and resilience.
Key Observations:
• Color: The seedlings are a healthy green, with some displaying slight variances in shade—typical of unique genetics like Mentha de Croco.
• Structure: Leaves are developing steadily, with short internodes (the space between sets of leaves) that hint at nice, compact growth patterns as they continue.
• Energy: Each plant seems to be finding its rhythm, which is a beautiful thing to watch! Some are taking their time, while others are diving right into rapid growth.
Nutrients & Supplements 💧
For this first week, I’m keeping it light on nutrients, letting the seedlings draw what they need from the Root Riots and the remaining seed stores. However, I’ve continued using Aptus Holland’s Regulator and Startbooster, both at 1ml/L, to support foundational growth.
Why These Nutrients?
• Aptus Regulator: Adds silicon to fortify cell walls, giving the seedlings extra strength to handle environmental changes. Even under the dome, this helps build resilience.
• Aptus Startbooster: Supplies essential microbes and root stimulators, setting up these little ones for explosive root growth once they’re ready to venture outside the dome.
Lighting: FOG LED & Environmental Control 💡
I’ve kept the Future of Grow (FOG) 600W LED dimmed to around 200 PPFD to avoid overwhelming these tender seedlings with too much light. They’re getting just enough energy to support healthy photosynthesis without stressing them in their early stages.
Lighting Benefits at Low Intensity:
• Prevents Stretching: With the lower PPFD, plants stay compact and focused on root and leaf development rather than reaching for the light.
• Supports Early Photosynthesis: The FOG LED’s balanced spectrum provides all the wavelengths these seedlings need to kick off photosynthesis and grow with vitality.
Controlled through the TrolMaster Tent X, the lighting schedule is consistent and stable. With this controller, I can manage humidity, lighting, and temperature settings all from one place, ensuring the environment stays perfect for these little ones.
Reflection & Tips for Fellow Growers 💡
Week 1 is about creating a stress-free environment for seedlings to adjust and establish themselves. Here’s a bit of wisdom for anyone embarking on a similar grow:
💧 Humidity & Hydration: High humidity is a seedling’s best friend. Keep your dome or grow area humid for strong, happy plants.
💡 Light Management: Keep lighting low to encourage compact growth and let those roots dig in. Adjust lighting gradually as they grow to avoid any shock.
🌱 Patience with Genetics: Each plant has its own rhythm, especially with unique genetics like these. Let them show you what they’re made of without pushing too fast.
Shout Outs & Community Love 💚
Much love to Terpyz Genetics for these incredible seeds, Aptus Holland for the nutrients, Future of Grow for the stellar LED, and TrolMaster for the environmental control. Big shout out to everyone following this journey—it’s always a blast sharing with you all. Let’s keep the positive energy flowing and watch these seedlings turn into something amazing together!
Stay tuned for Week 2 updates—more growth, more funk, and more growers’ love!
Genetics - Mentha De Croco
https://terpyz.eu/products/menta-de-croco-fern-type?_pos=1&_sid=e9237cbcb&_ss=r
DogDoctorOfficial Discount Codes @ terpyz.eu - DOCTOR 15% off
Nutrition - @aptusholland
https://aptus-holland.com/
Led Power @ F.O.G. Future Of Grow
https://www.thefuturofgrow.com/en/online-store/BLACK-SERIES-600-p489093171
Controls @ TrolMaster
https://www.trolmaster.eu/tent-x
As always thank you all for stopping by, for the love and for it all , this journey of mine wold just not be the same without you guys, the love and support is very much appreciloved and i fell honored with you all in my life
With true love comes happiness Always believe in your self and always do things expecting nothing and with an open heart , be a giver and the universe will give back to you in ways you could not even imagine so
Growers Love To you All 💚


Likes
26
Share


@DisTentAint4Campin
Follow
Growing great in week 8 day 2 bloom fed her the last time going to do winter frost and straight water out the gate I started supplementing phosphorus and it fatned them buds up some these girls are heavy eaters

Likes
4
Share


@t0m420
Follow
Since now the plants are ok...zero deficiencies or problems
Hopefully next week the plants will start flowering stage.

Likes
12
Share


@GuaroMan
Follow
Esta semana recién empieza a ver signos de flora, hice poda de bajos y defoliación


Likes
5
Share


@MrFriday
Follow
26.08.2024
1. RDWC: I run a DIY system made of 4 Buckets 17L+separated control/tank bucket (12L operational water per bucket used) fallponic plus underwater current. I don't know why I have made such system I just wanted to be sure that I have included every possible option. I'm not sure but maybe I'll upgrade it to rainponic it's not that hard of a job. I'm not using my 100L reservoir this run becose it needs replacement old one made a small flood in my garden.
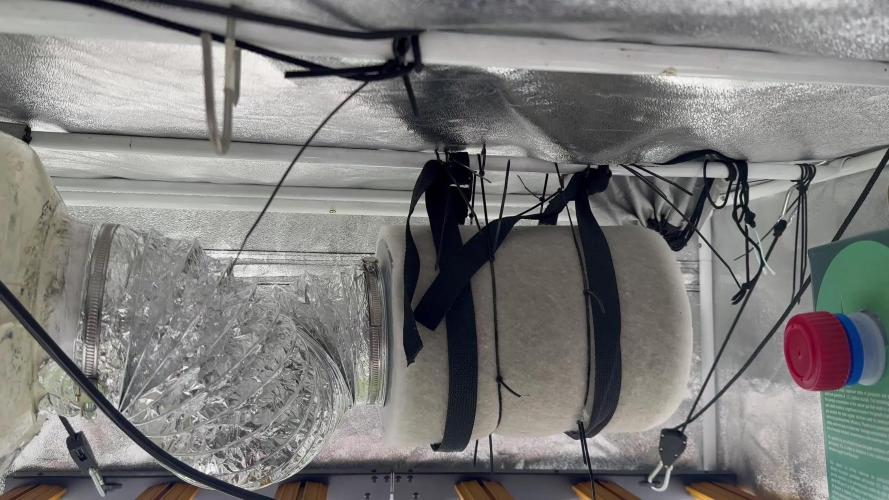
2. TENT AC Infinity 5x5
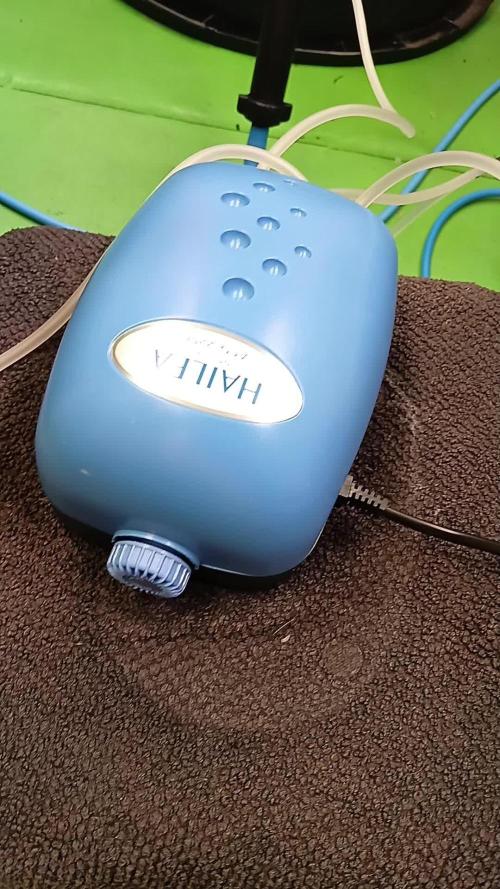
3. Airpump Hailea ACO 388 D 70L/min.
4. Water chiller: hailea water chiller hc-150a.
5. LED GROW light Grand Master Level Tarantula voyager 1500W 2 chanel's plus controller (it will be my first run with this monster it just arrived).
6. INLINE FAN: AC Infinity cloudline S6 carbon filter.
7. CLIP FAN: AC infinity Cloudray S6 3 pcs. For low middle and over the LED air movement.
8. Humidifier AC INFINITY T3 (I don't need stronger one naturally the humidity here is around 65-70%)
9. TENT CONTROLLERS: controller 69 PROX2
10. Germination/humidity dom by AC infinity with germination lamps 40W Ionabeam S11 only for the first 2 weeks before VEG.
DAY 1
Closed in a box hiden in a dark boiler room.
Room temperature 25C
EC 850
RH 90%
Instruments used for measuring:
AC Infinity Hydroponic Meter PRO
AC infinity VPD thermometer
DAY 2 5/6 seeds have start to crack open I guess tomorrow or the day after they will be all ready for the cubes.
DAY 3
ROOM TEMPERATURE 26 C
Relative Humidity 83%
5/6 seeds are showing signs of life. The 6th one is a little bit slower it's cracked as it can be seen on the picture but it refuses to show it's tale. I believe tomorrow it will be ready. On day 4 I'll put them in the "Root Riot" cubes and after that I'll just monitor the RH and RT until I see the sprouts.
DAY4
ROOM TEMPERATURE 24.5
RH 94%
6/6 seeds have germinated so far. Today I'll move them in the Humidity dom where they will stay until they become seedlings and I'll keep them there until they are ready to be moved in the RDWC system and coco coir. In the video I have show my method of preparing the cubes for the seeds next update will be tomorrow probably only for temperature and humidity.
DAY 5
ROOM TEMPERATURE 25-27.
RH 89-95
I can't believe that I'm seeing first sprout today. Maybe this strain is one who can take a little push 🤣🤣🤣 I'll keep in mind and I'll se how much I can push it. Unfortunately I still don't have CO2 for veg and flower but I can try other different little tricks. I'm happy with this seeds obviously 42 Fast Buds are giving a really quality seeds. Let's see what kind of buds will come out of this seeds. I hope tomorrow everything will be sprout out and i will turn on the lamps.
DAY 6
PPFD 120
ROOM TEMPERATURE 24.5
RH 92.1
It's day six 4/5 seeds are successfully germinated. Maybe the next two will pop out but for one of them I'm not so sure. Anyway I have one spare seed that I can pop out for the coco project plus I have one Papaya Cookies Auto for the fifth bucket so that's no problem. The seeds ar under the light AC Infinity Ionabeam S11 on level 3 equal to 115 ppfd plus the DOM extension.
DAY 7
ROOM TEMPERATURE 25C
RH 82%
I have 4/6 successfully germinated seedlings. Tomorrow I'll open up the humidity dom a little bit. It's good to have spare seeds. Now I'll have to plant my spare peace of gorilla cookies and probably one Papaya Cookies Auto (gift) becose my plans were for 6 plants. Anyway this 4 soon will be transplanted in the RDWC flowering pot. Let's see what tomorrow have to say.
DAY 8
ROOM TEMPERATURE 25C
RH 82%
Amazing root development, I wasn't expecting this kind of speed but obviously tomorrow I'll transplant them in the RDWC even before the VEG state. Maybe I'll keep them a few more days when the first set of leaves is all out.
DAY9
ROOM TEMPERATURE 24.1
RH 58%
Today is the last day in the humidity Dom. I delayed the move becose i wanted to have a longer stems and becose my fertilizers got lost in the depo so ill receive them tomorrow. We have very healthy baby's with a lot of tiny roots so it will be perfect to start then from day 10.
DAY 10
ROOM TEMPERATURE 26-27C
RH 70%
EC 115
pH 7
This is the fastest seeds I ever see. I have never transferred seedlings in to RDWC so far, usually I make this procedure around day 17-20. While I was transferring them one of the seedlings accidently snapped a little bit but I hope it was not fatal enough and maybe it will survive, only the time will show, anyway I have another one in coco so I can always transfer it in to RDWC if needed. EC is only 115 for today becose of the little bit of ATHENA BALANCE I dropped in the water, so far the roots are not touching the water so i can add the fertilizers tomorrow while I'm fresh.
DAY 11
Water Temperature 18C
Room temperature 28C
EC 120
pH 7
PPFD 200
RH 70%
They look nice and healthy still not enough signs of roots for picture but so far the seedlings look fresh. One more day in the Formulex+tap water and they will go in the Athena by day 13.
DAY 12
Water temperature 18C
Room temperature 27C
pH 7
PPFD 220
RH 70
AC 240
Everything is going g quick and perfect. So far this run is going smooth as never. I never had root development that quick as this with this seeds. I'm almost in love with them. After a quick summary with my previous runs I decided to double the AC before tomorrow when I'll change the water and I'll replace it with 6.0 pH RO water and the full athena program for the RDWC. So far so good let's see what the Athena nutrients will show after one week.
DAY 13
RH 70
Room temperature 27-28
EC 290
pH 6.1
Water Temperature 20C
PPFD 300
Light cicle 20/4
I couldn't resist to flip the fertilizer to athena. After all as soon as I teach em what its better. Full water change of the tank and new suplements. Formulex is amazing suplement for the first two weeks maybe it can carry most people to whole VEG if it's in soil or coco, but I want the real food in RDWC. So far all the plants have amazing small roots so that means the system work well. Let's see the progress tomorrow, but I beleave in the middle of the week this plants will be already in official VEG period.
DAY 14
RH 70
Room temperature 26C
EC 290
pH 6.0
Water temperature 19.5-20C
PPFD 350-400
Light cicle 20/4
I needed a little bit more light. I don't know how to explain it but its a grower thing and now my seedlings are looking better than the morning. They were looking a little bit "dizzy" if I can use this terminology. So basically in perfect water temperature, perfect fertilizer level and good aeration, there was nothing left beside the light. As I'm saying you can't feed a lot if you don't have enough light. I added the spider farmer SF 1000 EVO over the water container, becose the big fixture is too far from them, but I can't put them under the Voyager, becose my previous grow is in the final week. So now they are on a separate light 🤣🤣 🤣 370-400 PPFD is a little bit much but I beleave they will manage it. After all the plan of this run is to reach 1000 PPFD in the final days.
DAY 15
RH 70
Room temperature 26C
EC 290
pH 6.0
Water temperature 19.5-20C
PPFD 350-400
Light cicle 20/4
So far the progress is mainly on roots and some new leafes are coming out. Probably next set of leafes is going to be the first that will mark the veg stage. I have added a little bit of ATHENA clense today and by far notging ha e changed since yesterday.
DAY 16
RH 70
Room temperature day 26C
Room temperature night 23C
EC 290
pH 6.1
Water temperature 19.5-20C
PPFD 350-400
Light cicle 20/4
As I was expecting most of the job is pre-veg, what I mean is that the results we can see are mostly in root development and ohh boy this is a crazy root spike in just 24 hours. I don't know is it becose of the Athena or just the genetics of the seedling but Im really amazed. In just 11 days from first seedling until today and I'm seeing some crazy root development. I truly beleave that the next set of leaves will be marking the vegetative stage and then we can start the game.
DAY 17
RH 55-60
Room temperature day 26C
Room temperature night 21-23C
EC 320
pH 6.18
Water temperature 19.5-20C
PPFD 350-400
Light cicle 20/4
I decided to add a little bit more Athena Ca-mag. It feels like that my little ladies are struggling for it. I'll see the results tomorrow.
DAY 17
RH 55-60
Room temperature day 26C
Room temperature night 21-23C
EC 320
pH 6.18
Water temperature 19.5-20C
PPFD 350-400
Light cicle 20/4
I decided to add a little bit more Athena Ca-mag. It feels like that my little ladies are struggling for it. I'll see the results tomorrow.
DAY 17
RH 55-60
Room temperature day 26C
Room temperature night 21-23C
EC 320
pH 6.18
Water temperature 19.5-20C
PPFD 350-400
Light cicle 20/4
I decided to add a little bit more Athena Ca-mag. It feels like that my little ladies are struggling for it. I'll see the results tomorrow.
DAY 18
RH 55-60
Room temperature day 26C
Room temperature night 21-23C
EC 320
pH 6.18
Water temperature 19.5-20C
PPFD 350-400
Light cicle 20/4
Okay two more days and we will be in veg. It's Not like we are not in veg today I just want to keep the update from Sunday to Sunday.
DAY 19
RH 55-60
Room temperature day 26C
Room temperature night 21-23C
EC 320
pH 6.18
Water temperature 19.5-20C
PPFD 350-400
Light cicle 20/4
We are in veg tomorrow so today we change nothing. Tomorrow will be great day.


Likes
Comments
Share

@I_roll_my_own_420
Follow
Hey. I have done first scrog training day 5 of 12/12 light schedule. Looks good. Also, I added co2 box on the bottom of tent and use fan to move it around plants.


