
Processing
Likes
Comments
Share


@xX_The_Chef_Xx
Follow
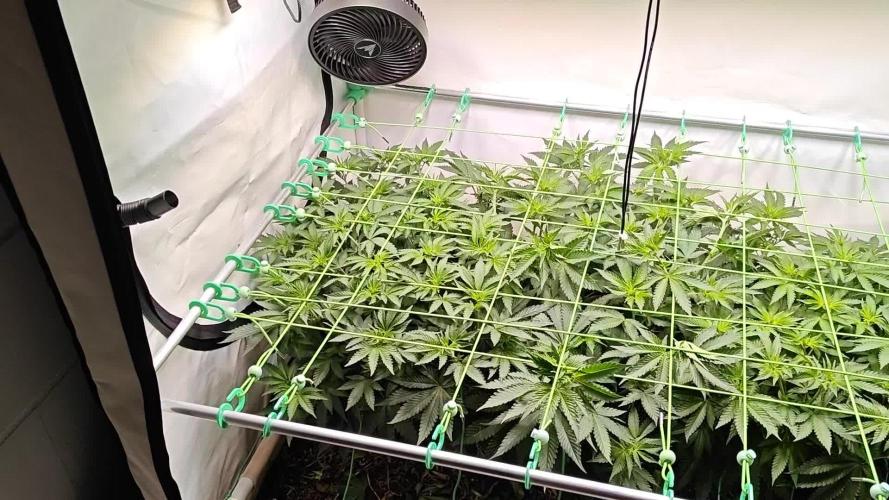
Moved some small clones after sitting in an aeroponic cloner for 2 weeks. We waited until they had 3 <--> 4 inch roots before transplanting them into the 6 site system. This is our first time growing with a hydroponic sysyem and first time indoors also. Running 4 weaker clones in fox farm's ocean floor blend to see the difference in growth rate between the 2 mediums.

Likes
99
Share


@BudXs
Follow
Love Fastbuds, love the team, love the genetics. Will always grow this breeder again


Likes
6
Share


@Abuelito
Follow
Had to leave out of town for 8 days. My girls suffered both heat stroke and dehydration. I fed them and saturated the fabric pots. I also turned the dehumidifier off for the next 12 hours since the rain has slowed, for now. It doesn't look like the grew much this week. I'm afraid this is going to make the final weight significantly less than it would have been.


Likes
15
Share


@Master_weeda
Follow
Bonjour à tous les padawans et maîtres jedis
Plus 2 centimètres le stretch est fini
Cette plante est tout simplement magnifique avec un gros rendement en perspective pour un solo cup
Je suis particulièrement fier de ce solo cup qui me donne un peu de fil à retordre car la plante est gourmande en eau ce qui fait que je dois être très attentif pour l'arrosage car parfois je dois l'arroser 2 fois par jour
Jour 65 defoliation pour que les têtes du bas puissent avoir plus de lumière et comme a mon habitude arrosage avec 10 ou 20 centilitres d'eau ph6.3 à laquelle j'ajoute 4ml de bio organic bloom 3 millilitres de alga max cellmax et 4 millilitres de bazooka bloom madame grow par litre d'eau
Likes
12
Share


Likes
9
Share


@DonFazool
Follow
Day 57 : AK was fed 2L with just Sensi Bloom A&B @ 2ml/l and Carboload @ 1ml/l . I backed off the Overdrive as i don't think it is time yet. The buds are still really forming and i don't want to burn this one as bad as cheese is showing.
Day 58 : I found out that i've probably been feeding too much cal-mag. I spoke with AN and they told me that their Sensi products have enough cal-mag that i didn't need to be adding it. I've started seeing tip burns only in the past few weeks. I think adding the Carboload and Overdrive may have pushed it over the top with the extra cal-mag going in each feed. Lesson learned.
Cheese is on water from this point on. I figure she'll be ready in the next 9-10 days. Need to start checking the trichomes as soon as my pocket microscope arrives in the next few days.
Man am I ever glad I didn't kill AK off because it was taking too long to flower. That plant is going to be a monster. It has so many side branches and bud sites. And it's starting to put off some kind of funk. Giddy up !
Day 59 : Pocket microscope came in today. Can't wait to check the trichs later on. Cheese is really starting to smell more and more. 8 more days until she gets chopped. AK is fattening up nicely. She'll finish in 11-12 weeks for sure.
AK was fed 2L this evening and is fattening up more and more each day. Cheese is getting close.
Day 60 : Cheese got 2L of water, had a good look at the trichomes and this plant is pretty much ready to go. I should have started the flush earlier but i didn't have the microscope yet. Checked various parts of the plant and I am seeing mostly cloudy with a small amount of amber trichomes. I'm going to let it go 4 more days to try and give it at least 10 days of flush.
Day 61 : Fed AK 2L, brought the base nutes down to 1.8ml/L and started Overdrive. I'm seeing some brown pistils starting to show up. Buds are filling out nicely each day.
Cheese is getting frostier every day now. Only a few while pistils left per bud, many of them starting to curl inward. Not seeing any yellowing yet. Been almost a week of just water. 4 more days and she's coming down !
Day 62 : Fed cheese 2L water this morning. That plant is looking really incredible. So much frost ! 3 more days until chop chop
Day 63 : Fed AK 2L, buds are filling out quite nicely. Some of the pistils are turning brown. Buds are not as fat as they are on cheese, however this AK seems to be a sativa phenotype so the smaller buds are expected. We'll see what the Overdrive does.
Cheese is 2 days away from chop chop ! So much frost.
This concludes week 9 !

Processing
Likes
11
Share


@w00tGrow
Follow
Californian snow seems to stop progressing, don't know why, any ideas?
Likes
Comments
Share


@Ninjabuds
Follow
Not a lot to update the seedlings have came up out the soil at this point they are still to small to tell any visible differences.
I started all the seeds from all 10 packs and and I put 26 of them in soil I now have about 20 of them left I still have atleast one left if every strain. I just kept the 20 plants that all started off at the same time it’s so much easier when there is not some plants behind from the rip. In a few days I will pick out the best one from each of the 10 strains and toss the rest so sad there is a plant count here.


Processing
Likes
5
Share


@Luv2Grow
Follow
Day 64 - The beginning of week 10 and started off with 2 gallons of plain pH’d water. I think I waited a day later than I should of cause she was pretty droopy and dried out but seems to of recovered. I ended up tying down a couple of the really long branches to keep her even and seems to of evened up the canopy a bit.
Day 65 - Did a bit of defoliating on the lower end of her today, mainly to remove some dying leaves. Since I’ve got 3 flowering plants in the tent right now, I don’t think everything is getting the right light coverage so I’ve got another AGLEX “1200W” COB LED that should be here tomorrow so hopefully I’ll have enough light coverage and penetration from here on out.
Day 66 - She’ll be ready for another round of water, 2 gallons worth tomorrow, she’s almost dry. Other than that, not much had to be done with her today. As will all the girls in the tent, I’m trying to figure out how to get my temps down. The AC is out in the house and hoping with some cooler temps moving in, it’ll help cool it down.
Day 67 - Nothing new today other than she was very dry so she got her 2 gallons of plain pH’d water, next will be a feeding of nutes.
Day 68 - No major updates and issues going on right now. Just got some updated pictures and tucked some leaves, also removed a couple of yellow leaves at the bottom.
Day 70 - The end of week 10 and she got a feeding of water and nutes today. She’s starting to fill in nicely but still a few weeks away from harvest.
Likes
1
Share


@EgoDeath
Follow
Really loved this plant and how it grew other then the fox tails, Unfortunately I had to move this weekend and just couldn’t continue growing her and moving at the same time. She still had a good 1-2 weeks left but what is there looks really good will update when she finishes drying.
Likes
9
Share


@Headies
Follow
So this week after I gave it under nutrients I apparently gave it too much nitrogen while having a potassium deficiency. Shiney dark leaves, So i fixed that, but some didn't bounce back, and I tried nitrogen. I think they are doing pretty good considering everything I've put them through SO FAR. lol. Nutrients are NPK Raw's total lineup, follow their instructions at first, Fastbuds adjustments as of this week.
Likes
43
Share


@GrowerGaz
Follow
Day 26 of 12/12 today , So in day 22 I made a biotabs PK compost tea with Mollases in place of Orgatrex. Yet two days later they still look hungry, so I turned the autopots off yesterday and gave them a little Canna Flores Organic. I really underestimated how much Biobloom I should have added to the soil. Next time I would use 5g per litre of soil. The jacks Toe Jam that's decided it wanted to flower in its own terms is almost ready so that did not get any feed , just water. Apart from that just general maintenance , defoliation , tying the branches down a little tighter , keeping the autopot tank full.


Likes
6
Share


@Mr_nugs_lover_David
Follow
It was such a nice experience for me with this strain, first time ever growing her, she had a little bit of long internodes and thought she wasn't gonna be very productive, however the nuggets are so so hard and compact and the quality is just brutal, doesn't even look like she's s been outdoor grown, I love this strain for the rare strong smell like very sweet and floral with that strange diesel notes mix the sweet tones, I would love be growing her my whole life, I definitely will keep growing this lady FOR SURE!. thank you so much and hope you guys enjoy! 💎🙏🔝💚
Likes
50
Share


@DogDoctorOfficial
Follow
🌱 Week 4 Veg: Thriving Despite the Chill 🌟
As we close out Week 4 of veg, I couldn’t be more impressed with how resilient and strong the Zamnesia Runtz are growing! Despite the freezing cold temperatures outside—evident in some snapshots of my frosty mint plants in the veggie garden—these beauties are thriving in their cozy indoor setup.
The Aptus Holland Nutrient Spray: A Deep Dive
This week, I treated the Runtz to a refreshing shower with Aptus Holland’s nutrient spray, a game-changer in plant health and vigor. Let’s break it down:
• What Is It?
Aptus nutrient sprays are foliar feeds designed to deliver essential nutrients directly to the leaves. They provide immediate uptake, bypassing the roots and giving the plant a quick boost in vitality.
• Why Use It?
Foliar feeding is especially beneficial during veg because it enhances nutrient absorption and promotes lush, healthy foliage. It’s also a fantastic way to supplement nutrients if the roots are growing but not yet absorbing nutrients at peak efficiency.
• What Does It Do?
Aptus sprays improve plant metabolism, strengthen cellular structure, and boost resistance to environmental stresses—perfect for battling those colder temps!
• How I Applied It
I used a fine mist to ensure even coverage across all leaves, aiming for the undersides where stomata are most active. Afterward, the plants looked vibrant and energized, ready to keep pushing those gorgeous leaves.
A New Partnership: Grove Bags and TerpLoc Technology
I’m thrilled to announce a new partnership with Grove Bags! Known for their TerpLoc technology, these bags are a true revolution in cannabis storage and curing.
• Why Grove Bags?
Grove Bags are designed to create the perfect microclimate for cannabis. Their TerpLoc technology helps preserve terpenes—the essential oils responsible for the flavor, aroma, and effects of cannabis—by locking them in while allowing oxygen and moisture to escape.
• How They Work
TerpLoc bags combine several unique layers:
• Moisture Control: Maintains ideal humidity levels to prevent over-drying or mold.
• Oxygen Barrier: Blocks excessive oxygen exposure, which can degrade terpenes.
• UV Protection: Shields the buds from harmful light that can alter their chemical composition.
• Why This Matters
For anyone who’s spent months cultivating a crop, ensuring the harvest cures and stores properly is the final crucial step. Grove Bags will play an essential role in preserving the quality and flavor of this Runtz grow, keeping the terps intact for that unforgettable smoke experience.
A big thank you to Grove Bags for joining this journey. I can’t wait to showcase their role in the final stages of this grow!
Photo Magic: Nikon P900 & Sony A6000
Capturing the Runtz in all their glory is part of the journey, and this week’s shots were nothing short of stunning. Using both the Nikon P900 and Sony A6000 allowed for crisp, detailed photos that highlight the beauty of these young plants. From their vibrant green tones to the intricate structure of their leaves, these images tell the story of strength and potential.
Week 4 Veg: What It Means
Week 4 in veg is a critical time in a grower’s journey. By now, the plants have developed a strong root system and are focusing on building structure. This is when:
• Leaf Development Peaks: Bigger leaves mean more photosynthesis and energy production.
• Growth Accelerates: Plants use this time to set the foundation for flowering, with nodes spacing out and stems thickening.
• Preparation for Transplanting: Root systems are expanding, making it the perfect time to plan for a move into larger pots, as we’ll be doing next week!
Looking Ahead
Next week, the Runtz will graduate to larger pots—not their final AutoPot homes yet, but an essential step for continued growth. This transition will help the roots spread further, setting the stage for a thriving flowering phase.
Community & Gratitude
A huge thank you, as always, to my sponsors and supporters:
• Aptus Holland
• Pro-Mix Soil
• TrolMaster Ecosystem
• ThinkGrow LED
• Future of Grow LED
• CannaKan Germination Station
• Zamnesia and Plagron for making this Eternity Cup journey so special
• Ziggi Papers
• And now, our newest partner: Grove Bags
To the amazing Grow Diaries community, you continue to inspire me daily. I’ve been blown away by the incredible work and creativity I’ve seen in other diaries—it’s motivating and humbling all at once. Good luck to everyone; let’s make this journey one to remember! 💚
Final Thoughts
From the frosty outdoors to the warmth of my grow room, these Runtz are proving their resilience and promise. Each week, I’m reminded of why I fell in love with this strain, and the excitement for what’s to come keeps growing.
Stay tuned for Week 5, where we’ll delve into the transplant process, nutrient updates, and more. Let’s keep learning, growing, and sharing the magic together!
Genetics - Runtz https://www.zamnesia.com/6000-zamnesia-seeds-runtz-feminized.html
Nutrients - Plagron https://plagron.com/en/hobby
- Aptus Holland https://aptus-holland.com/
Controls - Trol MAster https://www.trolmaster.eu/
LED - https://www.futureofgrow.com/en
LED - https://www.thinkgrowled.com
Soil - https://www.promixgardening.com/en
Germination - Cannakan https://cannakan.com/?srsltid=AfmBOopXr-inLXajXu3QFgKXCXXos4F1oEvScjMKIB5MR5dk8-GJ-F49
DOGDOCTOR 15% off
Smoking Papers - https://ziggioriginal.com/
Terpene saver - https://grovebags.com/
As always thank you all for stopping by, for the love and for it all , this journey of mine wold just not be the same without you guys, the love and support is very much appreciloved and i fell honored with you all in my life
With true love comes happiness Always believe in your self and always do things expecting nothing and with an open heart , be a giver and the universe will give back to you in ways you could not even imagine so
As always, this is shared for educational purposes, aiming to spread understanding and appreciation for this plant. The journey with nature is one of discovery, creativity, and respect. Let’s celebrate it responsibly and continue to learn and grow together!
Growers Love To you All 💚
#EternityGrowCup #RuntzHunt #GrowersLove #CannabisCommunity #AptusHolland #ProMixSoil #TrolMaster #Zamnesia #Plagron #ZiggiPapers #Grovebags
