The Grow Awards 2026 🏆 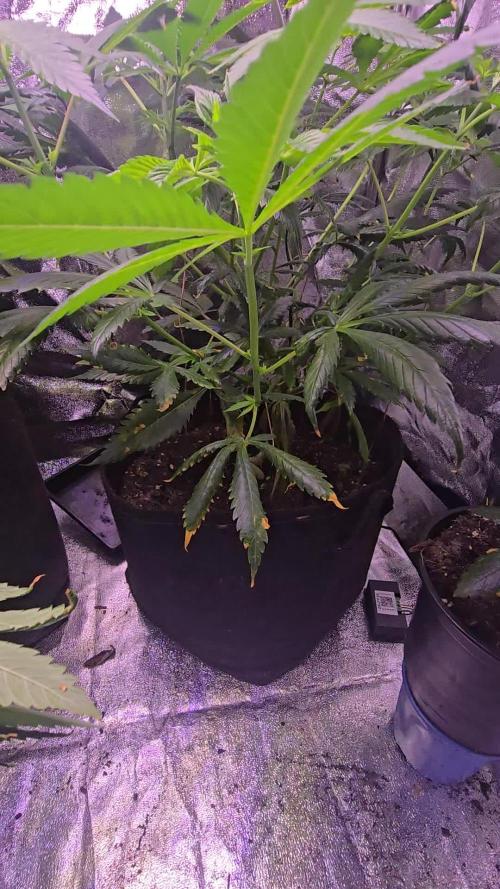


Likes
Comments
Share
@Dendegrow
Follow
🍬 Sweet Mandarine Skittles – Week 6 Update 🌿
This beauty is really starting to shine! ✨ The Sweet Mandarine Skittles has filled out nicely over the last days, with strong branching and a sweet citrus aroma already in the air 🍊🌸.
She’s showing her candy side now – colorful vibes and a really healthy look 🌈💚. Week 6 feels like the turning point where everything comes together beautifully.
Can’t wait to see those buds fatten up in the coming weeks 🔥🌱.
Follow along if you want to catch the sweetest rainbow in the garden 🌈🍬.
---
🍬 Sweet Mandarine Skittles – Woche 6 Update 🌿
Diese Schönheit fängt jetzt richtig an zu glänzen! ✨ Die Sweet Mandarine Skittles hat sich in den letzten Tagen super entwickelt – kräftige Verzweigungen und schon ein zarter Citrusduft in der Luft 🍊🌸.
Man sieht jetzt schon ihren „Candy-Charakter“ – bunte Vibes und ein rundum gesunder Look 🌈💚. Woche 6 ist echt ein Wendepunkt, wo alles perfekt zusammenkommt.
Ich freue mich riesig auf die nächsten Wochen, wenn die Buds anfangen richtig aufzublühen 🔥🌱.
Bleibt dabei, wenn ihr das süßeste Rainbow im Garten erleben wollt 🌈🍬.

Likes
12
Share
@Chubbs
Follow
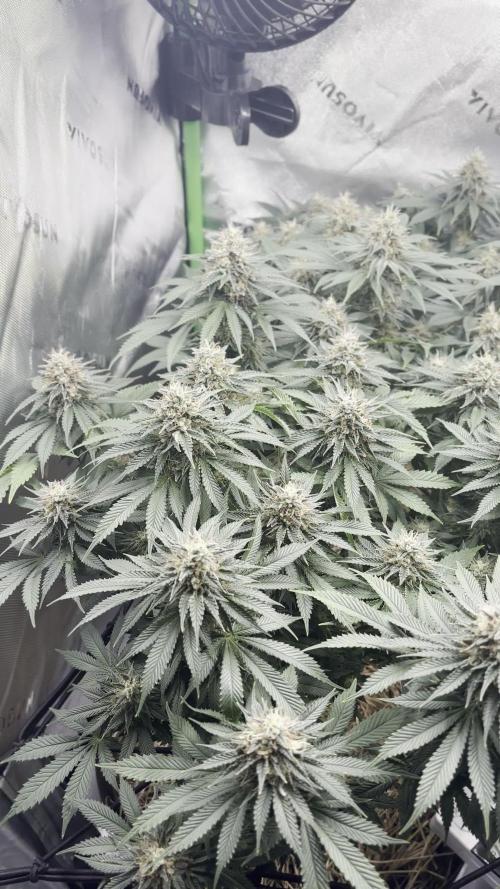
420Fastbuds-Greenhouse Grow 2025
The feminized strains RainbowMelon, GorillaMelon, LemonPaya, PapayaSherbet, LemonMandarin, the FastFlowering GG4/Sherbet from Fastbuds are doing amazing for there first full week in the greenhouse. The heat in SoCal is warming up with temps in the low 90's in the daytime and 60's for nighttime. Over all they're starting to reach for the stars after being topped. Besides a couple of yellow leafs I snipped at the soil level, I'm seeing growth almost daily. I'll start feeding this week Grow A & B as well as Calmag from AthenaBlendedLine. Since being transplanted into the 5gal fabric pots they've only got well water.
Happy Growing.


Likes
19
Share
@sneakymexican712
Follow
Ok this was my first grow and I made mistakes.
-forgot to buffer coco
- nutrient burn
-started the manlining to early
- probably worried to much about every stage these plants.
-ended up with fungus gnats
And probably appt more I can’t rmeber in the moment.
But i learned so much from all of my mistakes and spent so much time researching and seeing in real time how these plants react and grow.
I did do some experimentation
just a normal top with one blue dream.
I topped twice one another blue dream and did a 3 times topped on all the blue dreams and I see why you should at least top three times the eight main colas and spread out the plant I see some of the buds on the one I only topped once not matured at all because there was minimal light other buds were growing so fat it suffocated it basically. I could have probably defoliated and manliness better but ayy. Beginners wil make
Mistakes and I’m happy with what came out of these girls. Not excited for trim hail but I am at the same time 😅😅


Likes
4
Share
@AustinRon
Follow
OG 4Q24 Flower Week 7
Orangegasm (Fem) [ IRIE Genetics ]
12/12 @ Bolt (Day 21)
Germination: 20 November 2024
#3A Earliest Harvest Date: 9 February 2025
#3B Latest Harvest Date: 19 February 2025
_________________________________________
Start of Week: [Wed Jan 22,
2024 CR2 4Q24 43:F:6:1]
End of Week: [Tue Jan 28, 2024 CR2 4Q24 49:F:6:7]
OrangeGasm Fertigation:
- MAX: EC: [ 2.4, mS]
- LightIntensity MAX: [ 850, µMol/m2/s]
______________________________________
__
Wed Jan 22, 2025
OG 4Q24 43:F:6:1
- [x] R&R Each Drip Ring Assembly (Assure NO Fertigation/Bio Build up)
Runoff
- Amount: [ .5, l]
- EC: [ 3.8, mS/cm]
- EC∆: [ 1.2, mS/cm] # Danger!
Refresh Res (Filtered, pH’d Tap Water)
- [x] Amount: [ 2, gal]
- [x] Primer A&B: [ 35, ml]
- [x] SLF-100: [ 10, ml]
__
Thu Jan 23, 2025
OG 4Q24 44:F:6:2
Refresh Res (Distilled Water, pH: 7, EC: 0.0)
- [x] Amount: [ 2, gal]
- [x] Primer A&B: [ 39, ml]
- [x] SLF-100
Runoff
- Amount: [ 1.2, gal]
- EC: [ 4.3, mS/cm]
- EC∆: [ 1.6, mS/cm] # DANGER
__
Fri Jan 24, 2025
OG 4Q24 45:F:6:3
Runoff
- Amount: [ 0.3, gal]
- EC: [ 4.1, mS/cm]
- EC∆: [ 1.4, mS/cm] # DANGER

__
Sat Jan 25, 2025
OG 4Q24 46:F:6:4
Dump Res
- [x] Remove Chiller and Fertigation Pumps
- [x] Dump and CLEAN Reservoir, Note Sediment
- [x] Detach Main Feedline
- [x] Clean Chiller Pump
- [x] Clean Fertigation Pump
- [x] Dry ALL Components
- [x] REASSEMBLE When Dry
- [x] Clean 1/2” Fertigation Mainline
Watered In Primer A&B, CalMag Fuel, Silica Skin
- Amount: [ 1.9, l]
- EC: [ 2.7, mS/cm]
Refresh Res w/ Full Hydro (Primer A&B, Silica Skin)
- [x] Amount: [ 4, gal]
- [x] EC: [ 2.7, mS/cm]
- [x] Primer A & B: [ 73.1, ml]
- [x] SLF-100: [ 40, ml]
Runoff
- Amount: [ 0.25, gal]
- EC: [ 4.1, mS/cm]
- EC∆: [ 1.4, mS/cm] # DANGER
__
Sun Jan 26, 2025
OG 4Q24 47:F:6:5
Refresh Reservoir - 2 Gal, EC: 2.7
- [ ] Check, R&R Fertigation Manifold Filter as Needed
- [x] SLF-100: [ 10, ml]
- [x] Primer A & B: [ 40, ml]
Runoff
- Amount: [ 1.25, gal]
- EC: [ 4.2, mS/cm]
- EC∆: [ tbd, mS/cm]
__
Mon Jan 27, 2025
OG 4Q24 48:F:6:6

Watered In Primer A&B, CalMag Fuel, Silica Skin
- [x] Amount: [ 1.9, l]
- [x] EC: [ 2.7, mS/cm]
IPM
- [x] Spray sides - cover Air holes of Airpot
- [x] Spray tops of pots to drench
- [x] Dr. Zymes, 28ml/quart @ 85°F
- [x] APPLY Mosquito Bits to Top of Containers
Runoff
- [x] Amount: [ 1.5, gal]
- [x] EC: [ 4.9., mS/cm]
- [x] EC∆: [ 2.2, mS/cm] # *** Plants Should Be Fried!
Need to R&R Pre-Filter again. Fan Flow significantly diminished.
__
Tue Jan 28, 2025
OG 4Q24 49:F:6:7

Replace ACI Pre-Filter
- [x] Remove Plants
- [x] Disconnect Irrigation Emitters
- [x] Remove and Rinse Drain Tray
- [x] Drop Front of Light
- [x] Remove & Replace Pre-Filter
- [x] Verify Airflow (Make sure we don’t need to change the carbon in the filter)
- [x] Raise front of light to run position
- [x] Replace Drain Tray - Reposition Shims
- [x] Replace Plants AS THEY WERE
- [x] Replace Emitters
- [x] Verify Irrigation
Runoff
- [x] Amount: [ 0.5, gal]
- [x] EC: [ 4.8, mS/cm]
- [x] EC∆: [ 2.6, mS/cm] # *** Plants Should Be Fried!

Processing
Likes
5
Share
@NewbieLearner
Follow
Been slack with the updates as we are busy buidling a new greenhouse. will make sure I take nice individual photos for harvest though.
Likes
3
Share

Likes
9
Share
@Nachtjasmin
Follow
Zum Vergleich Bilder mit einem Feuerzeug. Beide FastBuds Pflanzen bisher sind ziemlich enttäuschend. Triebe, höchstens (!) zweimal so lang wie mein Daumennagel und schon steif mit ersten Anzeichen der Vorblüte.
Vergleicht das einfach mal mit der Sunshine LSD Auto, die ich im Sommer in 20l angebaut und so ziemlich alles falsch gemacht habe. Das Teil war ein Monstrum. Selbst jemand, der seit vielen Jahren mit Photoperiodischen zu tun hat und mir von Autoflowers abriet, war sehr sehr positiv überrascht, was das Teil unter widrigsten Umständen geliefert hat. Die Buds waren so schwer, dass ich alles abstützen musste, damit nicht alles umkippt. Alleine die Hauptcola über 30cm. Wirkung hat auch gepasst. Unglaubliches Teil.
Und was haben wir hier hier? Was wird das? Ein Zwergenwunderland?
Ich bin ziemlich enttäuscht aber vielleicht geschieht ja noch ein Wunder. Verstehe jetzt, warum von Autoflowers Indoor wegen Stromkosten/-verschwendung abgeraten wird. Das hier wäre was für meinen Balkonkasten im Sommer aber nicht für nen 14l Topf unter 240 Watt. Hatte nach der billigen aber bombastischen Sunshine LSD Auto von 66seeds echt mehr erwartet von Breedern, die sich speziell auf Autoflowers spezialisiert haben. Wenn der Ertrag so winzig ausfällt, wie das, was ich hier in den Kübeln habe, war es das mit FastBuds. Habe noch eine Blackberry Auto und einen Mix Pack mit fünf Samen da. Aber alleine dafür sind es mir die teuren Strompreise nicht wert. Ein Miniaturwunderland kann ich auch woanders bestaunen gehen.
Falls jemand einen Tipp hat, wo man ähnliche Autostrains wie die Sunshine LSD findet, bitte her damit ;) Die ist gut aber immer nur Skunk Geschmack wird auf Dauer langweilig.


Likes
2
Share
@mTuff
Follow
Três das quatro plantas estão com sementes, acabei colhendo uma delas e as outras três vou colher semana que vem :(, para minha sorte eu tenho um lindo clone da única que não se tornou hermafrodita :(, foi muito difícil controlar o clima não sei aonde errei


Likes
14
Share
@Spiritual_Herb
Follow
the little one is rising quickly this week, I think it will last another week, a week and a half at most, before dedicating itself to full flowering. the seedling entered the pre-flowering phase a few days ago (2/3 days ago)
Likes
11
Share
@Fullmeltalchemist
Follow
D56/F8 - 11.14 - Doing great! Loving the new Blumat Tropf system I installed for both of my tents. Starting to show sex and the very beginning of preflowers
D59/F11 - 11.17 - 👍 covered some vertical distance this week for sure. Back to having big ole leaves! :)
D60/F12 - 11.18 - <3

Likes
3
Share
@JoExotic
Follow
Thanks Everyone who watched and liked ny diary on Strawberry gorilla Auto it is 10/10 for My First grow ever it is a huge success I will be doing more in the future Good luck everyone !!!
Likes
16
Share
@JJs_Js
Follow
Was another easy week - lots of healthy growth. Simply watered when dry, did some daily LST and leaf tucking. The green crack is definitely the fastest growing out of all the plants, and the one runt LSD25 is a bit smaller but still chugging along.


Likes
2
Share
@Breaking-Bud
Follow
💀- El sustrato All-mix de biobizz, retiene demasiada agua, creando una capa superior de musgo, y retrasando el secado del sustrato.
y generando tayos morados en algunas plantas, por falta de oxigeno.
👌- Se baja la humedad (RH), de 60%-65% a 50%-55%, se remueve la parte superficial del sustrato para airear el sustrato y permitir mayor oxigenación.
💀Al regar con un agua base de OI (0,07), le cumplimentamos con Sensi Cal-Mag xtra, subiendo demasiado el EC si lo mezclas con otros fertilizantes, al menos en esta etapa del cultivo.
👌- Solo cumplimentar con Sensi Cal-Mag, en riegos con (solo agua), o en casos donde no llegues al EC correspondiente, teniendo en cuenta la saturación del sustrato por estos macronutrientes.
👽- Las plantas muestran un buen aspecto, sin mostrar síntomas de carencias y/o excesos.
Oss!
Likes
15
Share
@XperencdGmanXG
Follow
boy do these girls like to stretch just like a haze! Just wanna reach, so as long as your ready for it. The first week of flower is done now and flowers are starting to form. now reduce the fulvic a bit and keep an eye out for any P K C or Mg defs. Again as long as the buffet is laid out all you have to do is worry about the microbes.


