The Grow Awards 2026 🏆 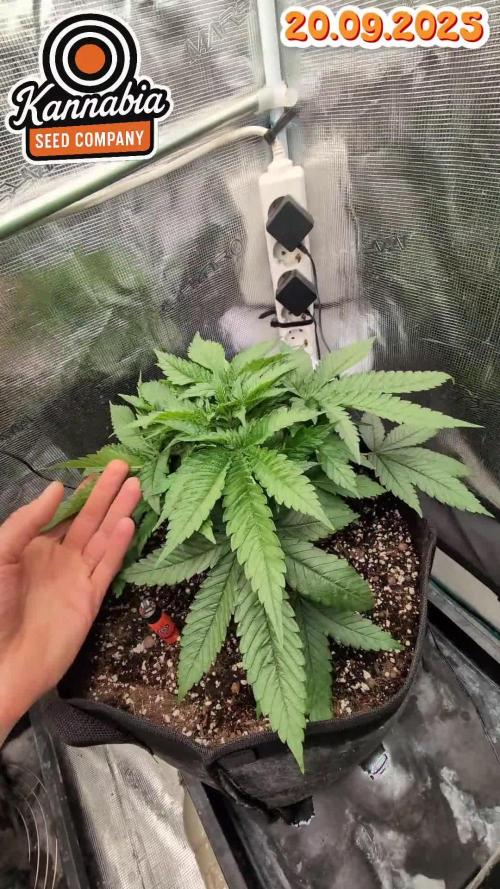


Likes
Comments
Share
@yan402
Follow
🌸🍊✨🍭🌸🍊✨🍭🌸🍊✨🍭🌸
Back at it with Kannabia — huge thanks for the NEW EXCLUSIVE Upcoming Kannabia's seed Launch 🙏🍨🍊
Grateful for the trust and for everyone following along, I’ll run her clean and showcase what she can do.
Dessert-party goals: berry–citrus sherbet terps, creamy finish, tight stacks, easy trim, zero drama.
Veg 24/0, clean manifold + LST, flip on a happy, even canopy.
Coco’s fresh, seed goes in now. 🚀
Added on 12.10.2025
🌞 Light conditions: Limited direct light for the first 4 weeks — ~4 h/day on weekdays and ~10–11 h on weekends due to tent sharing and work schedule.
🌸🍊✨🍭🌸🍊✨🍭🌸🍊✨🍭🌸
💭❗💭❗💭❗💭❗💭❗💭❗💭
❗Events & thoughts worth noting❗
💭❗💭❗💭❗💭❗💭❗💭❗💭
10.08.25 GW1 Sowed seed, soaked starter pot with #1
12.08.25 GW1 Seed popped hip hip hurray
28.08.25 VW2 Stopped using GreenBuzzBloom, took it out of the schedule.
01.09.25 VW3 TriPartMicro 10→30ml, TriPart bloom 10→30ml
12.09.25 VW4 Applied nemadodes against thrips and fungus gnats.
20.09.25 VW6 topped and trained for first time, decided against a full manifold as I lost a few weeks already.
🌱💦🌱💦🌱💦🌱💦🌱💦🌱
🌿 Day to day tasks & actions 🌿
🌱💦🌱💦🌱💦🌱💦🌱💦🌱
19.09.25 VW5 – Fed 5l of #1 → 2l runoff
20.09.25 VW6 no water no feed
21.09.25 VW6 – Fed 5l of #1 → 2l runoff
22.09.25 VW6 – Fed 5l of #1 → 2l runoff
23.09.25 VW6 – Fed 5l of #1 → 2l runoff
24.09.25 VW6 no water no feed
25.09.25 VW6 no water no feed
26.09.25 VW6 – Fed 5l of #1 → 2l runoff
(*RUNOFF reused for tomato plants)
🍶💧🍶💧🍶💧🍶💧🍶
💧 Nutrients in 30L #1
🍶💧🍶💧🍶💧🍶💧🍶
💧 TriPart Micro:
10ml
= 0.33ml/L
🍶 TriPart Grow:
0ml
= 0.00ml/L
💧 TriPart Bloom:
10ml
= 0.33ml/L
💧 Cal-Mag:
60ml
= 2.00ml/L
🍶 Home-made FFJ/FPJ (new batch):
30ml
= 1.00ml/L
💧 pH Down:
Citric acid (BuxXtrade) — adjust to ~pH 6.0
📦 TOTAL:
120ml per 30L
🔬 4.00ml/L
🍶💧🍶💧🍶💧🍶💧🍶
⚙️✂️⚙️✂️⚙️✂️⚙️✂️⚙️
✂️ Tools & equipment ✂️
⚙️✂️⚙️✂️⚙️✂️⚙️✂️⚙️
✂️ 2× MarsHydro SP3000
⚙️ MarsHydro 150mm ACF Ventilator
✂️ Trotec dehumidifier (big unit)
⚙️ Mini no-name dehumidifier
✂️ Kebab skewers (LST – stainless)
⚙️ Wire + roast skewers (LST assist)
✂️ Scissors (HST)
⚙️ Vacuum (for spills & cleanup)
✂️⚙️✂️⚙️✂️⚙️⚙️✂️⚙️✂️⚙️✂️⚙️
---
🍊🍧🌬️🍬🍊🍧🌬️🍬🍊🍧🌬️🍬 Mystery seed (Kannabia Seeds) — NEW EXCLUSIVE
🍊🍧🌬️🍬🍊🍧🌬️🍬🍊🍧🌬️🍬
Species: Hybrid (GF / swift-flowering line)
Genetics: TBA (breeder sheet pending)
THC: TBA
Effect: Euphoric, relaxed, creative (target profile)
Flavor: Berry–citrus sherbet, sweet candy, creamy finish
Flowering (indoors): ~6–7 weeks target (GF)
Resistance: High (aim: no drama)
Indoor yield: TBA
Outdoor yield: TBA
Structure: TBA
Notes: Brand-new exclusive from Kannabia’s GF line — I’ll update specs when the breeder card drops. Goal is rich sherbet terps (berry–citrus + cream), low leaf-to-calyx, easy trim. Stage harvest stays on the table if tops finish early.

Processing
Likes
3
Share
@Ogbangbang2981
Follow
Every week I watch my girls grow into beautiful budding trees only difference is now she in flowering I take her outside to absorb some of the beautiful sunshine and she's loving every bit of it. I let her stay outside for 8 hours in nature then back inside for another 8 hours of led full spectrum and turn out my lights for another 8 hr she's an Auto so she loving every minute of this ...... this is the results ⬆️

Likes
4
Share
@GeminiCQC
Follow
Can't wait for each of them to finish out. Giving them hopefully their full amount of water, less with the auto as it was stunted by the 12/12.


Likes
22
Share
@RDWCGrowing
Follow
1/11/2024 Vegetation Week 1 Day 1- I have a root almost in the water.. Yay!! Top feeding is almost done. she is looking a little sad as I work the transition Top feeding but once the roots are fully in the water she will start to take off. Ensured my PPFD is set between 250-300 it is set to: 258
1/12/2024 Vegetation Week 1 Day 2- I have a root in the water.... NO TOP FEED TODAY SIR!!! now that a root is touching the water and she looks stable, I am not going to topfeed, I will see how she looks tomorrow and as long as everything looks good I am going to go ahead and do a change and week 1 fill on Nutes.. I know it is a couple of days in but the same Nutes go through Week 2 and get changed at Week 3 So I should be good to go.. I will just ensure I fill to root touching the water when I change tomorrow.
1/13/2024 Vegetation Week 1 Day 3- Water Change Day!!
I added 36 Gallons of Water to the system:
Silica= .5mil/gal= 18mil
CalMag= .75mil/gal = 27mil
FloraMicro=3.0mil/gal = 108mil
FloraGro=2.0mil/gal = 72mil
FloraBloom= 2.0mil/gal = 72mil
PH DOWN= 30mil
Very important thing with this system is to now wait the 24 hours for the system to adjust.. Do not make any further adjustments to your PH up or Down for 24 hours to allow time for the system to balance.
1/14/2024 Vegetation Week 1 Day 4- Today I just adjusted the PH to ensure that it was right at 6.0
1/15/2024 Vegetation Week 1 Day 5- Today I Cleaned up the lower damaged leaves from the transition from top feeding to roots in the water. She looks good today.
1/16/2024 Vegetation Week 1 Day 6- Today I just took a picture of the beautiful lady for Log. Other than that just normal day to day operations, check the pH, check the Humidifiers and fill as necessary, check level of water in the Res. Everything looks great. onto Tomorrow!!
1/17/2024 Vegetation Week 1 Day 7- Today I filled the humidifers, checked the PH and just let her grow.. Grow baby Grow.....

Likes
1
Share
@Jaschkoo0
Follow
This week i thought i should gave the Phosphor plus from hesi but ist was zu much and same nutrien Burnout started
Likes
7
Share
@Baboon_Grows
Follow
Apart refilling the reservoir more frequently, it’s the same as usual some tea
Likes
44
Share
@I_and_I
Follow
Things going well again, the absolute dismay and fear of finding bud rot spreading through two plants has faded now, haha, the new air circulation setup seems to be doing the job
Oddly I've made it through the whole grow to this point without any nutrient burn of the leaves but now that I begin to flush a little nute burn shows up on one plant, must have been some residual salts, only one or two are affected at all :)
Likes
23
Share
@Budmarley2221
Follow
Good week this week last day of week 8 and looking really well buds starting to swell and ripen
Likes
24
Share
@DaddyPrime
Follow
8/18 pistols everywhere. Lost quite a bit of leaves due to heat stress I believe. Shes looking hungry for nitrogen. Sugar leaves are already looking super frosty 😍
8/22 been slacking on taking pictures ever since I started working again, but I stopped by last night and gave her a sniff test outta curiosity and its insane the amount of blueberry smell she has already💚💚

Likes
2
Share
@mrhomegrown10
Follow
Put plant into tent a few days after it sprouted. Is now being fed by aeroponic system.


Likes
5
Share
@whenindoubtsmokeitout
Follow
found a small bud rot site, we had to remove the whole cluster around, and sanitise with alcohol.

Likes
28
Share
@eldruida_lamota
Follow
Que hay familia, vamos con la tercera semana de crecimiento de estas Apple Fritter de Zamnesia.
La temperatura está entre los 21/24 grados, la humedad está entorno al 60%, y el ph lo mantengo ahora al principio en 6.2, el foco por supuesto está enchufado 18 horas , tener tienen que crecer fuertes.
Y aparte añadimos nutrientes de Agrobeta, que no puede faltar semejante gama.
Trasplante a 7 litros definitivamente, tienen las puntas amarillas de las hojas bajeras ya pedían trasplante pero las recuperaré.
Os comento que tengo un descuento y para que compréis en la web de Zamnesia de un 20%, el código es ZAMMIGD2023
The discount 20% and the code is ZAMMIGD2023
https://www.zamnesia.com/
agrobeta: https://www.agrobeta.com/agrobetatiendaonline/36-abonos-canamo
Mars hydro:
Code discount: EL420
https://www.mars-hydro.com/
Hasta aquí es todo, buenos humos 💨💨💨.
Likes
32
Share


Likes
24
Share
@Greensoul920
Follow
Week 4! Today transplanted the lady’s in a 5 liter pot. The soil that I’m using is made of
Light mix bio bizz
Warm casting
70/30% of 444 and 284 - 1Tbsp per gallon
Rock dust blend -1Tbsp per gallon
Oyster shell - 1 Tbsp per gallon
A hands full of lupins
I sprinkle some myco on the root ball and water them with a simple compost the made of worm casting and molasses brew for 24 hours. I raise the power of the light of 20%


Likes
8
Share
@Kirsten
Follow
27.2.25:
Watermelon 🍉 and Purple Lemonade 💜🍋 are both far below the scrog net, they've definitely stopped stretching now.
My LST on these was much worse than even just using the net. 😅 That was certainly a valuable takeaway.
I'm sure Purple Lemonade 💜🍋 will be good.
Watermelon 🍉 was so stunted. It's not a tall strain, usually either, but nevertheless, the buds there are looking very frosty and are very, very sticky! 😅
Should be a good smoke, eventually, 🤗 just won't be much to bag unfortunately.

Likes
3
Share


